Simplifying Custom Two-Way Data Binding in Angular 2
To simplify things, Angular 2 doesn't have built-in two-way data binding. But come on – we can't think of creating a modern web application without the power of two-way data binding.
Join the DZone community and get the full member experience.
Join For Freethere are three types of data bindings in angular 2:
- interpolation
- event binding
- property binding
if you are coming from angular 1.x background, you might be wondering where the two-way data binding is. remember the first time you saw an angularjs 1.x demo and you were just blown away by the power of ng-model? yes, like you, i was also very impressed by the power of two-way data binding in angularjs 1. even though angularjs 1 two-way data binding was beautiful, it came with the baggage of digest cycle and $watch.
to simplify things, angular 2 does not have any built-in two-way data binding. this does not mean you cannot have two-way data binding in angular 2 applications. come on, we can't think of creating a modern web application without having the power of two-way data binding.
in this post, we are going to learn how to work with two-way data binding in angular 2.
two-way data binding with ngmodel
angular 2 provides us with a directive ngmodel to achieve two-way data binding. it is very simple and straightforward to use ngmodel directive, as shown in the listing below:
import {component} from '@angular/core';

@component({
    moduleid:module.id,
    selector:'my-app',
    template:`
  <div class="container">
     <input [(ngmodel)]='name' />
      <br/>
      <h1>hello {{name}}</h1>
  </div>
  `
})
export class appcomponent{


}
to use ngmodel directive, we need to import formsmodule in the application:
import { ngmodule }      from '@angular/core';
import { browsermodule } from '@angular/platform-browser';
import { formsmodule }   from '@angular/forms';

import { appcomponent }  from './app.component';

@ngmodule({
    imports:      [ browsermodule,formsmodule ],
    declarations: [ appcomponent],
    bootstrap:    [ appcomponent ]
})
export class appmodule { }
in above demo, when typing into the input element, the input’s value will be assigned to a name variable and displayed back to the view. we are implementing two-way data binding using ngmodel as shown in the below image:

two-way data binding without ngmodel
to understand ngmodel directive working, let's see how we can achieve two-way data binding without using ngmodel directive. to do that, we need to use:
- property binding to bind the expression to the value property of the input element. in this demo, we are binding name variable expression to value property.
- event binding to emit an input event on the input element. yes, there is an input event that will be fired whenever the user inputs the input element. using event binding, the input event would be bound to an expression.
using property binding and the event binding, two-way data binding can be achieved as shown in the listing below:
import {component} from '@angular/core';

@component({
    moduleid:module.id,
    selector:'my-app',
    template:`
  <div class="container">
     <input [value]="name" (input)="name=$event.target.value" />
      <br/>
      <h1>hello {{name}}</h1>
  </div>
  `
})
export class appcomponent{

        name : string = "";
    }
like the ngmodel directive demo in this demo, when typing into the input element, the input element’s value will be assigned to name variable and displayed back to the view. we are implementing two-way data binding without using ngmodel using the code shown in the below image:
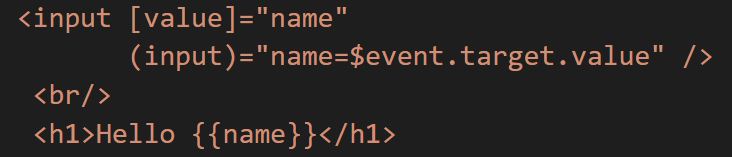
let's understand a few important things here:
- [value]=“name” is the property binding. we are binding the value property of the input element with the variable (or expression) name.
- (input)=“expression” is the event binding. whenever the input event is fired, the expression will be executed.
- “name=$event.target.value” is an expression that assigns the entered value to the name variable.
- the name variable can be accessed inside the appcomponent class.
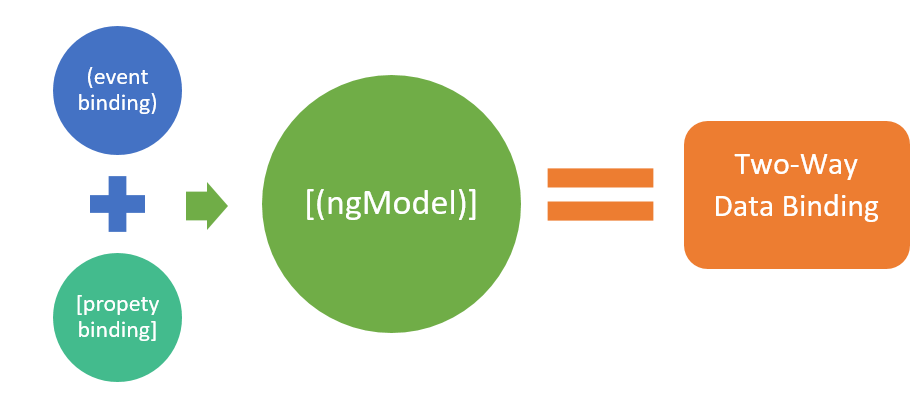
so far, we have seen two-way data binding with ngmodel and without ngmodel. we can conclude that the directive ngmodel is nothing but a combination of property binding and event binding. event binding is denoted using small brackets and property binding is denoted using square [] brackets. if you notice, the syntax of ngmodel is [(ngmodel)]. it suggests it is a combination of both event and property binding.
custom two-way data binding
we should be very careful whether to create a custom two-way data binding or rely on the ngmodel directive. we really don’t always have to create custom two-way data binding. however, it is good to know steps to create a custom two-way data binding. let's create a custom counter component with two-way data binding enabled.
step 1
create a component with two buttons and methods to increment and decrement.
@component({
    moduleid: module.id,
    selector:'countercomponent',
    template:`
    <button (click)='increnent()'>increment</button>
    {{count}}
    <button (click)='decrement()'>decrement</button>
    `
})
export class  appchildcomponent {

        count : number = 0;
        increment(){

            this.count = this.count+1;
        }

        decrement(){
            this.count = this.count - 1;
        }
    }
above, we have created a very simple component to increment and decrement the count. now, we can use this component inside another component. however, two-way data binding is not enabled. to enable that, we need to use @input and @output properties.
step 2
let us create a getter with @input() property. this getter will return the count. since it is attributed with @input() decorator, the consumer of this component can bind this value using property binding.
@input() get counter(){ return this.count; } step 3
to create two-way data binding, we need to create an event of the type eventemitter. this event is attributed with @output() decorator such that it can be emitted to the consumer component. we create an event object in the constructor of the component.
@output() counterchange :  eventemitter<number>;
    constructor(){

        this.counterchange = new eventemitter();

    }
step 4
as a last step, increment and decrement functions should emit the counterchange event. we need to modify increment and decrement function as shown in the listing below:
   increment(){
        this.count = this.count+1;
        this.counterchange.emit(this.count);
    }

    decrement(){
        this.count = this.count - 1;
        this.counterchange.emit(this.count);
    }
both functions are emitting the counterchange event. putting the pieces together, a component with custom two-way data binding will look like the code listed below:
import {component,input,output,eventemitter} from '@angular/core';

@component({
    moduleid: module.id,
    selector:'countercomponent',
    template:`
    <button (click)='increment()'>increment</button>
    {{count}}
    <button (click)='decrement()'>decrement</button>
    `
})
export class  appchildcomponent {

        count : number = 0;

     @output() counterchange :  eventemitter<number>;
        constructor(){
            this.counterchange = new eventemitter();
        }

     @input()
        get counter(){
            return this.count;
        }

        increment(){
            this.count = this.count+1;
            this.counterchange.emit(this.count);
        }

        decrement(){
            this.count = this.count - 1;
            this.counterchange.emit(this.count);
        }
    }
step 5
like any simple component, a component with two-way data binding can be used inside another component.
import {component} from '@angular/core';

@component({
    moduleid:module.id,
    selector:'my-app',
    template:`
  <div class="container">
     <br/>

     <countercomponent [(counter)]="c"></countercomponent>
     <br/>
     <h2>count = {{c}}</h2>

  </div>
  `
})
export class appcomponent{

        c : number = 1;

    }
the main thing you may want to notice by way of the value of the counter property is what we've set inside appcomponent. like ngmodel directive, the counter property is also set using the banana in box syntax [(counter)].
conclusion
two-way data binding in angular 2 is supported using the event and the property binding. we can use ngmodel directive to use two-way data binding. also, if required, custom two-way data bindings can be created. custom two-way data binding is useful in form controls.
Published at DZone with permission of Dhananjay Kumar. See the original article here.
Opinions expressed by DZone contributors are their own.
Comments