Spock vs. JUnit - Which One Should You Choose?
In the world of testing, two frameworks are often compared to one another: JUnit and Spock. We take a look at both to help see which one might be right for your next project.
Join the DZone community and get the full member experience.
Join For FreeSpock and JUnit are both great testing frameworks for Java and can be used for API testing. Personally, as an information technologies engineer, I prefer using Spock, and not only because it supports Groovy. In my opinion, Spock is easier and nicer to use. Inspired by JUnit, jMock, RSpec, Groovy, Scala, and Vulcans, it enjoys a combined set of advantages. JUnit, on the other hand, is a very mature framework, and a very large audience enjoys its abilities.
In this blog post I will compare Spock and JUnit according to four parameters:
- Parameterization
- Mocking
- Documenting tests and code
- Verification
Let’s get started.
Parameterization is the technique of changing test data for the same test method, thus making the test run the same code but for changing data. We will often need to use parameterization in our test cases. Let’s look at a simple example that shows why.
Imagine we have a method that gets the filename as input and validates its extension. The requirement is that only .jpeg, .jpg, and .bmp extensions pass, while .tiff and .png extensions are not allowed at all. This method will return "true" or "false" based on the file extension. As we can see, the code for checking each file extension should be the same, except for the extension itself. Parameterization will make the code the most efficient and easy to work with.
Let’s see how parameterization works in Spock and in JUnit:
Spock (19 lines - empty lines not counted):
import spock.lang.Specification
import spock.lang.Unroll

@Title("Testing file extension validation method")
class ImageValidatorShould extends Specification {

   @Unroll
   def "validate extension of #fileToValidate"() {
       when: "validator checks filename"
       def isValid = validate fileToValidate

       then: "return appropriate result"
       isValid == expectedResult

       where: "input files are"
       fileToValidate || expectedResult
       'some.jpeg'    || true
       'some.jpg'     || true
       'some.tiff'    || false
       'some.bmp'     || true
       'some.png'     || false
   }
}
JUnit (30 lines - empty lines not counted):
import org.junit.Test;
import org.junit.runner.RunWith;
import org.junit.runners.Parameterized;
import org.junit.runners.Parameterized.Parameters;

import java.util.Collection;

import static java.util.Arrays.asList;
import static org.junit.Assert.assertEquals;

@RunWith(Parameterized.class)
public class ImageValidator {

   @Parameters
   public static Collection<Object[]> data() {
       return asList(new Object[][]{
               {"some.jpeg", true},
               {"some.jpg", true},
               {"some.tiff", false},
               {"some.bmp", true},
               {"some.png", false}
       });
   }

   private String file;
   private boolean isValid;

   public ImageValidator(String input, boolean expected) {
       file = input;
       isValid = expected;
   }

   @Test
   public void validateFileExtension() {
       assertEquals(isValid, validate(file));
   }
}
As we can see from the code snippets, the JUnit code is more than 50% longer. In addition, it is readable for Java developers, but for all others, Spock is much more readable and clean.
Personally, as a Java engineer, when I saw Spock first time I had a feeling that it was not clean and understandable. But I gave it some time and experimented with it, and now all my tests are only in Spock.
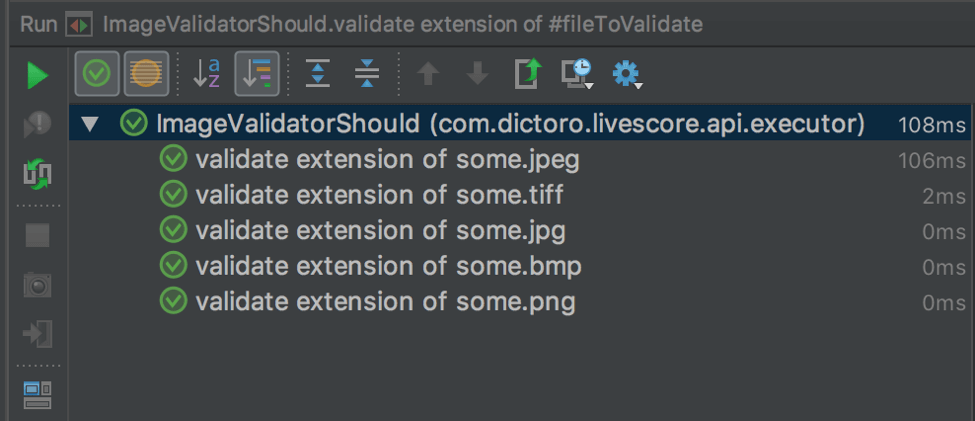
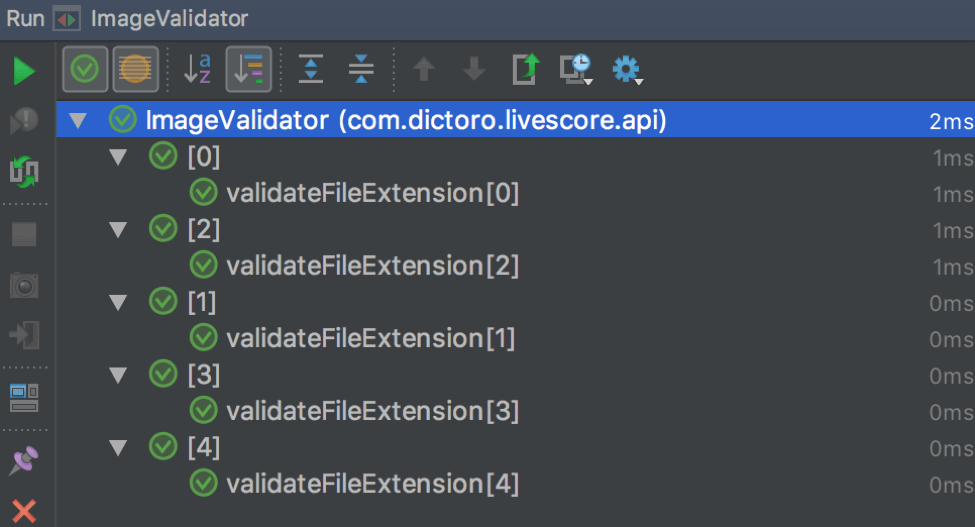
Now let’s take a look at the execution output for these code snippets:
Spock:


JUnit:


Here, as we can see from execution times, JUnit is winning as it is much faster. But, Spock is nicer and the output provides more information about the extensions.
Mocking
Mocking is the technique of creating objects in the code that aren’t real, but they simulate the behavior of real objects instead. Mocking is used to isolate the behavior of a certain object, by using mocks for all the other objects except the one being tested. Please note that mocks aren’t Stubs. Read more about Mocking and the difference between Mocking and Stubbing from Martin Fowler’s web page.
For mocking (as well as stubbing) in Java (and more or less in all languages), you need to include a 3rd party library like EasyMock or Mockito. In Spock though, you do not need anything from a 3rd party. Spock itself is enough with its Mock().
Mocking (as well as Stubbing) in Spock is as easy as the following code:
def subscriber = Mock(Subscriber)
def receiver = Stub(Receiver)
In JUnit though, you need to do a bit more for Mocking (and Stubbing):
- Choose a 3rd party library
- Annotate the variable or field with @Mock
- Initialize the mocks
@Mock
private Subscriber subscriber;

@Before
public void setup() {
subscriber = new Subscriber()
}
Another important thing to mention is mock injection. Mock Injection is the act of putting Mocks into Mocked classes.
In JUnit (through a 3rd party library) you need to make sure to initialize Mocks or annotate your class with @RunWith(MockitoJUnitRunner.class).
In Spock though, you do not need to do this, because in Spock you have direct access to non-existing constructors, private fields and more. As a result, you can work even with Object references instead of Mocks. Let me show this in the following code snippets:
Java class:
public class Formatter() {
private String message;
private int count;
}
Spock:
class FormatterShould extends Specification {

   def "get and set fields"() {
       given: "formatter"
       def formatter = new Formatter()

       when: "setting a message"
       formatter.message = 'message'

       then: "setted message is correct"
       assert formatter.message == 'message'
   }
}
JUnit (only possible when you have public accessors or a public constructor that has access to private fields):
public class Formatter() {
private String message;
private int count;

      public Formatter(String message, int count) {
          this.message = message;
          this.count = count;
      }
}
This is a simple example where Spock accessed private class fields, which shows how powerful Spock is.
In every piece of developed code, it is good practice to have self-explanatory methods, variable names and class names, objects, etc., especially when we need to work on legacy code. The same applies to test methods/classes, even more than for regular code, because regular code passes lots of quality gates and tests. So let’s see the differences between Spock and JUnit in this field.
In Spock, the code snippet documents our code by default. We have the @Title explanation for the whole test class, then in every test method we have given/when/then/{where} blocks and they all have explanations. Also, we have the test method name written in the simple and understandable English.
On the other hand, JUnit is losing on all levels, because there is no documentation “forced” by default. So if you want it, you have to develop brilliant self-explanatory code yourself (let’s be fair here, in the legacy code this is almost impossible) and at least some comments should be added.
Verification
In JUnit, to assure a method was executed based on some condition(s), you have to have 3rd party dependencies, e.g. Mockito.
verify(someMockedClass).someMethod(isA(Some.class));
Exactly the same login in Spock will look like this:
1 * someMockedClass.someMethod
Note that for doing this in Spock you do not need 3rd party libraries.
The then() of Mockito used in JUnit (and other frameworks) looks like this:
when(someClass.someMethod(TEST)).thenReturn(result);
Yet in Spock you will have much less code and readability:
someClass.someMethod(TEST) >> result
In other words, Spock uses 0* and >>, while JUnit uses verify() and then().
As we can see, Spock has more readability and a clearer documented code, it does not need 3rd parties, and it is more powerful than JUnit. In the end, using Spock or JUnit or TestNG or anything else is absolutely up to you. They each have their pros and cons for sure.
One thing I can say though, it’s that in the past I used JUnit and TestNG. But when I heard about and experimented with Spock, I switched to it completely. If you switch to Spock from any other tool you might struggle in the beginning, but pretty quickly you will enjoy a clean and maintainable tool with documented test code.
To try out API testing with BlazeMeter, just put your URL and assertion in the box below and your test will start in minutes. You can also request a demo.
Published at DZone with permission of , DZone MVB. See the original article here.
Opinions expressed by DZone contributors are their own.

Comments