AI-Powered Professor Rating Assistant With RAG and Pinecone
Build a Rate-Professor AI assistant with OpenAI, Pinecone, and Next.js, with real-time chat and context-aware responses. Deploy easily on Vercel or Netlify.
Join the DZone community and get the full member experience.
Join For FreeArtificial intelligence is transforming how people interact with information, and retrieval-augmented generation (RAG) is at the forefront of this innovation. RAG enhances large language models by enabling access to external knowledge bases, providing highly accurate and context-aware answers.
In this tutorial, I’ll guide you through building an AI-powered assistant using RAG to create a smarter, more informed system for rating professors. Using tools like Next.js, React, Pinecone, and OpenAI’s API, this project is designed to be approachable for all, whether you’re just starting or already have experience in AI.
I’ll begin by breaking down the fundamentals of RAG and showing how it works in real-world applications. Specifically, I’ll demonstrate how the Rate My Professor AI Assistant integrates a large language model with a curated dataset stored in a vector database. This combination allows the assistant to provide detailed and relevant answers to questions about professors and courses.
Whether you’re new to AI or an experienced developer, you’ll find this tutorial offers a clear, hands-on path to creating applications that combine general knowledge with specialized data.
Setting Up the Environment for Development
We need to set up our working environment before we start writing code for our Food Inventory Management App.
1. Install Node.js and npm
The first step is to install Node.js and npm. Go to the Node.js website and get the Long Term Support version for your computer's running system. Follow the steps given for installation.
2. Making a Project With Next.js
Start up your terminal and go to the location where you want to make your project. After that, run these commands:
npx create-next-app@latest rate-professor-app(With the @latest flag, npm gets the most recent version of the Next.js starting setup.)cd rate-professor-app
It will make a new Next.js project and take you to its path. You'll be given a number of configuration choices during the setup process, set them as given below:
- Would you like to use TypeScript? No
- Would you like to use ESLint? Yes
- Would you like to use Tailwind CSS? No
- Would you like to use the src/ directory? No
- Would you like to use App Router? Yes
- Would you like to customize the default import alias? No
3. Installing Additional Dependencies
Let’s install Material-UI, Pinecone, and other necessary packages. Run the following command in your project directory:
npm install @mui/material @emotion/react @emotion/styled @pinecone-database/pinecone @vercel/analytics openaiSetting Up an OpenAI Account and API
Step 1: Sign Up or Log In
- Head over to OpenAI’s website.
- Click on "Sign Up" if you’re new, or "Log In" if you already have an account.
- Complete any verification steps, like email confirmation, to access your account.
Step 2: Access the API Section
- After logging in, navigate to the API section. You can find this by clicking on your profile icon in the top-right corner and selecting "API Keys." Alternatively, go directly to the OpenAI API dashboard.
Step 3: Generate an API Key
- In the API dashboard, locate and click "Create New Secret Key."
- A new key will appear — copy it immediately, as you won’t be able to view it again later.
- Save the key securely in your project’s
.envfile, like this:-
Plain Text
OPENAI_API_KEY=your_openai_api_key
-
We set up our Rate My Professor AI Assistant development environment and project structure with these procedures. Next, we'll build our RAG system's fundamental components.
Setting up Pinecone Account
Step 1: Create an Account
- Open Pinecone's website in your browser.
- Click on "Sign Up" and fill out the form with your email, password, and other details.
- If you already have an account, click "Log In" and enter your credentials.
Step 2: Set Up Your Project
- Once logged in, you’ll be taken to the Pinecone dashboard.
- Click "Create Project" (or a similar button on the dashboard).
- Name your project something meaningful, like "RAG AI Assistant" or "Rate My Professor."
Step 3: Retrieve Your API Key and Environment
- In the dashboard, find the section labeled "API Keys" or "Settings."
- Copy the API key provided. This key is crucial for connecting your application to Pinecone.
- Also, note the environment (e.g., "us-west1-gcp") listed in the settings. This will be used to specify the server location when making API calls.
- Save the API key and environment details in a secure place, such as a
.envfile in your project:-
Plain Text
PINECONE_API_KEY=your_pinecone_api_key
-
Setting Up the Vector Database
To start building the Rate My Professor AI Assistant, the first step is to prepare the data and configure the vector database. This involves a few key tasks: processing professor review data, generating embeddings, and storing these embeddings in a Pinecone index.
These steps are essential for setting up the retrieval-augmented generation (RAG) system, enabling the AI to retrieve and utilize relevant information effectively when answering user queries. The process begins with setting up the Python environment and concludes with a fully populated Pinecone index, ready for integration into the application. Let’s break this down step-by-step to ensure a smooth setup.
- First, make sure you have Python installed.
- Install the necessary packages:
pip install python-dotenv pinecone-client openai. - Create a sample JSON file, which will consist of reviews of the professors (e.g.,
reviews.json). - Create a Python script (e.g.,
load.ipynb) that will handle adding the data to the vector database. - Execute the Python script once it is complete.
Sample reviews.json:
{
    "Reviews": [
      {
        "professor": "Dr. Emily Johnson",
        "subject": "Computer Science",
        "rating": 5,
        "reviews": "Excellent professor! Very knowledgeable and approachable."
      },
      {
        "professor": "Dr. John Smith",
        "subject": "Mathematics",
        "rating": 4,
        "reviews": "Great at explaining complex concepts but sometimes a bit fast-paced."
      },

      {
        "professor": "Dr. Susan Harris",
        "subject": "Physics",
        "rating": 3,
        "reviews": "Challenging course, but the professor was helpful."
      },
      {
        "professor": "Dr. Joseph Allen",
        "subject": "Philosophy",
        "rating": 5,
        "reviews": "Insightful and encourages deep thinking."
      },
      {
        "professor": "Dr. Carol Nelson",
        "subject": "Linguistics",
        "rating": 4,
        "reviews": "Very engaging and knowledgeable in the subject."
      },
      {
        "professor": "Dr. Thomas King",
        "subject": "Engineering",
        "rating": 3,
        "reviews": "Tough course, but the professor is fair."
      },
	// ...similarly add more reviews ...
    ]
}
Sample load.ipynb:
# Importing necessary libraries
from dotenv import load_dotenv  # Loads environment variables from a .env file
load_dotenv()  # Activates the environment variables
import os  # To access environment variables and interact with the operating system
from openai import OpenAI  # OpenAI client for interacting with OpenAI APIs
from pinecone import Pinecone, ServerlessSpec  # Pinecone client and configurations for vector database

# Initialize the Pinecone client using the API key from environment variables
pc = Pinecone(api_key=os.getenv("PINECONE_API_KEY"))

# Create a new Pinecone index named "rag" with the specified dimensions and metric
# Dimension is set to 1536, matching the output size of the embedding model
# The metric "cosine" will be used for similarity calculations
# ServerlessSpec specifies the cloud provider (AWS) and region (us-east-1)
pc.create_index(
    name="rag",
    dimension=1536,
    metric="cosine",
    spec=ServerlessSpec(cloud="aws", region="us-east-1")
)

# Load the dataset containing professor reviews from a JSON file
import json
data = json.load(open("reviews.json"))  # Reads the JSON file into a Python dictionary
reviews = data['Reviews']  # Extract the "Reviews" key, which contains the review data

# Prepare to process reviews into embeddings
processed_data = []  # Initialize an empty list to store processed data
client = OpenAI()  # Initialize the OpenAI client for creating embeddings

# Iterate over each review in the dataset
for review in reviews:
    # Use OpenAI's embedding model to create an embedding for the review text
    response = client.embeddings.create(
        input=review['reviews'],  # The review text to generate embeddings for
        model="text-embedding-3-small"  # The specific embedding model to use
    )
    embedding = response.data[0].embedding  # Extract the embedding from the response

    # Structure the processed data with embedding values, ID, and metadata
    processed_data.append({
        "values": embedding,
        "id": review["professor"],
        "metadata": {
            "review": review["reviews"],
            "subject": review["subject"],
            "stars": review["rating"]
        }
    })

# Print the first processed data entry to verify the output
print(processed_data[0])

# Retrieve the index created earlier for uploading the vectors
index = pc.Index('rag')

# Upsert (insert or update) the processed data into the Pinecone index
index.upsert(
    vectors=processed_data,  # The list of vectors to add to the index
    namespace="ns1"  # A namespace to logically separate vectors
)

# Describe the current statistics of the index (e.g., vector count, memory usage)
stats = index.describe_index_stats()
print(stats)
This script sets up the foundation for your RAG system by loading environment variables, initializing Pinecone, and creating a "rag" index. It processes review data from reviews.json, generates embeddings for each review using OpenAI’s API, and stores these embeddings in the Pinecone index.
Finally, it prints the number of inserted vectors and index statistics. Ensure you replace your_pinecone_api_key and your_openai_api_key in the .env file with your actual API keys before running the script. This setup allows the AI assistant to query the vector database for relevant information.
Building the Core Logic for the AI Assistant
1. Import Required Libraries
import { NextResponse } from "next/server";
import OpenAI from 'openai';
import { Pinecone } from '@pinecone-database/pinecone';NextResponse: A utility from Next.js for creating server-side responses.OpenAI: A library to interact with OpenAI APIs (e.g., for generating embeddings or chat completions).Pinecone: A library to interact with the Pinecone vector database for similarity searches.
2. Define the System Prompt
The system prompt defines the AI assistant's behavior, capabilities, response format, and ethical considerations. It ensures that the assistant provides accurate, relevant, and well-structured responses.
const systemPrompt = `
You are an AI assistant designed to help students find professors based on their queries using a Retrieval-Augmented Generation (RAG) approach.

Your Capabilities:
You have access to a comprehensive and accurate database of professor reviews, including information such as professor names, subjects, teaching styles, ratings, and student feedback. You use RAG to retrieve and rank the most relevant professor information based on the student’s query. Your primary goal is to provide factually correct and highly relevant information without generating unsupported or speculative content.

Your Responses Should:
- Be concise yet informative, focusing on verifiable details for each professor.
- Include the professor's name, subject, star rating, and a brief summary of their strengths or notable comments.
- Highlight specific aspects mentioned in the student's query (e.g., teaching style, course difficulty, etc.).
- Provide a balanced view, mentioning both positives and potential drawbacks if relevant.
- Avoid any content that cannot be directly supported by the data retrieved. Only provide information that is found in the database or directly retrieved.

Response Format:
For each query, structure your response as follows:

1. Introduction: Address the student's specific request.
2. Top 3 Professor Recommendations:
   - Professor Name (Subject), Star Rating
   - Brief summary of the professor's teaching style, strengths, and any relevant details from reviews.
3. Conclusion: Provide any additional advice or suggestions for the student.

Guidelines:
- Accuracy and Relevance: Ensure all provided information is directly supported by retrieved data and relevant to the student’s query.
- Clarity and Conciseness: Responses should be clear, to the point, and avoid unnecessary detail while still providing valuable information.
- Respect Privacy: Avoid sharing any sensitive or personal information that could identify students or professors outside the professional context.
- Ethical Considerations: Do not provide biased recommendations or omit important information that could influence a student’s decision unfairly.
- Neutral Tone: Maintain a neutral and professional tone in all responses, providing balanced information that helps the student make an informed choice.
- Avoid Repetition: If a professor has already been recommended in a previous query, avoid suggesting them again unless specifically relevant.
- Content Limitations: Do not copy full reviews or content verbatim from any source. Summarize and paraphrase the information, ensuring it is within the context of the student’s needs.

IMPORTANT: Always base your responses on the data retrieved and avoid generating any content that cannot be substantiated by the available information.
`;
3. Main Logic
- Request parsing. The function starts by extracting user data from the request payload.
- Pinecone setup. A Pinecone client is initialized to interact with a specific vector database for querying embeddings.
- OpenAI setup. OpenAI is used for generating text embeddings and chat completions.
- Embedding generation. The last user message is embedded using a pre-trained OpenAI embedding model.
- Database query. The embedding is queried against Pinecone to fetch the top five most similar results, including metadata.
- Result formatting. The query results are formatted and appended to the last user message.
- Chat completion. The OpenAI chat model generates a response considering the updated message history.
- Streaming response. The response is streamed in real time using a
ReadableStream. - Error handling. Errors during processing are logged, and a
500 Internal Server Errorresponse is returned if needed.
/**
 * Handles a POST request to generate a response based on user-provided data, using OpenAI for embeddings and chat completions,
 * and Pinecone for vector-based database queries.
 *
 * @param {Request} req - The HTTP POST request containing user data in JSON format.
 * @returns {Response} - A readable stream with the AI-generated response or an error message.
 */
export async function POST(req) {
    try {
        // Parse the JSON payload from the incoming request
        const data = await req.json();

        // Initialize the Pinecone client for vector database interaction
        const pc = new Pinecone({
            apiKey: process.env.PINECONE_API_KEY, // API key for authenticating with Pinecone
        });

        // Access a specific index and namespace in the Pinecone vector database
        const index = pc.index('rag').namespace('ns1');

        // Initialize the OpenAI client for embeddings and chat completions
        const openai = new OpenAI({
            apiKey: process.env.OPENAI_API_KEY, // API key for authenticating with OpenAI
        });

        // Extract the content of the last message from the user input
        const text = data[data.length - 1].content;

        // Generate a text embedding using OpenAI's embedding model
        const embeddingResponse = await openai.embeddings.create({
            model: "text-embedding-ada-002", // Model used for creating embeddings
            input: text, // The text to be embedded
        });

        // Extract the generated embedding from the response
        const embedding = embeddingResponse.data[0].embedding;

        // Query the Pinecone vector database for similar embeddings
        const results = await index.query({
            topK: 5, // Retrieve the top 5 similar results
            includeMetadata: true, // Include metadata in the response
            vector: embedding, // The embedding vector to query
        });

        // Initialize a string to store the results of the query
        let resultString = '\n\nReturned Ratings from vector db:';

        // Iterate over the query results and append relevant metadata to the result string
        for (const match of results.matches) {
            resultString += `
            Professor: ${match.id}
            Review: ${match.metadata.review}
            Subject: ${match.metadata.subject}
            Rating: ${match.metadata.stars}
            `;
        }

        // Append the query results to the user's last message
        const lastMessageContent = data[data.length - 1].content + resultString;

        // Prepare the previous messages, excluding the last one
        const previousMessages = data.slice(0, data.length - 1);

        // Generate a chat completion using OpenAI's chat model
        const completion = await openai.chat.completions.create({
            messages: [
                { role: 'system', content: systemPrompt }, // Add system-level context
                ...previousMessages, // Include prior conversation messages
                { role: 'user', content: lastMessageContent } // Include the updated last message
            ],
            model: 'gpt-4o-mini', // Chat model used for completion
            stream: true, // Stream the response for real-time output
        });

        // Create a readable stream to return the AI-generated response
        const stream = new ReadableStream({
            async start(controller) {
                const encoder = new TextEncoder();
                try {
                    // Stream the completion in chunks
                    for await (const chunk of completion) {
                        const content = chunk.choices[0]?.delta?.content;
                        if (content) {
                            controller.enqueue(encoder.encode(content)); // Enqueue the content
                        }
                    }
                } catch (err) {
                    controller.error(err); // Handle errors during streaming
                } finally {
                    controller.close(); // Close the stream
                }
            },
        });

        // Return the readable stream as the response
        return new NextResponse(stream);

    } catch (error) {
        // Log and handle errors that occur during the request
        console.error('Error processing request:', error);
        return new NextResponse('Internal Server Error', { status: 500 });
    }
}
Building User Interface for the AI Assistant
We’ll use NextJS with Material-UI components to build a simple chat interface. This code defines a simple React component for a chat interface for a professor guide assistant. It includes an input box for user messages, a list to display chat history, and a button to send messages. When a user types a message and clicks the "Send" button, the message is added to the chat history. The app sends the chat history to a server endpoint (/api/chat) for processing. The server responds with a streamed reply, which updates the assistant's response in real time.
Styling is applied to enhance the user interface, making the chat messages visually distinct for users and the assistant. The app dynamically updates the chat view as new messages are added. This setup demonstrates an interactive, responsive chat application using React's state management and asynchronous API calls.
'use client';
import { useState } from "react";

export default function Home() {
  const [messages, setMessages] = useState([
    {
      role: "assistant",
      content: "Hi! Welcome to ProfTalk - Your Professor Guide. How can I assist you today?"
    }
  ]);

  const [message, setMessage] = useState('');

  const sendMessage = async () => {
    const newMessages = [
      ...messages,
      { role: "user", content: message },
      { role: "assistant", content: '...' },
    ];
    setMessages(newMessages);
    setMessage('');

    try {
      const response = await fetch('/api/chat', {
        method: "POST",
        headers: {
          'Content-Type': 'application/json'
        },
        body: JSON.stringify(newMessages)
      });

      if (!response.body) {
        throw new Error('Response body is null');
      }

      const reader = response.body.getReader();
      const decoder = new TextDecoder();
      let result = '';

      const processText = async ({ done, value }: { done: boolean, value?: Uint8Array }) => {
        if (done) {
          setMessages((prevMessages) => {
            let lastMessage = prevMessages[prevMessages.length - 1];
            lastMessage.content = result;
            return [...prevMessages];
          });
          return;
        }

        const text = decoder.decode(value || new Uint8Array(), { stream: true });
        result += text;

        setMessages((prevMessages) => {
          let lastMessage = prevMessages[prevMessages.length - 1];
          lastMessage.content = result;
          return [...prevMessages];
        });

        reader.read().then(processText);
      };

      reader.read().then(processText);
    } catch (error) {
      console.error("Failed to send message:", error);
    }
  };

  return (
    <div style={{ display: 'flex', height: '100vh', fontFamily: 'Arial, sans-serif' }}>
      <div style={{ flex: 1, padding: '20px', display: 'flex', flexDirection: 'column', backgroundColor: '#f5f7fa' }}>
        <h1 style={{ textAlign: 'center', marginBottom: '20px', fontSize: '26px', color: '#2c3e50', fontWeight: 'bold' }}>
          ProfTalk - Your Professor Guide
        </h1>

        <div style={{ flex: 1, border: '1px solid #ddd', borderRadius: '10px', padding: '20px', overflowY: 'scroll', backgroundColor: '#fff', boxShadow: '0px 4px 10px rgba(0, 0, 0, 0.1)' }}>
          {messages.map((msg, index) => (
            <div key={index} style={{ margin: '10px 0', display: 'flex', justifyContent: msg.role === 'user' ? 'flex-end' : 'flex-start', animation: 'fadeIn 0.5s' }}>
              <div style={{ maxWidth: '75%', padding: '10px 15px', borderRadius: '15px', backgroundColor: msg.role === 'user' ? '#007BFF' : '#f1f1f1', color: msg.role === 'user' ? 'white' : '#333', boxShadow: '0px 2px 5px rgba(0, 0, 0, 0.1)' }}>
                <strong style={{ color: msg.role === 'user' ? 'white' : '#333' }}>{msg.role === 'user' ? 'You' : 'Assistant'}:</strong>
                <p style={{ margin: '5px 0 0' }}>{msg.content}</p>
              </div>
            </div>
          ))}
        </div>

        <div style={{ display: 'flex', marginTop: '10px' }}>
          <input
            type="text"
            value={message}
            onChange={(e) => setMessage(e.target.value)}
            style={{ flex: 1, padding: '15px', borderRadius: '30px', border: '1px solid #ddd', fontSize: '16px', color: '#333', outline: 'none', boxShadow: 'inset 0px 1px 3px rgba(0, 0, 0, 0.1)' }}
            placeholder="Type your message here..."
          />
          <button
            onClick={sendMessage}
            style={{ padding: '10px 25px', marginLeft: '10px', borderRadius: '30px', backgroundColor: '#007BFF', color: 'white', border: 'none', fontSize: '16px', cursor: 'pointer', transition: 'background-color 0.3s' }}
            onMouseOver={(e) => e.currentTarget.style.backgroundColor = '#0056b3'}
            onMouseOut={(e) => e.currentTarget.style.backgroundColor = '#007BFF'}
          >
            Send
          </button>
        </div>
      </div>

      <div className="background-image" style={{ flex: 1 }} />
    </div>
  );
}
Ways to Deploy this AI Assistant
Deployment on Vercel
Prerequisites
- Install the Vercel CLI (optional for local deployment).
- Ensure your project is a valid React project (Next.js is preferred for seamless Vercel integration).
Steps
- Step 1. Create a Vercel account.
- Sign up for an account and link your GitHub/GitLab/Bitbucket account.
- Step 2. Push Code to a Git repository.
- Push your project to a Git hosting service like GitHub.
- Step 3. Import the project.
- In the Vercel dashboard, click "New Project" and import the repository.
- Step 4. Configure environment variables.
- Add your API keys (e.g.,
OPENAI_API_KEY,PINECONE_API_KEY) in the "Environment Variables" section under "Settings."
- Add your API keys (e.g.,
- Step 5. Deploy
- Click "Deploy," and Vercel will handle building and hosting your app.
- Step 6. Test your app.
- Access the app at the URL provided by Vercel (e.g., https://your-project-name.vercel.app).
Advantages
- Free for small projects.
- Built-in serverless function support for APIs like
/api/chat.
Deployment on Netlify
Prerequisites
- Install the Netlify CLI (optional for local deployment).
- Ensure the project is buildable (e.g., npm run build works without errors).
Steps
- Step 1. Create a Netlify account.
- Sign up at netlify.com and link your GitHub/GitLab/Bitbucket account.
- Step 2. Push code to Git repository.
- Push your project to a Git hosting service like GitHub.
- Step 3. Import the project.
- In the Netlify dashboard, click "New Site from Git" and connect the repository.
- Step 4. Configure build settings.
- Set the build command (npm run build) and the publish directory (usually build for React apps).
- Step 5. Configure environment variables.
- Add API keys (
OPENAI_API_KEY,PINECONE_API_KEY) under "Site Settings" -> "Environment Variables."
- Add API keys (
- Step 6. Deploy.
- Deploy the app and access it via the URL provided (e.g., https://your-project-name.netlify.app).
Serverless Functions
- If your app's API (e.g.,
/api/chat) is built using serverless functions, you can define them in a netlify/functions directory. - Ensure the
netlify.tomlfile is configured:
CopyEdit

[build]

  functions = "netlify/functions"
Choosing Between Vercel and Netlify
|
Feature |
Vercel |
Netlify |
|
Ease of Use |
Best for Next.js projects |
Works well for all React projects |
|
Serverless Functions |
Built-in support |
Supported but requires setup |
|
Build Speed |
Fast for optimized Next.js builds |
Fast for general builds |
|
Pricing |
Free tier available |
Free tier available |
Additional Notes
- Static hosting. If you don't need serverless functions (e.g., API routes), build your app using npm run build and deploy the static files directly.
- Custom domains. Both platforms allow connecting custom domains to your app.
Both Vercel and Netlify offer quick and reliable ways to deploy your app. Choose the one that aligns with your project requirements and preferred workflow.
Conclusion
Well done! We’ve successfully built a Rate-Professor AI Assistant using cutting-edge technologies and methods in natural language processing and information retrieval.
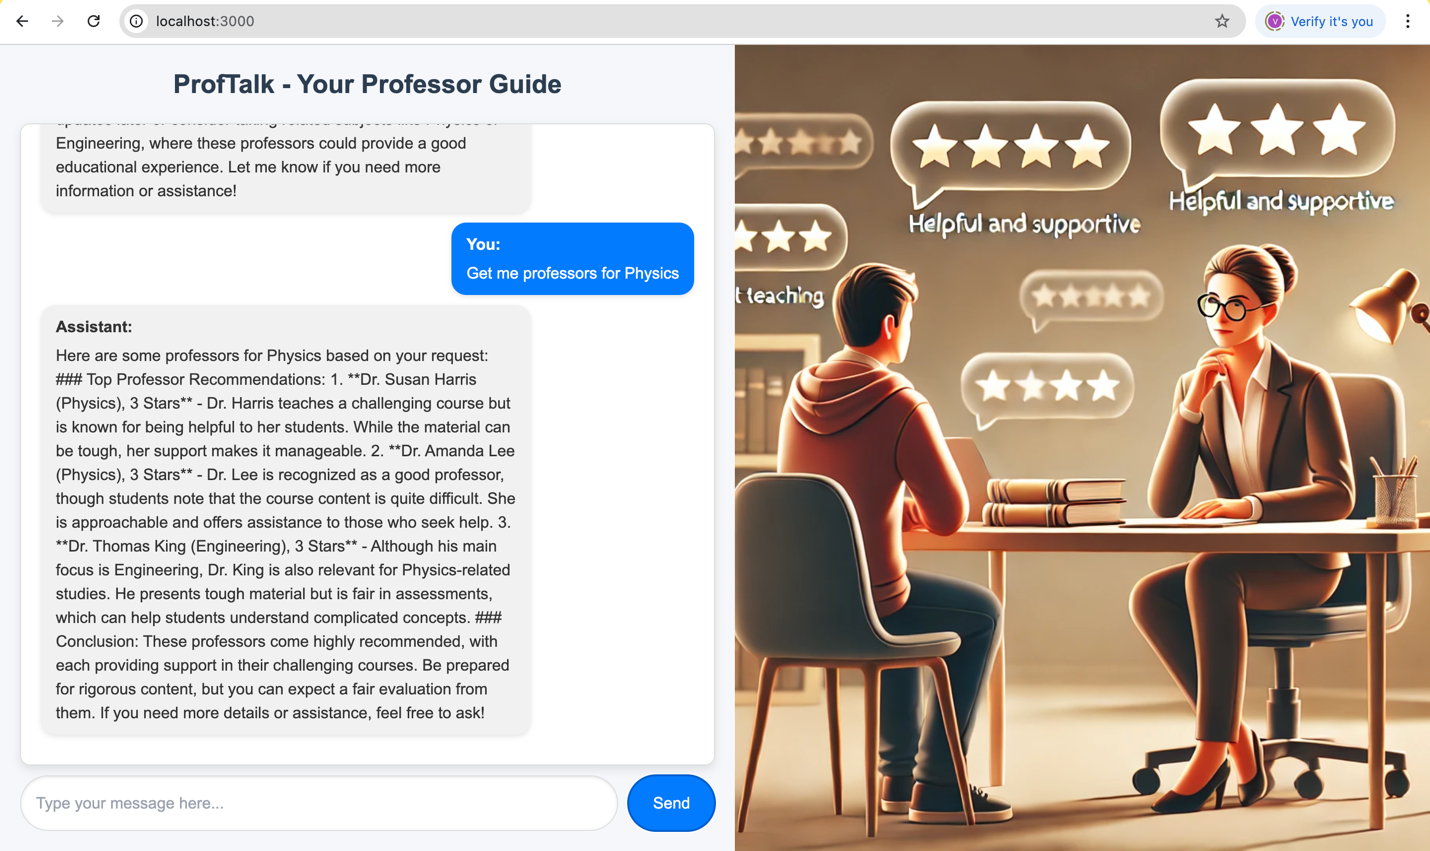
A sample look once completed:
Happy coding!
Opinions expressed by DZone contributors are their own.
Comments