Spring Microservices RESTFul API Documentation With Swagger Part 1
This article explains, how Spring boot Micro-services can be documented using Swagger2
Join the DZone community and get the full member experience.
Join For FreeWhen back-end APIs are developed and exposed to the client, having good documentation is key. API documentation should be properly structured so that it provides all information related to the API. Without having proper documentation, the client using the API will struggle to access it. If this happens, the API is useless. There are several tools to document the APIs/RESTful Services. However, when you have developed a RESTful service using Spring Boot, then Swagger2 is the obvious choice for documentation because it makes your documentation very easy.
- Swagger is the oldest and most mature spec.
- Supports most languages.
- Easy to get started with.
- Good community support.
- Has a Maven plugin and is easily configurable with a Spring Boot application.
In this and subsequent articles, we will see how can Swagger2 be configured with a Spring Boot RESTful service. In Part 1, I will show you how to configure your application without security and in Part 2, we'll add security.
Configuration Without Security
The following steps need to be performed to include Swagger in your Spring Boot application and document the API. I will do it for a fresh project
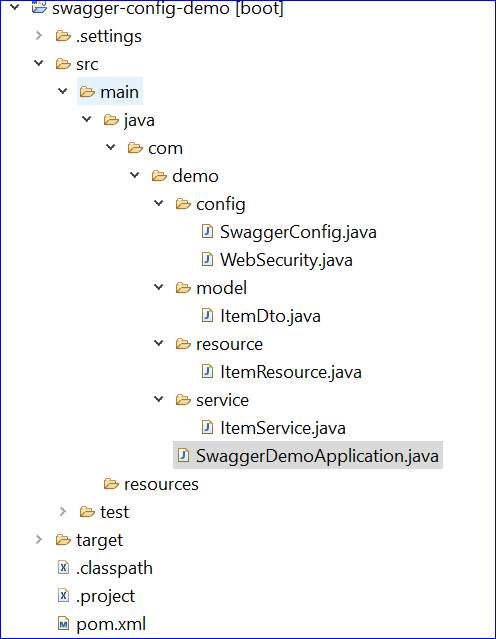
Step 1 — Create the Project Structure and create artifacts in the correct location.
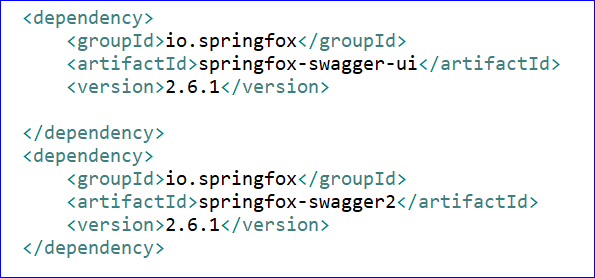
Step 2 — Add the following Swagger dependencies in your pom.xml file.
 Complete pom.xml
xxxxxxxxxx
<project xmlns="http://maven.apache.org/POM/4.0.0"
xmlns:xsi="http://www.w3.org/2001/XMLSchema-instance"
xsi:schemaLocation="http://maven.apache.org/POM/4.0.0 https://maven.apache.org/xsd/maven-4.0.0.xsd">
<modelVersion>4.0.0</modelVersion>
<parent>
<groupId>org.springframework.boot</groupId>
<artifactId>spring-boot-starter-parent</artifactId>
<version>2.2.6.RELEASE</version>
<relativePath ></relativePath> <!-- lookup parent from repository -->
</parent>
<groupId>com.demo</groupId>
<artifactId>swagger-config-demo</artifactId>
<version>0.0.1-SNAPSHOT</version>
<name>swagger-config-demo</name>
<description>Swagger Demo</description>
<properties>
<java.version>1.8</java.version>
</properties>
<dependencies>
<dependency>
<groupId>org.springframework.boot</groupId>
<artifactId>spring-boot-starter-web</artifactId>
</dependency>
<dependency>
<groupId>io.springfox</groupId>
<artifactId>springfox-swagger-ui</artifactId>
<version>2.6.1</version>
</dependency>
<dependency>
<groupId>io.springfox</groupId>
<artifactId>springfox-swagger2</artifactId>
<version>2.6.1</version>
</dependency>
<dependency>
<groupId>org.springframework.boot</groupId>
<artifactId>spring-boot-starter-test</artifactId>
<scope>test</scope>
<exclusions>
<exclusion>
<groupId>org.junit.vintage</groupId>
<artifactId>junit-vintage-engine</artifactId>
</exclusion>
</exclusions>
</dependency>
</dependencies>
<build>
<plugins>
<plugin>
<groupId>org.springframework.boot</groupId>
<artifactId>spring-boot-maven-plugin</artifactId>
</plugin>
</plugins>
</build>
</project>
Step 3 — Configuring Swagger in the application. To configure Swagger in the application, we need to create a config file, which will have all Swagger related configurations. I will explain each after this code snippet.
xxxxxxxxxx
package com.demo.config;
import java.util.ArrayList;
import java.util.HashSet;
import java.util.List;
import java.util.Set;
import org.springframework.context.annotation.Bean;
import org.springframework.context.annotation.Configuration;
import org.springframework.http.ResponseEntity;
import org.springframework.web.bind.annotation.RequestMethod;
import org.springframework.web.bind.annotation.RestController;
import springfox.documentation.builders.PathSelectors;
import springfox.documentation.builders.RequestHandlerSelectors;
import springfox.documentation.builders.ResponseMessageBuilder;
import springfox.documentation.schema.ModelRef;
import springfox.documentation.service.ApiInfo;
import springfox.documentation.spi.DocumentationType;
import springfox.documentation.spring.web.plugins.Docket;
import springfox.documentation.swagger2.annotations.EnableSwagger2;
public class SwaggerConfig {
public Docket productApi() {
Set<String> responseProduceType = new HashSet<String>();
responseProduceType.add("application/json");
responseProduceType.add("application/xml");
return new Docket(DocumentationType.SWAGGER_2)
.select().apis(RequestHandlerSelectors.withClassAnnotation(RestController.class))
.paths(PathSelectors.any()).build()
.useDefaultResponseMessages(false)
.genericModelSubstitutes(ResponseEntity.class)
.produces(responseProduceType)
.consumes(responseProduceType)
.apiInfo(apiInfo());
}
private ApiInfo apiInfo() {
("deprecation")
ApiInfo apiInfo = new ApiInfo(
"Item REST API",
"All Item related information",
"API",
"Terms of services",
"[email protected]",
"License of API",
"API License URL");
return apiInfo;
}
private Object apiKey() {
// TODO Auto-generated method stub
return null;
}
}
In above code snippet, you can see following configuration needs to be done:
@EnableSwagger2- Annotation enables Swagger in the Support in the Classselect()- method invocation on Docket bean instance that returns anAPISelectBuilderobject, which provides theapi()method and paths methods that need to be configured.api()- method filters the Controllers and methods that need to be documented. You can see I am setting theRestControllerClass asFilter. So, all classes that are annotated withRestControllerwill be filtered.Path()- method acts as an additional filter to generate documentation only for the path starting with some specific String. In my case, we are allowing all options.
Now, you can see there are few customizations that I had done like:
- Providing Produce and consume types. Here, I had configured two, "application/json" and "application/xml".
ApiInfo- We can set API Details for providing more details to the consumer, like setting name, emailId, terms and conditions, license etc.SecuritySchema- Will see in the next article (Swagger with Security)SecurityContext- Will see in the next article (Swagger with Security)globalResponseMessage- We can set global Response messages as well for handling errors like 500 and 404, and that will be applicable for all APIs that are being documented
There are a few more customization that can be performed on top of the Docket object.
Step 4 - Once Swagger Configurations are done, Controllers and Model objects need to be documented using available annotations.
1. Annotations of End Points
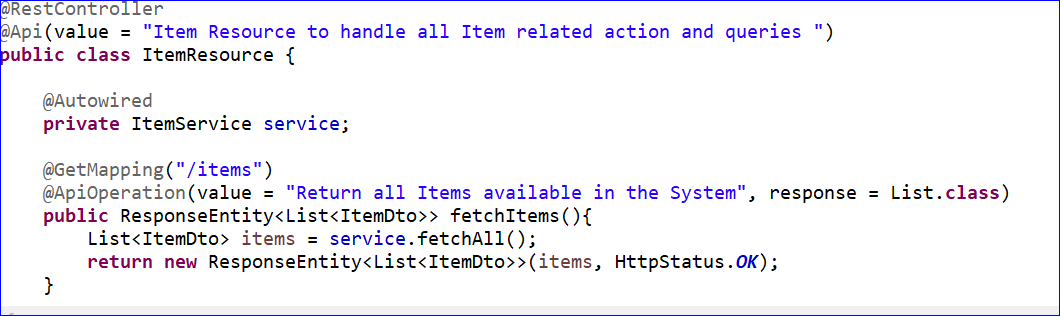
Any Class having the @RestController annotation will be considered as REST API Controllers (Resource).
xxxxxxxxxx
package com.demo.resource;
import java.util.List;
import org.springframework.beans.factory.annotation.Autowired;
import org.springframework.http.HttpStatus;
import org.springframework.http.ResponseEntity;
import org.springframework.web.bind.annotation.DeleteMapping;
import org.springframework.web.bind.annotation.GetMapping;
import org.springframework.web.bind.annotation.PatchMapping;
import org.springframework.web.bind.annotation.PathVariable;
import org.springframework.web.bind.annotation.PostMapping;
import org.springframework.web.bind.annotation.PutMapping;
import org.springframework.web.bind.annotation.RequestBody;
import org.springframework.web.bind.annotation.RestController;
import com.demo.model.ItemDto;
import com.demo.service.ItemService;
import io.swagger.annotations.Api;
import io.swagger.annotations.ApiOperation;
import io.swagger.annotations.ApiResponse;
import io.swagger.annotations.ApiResponses;
(value = "Item Resource to handle all Item related action and queries ")
public class ItemResource {
private ItemService service;
("/items")
(value = "Return all Items available in the System", response = List.class)
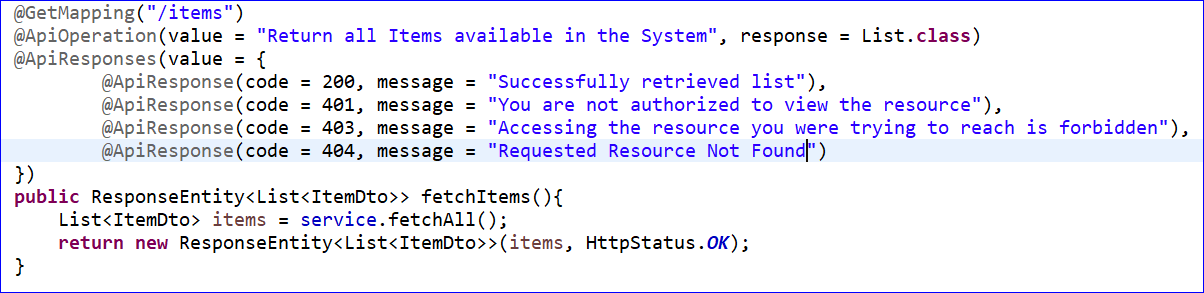
(value = {
(code = 200, message = "Successfully retrieved list"),
(code = 401, message = "You are not authorized to view the resource"),
(code = 403, message = "Accessing the resource you were trying to reach is forbidden"),
(code = 404, message = "Requested Resource Not Found")
})
public ResponseEntity<List<ItemDto>> fetchItems(){
List<ItemDto> items = service.fetchAll();
return new ResponseEntity<List<ItemDto>>(items, HttpStatus.OK);
}
(value = "Return Item for provided Id", response = ItemDto.class)
("/items/{id}")
public ResponseEntity<ItemDto> fetchItemById( long id){
ItemDto ItemDto = service.fetchById(id);
return new ResponseEntity<ItemDto>(ItemDto, HttpStatus.OK);
}
("/items")
(value = "Create the Item based on input provided", response = ItemDto.class)
public ResponseEntity<ItemDto> create( ItemDto dto){
ItemDto ItemDto = service.create(dto);
return new ResponseEntity<ItemDto>(ItemDto, HttpStatus.OK);
}
(value = "Updated Item for provided Id and with updated details", response = ItemDto.class)
("/items/{id}")
public ResponseEntity<ItemDto> update( Long id, ItemDto dto){
ItemDto itemDto = service.update(dto);
return new ResponseEntity<ItemDto>(itemDto, HttpStatus.OK);
}
(value = "Approves the Item for provided Id", response = ItemDto.class)
("/items/{id}")
public ResponseEntity<ItemDto> approve( Long id){
return null;
}
(value = "Delete the Item from System for provided Id", response = ItemDto.class)
("/items/{id}")
public ResponseEntity<String> delete( Long id){
service.delete(id);
return new ResponseEntity<String>("Item has been deleted", HttpStatus.OK);
}
}
In this Controller/Resource, you can see many annotations. Let's go one by one and see what they are responsible for:
@RestController- It is a combination of@Controllerand@ResponseBody, and it suggests that this class will be considered as a REST API Controller that will accept all API call requests.@RequestMapping- Class-level annotation that maps requests to items to controller. The method-level@RequestMappingannotations map web requests to the handler methods of the controller.@GetMapping,@PostMapping,@PatchMapping,@PutMapping,@DeleteMapping- To handle different requests coming from the client.@API- Class-level annotation to describe the API, and you can use this tag to explain the functionality of API.
@ApiOperation- Method-level annotation that describes the end point and its response type. You can also override the default response messages of HTTP methods. You can use the@ApiResponseannotation to document other responses, in addition to the regular HTTP 200 OK, like this.
Service Class Implementation
xxxxxxxxxx
package com.demo.service;
import java.util.ArrayList;
import java.util.List;
import java.util.stream.Collectors;
import org.springframework.stereotype.Service;
import com.demo.model.ItemDto;
public class ItemService {
List<ItemDto> items = new ArrayList<>();
public List<ItemDto> fetchAll(){
return items;
}
public ItemDto fetchById(long id) {
return items.stream().filter(dto -> dto.getId() == id).collect(Collectors.toList()).get(0);
}
public ItemDto create (ItemDto dto) {
items.add(dto);
return dto;
}
public ItemDto update (ItemDto dto) {
items.add(dto);
items.forEach( dto1 ->{
if(dto1.getId() == dto.getId()) {
dto1.setItemCode(dto.getItemCode());
dto1.setItemDescription(dto.getItemDescription());
dto1.setPrice(dto.getPrice());
}
});
return dto;
}
public void delete(long id) {
items.removeIf(dto -> dto.getId() == id);
}
}
Spring Boot application
xxxxxxxxxx
package com.demo;
import org.springframework.boot.SpringApplication;
import org.springframework.boot.autoconfigure.SpringBootApplication;
public class SwaggerDemoApplication {
public static void main(String[] args) {
SpringApplication.run(SwaggerDemoApplication.class, args);
}
}
2. Annotations for Models
@ApiModel and @ApiModelProperty can be used to document the Models used in the application.
@ApiModel- Class-level annotation that helps to describe the Model. It has two main fields value and a description.@ApiModelProperty- Field-level annotation that helps to describe the Field in detail. It has many properties; I am highlighting important ones you can use:- name - Unique Name
- value - Detail of field
- datatype - string, decimal, float, int etc
- readOnly - true/false
- example - Sample Value
xxxxxxxxxx
package com.demo.model;
import java.io.Serializable;
import io.swagger.annotations.ApiModel;
import io.swagger.annotations.ApiModelProperty;
(value = "Item Details", description = "Item Details for perticular Item")
public class ItemDto implements Serializable {
private static final long serialVersionUID = -7844251211618763233L;
(name = "Id", value = "Unique Item Id", dataType = "long", readOnly = true, example = "101")
private long id;
(name = "itemCode", value = "Unique Item Code", dataType = "long", required = true, example = "BOOK001")
private String itemCode;
(name = "ItemName", value = "Item Name", dataType = "String", required = true, example = "Microservices architecture")
private String itemName;
(name = "Item Description", value = "Description of the Item", dataType = "String", example = "Microservices architecture book for building Micro-services")
private String itemDescription;
(name = "Status", value = "Status of the item", dataType = "long", required = true)
private long status;
(name = "Price", value = "Price of the item", dataType = "double", required = true, example = "450.40")
private double price;
public long getId() {
return id;
}
public void setId(long id) {
this.id = id;
}
public String getItemCode() {
return itemCode;
}
public void setItemCode(String itemCode) {
this.itemCode = itemCode;
}
public String getItemName() {
return itemName;
}
public void setItemName(String itemName) {
this.itemName = itemName;
}
public String getItemDescription() {
return itemDescription;
}
public void setItemDescription(String itemDescription) {
this.itemDescription = itemDescription;
}
public long getStatus() {
return status;
}
public void setStatus(long status) {
this.status = status;
}
public double getPrice() {
return price;
}
public void setPrice(double price) {
this.price = price;
}
public String toString() {
return "ItemDto [id=" + id + ", itemCode=" + itemCode + ", itemName="
+ itemName + ", itemDescription=" + itemDescription
+ ", status=" + status + ", price=" + price + "]";
}
}
Step 5 - Once endpoint and Model documentation are done, start the Spring Boot application and access the following URL: http://localhost:8080/swagger-ui.html.
Once you access this url, Swager main page will get open which will have all your apis listed which you have documented
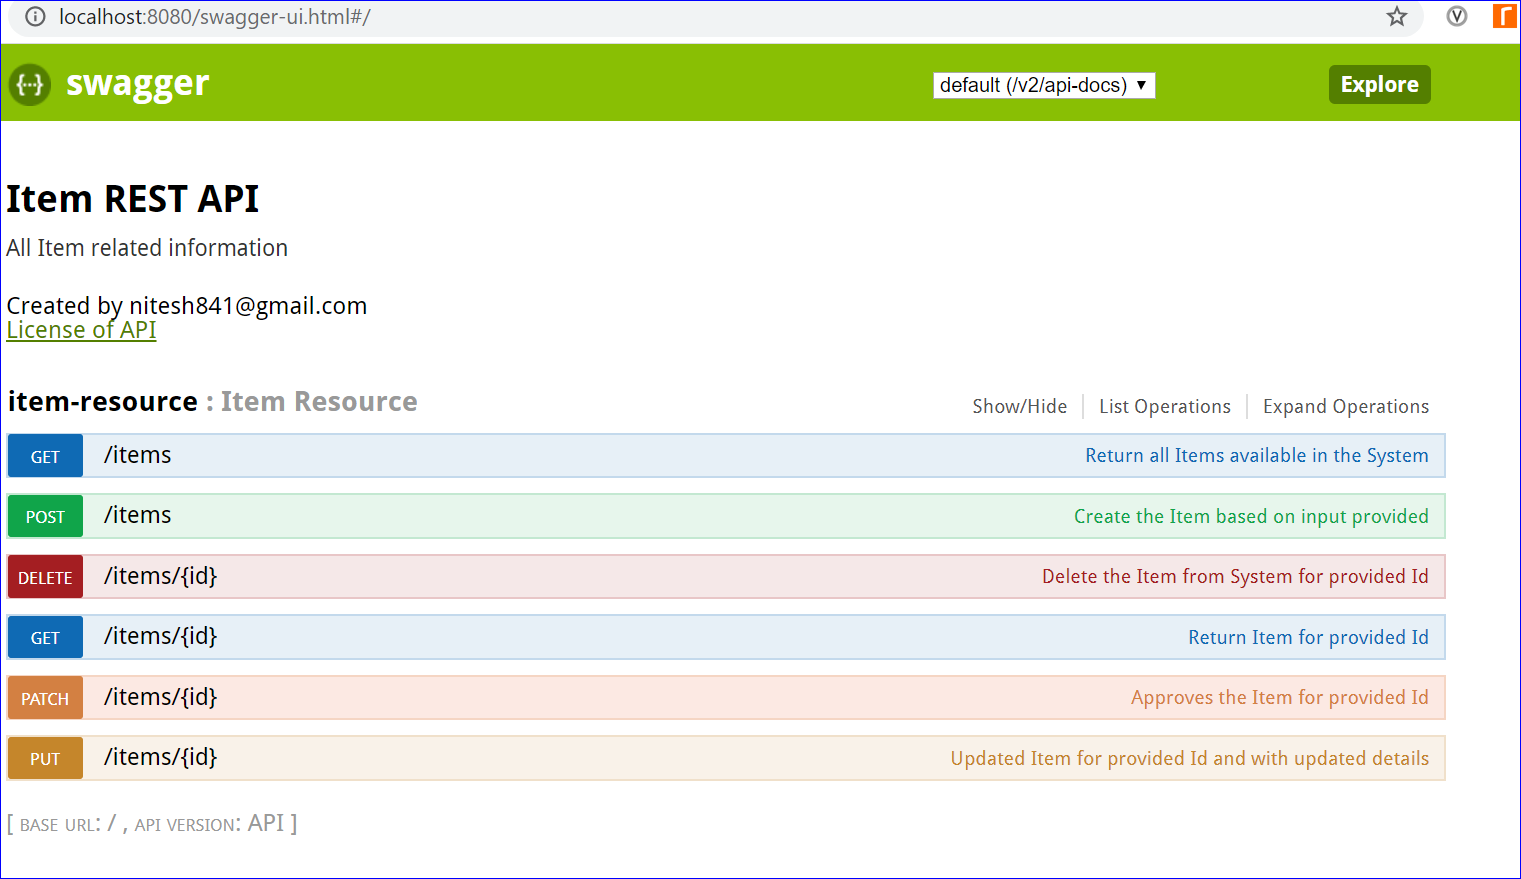
In this page, you can see following things:
- Your Controller/Resource Customized name.
- All end points which was annotated by
@ApiOperationand then you can see the description provided by you at right. - API Info provided in Swagger config file.
When you access POST Method of Items for creating Item:
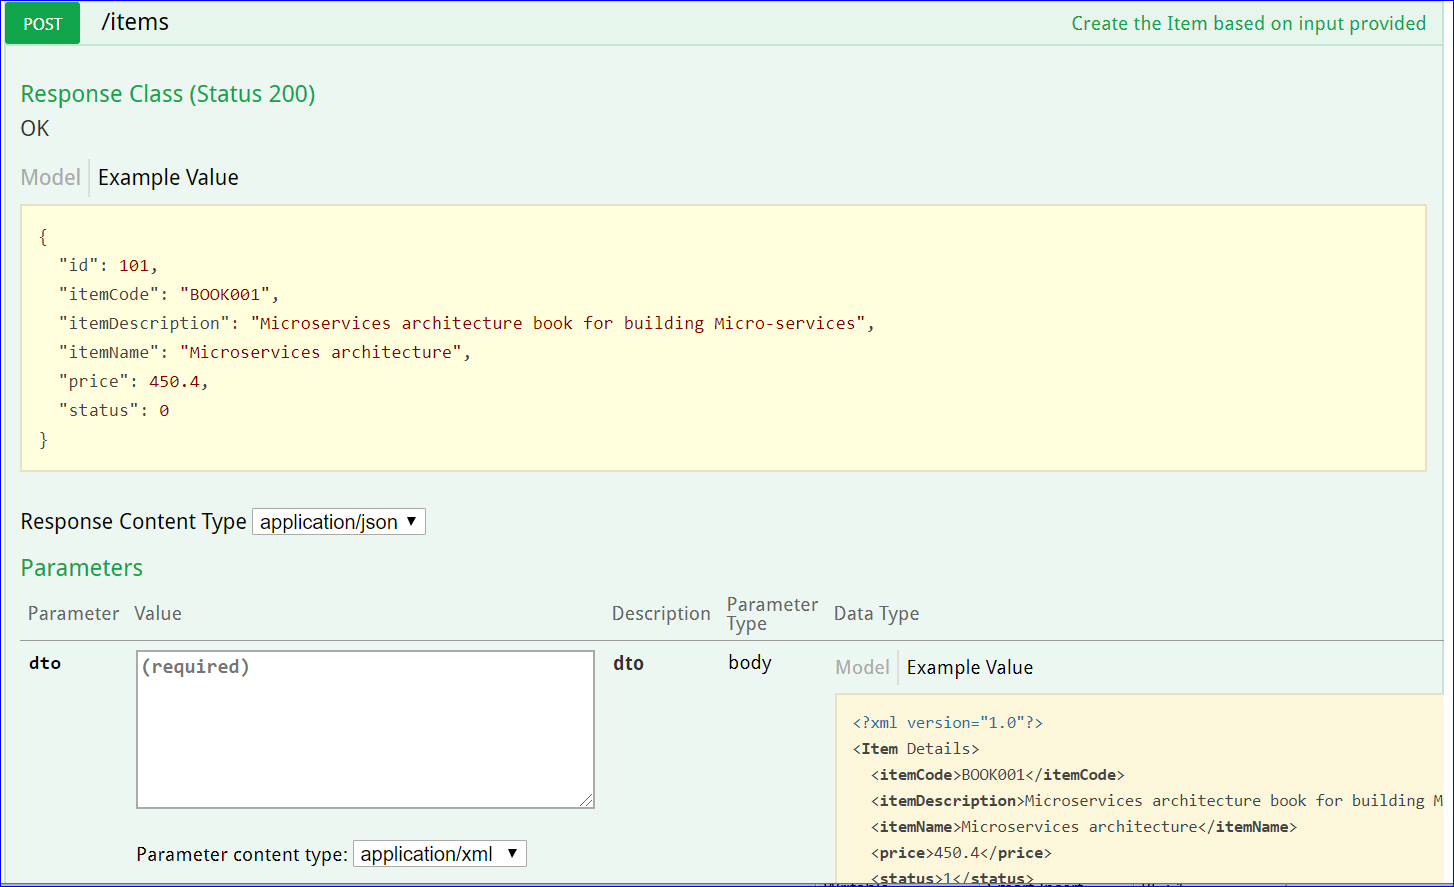
In this screenshot you can see following
- Response Content Type - Set in Swagger Config. You can chose either XML or JSON.
- Example Value - Picked from Model, documented by you.
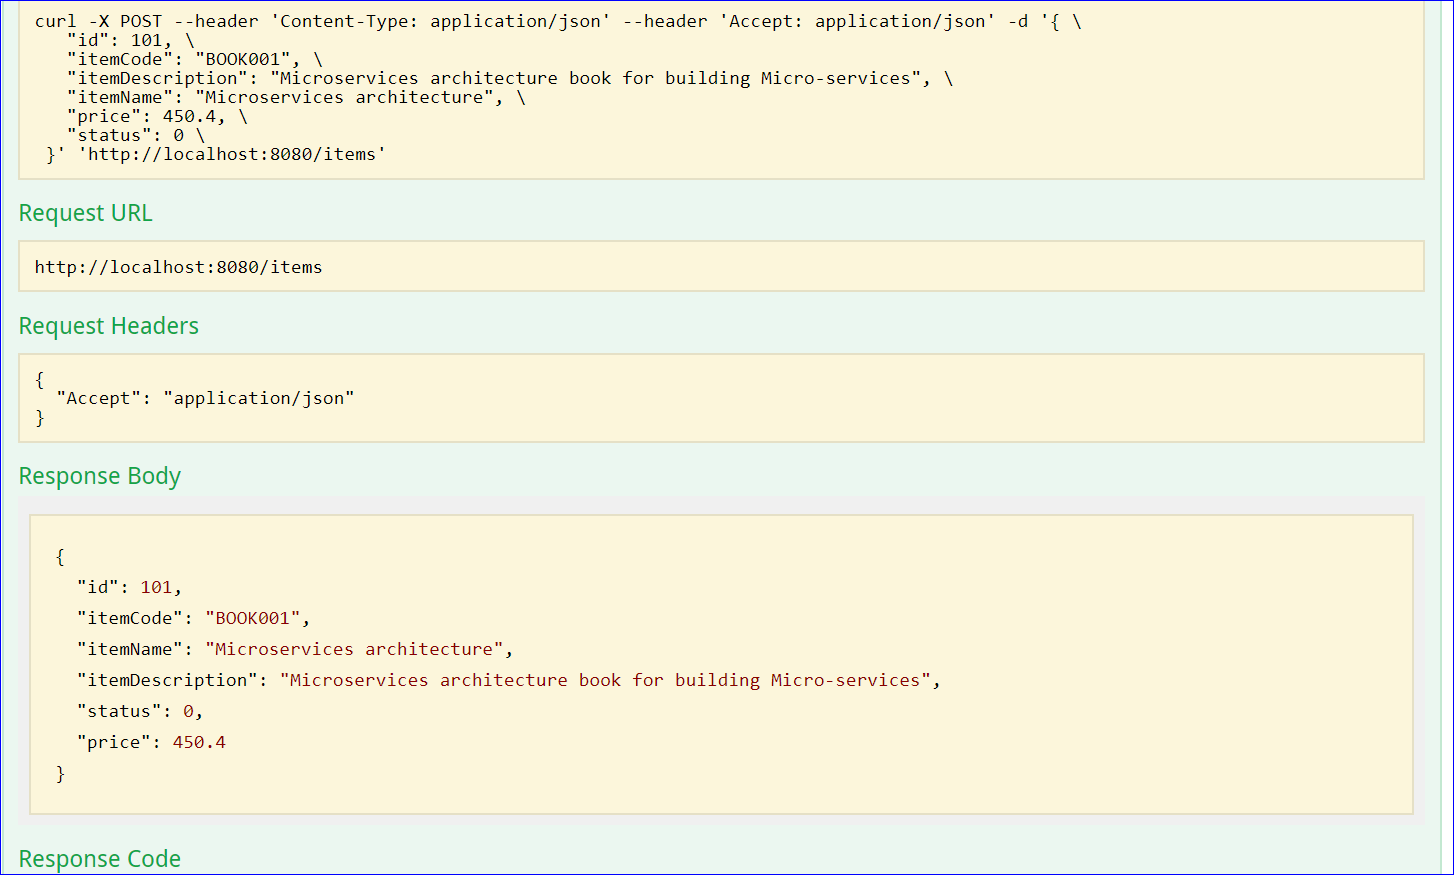
- Try Out - There will be a Try Out button. Once you click on it, a request will go to the server and perform the required operation:
Swagger Documentation for Item Model

Summary
Other than API Documentation, Swagger can also be used for defining your API Specs, and then later, you can perform API Validation as well. As it is integrated with your application, you can easily access the services.
I hope this is helpful. In the next article (Part 2), I will show you Swagger Configurations for adding security, so that only valid users can access Swagger documentation.
Opinions expressed by DZone contributors are their own.
Comments