Spring Boot RESTful Web Service Example
Does your Java app look sluggish and tired all the time? Learn how to make sure your Spring Boot application is well rested!
Join the DZone community and get the full member experience.
Join For FreePrerequisites for this project:
If you have Eclipse, download the STS plug-in from here.
If you don’t have Eclipse, download STS from here.
Download the latest JDK from here.
In this article, I am going to explain how to develop a RESTful Spring Boot project, step-by-step.
The first example I am going to explain is HTTP GET requests and the second example will be about HTTP POST requests and, in both, the example message format will be in JSON representation. You can download the project from https://github.com/prateekparallel/spring-boot-rest
Let’s start:
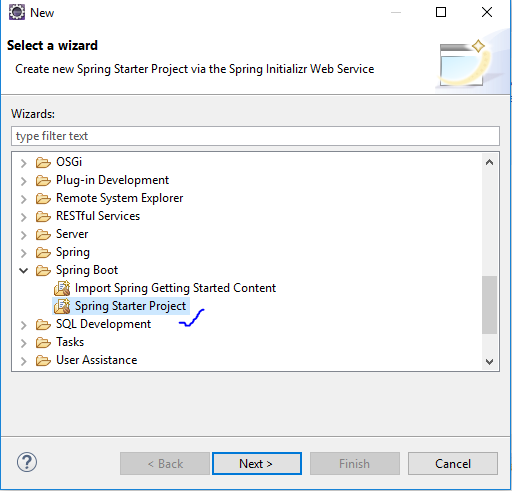
1. First, from the File menu select "New" and then "other" and from wizard expand "Spring Boot" and select ‘Spring Starter Project’ (File->New->other->wizard->Spring Starter Project)
Now select next and provide the below information and click the Finish button.

Now you can see the below file structure in your project's explorer window.
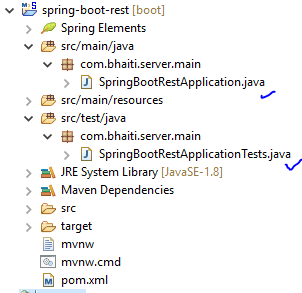
Now, look that the SpringBootRestApplication.java file which is created by the STS plug-ins.
package com.bhaiti.server.main;

import org.springframework.boot.SpringApplication;
import org.springframework.boot.autoconfigure.SpringBootApplication;

@SpringBootApplication
public class SpringBootRestApplication {

public static void main(String[] args) {
SpringApplication.run(SpringBootRestApplication.class, args);
}
}
This is a Spring Boot main class. A Spring Boot REST application loads through this class. We can also see that this class is created with the annotation @SpringBootApplication . As per the Spring documentation, the annotation @SpringBootApplication is equivalent to using @Configuration, @EnableAutoConfiguration, and @ComponentScan, and these annotations are frequently used together. Most of the time in Spring Boot development, the main class is always annotated with all three of these important annotations.
So we are going to modify the @SpringBootApplication (given below in the Java class) with a component path. Without that, the application cannot find out the controller classes. We will learn more about controller classes in a few minutes.
@SpringBootApplication(scanBasePackages = {"com.bhaiti"})

publicclass SpringBootRestApplication {
       publicstaticvoid main(String[] args) {
              SpringApplication.run(SpringBootRestApplication.class, args);
       }
}
2. To model the welcome representation, we are going to create a resource representation class here.
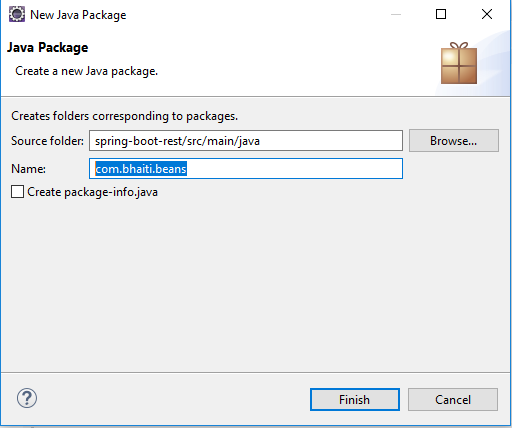
First, we will create package, com.bhaiti.beans, and add the class into that package like below:
a) Right-click on the project and select New and then package. Enter the above package name and click Finish.
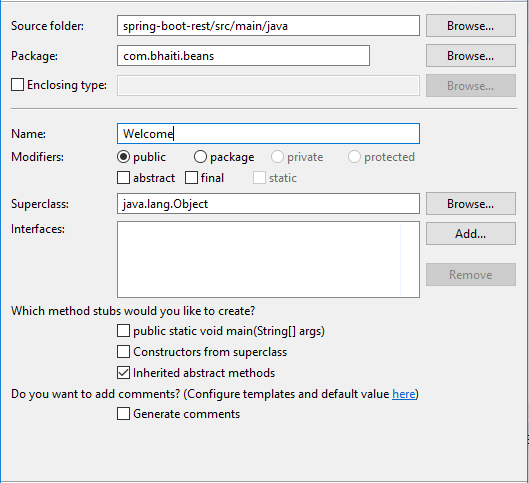
b) Now, right click on the packagecom.bhaiti.beans and select New->class and provide the class name, Welcome, like below:
In the empty class, just copy and paste the below code:
package com.bhaiti.beans;

public class Welcome {

public Welcome(String message) {
super();
this.message = message;
}

private final String message;

public String getMessage() {
return message;
}

}
So the above Welcome class is a resource representation class for a welcome message. Spring uses the Jackson JSON library to automatically marshal instances of type Welcome into JSON.
Now we will introduce a controller and that will serve Welcome. In Spring’s approach to building RESTful web services, HTTP requests are handled by a controller. Controller classes/components are easily identified by the @RestController annotation, and the below WelcomeController will handle GET requests for /welcome/user by returning a new instance of the Welcome class.
Now just follow step 2a and 2b and create the package com.bhaiti.rest.controllerand add the class WelcomeController to it and import the class Welcome.
import com.bhaiti.beans.Welcome;

import org.springframework.stereotype.Controller;
import org.springframework.web.bind.annotation.GetMapping;
import org.springframework.web.bind.annotation.RequestParam;
import org.springframework.web.bind.annotation.ResponseBody;

@Controller
public class WelcomeController {

private static final String welcomemsg = "Welcome Mr. %s!";

    @GetMapping("/welcome/user")
    @ResponseBody
    public Welcome welcomeUser(@RequestParam(name="name", required=false, defaultValue="Java Fan") String name) {
        return new Welcome(String.format(welcomemsg, name));
    }

}
The @RequestMapping annotation maps all HTTP operations by default and, in this example, it ensures that HTTP requests to /welcome/user are mapped to the Welcome() method.
Now we are done with everything for a GET RESTful call. Let’s test this application first. After the test, we will learn about POST calls as well.
To compile this project with Maven, we will add the below information into the POM file:
<dependencies>

<dependency>
<groupId>org.springframework.boot</groupId>
<artifactId>spring-boot-starter</artifactId>
</dependency>

<dependency>
    <groupId>org.springframework</groupId>
    <artifactId>spring-web</artifactId>
</dependency>

<dependency>
    <groupId>org.springframework.boot</groupId>
    <artifactId>spring-boot-starter-web</artifactId>
</dependency>

<dependency>
<groupId>org.springframework.boot</groupId>
<artifactId>spring-boot-starter-test</artifactId>
<scope>test</scope>
</dependency>

</dependencies>
And we'll also add tje below information for the property file for this project under the build section of our POM.xml file (to change the port number at the moment):
       <resources>
        <resource>
            <directory>src/main/resources</directory>
            <filtering>true</filtering>
        </resource>
        </resources>
Now create a property file, application.properties, under C:\Projects\spring-boot-rest\src\main\resources (this is my project location, in your case this folder/directory is situated under your project folder/directory. So search for ..\src\main\resources and create the above file and add the below lines to it.
server.port=8083
3. Now open the command prompt window and go to the project home directory in the command prompt. In my case, it looks like this:
cd C:\Projects\spring-boot-rest
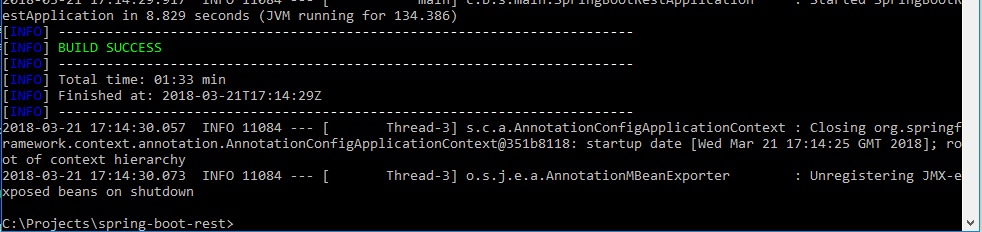
mvnw clean package
If everything goes fine, you can see the below result:
Now run the server:-
java -jar target\spring-boot-rest-0.0.1-SNAPSHOT.jar
Once the server starts successfully, open your browser and put the below URL in the address bar and press enter. Now you can see the below information:
http://localhost:8083/welcome/user?name=Abhijit (here I have put my name, you can change it to yours, this is also optional you can just try it with http://localhost:8083/welcome/user).

Up to now, we have learned how to implement a RESTful GET request. Now we will learn how to implement a POST request.
Our POST request will be for a Student Registration. For that, first, we are going to create a resource representation class, StudentRegistration, to capture a request and StudentRegistrationReply to send a response from the POST call.
1. Follow step 2b create both classes under the package com.bhaiti.beans.
package com.bhaiti.beans;

public class StudentRegistration {

String name;
int age;

public String getName() {
return name;
}
public void setName(String name) {
this.name = name;
}
public int getAge() {
return age;
}
public void setAge(int age) {
this.age = age;
}

}
package com.bhaiti.beans;

public class StudentRegistrationReply {

String name;
int age;
String registrationNumber;
String registrationStatus;

public String getName() {
return name;
}
public void setName(String name) {
this.name = name;
}
public int getAge() {
return age;
}
public void setAge(int age) {
this.age = age;
}
public String getRegistrationNumber() {
return registrationNumber;
}
public void setRegistrationNumber(String registrationNumber) {
this.registrationNumber = registrationNumber;
}
public String getRegistrationStatus() {
return registrationStatus;
}
public void setRegistrationStatus(String registrationStatus) {
this.registrationStatus = registrationStatus;
}

}
1. Now it's time to introduce the controller class to handle the POST request.
Follow step 2b and add the below controller class in the package.
package com.bhaiti.rest.controller;
import com.bhaiti.beans.*;

/**
 * @author prate
 *
 */
import org.springframework.stereotype.Controller;
import org.springframework.web.bind.annotation.RequestBody;
import org.springframework.web.bind.annotation.RequestMapping;
import org.springframework.web.bind.annotation.RequestMethod;
import org.springframework.web.bind.annotation.ResponseBody;

@Controller
public class StudentRegisterController {

@RequestMapping(method = RequestMethod.POST, value="/register/student")
@ResponseBody
StudentRegistrationReply registerStudent(@RequestBody StudentRegistration studentregd) {

StudentRegistrationReply stdregreply = new StudentRegistrationReply();
stdregreply.setName(studentregd.getName());
stdregreply.setAge(studentregd.getAge());
stdregreply.setRegistrationNumber("12345678");
stdregreply.setRegistrationStatus("Successful");
return stdregreply;

}

}
Stop the server (by using Control-C), compile the code, and run the server again.
Now to test our app, we will use SOAPUI. You can download SOAPUI from here.
In the SOAPUI tool, choose: File->New REST Project.
And copy-paste the below URL:
http://localhost:8083/register/student
Select POST and paste the data below in the Media Type Sub window
{
            "name": "Abhijit!",
            "age": 25
}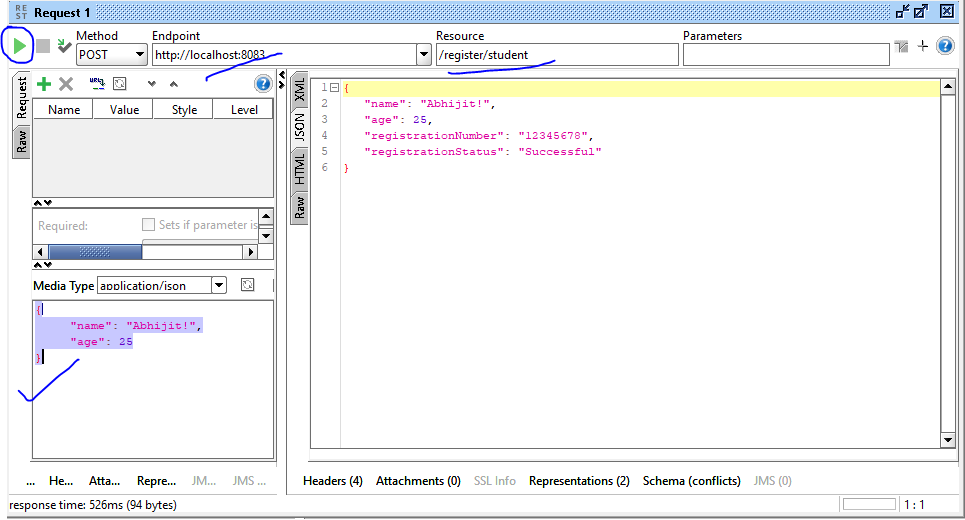
Now click the green arrow and see the response from the server.
Opinions expressed by DZone contributors are their own.
Comments