Spring Cloud and Spring Boot, Part 3: Implementing Spring Cloud Config Server
We're getting closer to wrapping up this series on Spring Cloud and Spring Boot with this Config Server.
Join the DZone community and get the full member experience.
Join For FreeIn this article, you will going to learn Spring Cloud Config Server and you can also read below 2 articles describing other spring cloud and spring boot capabilities like implementing Eureka Server and Zipkin Server.
- Implementing Eureka Server
- Implementing Zipkin Server
What is Spring Cloud Config Server?
Spring Cloud Config Server is a Spring-based centralized application which manages the application related configuration.
Spring Cloud Config is a client-server application for storing and serving the distributed configuration across multiple environments and applications.
In microservices architecture, there are a lot of small services and each service gas its own configuration, making it very difficult to manage the configuration for each service. Spring Cloud Config Server solves the problem of managing the configuration by storing it on a centralized repository and that repository can be Git or SVN. One of the advantages you can get from Spring Config Cloud Server is that whenever you are doing any changes in configuration, you don't have to restart the services.
To achieve this you need to create a Spring Cloud Config Server application and add the below dependency in POM.xml.
Implementing Spring Cloud Config Sever
Creating Spring Cloud Config Server Application
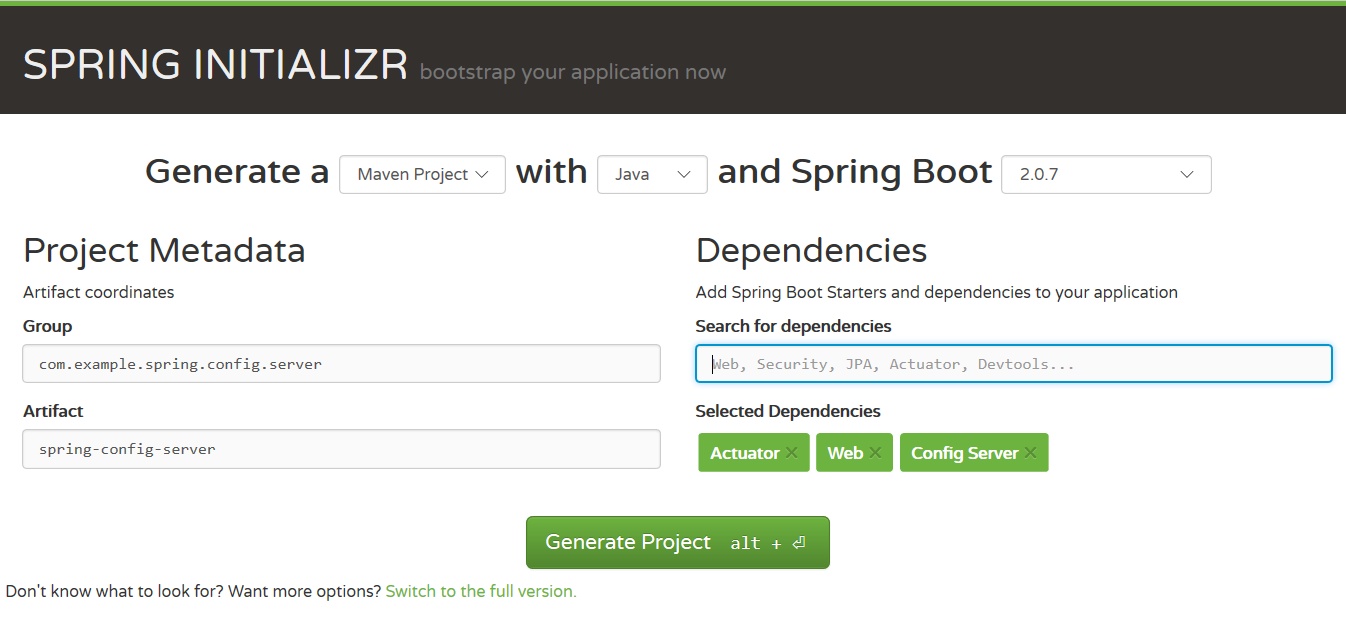
Navigate to https://start.spring.io/ and create a project template. Provide the project metadata like Group, Artifact and add the dependencies/modules below. Click Generate Project and it will download .zip Spring-based project and you can unzip the downloaded project and import in into Eclipse as Maven project.
- ConfigServer
- Web
- Actuator
POM.xml
<?xml version="1.0" encoding="UTF-8"?>
<project xmlns="http://maven.apache.org/POM/4.0.0" xmlns:xsi="http://www.w3.org/2001/XMLSchema-instance"
xsi:schemaLocation="http://maven.apache.org/POM/4.0.0 http://maven.apache.org/xsd/maven-4.0.0.xsd">
<modelVersion>4.0.0</modelVersion>
<parent>
<groupId>org.springframework.boot</groupId>
<artifactId>spring-boot-starter-parent</artifactId>
<version>2.0.7.RELEASE</version>
<relativePath/> <!-- lookup parent from repository -->
</parent>
<groupId>com.example.spring.config.server</groupId>
<artifactId>spring-config-server</artifactId>
<version>0.0.1-SNAPSHOT</version>
<name>spring-config-server</name>
<description>Demo project for Spring Boot</description>

<properties>
<java.version>1.8</java.version>
<spring-cloud.version>Finchley.SR2</spring-cloud.version>
</properties>

<dependencies>
<dependency>
<groupId>org.springframework.boot</groupId>
<artifactId>spring-boot-starter-actuator</artifactId>
</dependency>
<dependency>
<groupId>org.springframework.boot</groupId>
<artifactId>spring-boot-starter-web</artifactId>
</dependency>
<dependency>
<groupId>org.springframework.cloud</groupId>
<artifactId>spring-cloud-config-server</artifactId>
</dependency>

<dependency>
<groupId>org.springframework.boot</groupId>
<artifactId>spring-boot-starter-test</artifactId>
<scope>test</scope>
</dependency>
</dependencies>

<dependencyManagement>
<dependencies>
<dependency>
<groupId>org.springframework.cloud</groupId>
<artifactId>spring-cloud-dependencies</artifactId>
<version>${spring-cloud.version}</version>
<type>pom</type>
<scope>import</scope>
</dependency>
</dependencies>
</dependencyManagement>

<build>
<plugins>
<plugin>
<groupId>org.springframework.boot</groupId>
<artifactId>spring-boot-maven-plugin</artifactId>
</plugin>
</plugins>
</build>

</project>
Spring Boot Starter Application
Now you need to open SpringConfigServerApplication.java and add the annotation @EnableConfigServer on the top of the class as shown below.
package com.example.spring.config.server.springconfigserver;

import org.springframework.boot.SpringApplication;
import org.springframework.boot.autoconfigure.SpringBootApplication;
import org.springframework.cloud.config.server.EnableConfigServer;

@SpringBootApplication
@EnableConfigServer
public class SpringConfigServerApplication {

public static void main(String[] args) {
SpringApplication.run(SpringConfigServerApplication.class, args);
}

}
Application Properties file
You need to add the below list of properties in application.properties located at src/main/resources of your application.
spring.application.name=spring-cloud-config-server
server.port=8888
spring.cloud.config.server.git.uri=file://F:\\Spring-boot\\git-localconfig-repo
spring.cloud.config.server.git.uri determines the path of Git centralized repoistory where all your microservices config file stored.
In this case, we have a Git repository on local disk. So we gave a physical path for spring.cloud.config.server.git.uri property.
You can even mention the HTTP path if Git is accessible over http protocol.
Running Spring Cloud Config Server
Run the Spring Cloud Config Server as Java application and navigate to the url http://localhost:8888/config-client/default/master

Integrating Client Application With Spring Cloud Config Server
Create Spring Boot Client Microservice
You need to create a Spring Boot microservice which will read 2 properties maximum and minimum limit from properties file and send a response back to the consumer.
Project Name: limits-service
Spring Starter Class: LimitsServiceApplication
package com.example.config.limitsservice;

import org.springframework.boot.SpringApplication;
import org.springframework.boot.autoconfigure.SpringBootApplication;

@SpringBootApplication
public class LimitsServiceApplication {

public static void main(String[] args) {
SpringApplication.run(LimitsServiceApplication.class, args);
}

}
Rename Properties File
You need to rename application.properties file to bootstrap.properties located at path src/main/resources of your project.
Add below properties in your bootstrap.properties.
spring.application.name=limits-service
server.port=8086
spring.cloud.config.uri=http://localhost:8888
spring.profiles.active=dev
spring.cloud.config.uri determines the path of spring cloud config server.
spring.profiles.active determines the environment for which you need to read config file.
POM.xml
<?xml version="1.0" encoding="UTF-8"?>
<project xmlns="http://maven.apache.org/POM/4.0.0" xmlns:xsi="http://www.w3.org/2001/XMLSchema-instance"
xsi:schemaLocation="http://maven.apache.org/POM/4.0.0 http://maven.apache.org/xsd/maven-4.0.0.xsd">
<modelVersion>4.0.0</modelVersion>

<groupId>com.example.config</groupId>
<artifactId>limits-service</artifactId>
<version>1.0</version>
<packaging>war</packaging>

<name>limits-service</name>
<description>Demo project for Spring Boot</description>

<parent>
<groupId>org.springframework.boot</groupId>
<artifactId>spring-boot-starter-parent</artifactId>
<version>2.0.7.RELEASE</version>
<relativePath/> <!-- lookup parent from repository -->
</parent>

<properties>
<project.build.sourceEncoding>UTF-8</project.build.sourceEncoding>
<project.reporting.outputEncoding>UTF-8</project.reporting.outputEncoding>
<java.version>1.8</java.version>
<spring-cloud.version>Finchley.SR2</spring-cloud.version>
</properties>

<dependencies>
<dependency>
<groupId>org.springframework.boot</groupId>
<artifactId>spring-boot-starter-actuator</artifactId>
</dependency>
<dependency>
<groupId>org.springframework.boot</groupId>
<artifactId>spring-boot-starter-web</artifactId>
</dependency>
<dependency>
<groupId>org.springframework.cloud</groupId>
<artifactId>spring-cloud-starter-config</artifactId>
</dependency>
<dependency>
<groupId>org.springframework.boot</groupId>
<artifactId>spring-boot-starter-test</artifactId>
<scope>test</scope>
</dependency>
</dependencies>

<dependencyManagement>
<dependencies>
<dependency>
<groupId>org.springframework.cloud</groupId>
<artifactId>spring-cloud-dependencies</artifactId>
<version>${spring-cloud.version}</version>
<type>pom</type>
<scope>import</scope>
</dependency>
</dependencies>
</dependencyManagement>

<build>
<plugins>
<plugin>
<groupId>org.springframework.boot</groupId>
<artifactId>spring-boot-maven-plugin</artifactId>
</plugin>
</plugins>
</build>

<repositories>
<repository>
<id>spring-milestones</id>
<name>Spring Milestones</name>
<url>https://repo.spring.io/milestone</url>
<snapshots>
<enabled>false</enabled>
</snapshots>
</repository>
</repositories>
</project>
Creating Application Properties File
You need to create application properties file in Git repository and properties file needs to be created at same Git path that you have mentioned in Spring Cloud Config Server (i.e. F:\\Spring-boot\\git-localconfig-repo).
Properties file name should be {spring.application.name}-{environment}.properties. Below are some examples:
limits-service-dev.properties
limits-service-qa.properties
limits-service.properties

Spring cloud config server will access the properties file depending on spring.profiles.active you have set in bootstrap.properties.
In case, if you haven't defined spring.profiles.active property, it will read default properties file limits-service.properties.
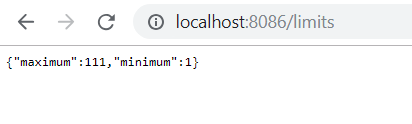
Add below 2 properties in limits-service-dev.properties
limits-service.minimum=1
limits-service.maximum=11
Adding More Classes in The Project
Add Configuration.java under package "com.example.config.limitsservice". It will contain 2 properties that you need to read from properties file.
@ConfigurationProperties Annotation for externalized configuration. Add this to a class definition or an @Bean method in a @Configuration class if you want to bind and validate some external Properties (e.g. from a .properties file).
package com.example.config.limitsservice;

import org.springframework.boot.context.properties.ConfigurationProperties;
import org.springframework.stereotype.Component;

@Component
@ConfigurationProperties("limits-service")
public class Configuration {

private int maximum;
private int minimum;


public int getMaximum() {
return maximum;
}
public void setMaximum(int maximum) {
this.maximum = maximum;
}
public int getMinimum() {
return minimum;
}
public void setMinimum(int minimum) {
this.minimum = minimum;
}


}
Add LimitConfiguration.java under package com.example.config.limitsservice.beans
package com.example.config.limitsservice.beans;

public class LimitConfiguration {

private int maximum;
private int minimum;

protected LimitConfiguration() {
super();
}

public LimitConfiguration(int maximum, int minimum) {
super();
this.maximum = maximum;
this.minimum = minimum;
}

public int getMaximum() {
return maximum;
}

public void setMaximum(int maximum) {
this.maximum = maximum;
}

public int getMinimum() {
return minimum;
}

public void setMinimum(int minimum) {
this.minimum = minimum;
}


}
Add LimitConfigurationController.java under package com.example.config.limitsservice
package com.example.config.limitsservice.beans;

public class LimitConfiguration {

private int maximum;
private int minimum;

protected LimitConfiguration() {
super();
}

public LimitConfiguration(int maximum, int minimum) {
super();
this.maximum = maximum;
this.minimum = minimum;
}

public int getMaximum() {
return maximum;
}

public void setMaximum(int maximum) {
this.maximum = maximum;
}

public int getMinimum() {
return minimum;
}

public void setMinimum(int minimum) {
this.minimum = minimum;
}


}
Running the limits-service
Before running the application, you need to make sure Spring Cloud Config Server is up and running. Run the limits-service as Java application and navigate to http://localhost:8086/limits
Enabling Auto-Refresh of Configuration
You need to add the @RefreshScope annotation in the LimitsConfigurationController as shown below.
package com.example.config.limitsservice;

import org.springframework.beans.factory.annotation.Autowired;
import org.springframework.cloud.context.config.annotation.RefreshScope;
import org.springframework.web.bind.annotation.GetMapping;

import org.springframework.web.bind.annotation.RestController;
import com.in28minutes.microservices.limitsservice.bean.LimitConfiguration;

@RestController
@RefreshScope
public class LimitsConfigurationController {

@Autowired
private Configuration configuration;

@GetMapping(value="/limits")
public LimitConfiguration retrieveLimitsFromConfiguration()
{
return new LimitConfiguration(configuration.getMaximum(),configuration.getMinimum());
}

}
@RefreshScope will expose one endpoint /refresh . It will useful whenever you do any changes in configuration in Git, you can trigger RefreshScopeRefreshedEvent using Spring Boot Actuator Refresh endpoint /actuator/refresh . You need to add below property in bootstrap.properties of limits-service to enable actuator refresh endpoint.
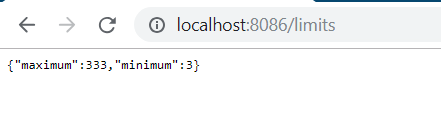
management.endpoints.web.exposure.include=refreshIn this example, you can refresh the configuration using POST http://localhost:8086/actuator/refresh. In this case, I have updated minimum value to 3 and maximum value to 333 in limits-service-dev.properties and trigger /refresh endpoint.

Now, you can trigger http://localhost:8086/limits and you will notice the new value will be reflected in the response.
You have noticed that the config server read the properties during startup but you need to trigger the /refresh endpoint for reflecting any changes in properties or you need to re-start config server.
Now, you know how to implement Spring Cloud Config Server.
Opinions expressed by DZone contributors are their own.
Comments