Spring Cloud Config (Part 1)
This series' kickoff examines how you can use Spring Cloud config to store your config in your environment, adhering to 12 Factor App design.
Join the DZone community and get the full member experience.
Join For FreeI’m a big fan of the Spring Cloud set of tools. I’ve been using them for a while both in a professional capacity (though quite limited) and a personal one. If you have not used it before, you should try it out. You’ll see how convenient it is to set up a microservices environment where your applications can follow the Twelve Factor App Manifesto.
Introduction to Spring Cloud Config
Store config in the environment.
That is the Third Factor of the Manifesto. In a Continuous Delivery world, it becomes more important to manage our apps' configurations in a way where we can de-couple changing configuration from deploying our apps, since you want to be able to react to certain events as quickly as possible. For example, changing the timeout for an HTTP call should not mean we need to deploy an application. It should be something you can do pretty quickly if you see that your environment is having some temporary issues.
Spring Cloud’s solution for following that third factor is Spring Cloud Config, which is basically a way to manage the configuration for your applications independently from the application itself.
In this post, I will go through the Spring Cloud Config technology, explaining how Spring manages configuration under the hood, how you can use that configuration in your application, and finally what does Spring Cloud Config add to the mix.
Understanding Spring’s Property Sources
In every Spring application, the runtime properties are always handled in the same way. The runtime properties are grouped by something called a Property Source, which is basically a group of runtime properties grouped by the source of those properties, so for example, a .properties file loaded into your application would be grouped in one PropertySource object.
When your application runs, Spring creates its Environment with a prioritized list of Property Sources, which it will then use to look up properties every time you want to read them by using any of the ways Spring provides to look up configuration (see next section)
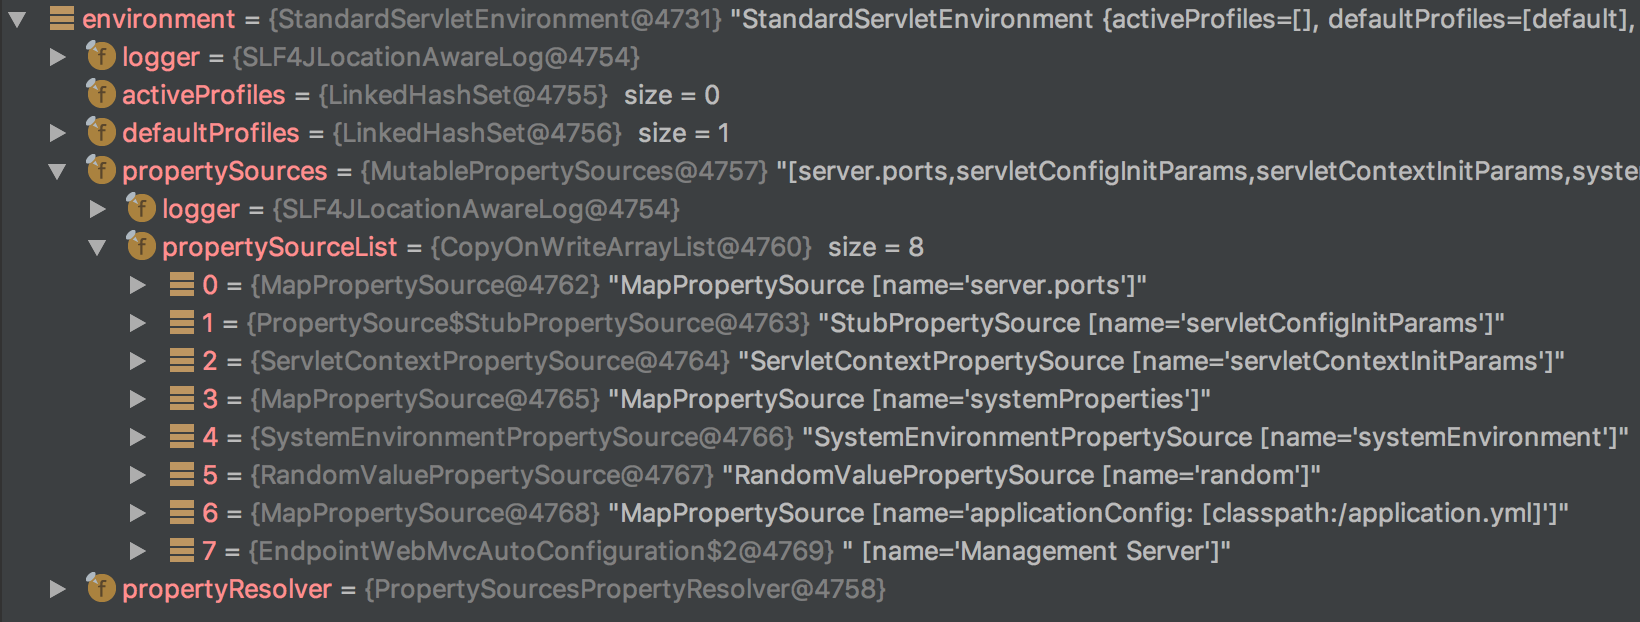
In order to get a more visual representation, you can see a screenshot of what the Environment object looks like below when a very simple Spring Boot application starts up:

As you can see, the environment contains a list of property sources. Whenever you try using a property in your application, Spring will start querying each Property Source in sequential order for the value of the property. If it finds a value in that Property Source, it returns it. Otherwise, it goes to the next Property Source. It will keep doing this until it finds a value in one of the Property Sources, or until there are no Property Sources left.
For the example above, if you have a property named sample.firstProperty in the application.yml Property Source (number 7 in the list), Spring will first go through the previous six Property Sources. Since none of them contains that value, it will end up reaching the application.yml. However, if you add a System Property named sample.firstProperty with some value, then the application will use that value, since the System Properties source is the fourth element in the list.
Now that we have summarized how Spring’s configuration is structured, let’s take a quick look at how you can use that configuration from your code.
Using Spring’s Property Sources
There are three main ways to use the configuration in your code:
Annotating Fields With @Value
@Component
@Data
public class AnnotatedProperties {
    @Value("${sample.firstProperty:}")
    private String firstProperty;
    @Value("${sample.secondProperty:}")
    private String secondProperty;
}
When the application starts, the bean creation mechanism provided by Spring will inspect this class and will inject into the annotated fields the value of the provided expression. This expression does not have to be a property name, it could also be a Spring expression. For example, you could convert a comma separated string into a list with:@Value("#{'${my.list.of.strings}'.split(',')}").
Be careful about having these kinds of expressions, as they are not easy to test or read.
Using @ConfigurationProperties
If you are using Spring Boot, you can use type safe configuration by using the @ConfigurationProperties annotation:
@Component
@ConfigurationProperties(prefix = "sample")
@Data
public class ConfigProperties {
    private String firstProperty;
    private String secondProperty;
}
In this case, Spring will look in your property sources for all properties that start with sample. and will match the child properties to the name of the attributes in the @ConfigurationProperties class.
This is an improvement from the previous example, since Spring Boot manages a lot of type conversions. It also provides a relaxed data binding, which allows you to declare the properties in various different ways, like sample.firstProperty as well as sample.first-property. You can even add JSR-303 annotations like @NotNull to your fields and Spring will run the validation for you.
Another advantage of this approach is that it encourages you to structure your properties hierarchically, making them much more organized.
Querying the Environment
@Component
@RequiredArgsConstructor
public class EnvironmentProperties {
   private final Environment environment;

   public String getFirstProperty() {
      return environment.getProperty("sample.firstProperty");
   }

   public String getSecondProperty() {
      return environment.getProperty("sample.secondProperty");
   }
}
This last option is more of a hand-crafted one. You can just wire an instance of the Environment object into your component and query it for the specific properties you need.
Spring Cloud Config Additions
So far, we’ve taken a look at how Spring manages its configuration through its Property Sources as well as how we can actually use that configuration from our components. Since this post is about Spring Cloud Config, let’s see what it brings to the picture.
Bootstrap Property Sources
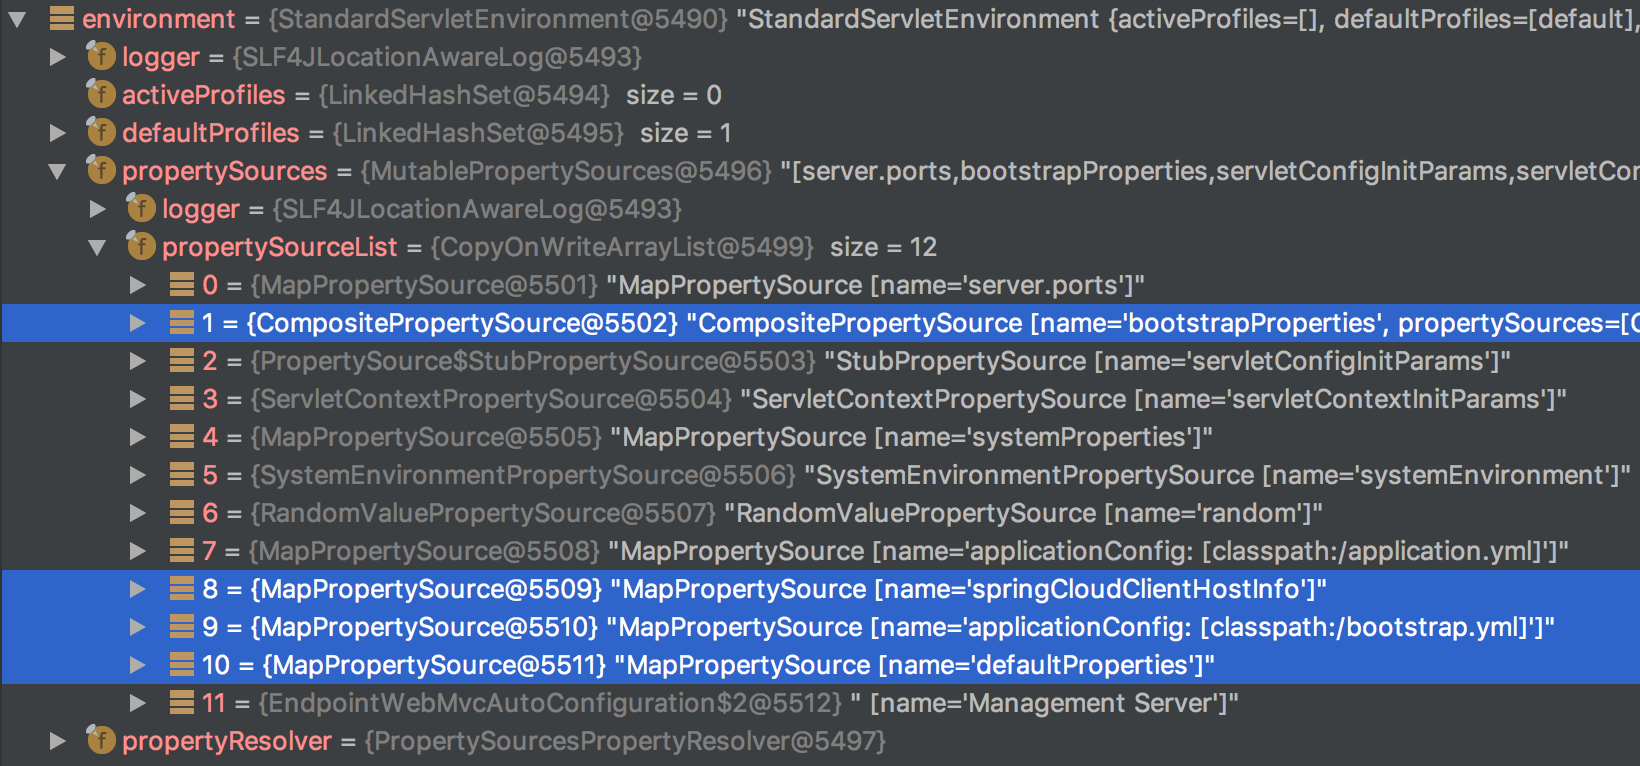
When using one of the Spring Cloud Config libraries, your runtime configuration setup will change slightly. If we start our application with one of these libraries available in the classpath, such as Spring Cloud Config Zookeeper, and you inspect the application’s property sources like we did earlier with the plain application, you’ll notice there are some differences. As you can see in the image below, there are a few more Property Sources (highlighted):

These are some Property Sources added by Spring Cloud. The most important one is the second element in the list with the name bootstrapProperties. Spring Cloud introduced the concept of a PropertySourceLocator, which is used to locate remote Property Sources. These remote Property Sources are resolved right when your application starts up before doing anything else, and they are then composed into one CompositePropertySource, which is inserted at the top of your Environment’s prioritized list with the name bootstrapProperties. This basically means that the remote configuration overrides any configuration you have embedded in your application or even the System Properties.
Dynamic Configuration Backend Integrations
We just described how a PropertySourceLocator object is responsible for loading remote properties. One of the main features of Spring Cloud Config is that it provides a few different options for loading remote properties out of the box like Git, Zookeeper, or Consul.
It’s important to notice that when you code your application, you can choose how you inject the configuration into your components by using one of the methods we discussed previously, but as you can see, none of those methods are defining where those properties are actually coming from. The code is totally agnostic about where the properties are defined. This makes changing the underlying technology used to load the remote configuration very easy, as we’ll see in subsequent posts.
Dynamic Configuration Refresh
We mentioned previously that your remote Property Sources are loaded right when your application starts up. Since the whole purpose of Spring Cloud Config is to be able to manage the configuration without having to re-deploy your application, it also provides a way to refresh the configuration.
The RefreshScope
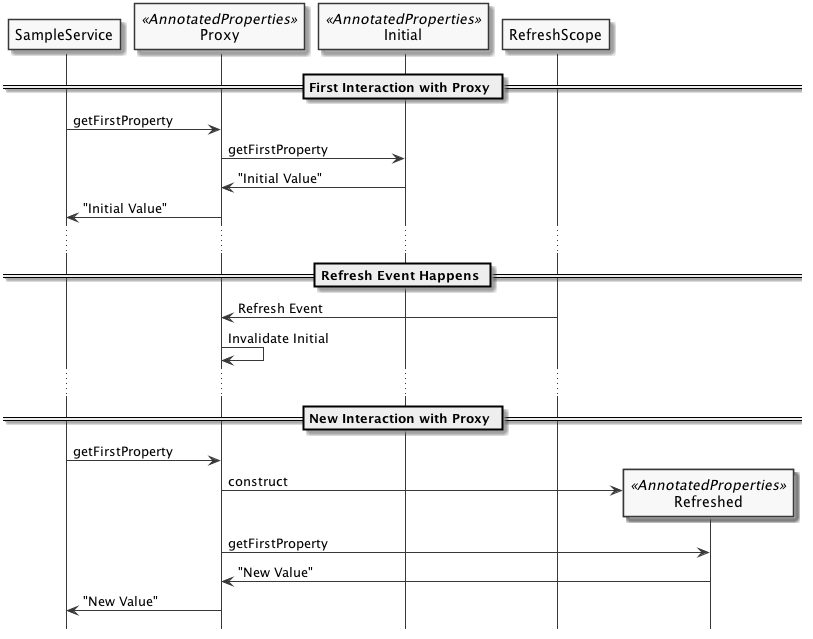
Spring Cloud provides a new scope for defining Beans called RefreshScope. If you declare a @Bean having this scope, Spring Cloud will wrap that bean in a proxy class, which is what other components will actually get injected with. This proxy will just be proxying every method of the component to the real implementation.
Whenever there is a refresh event in the application, all the RefreshScope proxy beans will mark their underlying bean (the real implementation) as dirty. This means that whenever any of the methods of the proxy are called, it will first re-create the underlying bean, and then it will forward the method call. This re-creation of the bean would mean that it reads the configuration again. It’s important to make sure that @RefreshScope beans are lightweight, since refresh events will trigger re-construction of these beans.
Let’s look at it in a bit more detail. Consider the following Spring components:
@RefreshScope
@Component
@Data
public class AnnotatedProperties {
    @Value("${sample.firstProperty:}")
    private String firstProperty;
    @Value("${sample.secondProperty:}")
    private String secondProperty;
}
@Service
@RequiredArgsConstructor
public class SampleService {
private final AnnotatedProperties annotatedProperties;
public String someOperation() {
return annotatedProperties.getFirstProperty();
}
}The following diagram describes what this interaction looks like when a refresh event happens:

Triggering a Refresh Event
After looking at what happens when a Refresh Event happens in your Spring Cloud application, let’s look at the different ways you can trigger this event.
The /refresh Actuator Endpoint
If you don’t know what Spring Boot’s Actuator Endpoints are, you should take a look. It’s one of the best features of Spring Boot. These are endpoints that help the operation of your application, like checking the health of your application, seeing what Auto-Configuration was triggered, etc.
One of these endpoints can be used to trigger a refresh of your context by sending a POST /refresh HTTP request.
Using Spring Cloud Bus
If you are using Spring Cloud Bus to communicate between your applications, you can force your applications to be refreshed by sending a RefreshRemoteApplicationEvent. If your applications are integrated with Spring Cloud Bus, they will have a listener for that event, which will trigger a refresh when receiving that message. This is the approach used by the spring-cloud-config-monitor library.
Bean Behavior When Triggering a Refresh
I think it’s important to understand how beans behave when triggering a refresh for each of the different ways to use configuration described earlier:
- A configuration class annotated with
@Valuewill not be refreshed automatically when there is a refresh event. For this reason, if you use this approach, you’ll need to add@RefreshScopeto your component in order for it to get the refreshed configuration. - A
@ConfigurationPropertiesclass will always be updated automatically. There is no need to use@RefreshScopefor these. - If you query the environment, it will always get the latest configuration, so this approach doesn’t need anything either.
Conclusion
We have taken a look at the concepts behind Spring Cloud Config. We have seen how you can use Spring Cloud Config to move the configuration out of your application, and we’ve also had a brief overview of how we can trigger our configuration to be refreshed when we know it has changed.
So far, we haven’t really talked much about concrete implementations, and that’s exactly what we’ll be doing in subsequent posts. Look out for the next post on using Git as a configuration backend.
Published at DZone with permission of Enrique Recarte. See the original article here.
Opinions expressed by DZone contributors are their own.

Comments