Spring vs Micronaut vs Quarkus: Which One Is the Best Framework for You?
In this article, take a look at Spring vs Micronaut vs Quarkus and see which one is the best framework for you.
Join the DZone community and get the full member experience.
Join For FreeWith the introduction of Spring, developing services in Java became easier and more productive. More specifically, REST APIs have improved, and the years since Spring's introduction have only added to the new frameworks that have emerged in the community.
Micronaut is one of the most known frameworks—developed by OCI, the company also responsible for Grails. Their goal is to assist developers to create serverless applications and microservices.
In addition to Micronaut, we have Quarkus, a recently popular framework that was developed by RedHat. Quarkus promises to deliver fast startup and to use less memory, which are two of the most common problems when developing REST services in Java.
When looking at these different choices, it is important to know how easy they actually make the creation of new services.
In this article, I will walk you through the steps of creating a secure REST application using Spring, Micronaut, and Quarkus. You will be able to compare and contrast the abilities of all three frameworks to determine which one is the best fit for you.
If you’d like, you can watch this tutorial as a screencast.
Prerequisites for Your Java REST API
This tutorial uses Maven 3+. Make sure it is installed and available to use before continuing. You can certainly also use Gradle, but YMMV.
You’re going to build apps that authenticate requests using OAuth 2.0, secured by an Okta application. Don’t have an Okta account? Don’t worry, it takes less than a minute to create a new one. Not only that, but Okta supports standards like JWT, OAuth 2.0, and OIDC. We provide support for well-known frameworks like Java EE, Spring Boot, and Spring Security. Heck, we even have a Maven plugin that automates everything for you.
There’s no need to reinvent the wheel!
Create an Okta Account for User Management
Open your terminal, and execute the following command:
xxxxxxxxxx
mvn com.okta:okta-maven-plugin:register
You will be asked to input the following information:
- First Name
- Last Name
- Company
Once you’ve answered the questions, you’ll receive an email to activate your brand new account. After activating your account, run the following command:
xxxxxxxxxx
mvn com.okta:okta-maven-plugin:spring-boot
This command creates an application for you with auth code flow and Spring Security’s redirect URI for Okta.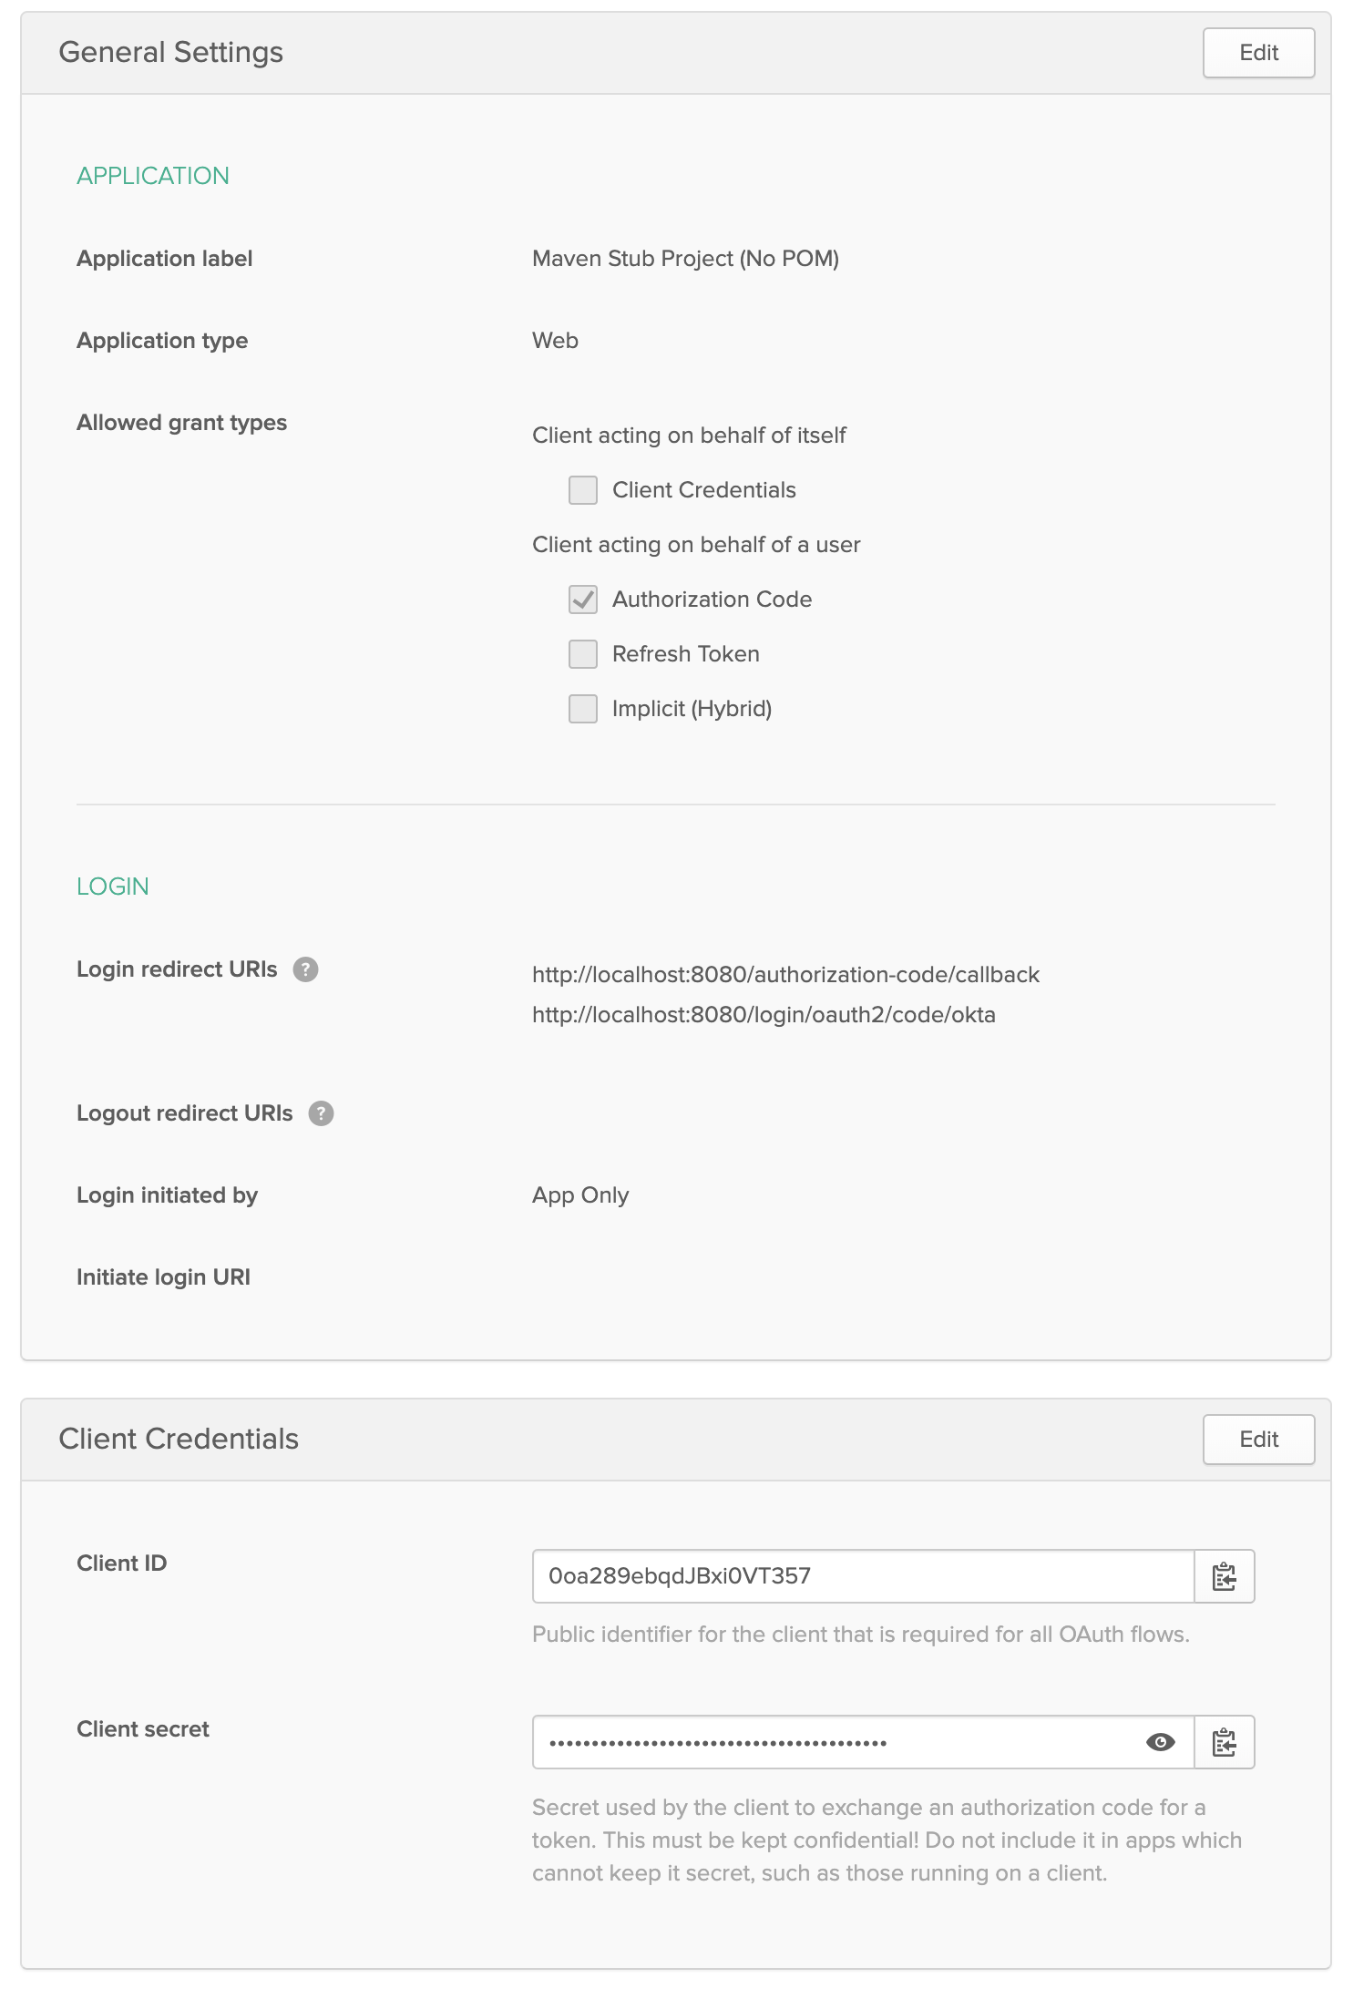
To remember it better, you can create the same app manually:
- Go to the Okta’s developer homepage and log in to your account.
- Click on Applications > Add Application > Web > Next.
You’ll see the following screen:
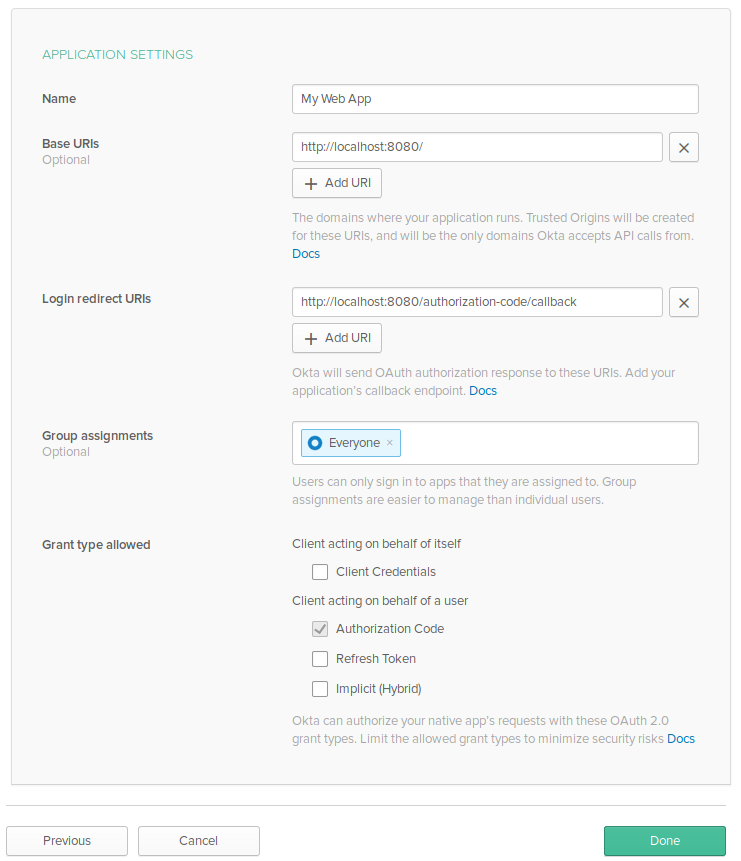
Before you continue, make the following changes in the application:
- Login redirect URIs:
http://localhost:8080/login/oauth2/code/oktahttps://oidcdebugger.com/debug
- Grant type allowed
- Authorization Code
- Implicit (Hybrid)
The implicit grant type (with ID and Access Token allowed checked) is necessary to retrieve an access token in your browser.
The fields not mentioned above can keep their default values.
After you finish it, click Done. Your app is ready!
The next step is to learn how to generate a valid token using it.
Generate Tokens Using OpenID Connect Debugger
Okta allows you to manage your users in the cloud using its APIs. It also allows you to secure your applications using OAuth 2.0 and OpenID Connect (a.k.a., OIDC). OAuth 2.0 provides a mechanism for delegated authorization which means you don’t have to store user credentials in your application. Instead, you can delegate that to an OAuth 2.0 provider (Okta, in this case). OIDC provides an identity layer on top of OAuth 2.0 and that’s why companies like Okta are called “identity providers”, or IdPs.
You’ve registered your app with Okta and can now generate a token to gain access to it. One of the login redirect URIs you registered is for the OpenID Connect website.
Your requests will be validated using a token. To generate this token, you will use OpenID Connect Debugger. This website will provide you an easy way to generate credentials for the users on your Okta application.
Go to the https://oidcdebugger.com and fill in the following information:
- Authorize URI:
https://{yourOktaDomain}/oauth2/default/v1/authorize - Redirect URI:
https://oidcdebugger.com/debug - Client ID:
{yourOktaClientId} - Scope:
openid email profile - State:
dev - Nonce: (keep the default value)
- Response type:
token
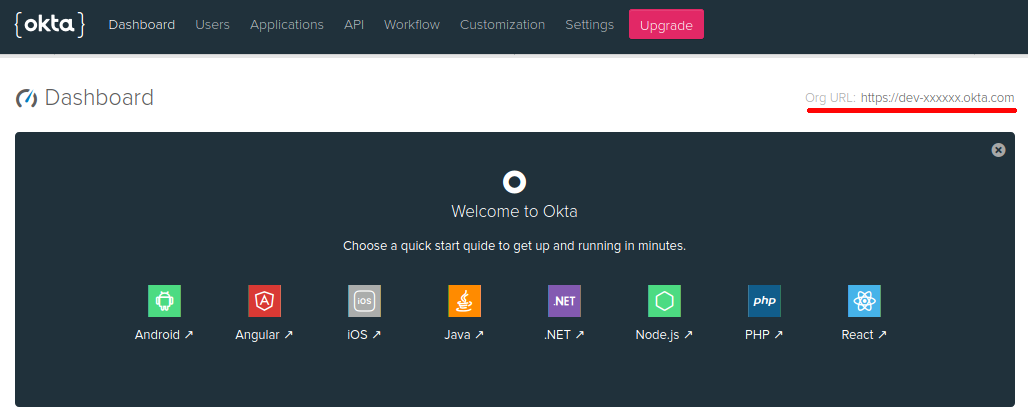
You can find the value for {yourOktaDomain} in the right upper corner of your account’s homepage:
To find your Okta Client ID follow the steps below:
- Go to Applications
- Select My Web App
- Click General
The Client ID will be available in the Client Credentials section: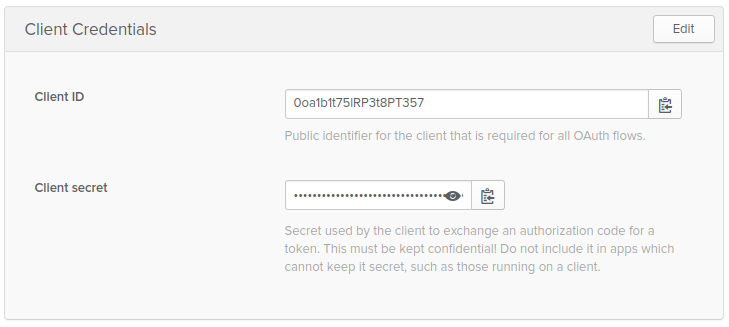
After you complete all the fields, click Send Request. You’ll be redirected to your Okta login page.
Once you have successfully authenticated, you’ll be redirected to OIDC Debugger again, where you can see the generated token: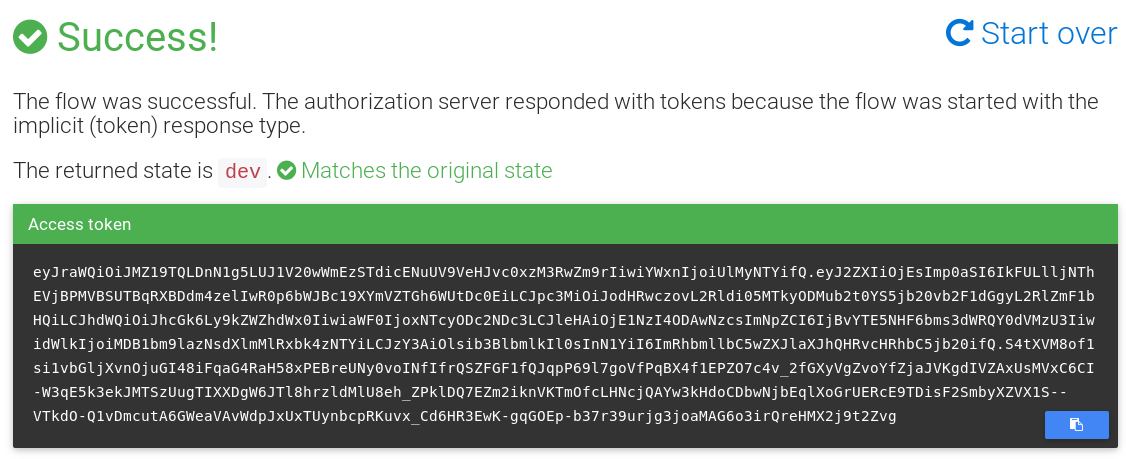
You’ll use this token to securely access the services you’re going to build.
Now that you have an Okta account and you know how to generate tokens using your Okta application, let’s start comparing the frameworks!
Build a Java REST API With Micronaut
The first step to developing your Micronaut service is to download SDKMAN!. SDKMAN! is a tool for managing parallel versions of multiple SDKs, which you’ll use to install the Micronaut client.
You can download SDKMAN! by running the following command:
xxxxxxxxxx
curl -s https://get.sdkman.io | bash
Now, you can install Micronaut itself. Just run the following command in the terminal:
xxxxxxxxxx
sdk install micronaut
After the command finishes executing, you’ll have the latest Micronaut version available on your computer.
You’re ready to start developing the application!
Develop Your Java Service
Go to the directory you want to create your application in and execute the following command:
xxxxxxxxxx
mn create-app com.okta.rest.app --build maven
This command will create a project with the basic structure of a Micronaut project. Micronaut uses Gradle by default, but since you’re using --build maven, it will use Maven instead.
The next step is to add the security libraries inside the project. Edit the pom.xml file and add the following dependencies:
<dependency>
<groupId>io.micronaut</groupId>
<artifactId>micronaut-security</artifactId>
</dependency>
<dependency>
<groupId>io.micronaut</groupId>
<artifactId>micronaut-security-jwt</artifactId>
</dependency>
These dependencies will enable security – specifically OAuth 2.0 with JWT – inside your project. Now that you have all the dependencies in place, you can start creating your endpoint.
Create the following class in src/main/java/com/okta/rest/controller:
xxxxxxxxxx
package com.okta.rest.controller;
import io.micronaut.http.MediaType;
import io.micronaut.http.annotation.Controller;
import io.micronaut.http.annotation.Get;
import io.micronaut.http.annotation.Produces;
import io.micronaut.security.annotation.Secured;
import io.micronaut.security.rules.SecurityRule;
import java.security.Principal;
("/hello")
public class HelloController {
(SecurityRule.IS_AUTHENTICATED)
(MediaType.TEXT_PLAIN)
public String hello(Principal principal) {
return "Hello, " + principal.getName() + "!";
}
}
The @Controller annotation indicates to Micronaut that this component will receive requests in the /hello path.
The class has only one method, named hello(). The @Get annotation shows that the method will receive HTTP GET requests. You need @Produces because Micronaut’s default return type is a JSON object. Since you’re returning simple text, you need to explicitly define this information in the method.
The last annotation is @Secured. It simply tells Micronaut that this method is only accessible to authenticated users.
You now have a controller that is secured, but you haven’t defined the security configuration yet. Let’s configure Micronaut to connect to your Okta application.
Rename src/main/resources/application.yml to application.properties and add the following security configuration:
xxxxxxxxxx
micronaut.security.enabled=true
micronaut.security.token.jwt.enabled=true
micronaut.security.token.jwt.signatures.jwks.okta.url=https://{yourOktaDomain}/oauth2/default/v1/keys
Replace {yourOktaDomain} with the value from your Okta account.
The configuration above enables security using OAuth 2.0. You declare that your OAuth 2.0 client comes from Okta, by specifying the issuer from your Okta organization.
You’re also enabling the use of JSON web tokens, or JWTs. Since you want to read the information from Okta, you must declare where you can find your JWKS (JSON Web Key Set) to validate JWT signatures.
It’s time to test your service! Start your application by executing the following command:
xxxxxxxxxx
./mvnw mn:run
With your app running, execute the following command:
xxxxxxxxxx
curl -X GET -I http://localhost:8080/hello
The command above will produce a result similar to this one:
xxxxxxxxxx
HTTP/1.1 401 Unauthorized
Date: Tue, 8 Jan 2019 15:47:36 GMT
transfer-encoding: chunked
connection: close
As you can see, the request didn’t go through. To make it work, you need to pass in the OAuth 2.0 access token retrieved by the OIDC Debugger. Assign the access token to a TOKEN variable in your shell.
xxxxxxxxxx
TOKEN=eyJraWQiOiJxOE1QMjFNNHZCVmxOSkxGbFFWNlN...
Execute the command below:
xxxxxxxxxx
curl -H "Authorization: Bearer $TOKEN" http://localhost:8080/hello
Now it works as expected! This time you’re receiving the greeting message as a response:
xxxxxxxxxx
Hello, daniel.pereira.com!
You can see that Micronaut requires very little code to create a secure REST API. If you counted the lines of code, you’d find that ~24% is dependencies in XML (8 lines), the Java code is only 22 lines of code, and the security configuration takes 3 lines. Micronaut’s built-in OAuth 2.0 support makes it easy to integrate with Okta and they even have a Guide for Okta in their documentation.
Great! Now let’s see how you create the same app using Quarkus.
Build a Java REST API With Quarkus
To develop your application using Quarkus you only need Maven installed, there are no other dependencies required.
Let’s start creating your app! Go to the directory you want to create it in and execute the following command:
xxxxxxxxxx
mvn io.quarkus:quarkus-maven-plugin:1.8.1.Final:create \
-DprojectGroupId=com.okta.rest \
-DprojectArtifactId=quarkus \
-DclassName="com.okta.rest.quarkus.HelloResource" \
-Dpath="/hello" \
-Dextensions="jwt"
The command above creates a project using the Quarkus Maven plugin. It will create a resource named HelloResource, which is going to receive requests on the /hello path. You’re also adding the JWT extension from Quarkus on the project.
Once you create the project, edit src/java/com/okta/rest/quarkus/HelloResource.java and add user information to the hello() method:
xxxxxxxxxx
package com.okta.rest.quarkus;
import io.quarkus.security.Authenticated;
import javax.ws.rs.GET;
import javax.ws.rs.Path;
import javax.ws.rs.Produces;
import javax.ws.rs.core.Context;
import javax.ws.rs.core.MediaType;
import javax.ws.rs.core.SecurityContext;
import java.security.Principal;
("/hello")
public class HelloResource {
("/")
(MediaType.TEXT_PLAIN)
public String hello( SecurityContext context) {
Principal userPrincipal = context.getUserPrincipal();
return "Hello, " + userPrincipal.getName() + "!";
}
}
The class above will behave the same way as the one you created in Micronaut. It reads the user’s information based on the token that was generated in the request and returns a greeting message to the user that is found.
You still haven’t configured Quarkus with your issuer and keys from Okta, so let’s do that.
Edit src/main/resources/application.properties and add the following code:
xxxxxxxxxx
mp.jwt.verify.publickey.location=https://{yourOktaDomain}/oauth2/default/v1/keys
mp.jwt.verify.issuer=https://{yourOktaDomain}/oauth2/default
Done! The Quarkus version of your application is ready to be tested. Go to your project folder and execute the following command:
xxxxxxxxxx
./mvnw compile quarkus:dev
The command above will start your application.
The first step is to make sure you receive a 401 - Unauthorized when you don’t use the correct credentials.
Execute the following command in the terminal:
xxxxxxxxxx
curl -X GET -I http://localhost:8080/hello
As expected, the result is an HTTP 401 response:
xxxxxxxxxx
HTTP/1.1 401 Unauthorized
www-authenticate: Bearer {token}
Content-Length: 0
If you execute this same request, including the token from the OIDC Debugger, it should return the greeting message.
Execute the following command:
xxxxxxxxxx
curl -H "Authorization: Bearer $TOKEN" http://localhost:8080/hello
It worked like a charm! In my case, the result was:
xxxxxxxxxx
Hello, daniel.pereira.com!
Quarkus requires even fewer lines of code than Micronaut! It generates an app with dependencies included, has 25 lines of Java code, and only 2 lines of configuration. Yes, lines of code is a silly comparison, but it also shows how these frameworks require very little code to develop secure apps.
Two down, one to go! Now that you were able to implement the app on Micronaut and Quarkus, let’s finish by creating the same app using Spring Boot.
Build a Java REST API With Spring Boot
Spring Boot doesn’t have any prerequisites to start creating your app, so let’s start by creating the project!
Open your terminal and execute the following command:
xxxxxxxxxx
curl https://start.spring.io/starter.zip -d language=java \
-d bootVersion=2.3.4.RELEASE \
-d dependencies=web,okta \
-d packageName=com.okta.rest \
-d name=spring-boot \
-d type=maven-project \
-o spring-boot.zip
The command above will create a spring-boot.zip file with a Spring Boot application that uses Maven. You can extract the file into a spring-boot directory using the command below.
xxxxxxxxxx
unzip spring-boot.zip -d spring-boot
Now, you’ll implement the controller that will receive the requests.
Create a com.okta.rest.controller package and a HelloController class in it:
xxxxxxxxxx
package com.okta.rest.controller;
import org.springframework.security.core.annotation.AuthenticationPrincipal;
import org.springframework.web.bind.annotation.GetMapping;
import org.springframework.web.bind.annotation.RestController;
import java.security.Principal;
public class HelloController {
("/hello")
public String hello( Principal principal) {
return "Hello, " + principal.getName() + "!";
}
}
The configuration here is very similar to the other frameworks. You annotate the class with @RestController to let Spring know that you’ll receive requests on the class. @GetMapping will receive HTTP GET requests on the /hello path. To retrieve the authenticated user you use the @AuthenticationPrincipal annotation.
Different from the other frameworks, you don’t need to specify that this endpoint is authenticated since Spring already controls this information from its configurations.
The last step is to add the issuer information, so Spring Security’s OIDC support can auto-discover the endpoints it needs to communicate with..
Edit src/main/resources/applications.properties and add the following configuration:
xxxxxxxxxx
okta.oauth2.issuer=https://{yourOktaDomain}/oauth2/default
Let’s test it! Start your Spring Boot app using Maven.
xxxxxxxxxx
./mvnw spring-boot:run
Then, open a terminal and execute the command below:
xxxxxxxxxx
curl -X GET -I http://localhost:8080/hello
The response is an HTTP 401 error, since you didn’t include the token:
xxxxxxxxxx
HTTP/1.1 401
Set-Cookie: JSESSIONID=316DCFD55C302A8D69EFD865411DFA77; Path=/; HttpOnly
WWW-Authenticate: Bearer
X-Content-Type-Options: nosniff
X-XSS-Protection: 1; mode=block
Cache-Control: no-cache, no-store, max-age=0, must-revalidate
Pragma: no-cache
Expires: 0
X-Frame-Options: DENY
Content-Length: 0
Date: Thu, 09 Jan 2020 15:46:34 GMT
Test it again, now passing the token:
xxxxxxxxxx
curl -H "Authorization: Bearer $TOKEN" http://localhost:8080/hello
It worked! As with the other services, the result of this command is the following:
xxxxxxxxxx
Hello, daniel.pereira.com!
Spring Boot clocks in at the least amount of code required: 17 lines of Java and only 1 line of configuration! Spring has always been excellent at making developers’ lives easier, so this comes as no surprise.
That’s it! You implemented a basic Java REST API in all three frameworks!
Final Thoughts on REST APIs With Java: Micronaut, Quarkus, and Spring Boot
When it comes to developing your REST API, all three frameworks did the job well. With only a bit of code and some configuration, you were able to develop a secure application using Okta and OAuth 2.0.
Spring has been around for many years, it’s widely popular, and has many features around its ecosystem. Personally, I still believe it is the best option available when programming in Java.
Micronaut and Quarkus are growing in popularity and gaining momentum inside the Java community. If you’re facing performance issues, or maybe if you’re aching for a change, you might give one of them a try and see how it goes.
Performance is the most often highlighted comparison point between these three frameworks. If you’re looking for fast startup in a serverless environment, or the ability to create native images with GraalVM, Micronaut and Quarkus will likely work well for you. Just for fun, the startup times for each of these apps are as follows (based on the average from three attempts):
- Micronaut: 474ms
- Quarkus: 1132ms
- Spring Boot: 1014ms
I got these numbers from running each framework’s Maven goals for development.
- Micronaut:
./mvnw mn:run - Quarkus:
./mvnw compile quarkus:dev - Spring Boot:
./mvnw spring-boot:run
These commands aren’t optimized for speed, so I packaged each application with ./mvnw package and started them with java -jar.
- Micronaut: 596ms
- Quarkus: 658ms
- Spring Boot: 1878ms
NOTE: These numbers were calculated on a 2019 MacBook Pro with a 2.4 GHz 8-Core Intel Core i9 CPU and 64 GB of RAM. OpenJDK 15 was used with no JAVA_OPTS setting.
If you’re looking for even faster startup times, you can use GraalVM. Rather than running timing tests myself, I looked at each project’s documentation.
- Micronaut: 12ms according to Creating your first Micronaut Graal application.
- Quarkus: 14ms according to Quarkus and GraalVM: Booting Hibernate at Supersonic Speed, Subatomic Size on InfoQ. The Quarkus docs don’t list a startup time.
- Spring Boot: 44ms according to Spring Graal Native 0.6.0 released.
In the end, you’ll be able to productively develop a secure application, regardless of the choice you make.
Want to take a look at the source code? You can find it on GitHub at okta-java-rest-api-comparison-example.
Do you want to learn more about Java, REST APIs, and secure applications? Here are some other posts from our blog that you might find useful:
- Watch GraalVM Turn Your Java Into Binaries
- OAuth 2.0 Java Guide: Secure Your App in 5 Minutes
- Java Microservices with Spring Boot and Spring Cloud
- How to Develop a Quarkus App with Java and OIDC Authentication
- Simple Authentication with Spring Security
For more posts like this one, follow @oktadev on Twitter. We also regularly publish screencasts to our YouTube channel!
- Sep 23, 2020: Upgraded to Micronaut 2.0.2, Quarkus 1.8.1, and Spring Boot 2.3.4. See the code changes in the example app on GitHub. Changes to this post can be viewed in oktadeveloper/okta-blog#423.
- May 21, 2020: Added startup times for
java -jarand running with GraalVM. Changes to this article can be viewed in oktadeveloper/okta-blog#304. - May 20, 2020: Upgraded to Micronaut 1.3.5, Quarkus 1.4.2, and Spring Boot 2.3.0. See the code changes in the example app on GitHub. Changes to this article can be viewed in oktadeveloper/okta-blog#301.
- Jan 30, 2020: Updated to optimize Micronaut based on feedback from the Micronaut team. Also re-calculated startup times based on an average of three attempts. See the code changes in the example app on GitHub. Changes to this article can be viewed in oktadeveloper/okta-blog#176.
Published at DZone with permission of Daniel Pereira. See the original article here.
Opinions expressed by DZone contributors are their own.
Comments