How to Develop Microservices With Spring Cloud and Netflix Discovery
Join the DZone community and get the full member experience.
Join For FreeToday I am going to provide you an example of a small microservices based application, where I am going to implement a Eureka discovery server to register all the microservices application in it, so that each of these services can be accessible from all the microservices applications registered with Discovery Server.
For this example, we are going to create total four microservices applications/services.
- discovery-service – A eureka Discovery server.
- library-service ( a rest service, a discovery client as well).
- book-service (a rest service, a discovery client as well).
- read-service – A rest service which will consume both book-service and library-library service. This is also a discovery client which will register itself in discovery server.
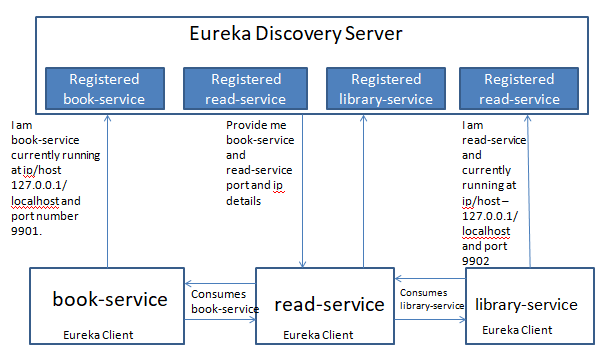
Here, the role of Discovery Server is, to register all the client applications in it so that their information can be globally available to all the registered client applications. So this Discovery Server will allow microservices to consume other microservices without knowing their exact location i.e. their host id and port number. Even if you decide to move an application/service to a different server, no application previously consuming your service will be impacted.
Because from discovery server they will know the new location (new host id and port) of your service which has been moved to a different server. Suppose you have decided to move your application from an Indian server (http://myindia.gov.in:9001) to an US server (http://your-us.gov.us:99013) you do not need to inform any of the applications previously consuming your services. They will get to know it automatically from discovery server and they even do not need to do anything at their end.
Please see the below diagram to understand how a discovery server serve a client application registered in it. For example read-service need to consume services from book-service and library-service, now how will read-service get the host name and port number of both these application to consume? It will be provided by discovery service as both book-service and library-service already registered themselves in discovery-service.
To read more about Spring cloud Netflix you can visit https://cloud.spring.io/spring-cloud-netflix/2.0.x/single/spring-cloud-netflix.html.
Let us develop the entire project step-by-step.
Step 1
First, we will create discovery-service which is a Eureka discovery server. If you are new to Spring Boot, you can follow my article https://github.com/prateekparallel/spring-boot-rest-2 to create a Spring Boot application. Now, click https://start.spring.io/ and open Spring Initializr. Now do exactly what I am doing in the below screen shot. (Group, Artifact, etc fill as per your choice):
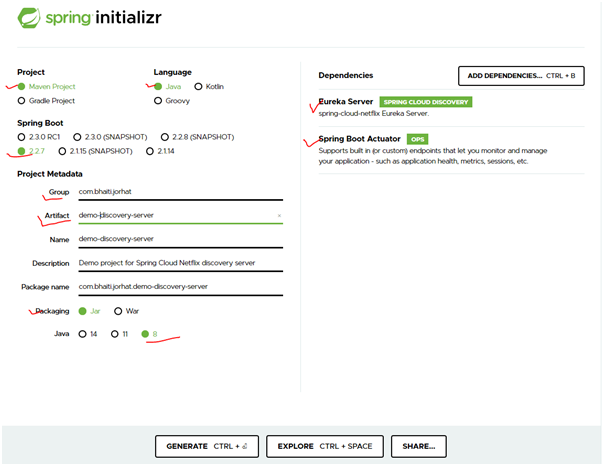
Click ADD DEPENDENCIES and select all the dependencies (in search bar just type the dependency – Eureka and Actuator and select it one at a time. Do not select Eureka client)

Now click the GENERATE button to generate the project and save it to your machine and import it as maven project to your tool (here I am using Eclipse).
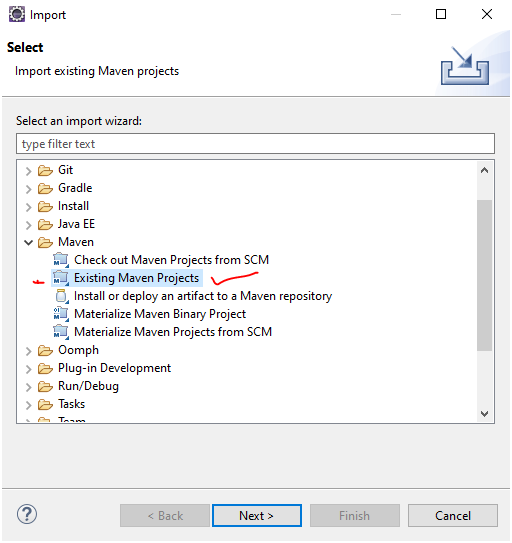
In eclipse right click on project explorer and select import and select -
Now, open the Java file, DemoDiscoveryServerApplication.java, and add @EnableEurekaServer in it:
xxxxxxxxxx
package com.bhaiti.jorhat.demodiscoveryserver;
import org.springframework.boot.SpringApplication;
import org.springframework.boot.autoconfigure.SpringBootApplication;
public class DemoDiscoveryServerApplication {
public static void main(String[] args) {
SpringApplication.run(DemoDiscoveryServerApplication.class, args);
}
}
Now, rename your application.properties file to application.yml and add the following:
xxxxxxxxxx
server.port9001
spring.application.namedemo-discovery-server
eureka
server
evictionIntervalTimerInMs3000
response-cache-update-interval-ms3000
client
registerWithEurekafalse
fetchRegistryfalse
service-url.defaultZonehttp//localhost$server.port/eureka
You can see above we assigned false to both registerWithEureka and fetchRegistry. The reason is we do not want to register this application in itself as this is a discovery server to register discovery client only. For detail about configuration please check in this repository.
Your discovery server is ready now. Just compile it and run it in command prompt.
In the project home directory just execute the below command:
mvnw clean package
Now, start the discovery server
java -jar target/demo-discovery-server-0.0.1-SNAPSHOT.jar
<>now you can check the dashboard of Eureka discovery server by hitting http://localhost:9001
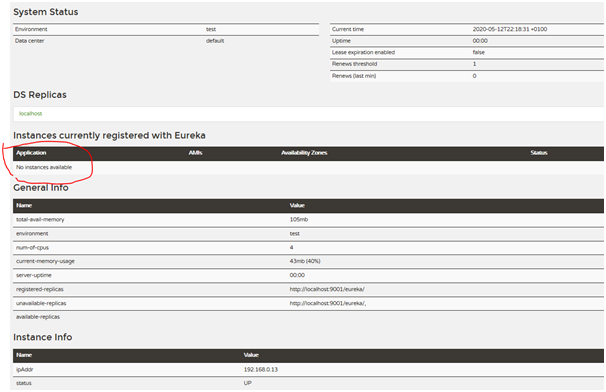
Now you do not see any client in it. Let’s develop our first client application book-service
Step 2: Create a REST service application call book-service. To create the project , follow below steps
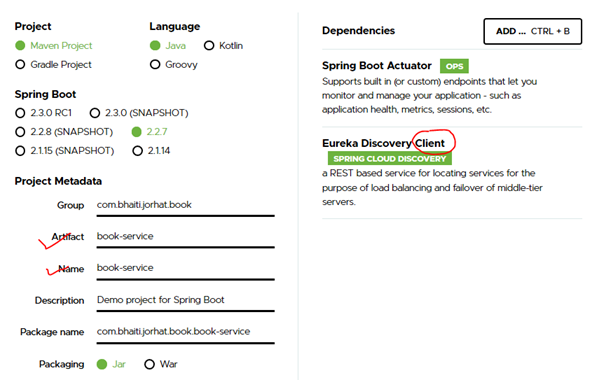
Please notice here we have selected dependency Eureka Client this time, as our REST service application is also a Eureka Client as well. Generate the project and import to your eclipse as maven project.
Now change the application.property to application.yml and modify it like below-
xxxxxxxxxx
server.port9901
spring
application.namebook-service
eureka
client
serviceUrl
defaultZonehttp//localhost9001/eureka/
registryFetchIntervalSeconds1
instance
leaseRenewalIntervalInSeconds1
Now in the above you can see that defaultZone is assigned with the address of our discovery server. So this discovery client will register itself in the discovery server which will be listing at http://localhost:9001. Now we have to do some coding in our REST application book-service. First open BookServiceApplication.java file and add @EnableDiscoveryClient in it to activate the discovery client.
xxxxxxxxxx
package com.bhaiti.jorhat.book.bookservice;
import org.springframework.boot.SpringApplication;
import org.springframework.boot.autoconfigure.SpringBootApplication;
import org.springframework.cloud.client.discovery.EnableDiscoveryClient;
public class BookServiceApplication {
public static void main(String[] args) {
SpringApplication.run(BookServiceApplication.class, args);
}
}
Now create a new java class call BookService.java like below
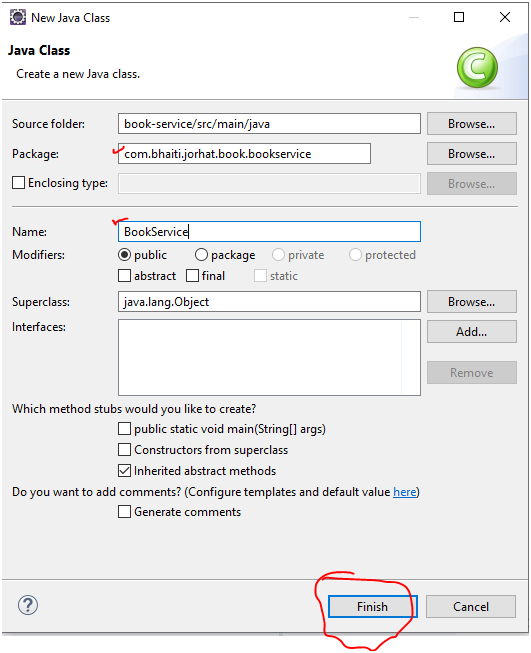
And add the following code in it
xxxxxxxxxx
package com.bhaiti.jorhat.book.bookservice;
import java.util.Arrays;
import java.util.List;
public class BookService {
private static List<String> bookList = Arrays.asList("Book1","Book2","Book3");
public static List<String> getBookList() {
return bookList;
}
}
Now create a controller class like below:-
xxxxxxxxxx
package com.bhaiti.jorhat.book.bookservice;
import java.util.List;
import org.springframework.http.ResponseEntity;
import org.springframework.web.bind.annotation.GetMapping;
import org.springframework.web.bind.annotation.RestController;
public class BookController {
("/books")
public ResponseEntity<List<String>> getBookList(){
return ResponseEntity.ok(BookService.getBookList());
}
}
Add the below dependency in your pom.xml file
xxxxxxxxxx
<dependency>
<groupId>org.springframework</groupId>
<artifactId>spring-web</artifactId>
</dependency>
<dependency>
<groupId>org.springframework.boot</groupId>
<artifactId>spring-boot-starter-web</artifactId>
</dependency>
<dependency>
<groupId>org.springframework.boot</groupId>
<artifactId>spring-boot-starter</artifactId>
</dependency>
Now compile it and run it like below:-
xxxxxxxxxx
cd book-service
mvnw clean package
java -jar target/book-service-0.0.1-SNAPSHOT.jar
Now refresh eureka (discovery server) dashboard, you can see that book-service has been registered in it.

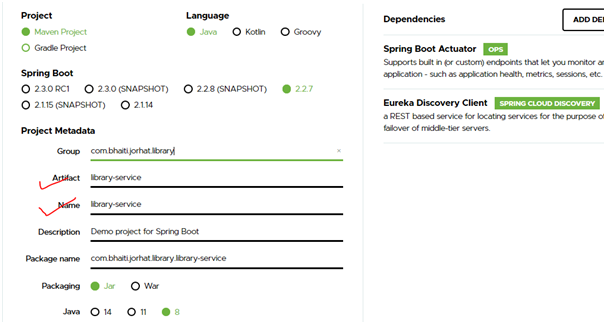
Step 3: Now create library-service application. Just repeat step 2 and create a project and import it to you development area.
Now update your pom.xml exactly like you did for book-service.
Now add two classes respectively LibraryService.java and LibraryController.java
First modify your LibraryServiceApplication.java and add @EnableDiscoveryClient
xxxxxxxxxx
public class LibraryServiceApplication {
public static void main(String[] args) {
SpringApplication.run(LibraryServiceApplication.class, args);
}
}
Now create LibraryService.java and modify it like below
xxxxxxxxxx
package com.bhaiti.uk.global.repo;
import java.util.HashMap;
import java.util.Map;
public class LibraryService {
private static Map<String, String> libList;
static {
libList = new HashMap<String, String>();
libList.put("Book1", "Library3");
libList.put("Book2", "Library1");
libList.put("Book3", "Library2");
}
public static Map<String, String> getLibList() {
return libList;
}
}
Now create LibraryController.java and modify it like below
xxxxxxxxxx
package com.bhaiti.uk.global.repo;
import java.util.Map;
import org.springframework.http.ResponseEntity;
import org.springframework.web.bind.annotation.GetMapping;
import org.springframework.web.bind.annotation.RestController;
public class LibraryController {
("/librarys")
public ResponseEntity<Map<String, String>> getBookList(){
return ResponseEntity.ok(LibraryService.getLibList());
}
}
Now, rename your application.properties file to application.yml and add the following:
xxxxxxxxxx
server.port9902
spring
application.namelibrary-service
eureka
client
serviceUrl
defaultZone$EUREKA_URIhttp//localhost9001/eureka
registryFetchIntervalSeconds1
instance
leaseRenewalIntervalInSeconds1
Compile and run the application:
xxxxxxxxxx
cd library-service
mvnw clean package
java -jar target/library-service-0.0.1-SNAPSHOT.jar
Now, refresh the Eureka dashboard, and you can see that your library-service also listed in it.

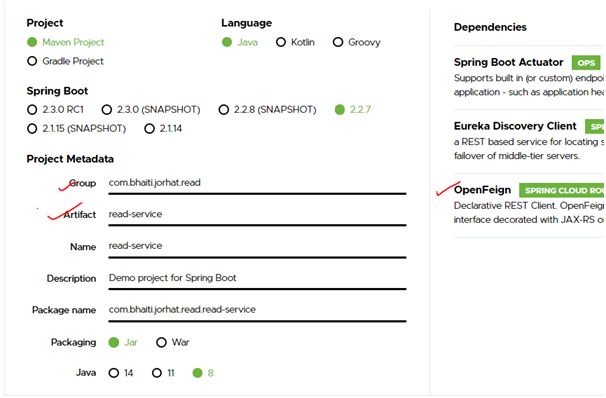
Step 5: Now we are going to create our last REST service - read-service. Now create it and import it to your eclipse. Please notice we are adding one more dependency here i.e. OpenFeign.
Now change the name of file application.properties file to application.yml and add the following:
xxxxxxxxxx
server.port9903
spring
application.namelibrary-service
eureka
client
serviceUrl
defaultZone$EUREKA_URIhttp//localhost9001/eureka
registryFetchIntervalSeconds1
instance
leaseRenewalIntervalInSeconds1
Modify your pom.xml exactly the same way as you did for library-service.
Here, in read-service, we are going to consume both book-service and library-service. To call the REST service API of library-service and book-service we will implement a Feign Client here.
First modify your ReadServiceApplication.java like below:
xxxxxxxxxx
public class ReadServiceApplication {
Now, create our Feign Clients here. Create two interface respectively BookClient.java and LibraryClient.java, and modify them like below:
xxxxxxxxxx
package com.bhaiti.jorhat.read;
import java.util.List;
import org.springframework.cloud.openfeign.FeignClient;
import org.springframework.web.bind.annotation.GetMapping;
("book-service")
public interface BookClient {
("/books")
List<String> getBookList();
}
xxxxxxxxxx
package com.bhaiti.jorhat.read;
import java.util.Map;
import org.springframework.cloud.openfeign.FeignClient;
import org.springframework.web.bind.annotation.GetMapping;
("library-service")
public interface LibraryClient {
("/librarys")
Map<String, String> getLibraryList();
}
The beauty of using FeignClient is that you don’t need to know the host name and port number of the application where you are going to make a REST call. Here to make a REST call to book-service we are not using an URI. Feign use Ribbon to get everything requires for the REST call and gets all the detail about book-service and library-service(host and port) from discovery server. Because book-service and library-service are not only a REST based application but also a discovery client too, hence it can retrieve information about other clients of discovery server.
To read more about FeignClient visit https://cloud.spring.io/spring-cloud-netflix/multi/multi_spring-cloud-feign.html and https://cloud.spring.io/spring-cloud-openfeign/reference/html/
Suppose you don’t want to use a FeignClient and want to make a REST call with http connection object or with RestTemplate, in such situation you can use the below codes to get the application’s host name and port number.
xxxxxxxxxx
private EurekaClient eurekaClient;
public String getBaseUrl() {
Application application = eurekaClient.getApplication("book-service");
InstanceInfo instanceInfo = application.getInstances().get(0);
String hostname = instanceInfo.getHostName();
int port = instanceInfo.getPort();
return "http://" + hostname + ":" + port;
}
(Above codes are out of the scope of this article. I am discussing about it in my article SSL based/Secured FeignClient…)
Now add the below controller
xxxxxxxxxx
package com.bhaiti.jorhat.read;
import java.util.List;
import java.util.Map;
import org.springframework.beans.factory.annotation.Autowired;
import org.springframework.http.ResponseEntity;
import org.springframework.web.bind.annotation.GetMapping;
import org.springframework.web.bind.annotation.PathVariable;
import org.springframework.web.bind.annotation.RestController;
public class ReadServiceController {
BookClient bookClient;
LibraryClient libraryClient;
(path= "/read/{bookName}", produces = "application/json")
public ResponseEntity<String> getReadingLocation((value = "bookName") String bookName){
String response;
List<String> bookList = bookClient.getBookList();
if(bookList.contains(bookName)) {
Map<String, String> libList = libraryClient.getLibraryList();
response = "You can read this book - " + bookName
+ " at this Library - " + libList.get(bookName);
}
else {
response = "Your Book - " + bookName + " is not currently available in Libaries";
}
return ResponseEntity.ok().body(response);
}
}
And finally modify the ReadServiceApplication.java like below:
xxxxxxxxxx
package com.bhaiti.jorhat.read;
import org.springframework.boot.SpringApplication;
import org.springframework.boot.autoconfigure.SpringBootApplication;
import org.springframework.cloud.client.discovery.EnableDiscoveryClient;
import org.springframework.cloud.openfeign.EnableFeignClients;
public class ReadServiceApplication {
public static void main(String[] args) {
SpringApplication.run(ReadServiceApplication.class, args);
}
}
Now, your microservices application is fully ready for testing.
First compile it and run it and check the Eureka server.
cd read-service
mvnw clean package
java -jar target/read-service-0.0.1-SNAPSHOT.jar

Now, hit the below URL and check

It will display the below line in your browser.

Just change the name of the book to Book1 and Book2 and Book4 and test for each entry. Source code of this project is available here - https://github.com/prateekparallel/microservices-example.
Hope you enjoyed this tutorial.
Opinions expressed by DZone contributors are their own.
Comments