Streamline Microservices Development With Dapr and Amazon EKS
Learn how the combination of Dapr and Amazon EKS accelerates development, enhances applications' resilience, and improves scalability.
Join the DZone community and get the full member experience.
Join For FreeMicroservices and containers are revolutionizing how modern applications are built, deployed, and managed in the cloud. However, developing and operating microservices can introduce significant complexity, often requiring developers to spend valuable time on cross-cutting concerns like service discovery, state management, and observability.
Dapr, or Distributed Application Runtime, is an open-source runtime for building microservices on cloud and edge environments. It provides platform-agnostic building blocks like service discovery, state management, pub/sub messaging, and observability out of the box. Dapr moved to the graduated maturity level of CNCF (Cloud Native Computing Foundation) and is currently used by many enterprises.
When combined with Amazon Elastic Kubernetes Service (Amazon EKS), a managed Kubernetes service from AWS, Dapr can accelerate the adoption of microservices and containers, enabling developers to focus on writing business logic without worrying about infrastructure plumbing. Amazon EKS makes managing Kubernetes clusters easy, enabling effortless scaling as workloads change.
In this blog post, we'll explore how Dapr simplifies microservices development on Amazon EKS. We'll start by diving into two essential building blocks: service invocation and state management.
Service Invocation
Seamless and reliable communication between microservices is crucial. However, developers often struggle with complex tasks like service discovery, standardizing APIs, securing communication channels, handling failures gracefully, and implementing observability.
With Dapr's service invocation, these problems become a thing of the past. Your services can effortlessly communicate with each other using industry-standard protocols like gRPC and HTTP/HTTPS. Service invocation handles all the heavy lifting, from service registration and discovery to request retries, encryption, access control, and distributed tracing.
State Management
Dapr's state management building block simplifies the way developers work with the state in their applications. It provides a consistent API for storing and retrieving state data, regardless of the underlying state store (e.g., Redis, AWS DynamoDB, Azure Cosmos DB).
This abstraction enables developers to build stateful applications without worrying about the complexities of managing and scaling state stores.
Prerequisites
In order to follow along this post, you should have the following:
- An AWS account. If you don’t have one, you can sign up for one.
- An IAM user with proper permissions. The IAM security principal that you're using must have permission to work with Amazon EKS IAM roles, service-linked roles, AWS CloudFormation, a VPC, and related resources. For more information, see Actions, resources, and condition keys for Amazon Elastic Container Service for Kubernetes and Using service-linked roles in the AWS Identity and Access Management User Guide.
Application Architecture
In the diagram below, we have two microservices: a Python app and a Node.js app. The Python app generates order data and invokes the /neworder endpoint exposed by the Node.js app. The Node.js app writes the incoming order data to a state store (in this case, Amazon ElastiCache) and returns an order ID to the Python app as a response.
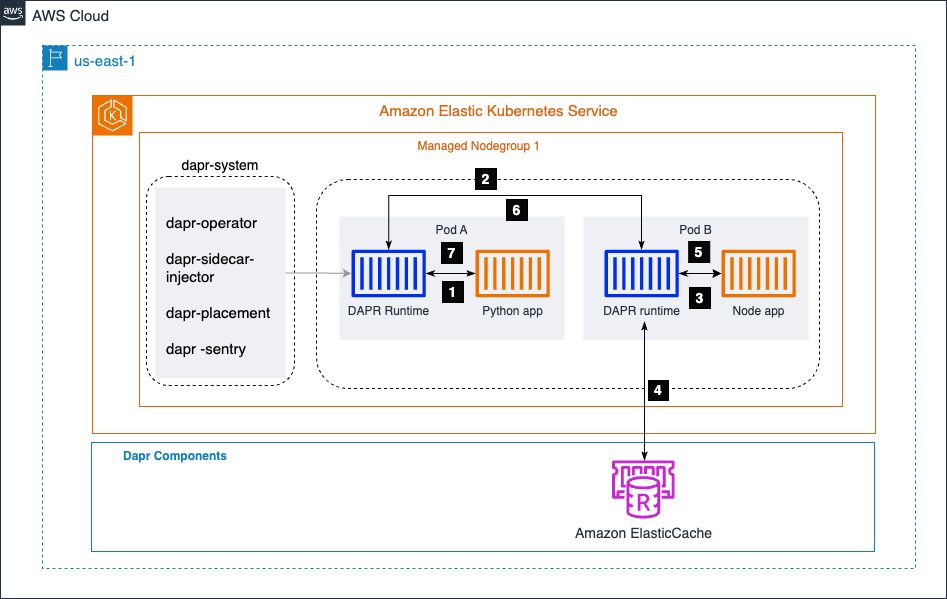
By leveraging Dapr's service invocation building block, the Python app can seamlessly communicate with the Node.js app without worrying about service discovery, API standardization, communication channel security, failure handling, or observability. It implements mTLS to provide secure service-to-service communication.
Dapr handles these cross-cutting concerns, allowing developers to focus on writing the core business logic.
Additionally, Dapr's state management building block simplifies how the Node.js app interacts with the state store (Amazon ElastiCache). Dapr provides a consistent API for storing and retrieving state data, abstracting away the complexities of managing and scaling the underlying state store. This abstraction enables developers to build stateful applications without worrying about the intricacies of state store management.
The Amazon EKS cluster hosts a namespace called dapr-system, which contains the Dapr control plane components. The dapr-sidecar-injector automatically injects a Dapr runtime into the pods of Dapr-enabled microservices.
Service Invocation Steps
- The order generator service (Python app) invokes the Node app’s method,
/neworder. This request is sent to the local Dapr sidecar, which is running in the same pod as the Python app. - Dapr resolves the target app using the Amazon EKS cluster’s DNS provider and sends the request to the Node app’s sidecar.
- The Node app’s sidecar then sends the request to the Node app microservice.
- Node app then writes the order ID received from the Python app to Amazon ElasticCache.
- The node app sends the response to its local Dapr sidecar.
- Node app’s sidecar forwards the response to the Python app’s Dapr sidecar.
- Python app side car returns the response to the Python app, which had initiated the request to the Node app's method
/neworder.
Deployment Steps
Create and Confirm an EKS Cluster
To set up an Amazon EKS (Elastic Kubernetes Service) cluster, you'll need to follow several steps. Here's a high-level overview of the process:
Prerequisites
- Install and configure the AWS CLI
- Install
eksctl,kubectl, and AWS IAM Authenticator
1. Create an EKS cluster. Use eksctl to create a basic cluster with a command like:
eksctl create cluster --name my-cluster --region us-west-2 --node-type t3.medium --nodes 32. Configure kubectl. Update your kubeconfig to connect to the new cluster:
aws eks update-kubeconfig --name my-cluster --region us-west-23. Verify the cluster. Check if your nodes are ready:
kubectl get nodesInstall DAPR on Your EKS cluster
1. Install DAPR CLI:
wget -q https://raw.githubusercontent.com/dapr/cli/master/install/install.sh -O - | /bin/bash2. Verify installation:
dapr -h3. Install DAPR and validate:
dapr init -k --dev
dapr status -k
The Dapr components statestore and pubsub are created in the default namespace. You can check it by using the command below:
dapr components -k
Configure Amazon ElastiCache as Your Dapr StateStore
Create Amazon ElastiCache to store the state for the microservice. In this example, we are using ElastiCache serverless, which quickly creates a cache that automatically scales to meet application traffic demands with no servers to manage.
Configure the security group of the ElastiCache to allow connections from your EKS cluster. For the sake of simplicity, keep it in the same VPC as your EKS cluster. Take note of the cache endpoint, which we will need for the subsequent steps.
Running a Sample Application
1. Clone the Git repo of the sample application:
git clone https://github.com/dapr/quickstarts.git2. Create redis-state.yaml and provide an Amazon ElasticCache endpoint for redisHost:
apiVersion: dapr.io/v1alpha1
kind: Component
metadata:
  name: statestore
  namespace: default
spec:
  type: state.redis
  version: v1
  metadata:
  - name: redisHost
    value: redisdaprd-7rr0vd.serverless.use1.cache.amazonaws.com:6379
  - name: enableTLS
    value: true
Apply yaml configuration for state store component using kubectl.
kubectl apply -f redis-state.yaml3. Deploy microservices with the sidecar.
For the microservice node app, navigate to the /quickstarts/tutorials/hello-kubernetes/deploy/node.yaml file and you will notice the below annotations. It tells the Dapr control plane to inject a sidecar and also assigns a name to the Dapr application.
annotations:
        dapr.io/enabled: "true"
        dapr.io/app-id: "nodeapp"
        dapr.io/app-port: "3000"
Add an annotation service.beta.kubernetes.io/aws-load-balancer-scheme: "internet-facing" in node.yaml to create AWS ELB.
kind: Service
apiVersion: v1
metadata:
  name: nodeapp
  annotations:
    service.beta.kubernetes.io/aws-load-balancer-scheme: "internet-facing"
  labels:
    app: node
spec:
  selector:
    app: node
  ports:
  - protocol: TCP
    port: 80
    targetPort: 3000
  type: LoadBalancer
Deploy the node app using kubectl. Navigate to the directory /quickstarts/tutorials/hello-kubernetes/deploy and execute the below command.
kubectl apply -f node.yamlObtain the AWS NLB, which appears under External IP, on the output of the below command.
kubectl get svc nodeapp http://k8s-default-nodeapp-3a173e0d55-f7b14bedf0c4dd8.elb.us-east-1.amazonaws.comNavigate to the /quickstarts/tutorials/hello-kubernetes directory, which has sample.json file to execute the below step.
curl --request POST --data "@sample.json" --header Content-Type:application/json http://k8s-default-nodeapp-3a173e0d55-f14bedff0c4dd8.elb.us-east-1.amazonaws.com/neworderYou can verify the output by accessing /order endpoint using the load balancer in a browser.
http://k8s-default-nodeapp-3a173e0d55-f7b14bedff0c4dd8.elb.us-east-1.amazonaws.com/orderYou will see the output as {“OrderId”:“42”}
Next, deploy the second microservice Python app, which has a business logic to generate a new order ID every second and invoke the Node app’s method /neworder.
Navigate to the directory /quickstarts/tutorials/hello-kubernetes/deploy and execute the below command.
kubectl apply -f python.yaml4. Validating and testing your application deployment.
Now that we have both the microservices deployed. The Python app is generating orders and invoking /neworder as evident from the logs below.
kubectl logs --selector=app=python -c daprd --tail=-1time="2024-03-07T12:43:11.556356346Z" level=info msg="HTTP API Called" app_id=pythonapp instance=pythonapp-974db9877-dljtw method="POST /neworder" scope=dapr.runtime.http-info type=log useragent=python-requests/2.31.0 ver=1.12.5
time="2024-03-07T12:43:12.563193147Z" level=info msg="HTTP API Called" app_id=pythonapp instance=pythonapp-974db9877-dljtw method="POST /neworder" scope=dapr.runtime.http-info type=log useragent=python-requests/2.31.0 ver=1.12.5We can see that the Node app is receiving the requests and writing to the state store Amazon ElasticCache in our example.
kubectl logs —selector=app=node -c node —tail=-1Got a new order! Order ID: 367
Successfully persisted state for Order ID: 367
Got a new order! Order ID: 368
Successfully persisted state for Order ID: 368
Got a new order! Order ID: 369
Successfully persisted state for Order ID: 369In order to confirm whether the data is persisted in Amazon ElasticCache we access the endpoint /order below. It returns the latest order ID, which was generated by the Python app.
http://k8s-default-nodeapp-3a173e0d55-f7b14beff0c4dd8.elb.us-east-1.amazonaws.com/orderYou will see an output with the most recent order as {“OrderId”:“370”}.
Clean up
Run the below command to delete the deployments Node app and Python app along with the state store component.
Navigate to the /quickstarts/tutorials/hello-kubernetes/deploy directory to execute the below command.
kubectl delete -f node.yaml
kubectl delete -f python.yaml
You can tear down your EKS cluster using the eksctl command and delete Amazon ElastiCache.
Navigate to the directory that has the cluster.yaml file used to create the cluster in the first step.
eksctl delete cluster -f cluster.yamlConclusion
Dapr and Amazon EKS form a powerful alliance for microservices development. Dapr simplifies cross-cutting concerns, while EKS manages Kubernetes infrastructure, allowing developers to focus on core business logic and boost productivity.
This combination accelerates the creation of scalable, resilient, and observable applications, significantly reducing operational overhead. It's an ideal foundation for your microservices journey. Watch for upcoming posts exploring Dapr and EKS's capabilities in distributed tracing and observability, offering deeper insights and best practices.
Opinions expressed by DZone contributors are their own.
Comments