Swift: Master of Decoding Messy JSON
Learn how to decode messy flat JSON in Swift using dynamic CodingKeys, clean models, and custom Decodable logic for scalable, production-ready apps.
Join the DZone community and get the full member experience.
Join For FreeI recently came across an interesting challenge involving JSON decoding in Swift. Like many developers, when faced with a large, complex JSON response, my first instinct was to reach for “quick fix” tools. I wanted to see how online resources, various JSON-to-Swift converters, and even modern AI models would handle a messy, repetitive data structure.
To be honest, I was completely underwhelmed.
The Problem: The “Flat” JSON Nightmare
The issue arises when you encounter a legacy API or a poorly structured response that uses “flat” numbered properties instead of clean arrays. Take a look at this JSON sample:
{
  "meals": [
    {
      "idMeal": "52771",
      "strMeal": "Spicy Arrabiata Penne",
      "strInstructions": "Bring a large pot of water to a boil...",
      "strMealThumb": "https://www.themealdb.com/images/media/meals/ustsqw1468250014.jpg",
      "strIngredient1": "penne rigate",
      "strIngredient2": "olive oil",
      "strIngredient3": "garlic",
      "strIngredient4": "chopped tomatoes",
      "strIngredient5": "red chilli flakes",
      // ... this continues up to strIngredient20
      "strMeasure1": "1 pound",
      "strMeasure2": "1/4 cup",
      "strMeasure3": "3 cloves",
      // ... this continues up to strMeasure20
    }
  ]
}
Why Online Converters Fail
When I plugged this into standard conversion tools, the result was a maintenance nightmare. They generated a “wall of properties” that looked something like this:
struct Meal: Codable {
    let idMeal: String
    let strMeal: String
    let strInstructions: String?
    let strMealThumb: String?

    // The repetitive property nightmare
    let strIngredient1: String?
    let strIngredient2: String?
    let strIngredient3: String?
    // ...
    let strIngredient20: String?

    let strMeasure1: String?
    let strMeasure2: String?
    let strMeasure3: String?
    // ...
    let strMeasure20: String?
}
Let’s be honest, the code generated by those online tools belongs in the “trash bin” for any serious project. Not only is it unscalable, but imagine the look on your senior developer’s face during a PR review when they see 40+ optional properties. It’s a maintenance nightmare and a blow to your professional reputation.
I decided to take control of the decoding process to make it clean, Swifty, and — most importantly — production-ready. Here is how I structured the solution and why it works.
The Secret Weapon: Why We Use a Struct for CodingKeys
In 99% of Swift tutorials, you see CodingKeys defined as an enum. Enums are great when you know every single key at compile time. But in our case, we have a "flat" JSON with keys like strIngredient1, strIngredient2... up to 20.
Writing an enum with 40 cases is not just boring — it’s bad engineering. That is why we use a struct instead.
1. Breaking the Protocol Requirements
To conform to CodingKey, a type must handle both String and Int values. By using a struct, we can pass any string into the initializer at runtime.
struct CodingKeys: CodingKey {
    let stringValue: String
    var intValue: Int?

    init?(stringValue: String) {
        self.stringValue = stringValue
    }

    // This allows us to map any raw string from the JSON to our logic
    init(rawValue: String) {
        self.stringValue = rawValue
    }

    init?(intValue: Int) { return nil } // We don't need integer keys here
}
2. Mapping “Ugly” Keys to Clean Names
You don’t have to stick with the API’s naming conventions inside your app. Notice how I used static var to create aliases. This keeps the rest of the decoding logic readable while keeping the "dirty" API keys isolated inside this struct.
static var name = CodingKeys(rawValue: "strMeal")
static var thumb = CodingKeys(rawValue: "strMealThumb")
static var instructions = CodingKeys(rawValue: "strInstructions")
3. The Power of Dynamic Key Generation
This is the part that makes this approach superior to any AI-generated code. We created static functions that use string interpolation to generate keys on the fly.
static func strIngredient(_ index: Int) -> Self {
    CodingKeys(rawValue: "strIngredient\(index)")
}

static func strMeasure(_ index: Int) -> Self {
    CodingKeys(rawValue: "strMeasure\(index)")
}
Instead of hardcoding strIngredient1, strIngredient2, etc., we now have a "key factory." When we loop through 1...20 in our initializer, we simply call these functions. It’s clean, it’s reusable, and it’s significantly harder to make a typo than writing 40 individual cases.
4. Building a Model That Actually Makes Sense
The original JSON treats an ingredient and its measurement as two strangers living in different houses. In our app, there are a couple. By nesting a dedicated struct, we fix the data architecture at the source:
struct Ingredient: Decodable, Hashable {
    let id: Int
    let name: String
    let measure: String
}
Why Hashable and the id?
I added an id property using the loop index. Why? Because modern SwiftUI views like List and ForEach require identifiable data. By conforming to Hashable, we ensure:
- No UI glitches: SwiftUI won’t get confused if two different ingredients have the same name (like two different types of “Salt”).
- Performance: Diffable data sources love hashable objects.
5. Cleaning Up the “API Smell”
Before we get to the initializer, look at how we define our main properties. We aren’t just copying what the API gives us; we are translating it into clean Swift.
let name: String
let thumb: URL?
let instructions: String
let ingredients: [Ingredient]- Goodbye
strprefix: We dropped the Hungarian notation.nameis better thanstrMeal. - Proper types: We decode the thumbnail directly into a
URL?. If the API sends a broken link or an empty string, our decoder handles it gracefully during the parsing phase, not later in the View.
6. The Smart Initializer: Our “Data Bouncer”
This is the finale. Instead of blindly accepting every key the JSON offers, our custom init(from:) acts like a bouncer at a club — only valid data gets in.
init(from decoder: any Decoder) throws {
    let container = try decoder.container(keyedBy: CodingKeys.self)

    // 1. Decode simple properties using our clean aliases
    self.name = try container.decode(String.self, forKey: .name)
    self.thumb = try? container.decode(URL.self, forKey: .thumb)
    self.instructions = try container.decode(String.self, forKey: .instructions)

    // 2. The Dynamic Decoding Loop
    var ingredients: [Ingredient] = []

    for index in 1...20 {
        // We use 'try?' because some keys might be null or missing
        if let name = try? container.decode(String.self, forKey: .strIngredient(index)),
           let measure = try? container.decode(String.self, forKey: .strMeasure(index)),
           !name.isEmpty, !measure.isEmpty
        {
            // We only save it if the name AND measure are valid and non-empty
            ingredients.append(Ingredient(id: index, name: name, measure: measure))
        }
    }
    self.ingredients = ingredients
}
The Final Result: Clean, Swifty, and UI-Ready
After all that work behind the scenes, look at what we’ve achieved. We have transformed a “flat” JSON nightmare into a model that is a joy to use. This is what the rest of your app sees now:
struct MealDetail {
let name: String
let instructions: String
let thumb: URL?
let ingredients: [Ingredient]
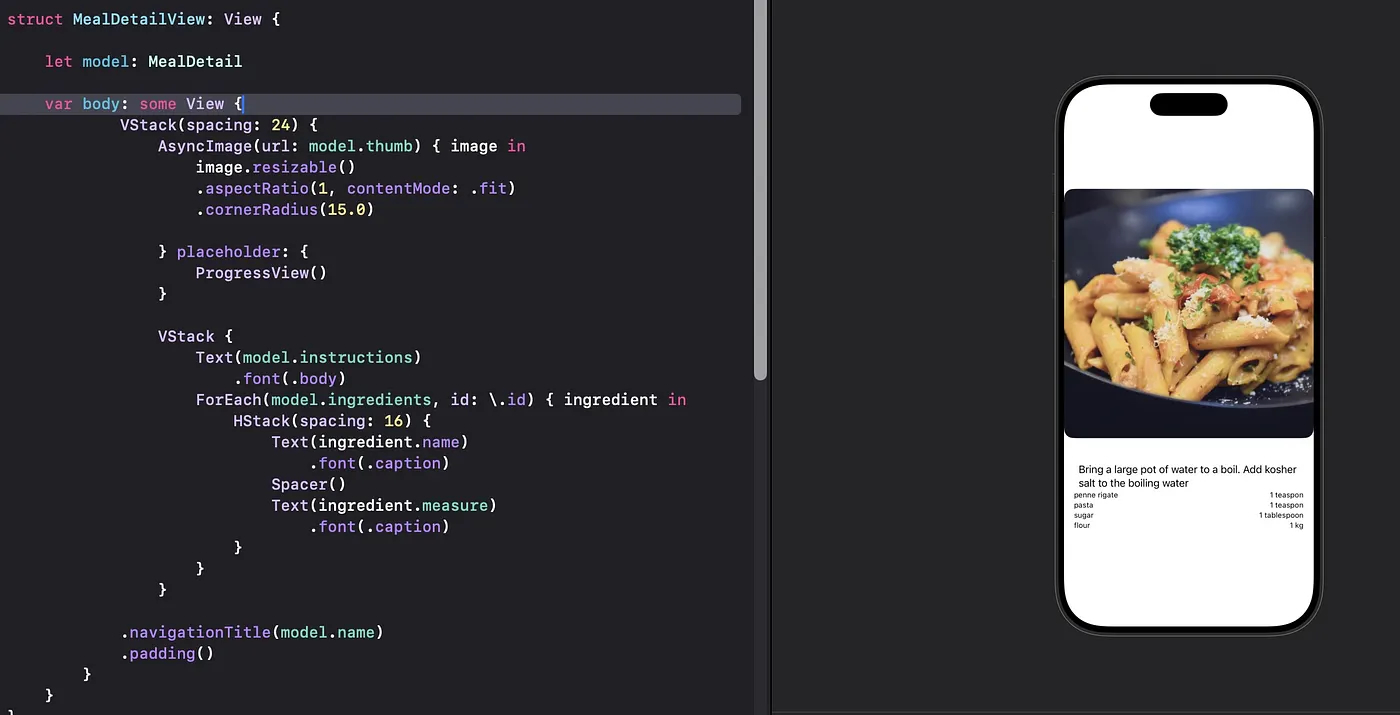
}Pure Simplicity in the UI
Because we did the heavy lifting during the decoding phase — filtering empty values and grouping ingredients — our SwiftUI code becomes incredibly clean. We don’t need any complex logic in the View; we just map the data directly to the components.
The Cherry on Top: Making Mocking Easy
You might have noticed one small side effect: when we define a custom init(from: Decoder), Swift stops generating the default memberwise initializer. This can make writing unit tests or SwiftUI Previews a bit annoying.
To fix this and keep our codebase “test-friendly,” we can add this simple extension. This allows us to create “Mock” data for our UI without needing a JSON file.
extension MealDetail {
    // Restoring the ability to create manual instances for Mocks and Tests
    init(name: String, thumb: URL?, instructions: String, ingredients: [Ingredient]) {
        self.name = name
        self.thumb = thumb
        self.instructions = instructions
        self.ingredients = ingredients
    }
}
Now, creating a preview is as simple as: let mock = MealDetail(name: "Pasta", thumb: nil, instructions: "Cook it.", ingredients: []).
Conclusion
The next time you’re faced with a messy API, remember: Don’t let the backend dictate your front-end architecture. Online tools and AI might give you a quick “copy-paste” solution, but they often lead to technical debt. By taking control of your Decodable implementation, you create code that is:
- Readable: Clear, intent-based property names.
- Robust: Filters out empty or corrupt data at the source.
- Maintainable: Easy to test and easy to display in the UI.
Happy coding, and keep your models clean!
Full code is here.
Opinions expressed by DZone contributors are their own.
Comments