How to Test POST Requests With REST Assured Java for API Testing: Part I
Test POST requests with REST Assured for API testing with this step-by-step guide for software test automation engineers, designed to build reliable API tests.
Join the DZone community and get the full member experience.
Join For FreeREST Assured is a popular API test automation framework in Java. Software teams widely use it for efficiently validating RESTful web services with minimal setup. It simplifies the process of sending requests, verifying responses, and handling JSON or XML paåyloads.
With its rich syntax and integration support for tools like TestNG and Maven, REST Assured enables robust, maintainable, and scalable API testing.
In this tutorial blog, you will learn the following:
- Setting up a Maven project with REST Assured for API Test automation
- What is a POST request?
- How to test a POST request with REST Assured Java
Getting Started
Before you begin writing API tests with REST Assured, make sure your environment is properly set up. You’ll need the following to be installed and configured on your machine as a prerequisite:
- Java JDK 17 or higher
- Apache Maven
- IntelliJ IDE (Community edition) or a similar IDE for writing the test scripts
Creating a New Project
Let’s create a new Maven project using the following steps:
Step 1: Open IntelliJ, then navigate to File >> New >> Project
Step 2: Enter the following details in the “New Project” window:
- Name of the project
- Location/path where the project needs to be saved
- Select JDK version (I am using JDK 17)
- Archetype (Search for “quickstart” and select
maven-archetype-quickstartfrom the result)
Click on the “Create” button to create the project.
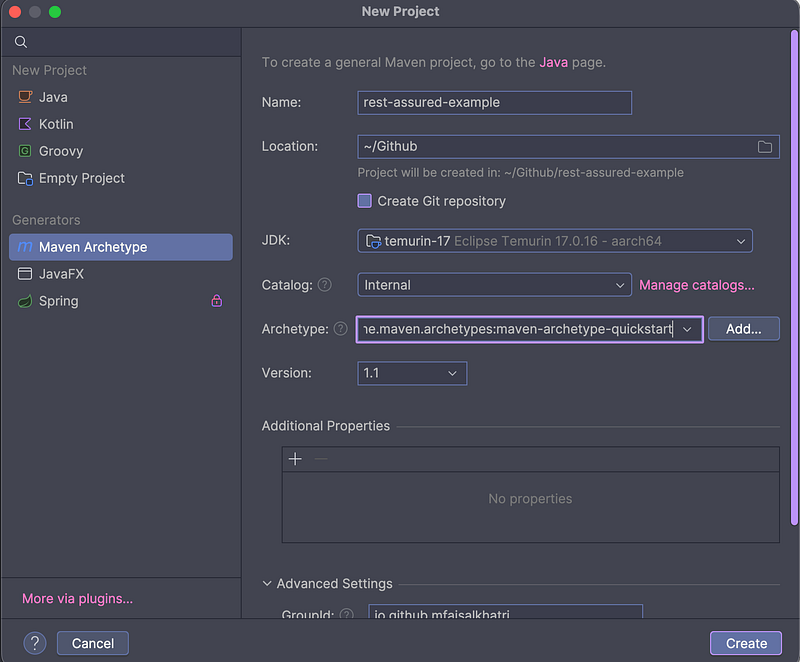
The Maven project will be successfully created in the location specified.
Updating the Dependencies
After creating the project, the following dependencies and plugins should be added to the pom.xml file:
- REST Assured
- TestNG
- Lombok (for using the builder pattern and generating POJO at runtime)
- Jackson Databind
- Google Gson (for serialization)
- Datafaker (for generating test data at runtime)
- Hamcrest (for Assertions)
- Maven Surefire plugin
- Maven Compiler plugin
Your pom.xml file should look like the example below after adding the required dependencies and plugins:
<?xml version="1.0" encoding="UTF-8"?>
<project xmlns:xsi="http://www.w3.org/2001/XMLSchema-instance"
    xmlns="http://maven.apache.org/POM/4.0.0"
    xsi:schemaLocation="http://maven.apache.org/POM/4.0.0 http://maven.apache.org/xsd/maven-4.0.0.xsd">
    <modelVersion>4.0.0</modelVersion>

    <groupId>io.github.mfaisalkhatri</groupId>
    <artifactId>rest-assured-examples</artifactId>
    <version>1.0-SNAPSHOT</version>

    <properties>
        <project.build.sourceEncoding>UTF-8</project.build.sourceEncoding>
        <rest-assured.version>5.5.6</rest-assured.version>
        <testng.version>7.11.0</testng.version>
        <lombok.version>1.18.42</lombok.version>
        <jackson-databind.version>2.20.0</jackson-databind.version>
        <google-gson.version>2.13.2</google-gson.version>
        <data-faker.version>2.5.1</data-faker.version>
        <hamcrest-all.version>1.3</hamcrest-all.version>
        <maven-compiler-plugin.version>3.14.1</maven-compiler-plugin.version>
        <maven-surefire-plugin.version>3.5.4</maven-surefire-plugin.version>
        <java-release.version>17</java-release.version>
        <suite-xml>test-suite/testng.xml</suite-xml>
    </properties>

    <dependencies>
        <dependency>
            <groupId>io.rest-assured</groupId>
            <artifactId>rest-assured</artifactId>
            <version>${rest-assured.version}</version>
            <scope>test</scope>
        </dependency>
        <dependency>
            <groupId>org.testng</groupId>
            <artifactId>testng</artifactId>
            <version>${testng.version}</version>
        </dependency>
        <dependency>
            <groupId>com.fasterxml.jackson.core</groupId>
            <artifactId>jackson-databind</artifactId>
            <version>${jackson-databind.version}</version>
        </dependency>
        <dependency>
            <groupId>org.projectlombok</groupId>
            <artifactId>lombok</artifactId>
            <version>${lombok.version}</version>
            <scope>provided</scope>
        </dependency>
        <dependency>
            <groupId>net.datafaker</groupId>
            <artifactId>datafaker</artifactId>
            <version>${data-faker.version}</version>
        </dependency>
        <dependency>
            <groupId>com.google.code.gson</groupId>
            <artifactId>gson</artifactId>
            <version>${google-gson.version}</version>
        </dependency>
        <dependency>
            <groupId>org.hamcrest</groupId>
            <artifactId>hamcrest-all</artifactId>
            <version>${hamcrest-all.version}</version>
        </dependency>
    </dependencies>
    <build>
        <pluginManagement>
            <plugins>
                <plugin>
                    <groupId>org.apache.maven.plugins</groupId>
                    <artifactId>maven-compiler-plugin</artifactId>
                    <version>${maven-compiler-plugin.version}</version>
                    <configuration>
                        <release>${java-release.version}</release>
                        <encoding>UTF-8</encoding>
                        <forceJavacCompilerUse>true</forceJavacCompilerUse>
                    </configuration>
                </plugin>
                <plugin>
                    <groupId>org.apache.maven.plugins</groupId>
                    <artifactId>maven-surefire-plugin</artifactId>
                    <version>${maven-surefire-plugin.version}</version>
                    <executions>
                        <execution>
                            <goals>
                                <goal>test</goal>
                            </goals>
                        </execution>
                    </executions>
                    <configuration>
                        <suiteXmlFiles>
                            <suiteXmlFile>${suite-xml}</suiteXmlFile>
                        </suiteXmlFiles>
                        <argLine>-Dfile.encoding=UTF-8 -Xdebug -Xnoagent</argLine>
                    </configuration>
                </plugin>
                </plugin>
            </plugins>
        </pluginManagement>
    </build>
</project>
Updating dependency versions in the <properties> block is considered a best practice, as it allows you to easily manage, check, and update Maven dependency versions across the project.
With the addition of dependencies to the pom.xml file, the setup is complete, and the project is now ready to initiate API automation testing using REST Assured.

What Is a POST Request?
A POST request is used to create a new resource on the server by sending data in the request body. This data can come in various formats, such as JSON, XML, or form data.
The Content-Type header specifies which format is being used. The POST requests are not idempotent, meaning that sending the same request multiple times could result in duplicate entries or changes on the server.
Let’s take an example of the POST /addOrder API from the RESTful e-commerce application.
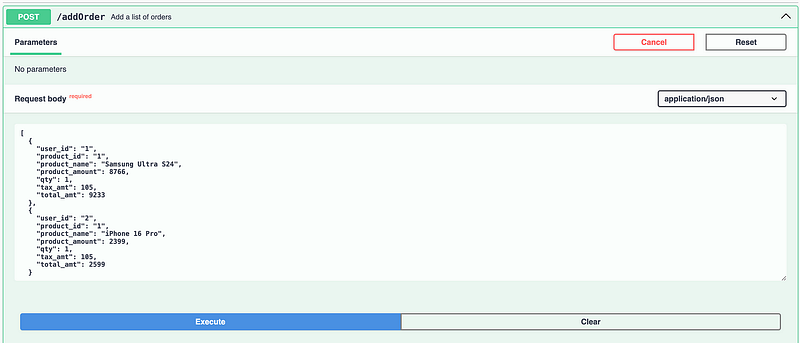
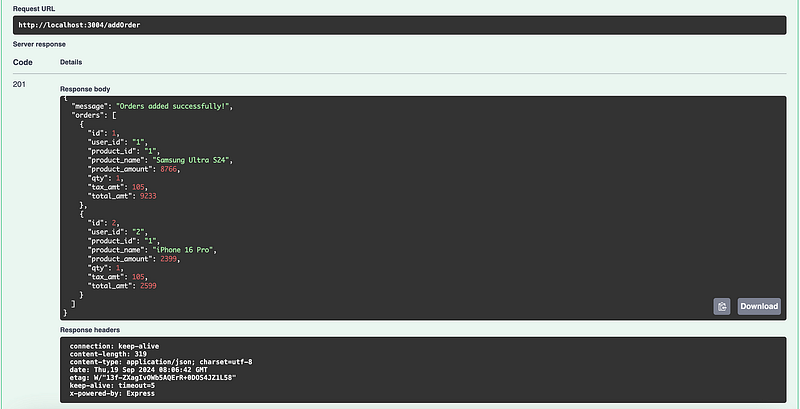
This POST /addOrder API sends the data to the server to create new orders in the system. When the POST request is successfully executed, the desired order data is generated in the system. The server responds with a 201 status code, along with a message and the details of the newly created order.
How to Test POST Requests With REST Assured Java
A POST request needs a request body to be sent in the required format; otherwise, the POST request will fail to create the desired result.
There are five different ways to post a request body using the REST Assured framework:
- String
- JSON object/array
- Using POJO
- Using JSON files
- With Builder Pattern and DataFaker on Runtime
Let’s write the tests using each of these ways one by one.
1. Writing a POST API Test With a Request Body as a String
This is the simplest approach for testing a POST API, as it involves using hard-coded values in string format for the request body. This approach should be used only for temporary scenarios and avoided in real-world projects.
The POST /addOrder API uses the following request body in JSON format:
[
  {
    "user_id": "string",
    "product_id": "string",
    "product_name": "string",
    "product_amount": 0,
    "qty": 0,
    "tax_amt": 0,
    "total_amt": 0
  }
]
Let’s create a hard-coded string with values and use it as the request body for the POST request.
String order = "[{\"user_id\": \"1\","
        + "\"product_id\": \"1\","
        + "\"product_name\": \"iPhone\","
        + "\"product_amount\": 500.00,"
        + "\"qty\": 1,"
        + "\"tax_amt\": 5.99,"
        + "\"total_amt\": 505.99}]";
Let’s create a new Java class named TestPostRequestWithHardCodedBody and add a new test method “testCreateOrder()” in it.
public class TestPostRequestWithHardCodedBody {

    @Test
    public void testCreateOrder () {

        String order = "[{\"user_id\": \"1\"," + "\"product_id\": \"1\"," + "\"product_name\": \"iPhone\"," + "\"product_amount\": 500.00," + "\"qty\": 1," + "\"tax_amt\": 5.99," + "\"total_amt\": 505.99}]";

        given ().contentType (ContentType.JSON)
            .when ()
            .log ()
            .all ()
            .body (order)
            .post ("http://localhost:3004/addOrder")
            .then ()
            .log ()
            .all ()
            .statusCode (201)
            .and ()
            .assertThat ()
            .body ("message", equalTo ("Orders added successfully!"));
    }
}
Code Walkthrough
The REST Assured library provides a Domain-Specific Language (DSL) that makes writing API tests simple, readable, and expressive. REST Assured supports method chaining, which allows for a fluent API style that improves readability and makes test scripts more concise.
The POST API test scripts start with the given() method, which is part of the given-when-then pattern. The given method configures the precondition for the request. The details, such as headers, content type, query parameter, authentication, etc., can be configured.
Next, the content type is used to specify the media type of the request body being sent to the server. By setting the content type to JSON, you’re telling the server that the data in the request body is formatted as JavaScript Object Notation (JSON).
Providing the content type is important as the server should know how to parse the incoming data. If the content type is not provided, the server may reject the request or misinterpret the data, resulting in test failures.
The log().all() method, used after the when() method, logs all the request details, including headers, parameters, authentication, content type, and other data sent to the server. This is especially useful for debugging failed tests.
The request body is supplied in the body() method, and finally, the post request is executed using the post() method. The body() method and post() methods work together to send a POST request with a request payload. This test uses the hard-coded request body in String format to create a new order in the system.
The log().all() method, after the then() method, logs all response details, including headers, response data, and the response content type.
Assertions
REST Assured provides a powerful inline assertions library, allowing you to validate response data directly within the test script. Using its fluent syntax, you can easily verify status codes, response headers, and specific JSON or XML values without needing additional assertion frameworks.
The statusCode() method verifies that the status code is 201. The response data can also be verified by combining the assertions using the and() and assertThat() method, and calling the body() method with the required parameters for expected and actual data verification.
The equalTo() method called inside the body method belongs to the Hamcrest library, which is a popular framework for writing readable and expressive assertions in Java.
Test Execution
The following is a screenshot of a successful test execution from the IntelliJ IDE:
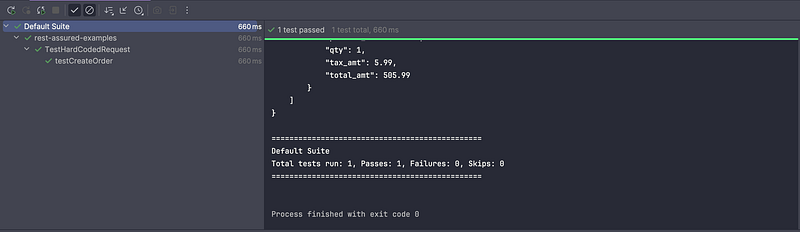
The following are the logs displaying the request and the response details in the console:
Request method: POST
Request URI: http://localhost:3004/addOrder
Proxy:   <none>
Request params: <none>
Query params: <none>
Form params: <none>
Path params: <none>
Headers:  Accept=*/*
    Content-Type=application/json
Cookies:  <none>
Multiparts:  <none>
Body:
[
    {
        "user_id": "1",
        "product_id": "1",
        "product_name": "iPhone",
        "product_amount": 500.00,
        "qty": 1,
        "tax_amt": 5.99,
        "total_amt": 505.99
    }
]
HTTP/1.1 201 Created
X-Powered-By: Express
Content-Type: application/json; charset=utf-8
Content-Length: 178
ETag: W/"b2-cCuoDUhklBnDdnS/dk3LEyOpViA"
Date: Thu, 09 Oct 2025 14:05:50 GMT
Connection: keep-alive
Keep-Alive: timeout=5

{
    "message": "Orders added successfully!",
    "orders": [
        {
            "id": 1,
            "user_id": "1",
            "product_id": "1",
            "product_name": "iPhone",
            "product_amount": 500,
            "qty": 1,
            "tax_amt": 5.99,
            "total_amt": 505.99
        }
    ]
}
2. Writing a POST API Test With a Request Body as a JSON Array/JSON Object
The request body can be provided either as a JSON array or a JSON object, depending on the requirement. There are two approaches for creating the request body as JSON.
The first approach uses the Google Gson library to create a JSON object and then add it to a JSON array, forming an array of orders as required for the POST /addOrder API.
Using Google Gson to Create a Request Body for POST Requests
Let’s create a new Java class, TestPostRequestWithJsonArray, and create a testCreateOrder method to implement the test.
public class TestPostRequestWithJsonArray {

    @Test
    public void testCreateOrder () {
        JsonObject orderOne = new JsonObject ();
        orderOne.addProperty ("user_id", "1");
        orderOne.addProperty ("product_id", "1");
        orderOne.addProperty ("product_name", "MacBook Pro");
        orderOne.addProperty ("product_amount", 9998.23);
        orderOne.addProperty ("qty", 1);
        orderOne.addProperty ("tax_amt", 999.8);
        orderOne.addProperty ("total_amt", 10998.03);

        JsonArray orderArray = new JsonArray ();
        orderArray.add (orderOne);

        given ().contentType (ContentType.JSON)
            .when ()
            .log ()
            .all ()
            .body (orderArray.toString ())
            .post ("http://localhost:3004/addOrder")
            .then ()
            .log ()
            .all ()
            .statusCode (201)
            .and ()
            .assertThat ()
            .body ("message", equalTo ("Orders added successfully!"));
    }
}
The JsonObject class from the Google Gson library is instantiated to create a new JSON object representing a single order. Using the addProperty() method, key-value pairs such as user_id, product_name, and total_amt, etc., are added to define the order details.
Once the JSON object is fully constructed, it is added to a JSONArray instance using the add() method. This allows multiple order objects to be grouped in a single JSON array, which can then be sent as the request body in an API call.
It should be noted here that when the body parameter should be passed as orderArray.toString() because REST Assured uses Jackson library by default for JSON serialization, and it does not know how to serialize the com.google.gson.JsonObject or JsonArray objects. It is recommended to convert your JSON Array or Object to a string using the toString() method and then pass it to the body method.
Using Java Collections to Create a Request Body for POST Requests
The List and Map interfaces from the Java Collections can also be used for generating a JSON request payload. This comes in handy in case you don't want to use any third-party libraries.
@Test
    public void testCreateOrderWithCollections () {
        Map<String, Object> orderOne = new HashMap<> ();
        orderOne.put ("user_id", "2");
        orderOne.put ("product_id", "2");
        orderOne.put ("product_name", "Xiaomi Pad 7");
        orderOne.put ("product_amount", 899.67);
        orderOne.put ("qty", 1);
        orderOne.put ("tax_amt", 89.96);
        orderOne.put ("total_amt", 989.63);

        List<Map<String, Object>> orderList = new ArrayList<> ();
        orderList.add (orderOne);

        given ().contentType (ContentType.JSON)
            .when ()
            .log ()
            .all ()
            .body (orderList)
            .post ("http://localhost:3004/addOrder")
            .then ()
            .log ()
            .all ()
            .statusCode (201)
            .and ()
            .assertThat ()
            .body ("message", equalTo ("Orders added successfully!"));
    }
The request body of the order contains a JSON array consisting of multiple JSON objects, each representing the details used to update the order. The order details are mapped in the HashMap that contains key-value pairs of order details, such as user_id, product_id, product_name, total_amt, etc.
The order details are then wrapped inside the JSON Array using the ArrayList, and finally, it is supplied to the body() method of REST Assured in the test.
3. Writing a POST API Test With a Request Body as a POJO
The request body can also be passed using a POJO (Plain Old Java Object). This is a more convenient approach as we write the POJO classes once and reuse them whenever required. Going further, these POJOs can also be combined with the DataProvider annotation in TestNG for data-driven testing.
Let’s create a new POJO class, ensuring we name the fields exactly as they are in the JSON file.
@Getter
@AllArgsConstructor
public class Orders {
    private String user_id;
    private String product_id;
    private String product_name;
    private double product_amount;
    private int    qty;
    private double tax_amt;
    private double total_amt;
}
Lombok is a convenient library that automatically generates getters and constructors at runtime using annotations such as @Getter and @AllArgsConstructor. Since all fields need to be initialized for generating the payload dynamically at runtime, the @AllArgsConstructor annotation is used.
Create a new Java class named TestPostRequestWithPOJO, and within this class, add a test method called testCreateOrder() to implement the test.
public class TestPostRequestWithPOJO {

    @Test
    public void testCreateOrder () {
        Orders orderOne = new Orders ("3", "4", "Google Pixel 9 Pro", 659.87, 1, 65.97, 725.84);
        Orders[] orders = { orderOne };

        given ().contentType (ContentType.JSON)
            .when ()
            .log ()
            .all ()
            .body (orders)
            .post ("http://localhost:3004/addOrder")
            .then ()
            .log ()
            .all ()
            .statusCode (201)
            .and ()
            .assertThat ()
            .body ("message", equalTo ("Orders added successfully!"));

    }
}
The Orders class is instantiated with the respective order values passed in the constructor, which will generate the order object. Next, the POJO array called Orders [] is created, which supplies the orders as the request body to the test. This Orders[] array will allow you to add multiple orders by simply adding more order objects.
Orders orderOne = new Orders ("3", "4", "Google Pixel 9 Pro", 659.87, 1, 65.97, 725.84);
Orders orderTwo = new Orders ("3", "4", "Google Pixel 10 Pro", 700.00, 1, 70.00, 770.00);
        Orders[] orders = { orderOne, orderTwo };
Another approach for supplying the order array is using the List interface from Java collections. So, the implementation will appear as follows, using a List for creating an array of orders:
Orders orderOne = new Orders ("3", "4", "Google Pixel 10 Pro", 759.87, 1, 75.97, 835.84);
List<Orders> orders = new ArrayList<> ();
orders.add (orderOne);
Both of these approaches are correct and can be used; it all depends on your choice, which one you feel is simpler and easier to implement.
In the next part of this tutorial, I will be covering the following points for testing the POST API requests with REST Assured:
- Using JSON files
- With Builder Pattern and DataFaker on Runtime
- Response Verification
Summary
Testing POST API requests involves sending the data in the required format (JSON/XML) to the server. The request body can be created by using raw JSON as a string, Java Collections, or POJOs, which REST Assured serializes into JSON. The REST Assured framework offers inline assertions for validating the status codes, response data, and other relevant properties.
The request body is a fundamental component of POST API requests. It is important to use a dynamic approach for the request body, as this enhances maintainability as the project grows. While a hard-coded approach can be used temporarily, it is not recommended for long-term use.
Published at DZone with permission of Faisal Khatri. See the original article here.
Opinions expressed by DZone contributors are their own.
Comments