Token-Based Authentication in Angular 6 With Web API
Want to learn how to perform token-based authentication? Check out this tutorial on using OWIN Middleware and a Web API in Angular 6.
Join the DZone community and get the full member experience.
Join For Free
In this tutorial, I will show how to perform token-based authentication with OWIN Middleware and a Web API that has the same integration with Angular 6.
If you prefer to watch a video on how to do this, here is the link for same, explaining token-based authentication with a Web API and Angular 6.
Now, let us get started! Here are the basic steps:
- Angular 6 login and logout with the Web API using token-based authentication
- Design login form in Angular 6 application
- Web API token-based authentication using OWIN and ASP.Net Identity.
Let us start with the Web API:
Create a Web API Project
You will do this by creating a class, as shown below:
using System;
using System.Collections.Generic;
using System.ComponentModel.DataAnnotations;
using System.Linq;
using System.Web;

namespaceDeepCart.Models
{
publicclassUser
{
[Key]
publicint Id { get; set; }

[Required, MinLength(3), MaxLength(50)]
publicstring UserName { get; set; }

[Required, MinLength(3), MaxLength(50)]
publicstring Password { get; set; }
}
}
Now, let's build the project.
Install the Following Packages in Your Web API Project
Microsoft.Owin

Microsoft.Owin.Host.SystemWeb

Microsoft.Owin.Security.OAuth

Microsoft.Owin.Security

Microsoft.AspNet.Identity.Owin

Microsoft.Owin.Cors
These packages are the important packages to give support for the OWIN Middleware and OAuth.
In this tutorial, we will be talking about bearer authentication.
Write a Provider Class
using Microsoft.Owin.Security;
using Microsoft.Owin.Security.OAuth;
using System.Collections.Generic;
using System.Linq;
using System.Security.Claims;
using System.Threading.Tasks;
using System.Web.Http.Cors;
using DeepCart.Models;
using System;

namespaceDeepCart.DtProvider
{
// This tutorial is by DotNet Techy YouTube Channel
// For more info about channel You can visit this link
// [](https://www.youtube.com/c/dotnettechy)

[EnableCors(origins: "*", headers: "*", methods: "*")]
publicclassDotNetTechyAuthServerProvider : OAuthAuthorizationServerProvider
{

publicoverrideasync Task ValidateClientAuthentication(OAuthValidateClientAuthenticationContext context)
{
context.Validated();
}

publicoverrideasync Task GrantResourceOwnerCredentials(OAuthGrantResourceOwnerCredentialsContext context)
{
var identity = new ClaimsIdentity(context.Options.AuthenticationType);

context.OwinContext.Response.Headers.Add("Access-Control-Allow-Origin", new[] { "*" });

using (var db = new DeepCartContext())
{
if (db != null)
{
var user = db.Registrations.ToList();
if (user != null)
{
if (!string.IsNullOrEmpty(user.Where(u => u.UserName == context.UserName && u.Password == context.Password).FirstOrDefault().UserName))
{
var currentUser = user.Where(u => u.UserName == context.UserName && u.Password == context.Password).FirstOrDefault();
identity.AddClaim(new Claim("Role", currentUser.Role));
identity.AddClaim(new Claim("Id",Convert.ToString( currentUser.Id)));

var props = new AuthenticationProperties(new Dictionary<string, string>
{
{
"DisplayName", context.UserName
},
{
"Role", currentUser.Role
}
});

var ticket = new AuthenticationTicket(identity, props);
context.Validated(ticket);
}
else
{
context.SetError("invalid_grant", "Provided username and password is not matching, Please retry.");
context.Rejected();
}
}
}
else
{
context.SetError("invalid_grant", "Provided username and password is not matching, Please retry.");
context.Rejected();
}
return;
}
}

}
}
This DotNetTechyAuthServerProvider class is inherited from the OAuthAuthorizationServerProvider, and this comes from Microsoft.Owin.Security.OAuth.
It has two basic methods that need to be overridden in order to validate the username and password from your database and return the token if the username and password are valid. The first method is theValidateClientAuthentication, and the second method is the GrantResourceOwnerCredentials. You will better understand this by looking at the code.
Create a Startup Class
using DeepCart.DtProvider;

using Microsoft.Owin;

using Microsoft.Owin.Cors;

using Microsoft.Owin.Security.OAuth;

using Owin;

using System;

using System.Collections.Generic;

using System.Linq;

using System.Web;

using System.Web.Http;

[assembly: OwinStartup(typeof(DeepCart.Startup))]

namespace DeepCart

{

// This tutorial is by DotNet Techy YouTube Channel

// For more info about channel You can visit this link

//

public class Startup

{

public void ConfigureAuth(IAppBuilder app)

{

app.UseCors(CorsOptions.AllowAll);
var OAuthOptions = newOAuthAuthorizationServerOptions
{
AllowInsecureHttp = true,
TokenEndpointPath = newPathString("/token"),
AccessTokenExpireTimeSpan = TimeSpan.FromMinutes(20),
Provider = newDotNetTechyAuthServerProvider()

};

app.UseOAuthBearerTokens(OAuthOptions);
app.UseOAuthAuthorizationServer(OAuthOptions);
app.UseOAuthBearerAuthentication(newOAuthBearerAuthenticationOptions());


HttpConfiguration config = newHttpConfiguration();
WebApiConfig.Register(config);

}

public void Configuration(IAppBuilder app)
{
//app.UseCors(Microsoft.Owin.Cors.CorsOptions.AllowAll);
ConfigureAuth(app);
GlobalConfiguration.Configure(WebApiConfig.Register);

}


}

}

This is the imprtant line which is loading Owin when application gets intilized.

[assembly: OwinStartup(typeof(DeepCart.Startup))]

Then in

var OAuthOptions = new OAuthAuthorizationServerOptions

{

AllowInsecureHttp = true,

TokenEndpointPath = new PathString("/token"),

AccessTokenExpireTimeSpan = TimeSpan.FromMinutes(20),

Provider = new DotNetTechyAuthServerProvider()

};
We are providing our earlier created provider: DotNetTechyAuthServerProvider.
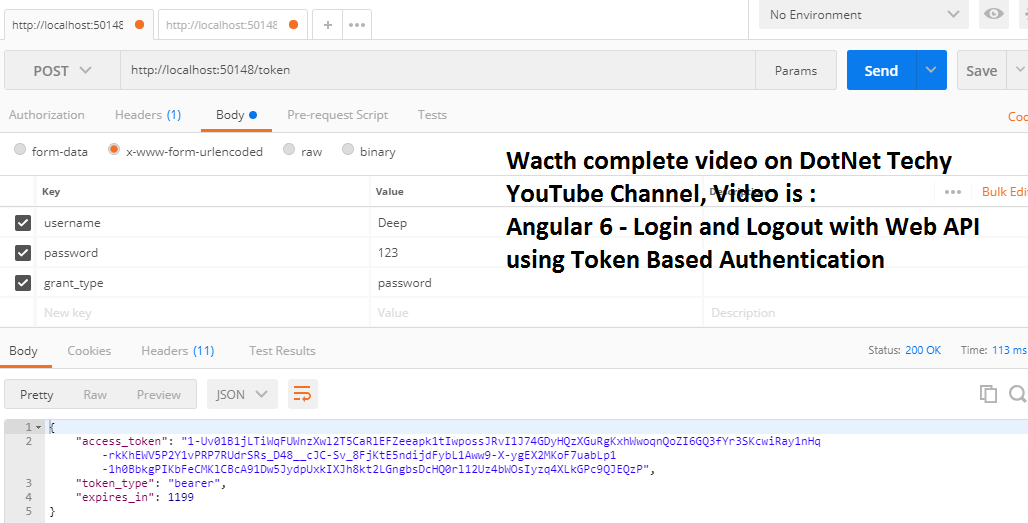
Testing the Access Token Generation
Next, we will make a request from the postman where the username and password should be from your database and whatever you have given registration.
Here is the screenshot of testing the token.
Integrate This Access Token in Angular 6
This involves multiple steps:
a) Create a service to call the Web API and get the token back.
b) Store the token for the next request to pass into the header
c) Call the ValidateUser method form, and from your login button, click event
d) Create an Auth Guard and override the CanActivate method
Service Method
// This tutorial is by DotNet Techy YouTube Channel

// For more info about channel You can visit this link

//

ValidateUser (user:any)

{

var userData = "username=" + user.UserName + "&password=" + user.Password + "&grant_type=password";

var reqHeader = new HttpHeaders({ 'Content-Type': 'application/x-www-form-urlencoded','No-Auth':'True' });

returnthis.httpClient.post(this.apiURL+ '/token',userData,{ headers: reqHeader })
.pipe(
map(res => res),
catchError( this.errorHandler)
);


}

Auth Guard

// This tutorial is by DotNet Techy YouTube Channel

// For more info about channel You can visit this link

// https://www.youtube.com/c/dotnettechy

canActivate(): boolean {

if (!this.auth.isAuthenticated()) {

//this.router.navigate(['login']);

console.log('You are not authrised to view this page')

return false;

}

return true;

}

store token in local storage

storeToken(token: string) {

localStorage.setItem("token", token);

}
Once the login is successful, you should call the storeToken method.
Opinions expressed by DZone contributors are their own.
Comments