Continuous Delivery Using JFrog Artifactory With Shippable
You can push your versioned package to Artifactory after CI with Shippable's recently added native integration with JFrog's Artifactory.
Join the DZone community and get the full member experience.
Join For FreeShippable recently added a native integration with JFrog's Artifactory. You can push your versioned package to Artifactory after CI as explained in this blog. From Artifactory, you can deploy the package to a test environment and then promote the package through various environments and finally to production. You can also pull dependencies from Artifactory as part of your CI and CD workflows on Shippable.
JFrog's Artifactory is one of the most advanced repository managers available today. It is open-source and especially popular with Java app developers and enterprises who want to self-host a repository manager for their projects. You can learn more about Artifactory here.
This blog continues from where the earlier blog, Pushing to JFrog Artifactory After CI, left off. It assumes that you have forked the sample project, set up CI, and pushed HelloWorld.war to your Artifactory account. This blog will deploy the WAR file to a beta environment running on a node cluster on Digital Ocean.
1. Enable Sample Project and Push WAR to Artifactory
Complete all steps in the Pushing to JFrog Artifactory After CI blog.
2. Create Virtual Machine(s)
Next, you should create one or more nodes on Amazon EC2, Digital Ocean, or wherever you prefer. You will deploy your application to this node(s). We chose Digital Ocean's droplets while creating this sample, but you can choose any IaaS. Our node had the following config:
Distribution: Ubuntu 16.04.1.
Size: $20/mo 2CPUs, 2GB RAM, 30GB SSD.
Block storage: None.
Datacenter region: Our servers are on the east coast, so we recommend you choose one close to that.
Additional Options: None.
SSH key: Add your machine's SSH key if you do not want to sign into the node with a password each time.
Choose number of droplets you want to deploy the application to and give names to each.
3. Install Tomcat 8 on Your Node(s)
Follow these instructions to install Tomcat 8 on all your nodes in the cluster. Please note that as of the time this blog was published, the latest version of Tomcat is 8.5.9, so you will need to use the right version in the curl statement of the instructions.
4. Add a Node Cluster Integration to Shippable
You now need to add an integration for your nodes to your Shippable account so that your account has permissions to deploy to your nodes. To do this, follow instructions from the Add an account integration section of the node clusters integration page. Write down the integration name because it will be needed in the next step.
5. Edit the Pipeline Configuration
Your pipeline configuration is in the pipelines branch of your forked sample repository. You will need to make the following changes to the configuration.
Update shippable.resources.yml
Update the cluster resource demo-war-test-cls with the integration name from the previous step.
Name:
demo-war-test-cls.Type: Cluster.
Integration: Your node cluster integration.
Update the demo-war resource that points to your WAR file on Artifactory. Also update the repository name if you pushed HelloWorld.war to a different repository from builds.
Name: demo-war .
Type: File.
Integration: Your node cluster integration.
Source name: Builds/HelloWorld.war (update the repository name if needed).
Version name: Initial.
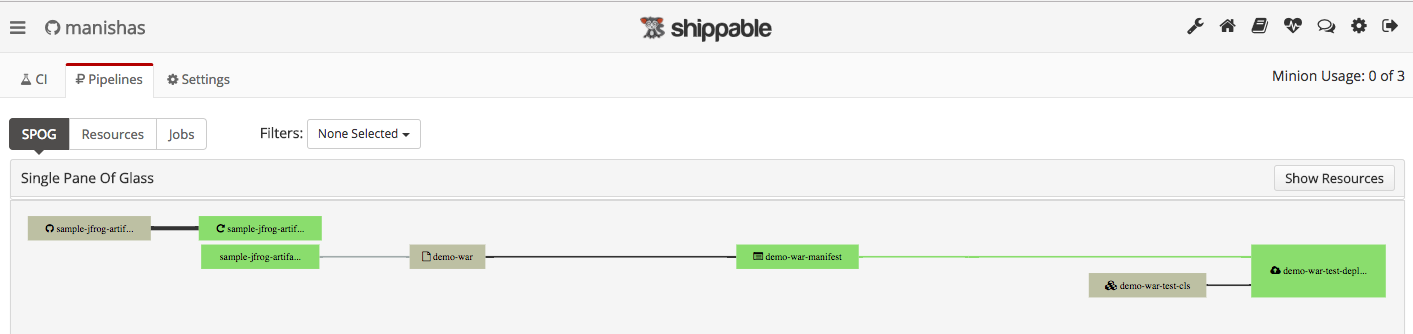
Take a look at shippable.jobs.yml. demo-war-manifest is a manifest job that creates a new manifest every time the WAR file on Artifactory is changed. demo-war-test-deploy is the deploy job that is triggered every time a new manifest is available. This job deploys the application to all nodes in your cluster.
7. Seed Your Pipeline
Next, you will need to add your pipeline config to your Shippable subscription. To do this, follow steps described in the Adding a seed repository section in our docs. Please make sure you select the pipelines branch while setting up your sync repository.
Connect Your CI to the Newly Created Pipeline
Now that you have seeded your pipeline, you should connect it to your CI. On completing this step, every code change to your sample application will trigger a deployment to the node cluster we set up in previous steps.
8. Create an API Token for Your Account
To do this, go to your account settings by clicking on the gear icon in the top navbar. Then, click on API tokens in the left sidebar menu and create a token. Copy the token because you won't be able to see it again.
9. Create an Event Trigger Integration
Go to Integrations in the left sidebar menu of Account Settings and then click on Add Integration. Select Event Trigger from the list and complete the settings as shown below. Please make sure you update the Authorization text box in the format apiToken <token-value>. The resource name should be set to the file resource demo-war. Save the integration.

10. Update shippable.yml in the Master Branch of Your Forked Repository
Uncomment the notifications section and include the event trigger name you created in the earlier step.
Integration name: Your event trigger integration name.
Type: Webhook.
Payload: versionName=$BUILD_NUMBER .
on_success: Always.
Commit and push to the master branch of your forked repository.
11. Run Your End-to-End Pipeline
This will automatically run a CI build for the forked repository. This will push a new version of HelloWorld.war to your Artifactory account. Your pipeline will now detect tha new WAR file version and trigger the manifest job demo-war-manifest. This will in turn trigger the deploy job demo-war-test-deploy.
12. Verify Your Deployed Application
Your application should be deployed to http://<your-node-url>:8080/HelloWorld if your pipeline deploy job finishes successfully.

Published at DZone with permission of Pavan Belagatti. See the original article here.
Opinions expressed by DZone contributors are their own.
Comments