Tutorial: How to Build a Progressive Web App (PWA) with Face Recognition and Speech Recognition
I will discuss advanced PWA features that provide access to your hardware APIs. We are going to build an app with Face Recognition and Speech Recognition. This is now possible on the Web/Browser! The native experience users see on native apps is now brought to the web! This would open up a whole new approach.
Join the DZone community and get the full member experience.
Join For FreeThis is a follow up to the second tutorial on PWA. You can also follow this tutorial if you haven't followed the second one or my first tutorial about PWA. We are going to focus on some new Web APIs, such as:
- Face detection API, for face recognition in the browser. https://justadudewhohacks.github.io/face-api.js/docs/index.html
- Web speech API for enabling 'Speech-to-text' in this app. https://developer.mozilla.org/en-US/docs/Web/API/Web_Speech_API/Using_the_Web_Speech_API
We add these APIs to our existing PWA for taking 'selfies.' With face detection, we predict your emotion, your gender, and your age.
To record an accompanying text ('Speech-to-text') for your 'selfie,' you can easily use the Web Speech API.
Experimental Web Platform features
The above APIs only work if you have enabled 'Experimental Web Platform features' in your Chrome browser via the URL: chrome: // flags
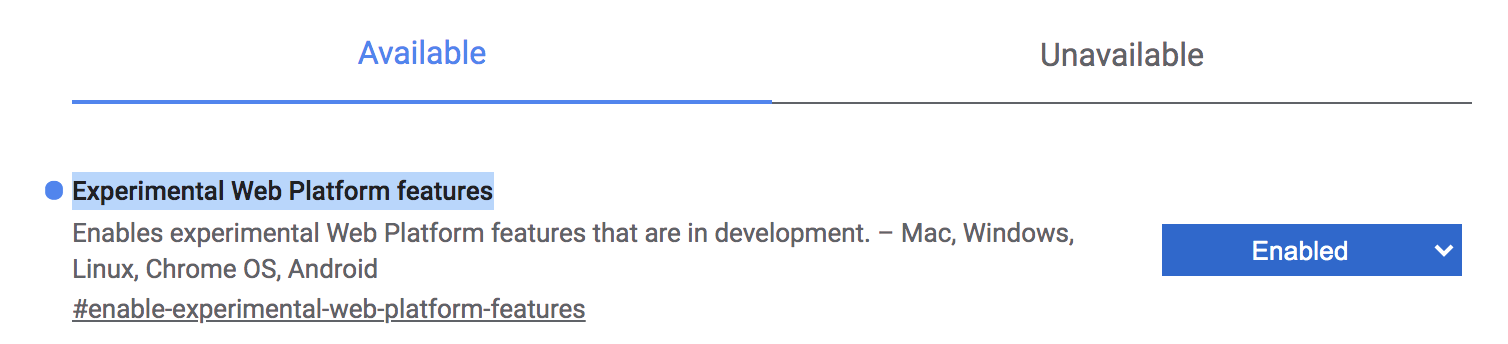
Figure 1
Project Setup
As a starting point for the tutorial, clone the following Github repository:
xxxxxxxxxx
git clone https://github.com/petereijgermans11/progressive-web-app
Then in your terminal, move to the following directory:
xxxxxxxxxx
cd pwa-article/pwa-app-native-features-rendezvous-init
and install the dependencies through:
xxxxxxxxxx
npm i && npm start
Open your app on: http:// localhost:8080
Figure 2
Public URL for Your Mobile
There are many ways to access our localhost:8080 from a remote mobile device. You can use ngrok for this (https://ngrok.com/).
Install ngrok via:
xxxxxxxxxx
npm install -g ngrok
And run the following command in your terminal:
xxxxxxxxxx
ngrok http 8080
This command generates a public URL for you. Then browse to the generated URL on your mobile in Chrome.
Face Recognition With JavaScript
Face detection/face recognition is one of the most used applications of Artificial Intelligence. The use of face recognition has increased in recent years.
In this tutorial, we will expand the existing app with face recognition that even works in the browser. We predict your emotion, your gender, and your age based on your 'selfie.' We are using the Face-api.js here.
Face-api.js contains a JavaScript API for face recognition in the browser. This API is implemented on top of the tensorflow.js API.
The output of this app looks as shown below:
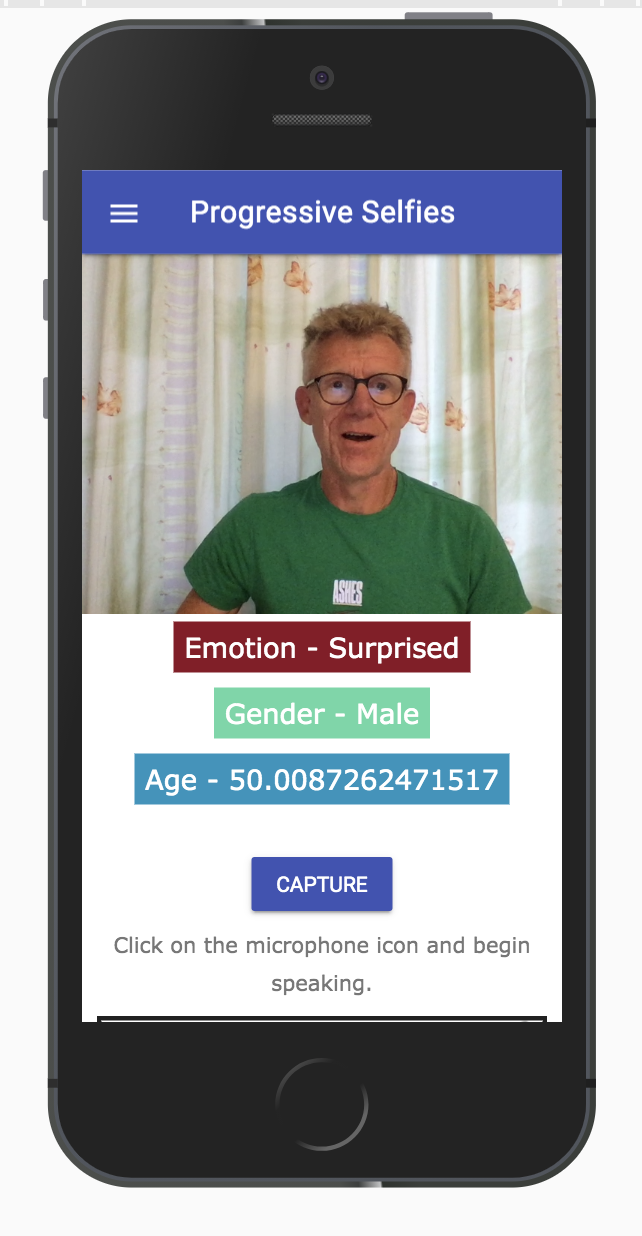
Figure 3
The steps to implement the above are as follows:
Step 1: Face-api
Face-api.js contains a JavaScript API for face recognition in the browser. This face-api is already available in the folder: public/src/lib
Step 2: Models
Models are the trained data that we will use to detect features of your 'selfie.' These models are already available in the folder: public/src/models
Step 3: index.html
In the index.html file, we import:
- the existing facedetection.css for the styling (see listing 1);
- face-api.min.js, this is the Face detection API for processing the model data and extracting the features (see listing 3);
- facedetection.js where we will write our logic.
First, import the styling into the index.html
xxxxxxxxxx
<link rel="stylesheet" href="src/css/facedetection.css">
Listing 1
Place the code below in the index.html file, directly below the tag: <div id="create-post">
We use the existing video tag to be able to take a "selfie"(see listing 2). And a "result container" for predicting your emotion, your gender, and your age.
x
<video id="player" autoplay></video>
<div class="container-faceDetection">
</div>
<canvas id="canvas" width="320px" height="240px"></canvas>
<div class="result-container">
<div id="emotion">Emotion</div>
<div id="gender">Gender</div>
<div id="age">Age</div>
</div>
Listing 2
Place the code below at the bottom of the index.html so that we can use the Face-detection API:
xxxxxxxxxx
<script src="src/lib/face-api.min.js"></script>
<script src="src/js/facedetection.js"></script>
Listing 3
Step 4: Import Models Into the PWA
Here we create a separate function in feed.js to start the video streaming (listing 4).
Move the following existing code from the initializeMedia()-function into a separate function called startVideo() (see result code: listing 4)
This function is responsible for the video streaming:
xxxxxxxxxx
const startVideo = () => {
navigator.mediaDevices.getUserMedia({video: {facingMode: 'user'}, audio: false})
.then(stream => {
videoPlayer.srcObject = stream;
videoPlayer.style.display = 'block';
videoPlayer.setAttribute('autoplay', '');
videoPlayer.setAttribute('muted', '');
videoPlayer.setAttribute('playsinline', '');
})
.catch(error => {
console.log(error);
});
}
Listing 4
In the existing feed.js, we use Promise.all to load the models for the face API asynchronously. Once these models are properly loaded, we call the created startVideo() function (see listing 5).
Place the following code at the bottom of the initializeMedia() function:
xxxxxxxxxx
Promise.all([
faceapi.nets.tinyFaceDetector.loadFromUri("/src/models"),
faceapi.nets.faceLandmark68Net.loadFromUri("/src/models"),
faceapi.nets.faceRecognitionNet.loadFromUri("/src/models"),
faceapi.nets.faceExpressionNet.loadFromUri("/src/models"),
faceapi.nets.ageGenderNet.loadFromUri("/src/models")
]).then(startVideo);
Listing 5
Step 5: Implement the facedetection.js
Below are the functions of the Face detection API, which we use in our app:
faceapi.detectSingleFace |
faceapi.detectSingleFace uses the SSD Mobilenet V1 Face Detector. You can specify the face recognition by passing the videoPlayer object an options object. To detect multiple faces, replace the detectSingleFace feature with detectAllFaces.
withFaceLandmarks |
This function is used to detect 68 face landmarks.
withFaceExpressions |
This function detects all faces in an image, recognizes face expressions from each face, and returns an array.
withAgeAndGender |
This function detects all faces in an image, estimates the age and gender of each face, and returns an array.
Place the code below in the existing file with the name: facedetection.js, under the existing code (see listing 6).
The above functions are called in here to perform face recognition.
First, a playing event handler is added to the videoPlayer, which responds when the video camera is active.
The variable videoPlayer contains the HTML element <video>. Your video tracks will be rendered in this.
Then a canvasElement is created under the name canvasForFaceDetection. This is used for face recognition. This canvasForFaceDetection is placed in the container faceDetection.
The setInterval() function repeats the faceapi.detectSingleFace function at a time interval of 100 milliseconds. This function is called asynchronously using async / await, and finally, the results of the face recognition are displayed in the fields: emotion, gender, and age.
xxxxxxxxxx
videoPlayer.addEventListener("playing", () => {
const canvasForFaceDetection = faceapi.createCanvasFromMedia(videoPlayer);
let containerForFaceDetection = document.querySelector(".container-faceDetection");
containerForFaceDetection.append(canvasForFaceDetection);
const displaySize = { width: 500, height: 500};
faceapi.matchDimensions(canvasForFaceDetection, displaySize);
setInterval(async () => {
const detections = await faceapi
.detectSingleFace(videoPlayer, new faceapi.TinyFaceDetectorOptions())
.withFaceLandmarks()
.withFaceExpressions()
.withAgeAndGender();
const resizedDetections = faceapi.resizeResults(detections, displaySize);
canvasForFaceDetection.getContext("2d").clearRect(0, 0, 500, 500);
faceapi.draw.drawDetections(canvasForFaceDetection, resizedDetections);
faceapi.draw.drawFaceLandmarks(canvasForFaceDetection, resizedDetections);
if (resizedDetections && Object.keys(resizedDetections).length > 0) {
const age = resizedDetections.age;
const interpolatedAge = interpolateAgePredictions(age);
const gender = resizedDetections.gender;
const expressions = resizedDetections.expressions;
const maxValue = Math.max(Object.values(expressions));
const emotion = Object.keys(expressions).filter(
item => expressions[item] === maxValue
);
document.getElementById("age").innerText = `Age - ${interpolatedAge}`;
document.getElementById("gender").innerText = `Gender - ${gender}`;
document.getElementById("emotion").innerText = `Emotion - ${emotion[0]}`;
}
}, 100);
});
Listing 6
Web Speech API
The interface we are going to build for the Web Speech API will look like the one shown below (see figure 4). As you can see, the screen contains an input field to enter text. But it is also possible to record text using 'Speech-to-text.' For this, you have to click on the microphone icon in the input field.
Under this input field, you can also choose the desired language via a select box.
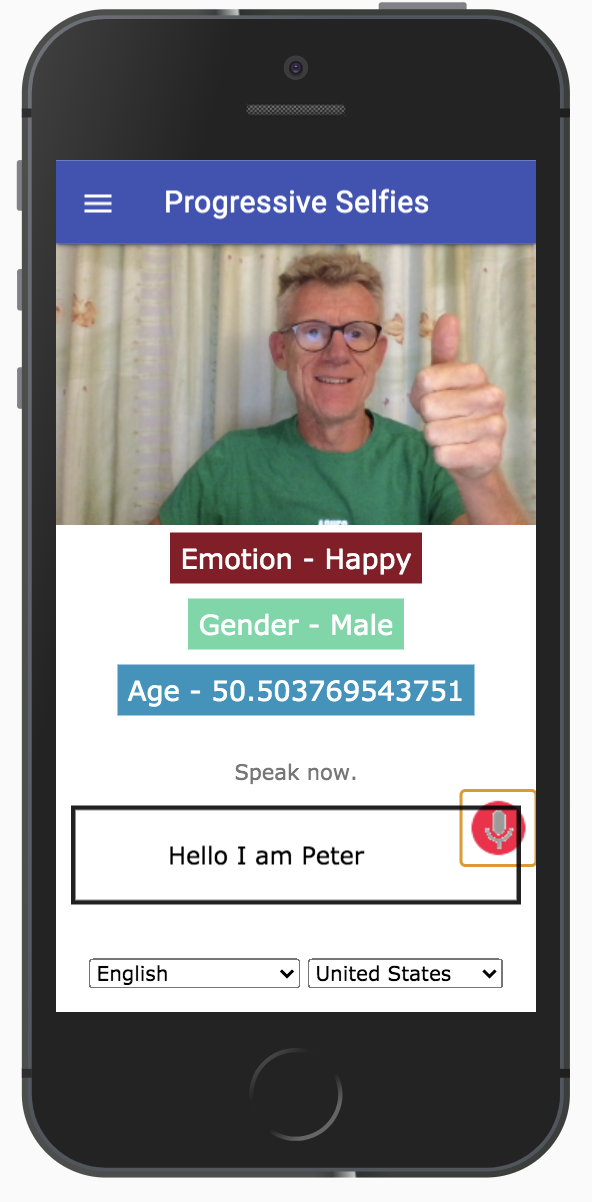
Figure 4
The steps to implement the above are as follows:
Step 1: index.html
In the index.html file, we import:
- the existing speech.css for the styling (see listing 7);
- speech.js where we will write our logic for the 'Speech-to-Text' feature (see listing 9).
First, import the styling into index.html:
x
<link rel="stylesheet" href="src/css/speech.css">
Listing 7
Place the code below in the index.html, directly below the tag: <form> (see listing 8)
In the <div id ="info"> - section, the info texts are placed that can be displayed as soon as this API is used.
With the startButton onclick-event, you can start and use the API.
Finally, with updateCountry onchange-event you can select the desired language via a select box.
xxxxxxxxxx
<div id="info">
<p id="info_start">Click on the microphone icon and begin speaking.</p>
<p id="info_speak_now">Speak now.</p>
<p id="info_no_speech">No speech was detected. You may need to adjust your
<a href="//support.google.com/chrome/bin/answer.py?hl=en&answer=1407892">
microphone settings</a>.</p>
<p id="info_no_microfoon" style="display:none">
No microphone was found. Ensure that a microphone is installed and that
<a href="//support.google.com/chrome/bin/answer.py?hl=en&answer=1407892">
microphone settings</a> are configured correctly.</p>
<p id="info_allow">Click the "Allow" button above to enable your microphone.</p>
<p id="info_denied">Permission to use microphone was denied.</p>
<p id="info_blocked">Permission to use microphone is blocked. To change,
go to chrome://settings/contentExceptions#media-stream</p>
<p id="info_upgrade">Web Speech API is not supported by this browser.
Upgrade to <a href="//www.google.com/chrome">Chrome</a>
version 25 or later.</p>
</div>
<div class="right">
<button id="start_button" onclick="startButton(event)">
<img id="start_img" src="./src/images/mic.gif" alt="Start"></button>
</div>
<div class="input-section mdl-textfield mdl-js-textfield mdl-textfield--floating-label div_speech_to_text">
<span id="title" contenteditable="true" class="final"></span>
<span id="interim_span" class="interim"></span>
<p>
</div>
<div class="center">
<p>
<div id="div_language">
<select id="select_language" onchange="updateCountry()"></select>
<select id="select_dialect"></select>
</div>
</div>
Listing 8
Place the code below at the bottom of index.html, so we can use the Web Speech API (see listing 9):
xxxxxxxxxx
<script src="src/js/speech.js"></script>
Listing 9
Step 2: Implement the Web Speech API
This code in the speech.js initializes the Web Speech Recognition API (see listing 10):
xxxxxxxxxx
if ('webkitSpeechRecognition' in window) {
start_button.style.display = 'inline-block';
recognition = new webkitSpeechRecognition();
recognition.continuous = true;
recognition.interimResults = true;
recognition.onstart = () => {
recognizing = true;
showInfo('info_speak_now');
start_img.src = './src/images/mic-animate.gif';
};
recognition.onresult = (event) => {
let interim_transcript = '';
for (let i = event.resultIndex; i < event.results.length; ++i) {
if (event.results[i].isFinal) {
final_transcript += event.results[i][0].transcript;
} else {
interim_transcript += event.results[i][0].transcript;
}
}
final_transcript = capitalize(final_transcript);
title.innerHTML = linebreak(final_transcript);
interim_span.innerHTML = linebreak(interim_transcript);
};
recognition.onerror = (event) => {
.
};
recognition.onend = () => {
};
}
Listing 10
First, it is checked whether the API of the 'webkitSpeechRecognition' is available in the window object. The window object represents the browser window (Javascript is part of the window object).
If the 'webkitSpeechRecognition' is available in the window object, then a 'webkitSpeechRecognition' object is created via: recognition = new webkitSpeechRecognition ();
We then set the following properties of the Speech API:
recognition.continuous = true |
This property determines whether results are continuously returned for each recognition.
recognition.interimResults = true |
This property determines whether the Speech recognition returns intermediate results.
Event Handler
recognition.onstart(event) |
This event handler is executed when the SpeechRecognition API is started (see Listing 10).
The following info text is displayed: 'Speak now.' Then an animation of a pulsating microphone is shown: mic-animate.gif (see image).
recognition.onresult(event) |
This event handler is executed when the SpeechRecognition API returns a result.
The SpeechRecognitionEvent "results property" returns a 2-dimensional SpeechRecognitionResultList. The isFinal property determines in a "loop" whether a result text from the list is 'final' or 'interim.' The results are also converted to a string with the transcript property.
recognition.onend(event) |
This event handler is executed when Speech Recognition is terminated.
No info text is displayed, only the default icon of a microphone.
recognition.onerror(event) |
This event handler handles the errors. A matching info text is also shown with the error message.
Starting the Speech Recognition
Add the following code at the top of the already existing speech.js to start the Web Speech API, using the startButton event (see listing 11):
xxxxxxxxxx
const startButton = (event) => {
if (recognizing) {
recognition.stop();
return;
}
final_transcript = '';
recognition.lang = select_dialect.value;
recognition.start();
ignore_onend = false;
title.innerHTML = '';
interim_span.innerHTML = '';
start_img.src = './src/images/mic-slash.gif';
showInfo('info_allow');
start_timestamp = event.timeStamp;
};
Listing 11
This code starts the Web Speech Recognition API using recognition.start(). This start() function triggers a start event and is handled in the event handler recognition.onstart() (see Listing 10).
Furthermore, the selected language is set with recognition.lang. And finally, a pulsating microphone image is shown.
Conclusion
The Web is getting more sophisticated day-by-day. More native features are being brought on board; this is due to the fact that the number of web users is far greater than native app users. The native experience users see on native apps is brought to the web to retain them there without the need to go back to the native apps.
After this introduction, you can continue with an extensive tutorial that you can find in: https://github.com/petereijgermans11/progressive-web-app/tree/master/pwa-workshop.
See also my previous article. In this article, I will discuss some advanced PWA features that provide access to your hardware APIs, like Media Capture API, Geolocation API, and the Background Sync API.
And take a look at my first article. In this article, I discuss some basics behind building PWAs and then provide a comprehensive tutorial on creating your first PWA.
Follow or like me on Twitter: https://twitter.com/EijgermansPeter.
Opinions expressed by DZone contributors are their own.
Comments