Two-Factor Authentication in Spring Webflux REST API
Join the DZone community and get the full member experience.
Join For FreeMulti-factor authentication became common practice for many cases, especially for enterprise applications or those that deal with sensitive data (like finance apps). Moreover, MFA is enforced (especially in the EU) by law in a growing number of industries, and if you are working on an app, that by some requirement, has to enable two-factor auth in some way, don’t hesitate to check out this post.
In this article, I will show you how to write a two-factor authentication for a reactive API, built with Spring Webflux. This app uses TOTP (one-time codes, generated by an app on the user device – like Google Authenticator)m as the second security factor, alongside email and password pairs.
How Two-Factor Authentication Does Works
Technically, two-factor authentication (or multi-factor authentication) stands for a security process, where users have to provide 2 or more factors to verify themselves. That means, that usually, a user supplies a password in addition to another identifier. It can be a one-time password, hardware tokens, biometric factors (like fingerprint), etc.
Basically, such practice requires several steps:
- User enters email (username) and password.
- Alongside credentials, user submits a one-time code, generated by an authenticator app.
- The app authenticates email (username) and password and verifies the one-time code, using user’s secret key, issued during the signup process,
That means, that usage of authenticator apps (like Google Authenticator, Microsoft Authenticator, FreeOTP etc) brings a number of advantages, compared to using SMS for code delivery. They are not sensitive for SIM attacks and work without cell/internet connection.
An Example Application
Through this post, we will complete a small simple REST API, which uses two-factor authentication techniques. It requires users to provide both an email-password pair and a short code, generated by an app. You can use any compatible app to generate TOTP; I use Google Authenticator for Android. The source code is available in this github repository. The app requires JDK 11, Maven and MongoDB (to store user profiles). Take a look on the project structure:

I will not go through each component; rather we will concentrate only on AuthService (and implementation), TokenManager (and implementation), and TotpManager (and implementation). These parts are responsible for authentication flows. Each of them provides the following functionality:
AuthService– is a component that stores all business logic, related to authentication/authorization, including signup, login, and token validationTokenManager– this component abstracts a code to generate and validate JWT tokens. This makes main business logic implementation-independent from concrete JWT libraries. In this post, I use Nimbus JOSE-JWT.TotpManager– another abstraction to isolate implementation from base logic. It is used to generate a user’s secret and to assert supplied short codes. I do this with this TOTP Java library, but there are other choices as well.
As you can note, I will focus only on auth components. We will start from the user creation process (signup), which requires the secret’s generation and the issue of the token. Then, we will get into the login flow, which involves an assertion of the short-code, supplied by the user.
Implement a Signup Flow
In this section we will complete a signup process that involves the following steps:
- Get signup request from the client.
- Check that user does not exist already.
- Hash password.
- Generate a secret key.
- Store users in the database.
- Issue JWT.
- Return a response with the user id, secret key, and token.
I separated the main business logic (AuthServiceImpl) from token generation and secret key generation.
General Steps
The main component, AuthServiceImpl, accepts SignupRequest and returns SignupResponse. Behind the scenes, it is responsible for whole signup logic. First, take a look at its implementation:
xxxxxxxxxx
public Mono<SignupResponse> signup(SignupRequest request) {
// generating a new user entity params
// step 1
String email = request.getEmail().trim().toLowerCase();
String password = request.getPassword();
String salt = BCrypt.gensalt();
String hash = BCrypt.hashpw(password, salt);
String secret = totpManager.generateSecret();
User user = new User(null, email, hash, salt, secret);
// preparing a Mono
Mono<SignupResponse> response = repository.findByEmail(email)
.defaultIfEmpty(user) // step 2
.flatMap(result -> {
// assert, that user does not exist
// step 3
if (result.getUserId() == null) {
// step 4
return repository.save(result).flatMap(result2 -> {
// prepare token
// step 5
String userId = result2.getUserId();
String token = tokenManager.issueToken(userId);
SignupResponse signupResponse = new SignupResponse();
signupResponse.setUserId(userId);
signupResponse.setSecretKey(secret);
signupResponse.setToken(token);
signupResponse.setSuccess(true);
return Mono.just(signupResponse);
});
} else {
// step 6
// scenario - user already exists
SignupResponse signupResponse = new SignupResponse();
signupResponse.setSuccess(false);
return Mono.just(signupResponse);
}
});
return response;
}
Now, let's go step-by-step through my implementation. Basically, we can get two possible scenarios with the signup process: user is new, and we sign it up, or the user is already present in the database, so we have to reject the request.
Consider these steps:
- We create a new user entity from the request data and generate a secret.
- Provide the new entity as default, if user does not exist.
- Check, the repository’s call result.
- Save user in the database and obtain a
userId - Issue a JWT.
- Return a rejecting response if user does already exist.
Note, that here I use jBcrypt library in order to generate secure hashes and salts. This is a more acceptable practice than using SHA functions: please, don’t use them in order to produce hashes, as they are known for vulnerabilities and security issues. I can advise you to check this tutorial on using jBcrypt to get more information.
Generate a Secret Key
Next, we need to implement a function to generate a new secret key. It is abstracted inside TotpManager.generateSecret(). Take a look at the code below:
xxxxxxxxxx
public String generateSecret() {
SecretGenerator generator = new DefaultSecretGenerator();
return generator.generate();
}
Testing
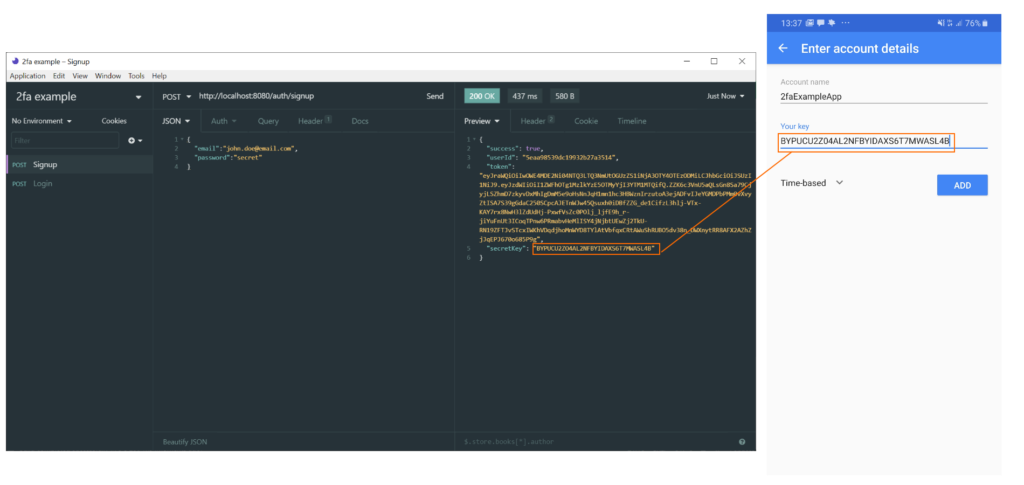
After the signup logic was implemented, we can validate that everything works as expected. First, let's call the signup endpoint to create a new user. The result object contains userId, token, and secret key that you need to add to the app generator (Google Authenticator):

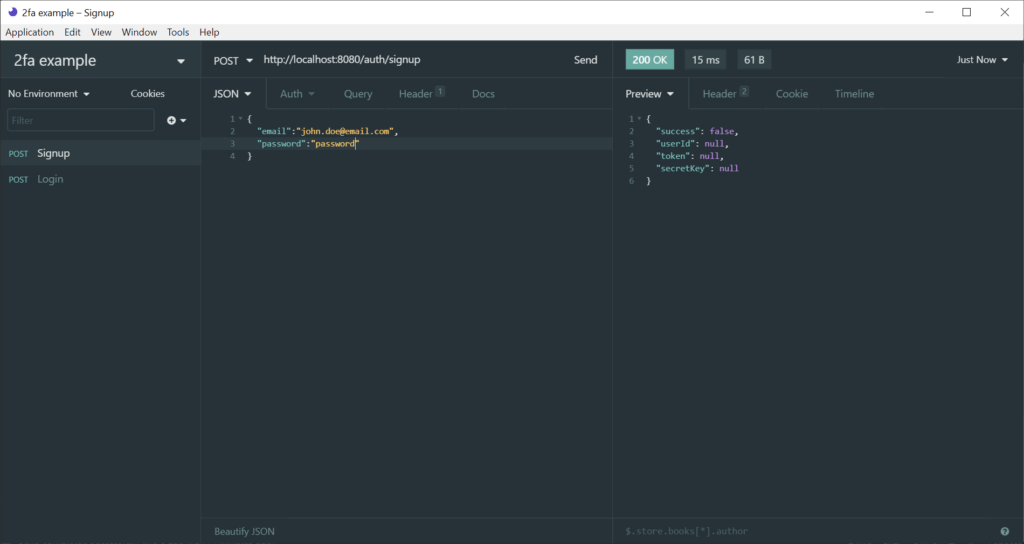
However, we should not be allowed to signup twice with same email. Let try this case to assert, that app actually looks for the existed email before creating a new user:

The next section deals with a login flow.
Login
The login process consists of two main parts: validating email-password credentials and validating one-time code, supplied by the user. As in the previous section, I start with presenting the required steps. For login it would be:
- Get login request from the client.
- Find the user in the database.
- Asserting existing password with the password supplied in the request.
- Asserting one-time code.
- Return login response with token.
The process of JWT generation is the same as in the signup stage.
General Steps
Main business logic is implemented in AuthServiceImpl.login. It does the majority of work. First, we need to find a user by request email in database; otherwise, we provided a default value with null fields. The condition user.getUserId() == null means that the user does not exist, and signup flow should be aborted.
Next, we need to assert that the passwords match. As we stored the password hash in the database, we first need to hash a password from the request with the stored salt and then assert both values.
If passwords matched, we need to verify a code using the secret value, which we stored before. The successful result of validation is followed by the generation of JWT and the creation of the LoginResponse object. The final source code for this part is presented to you below:
xxxxxxxxxx
public Mono<LoginResponse> login(LoginRequest request) {
String email = request.getEmail().trim().toLowerCase();
String password = request.getPassword();
String code = request.getCode();
Mono<LoginResponse> response = repository.findByEmail(email)
// step 1
.defaultIfEmpty(new User())
.flatMap(user -> {
// step 2
if (user.getUserId() == null) {
// no user
LoginResponse loginResponse = new LoginResponse();
loginResponse.setSuccess(false);
return Mono.just(loginResponse);
} else {
// step 3
// user exists
String salt = user.getSalt();
String secret = user.getSecretKey();
boolean passwordMatch = BCrypt.hashpw(password, salt).equalsIgnoreCase(user.getHash());
if (passwordMatch) {
// step 4
// password matched
boolean codeMatched = totpManager.validateCode(code, secret);
if (codeMatched) {
// step 5
String token = tokenManager.issueToken(user.getUserId());
LoginResponse loginResponse = new LoginResponse();
loginResponse.setSuccess(true);
loginResponse.setToken(token);
loginResponse.setUserId(user.getUserId());
return Mono.just(loginResponse);
} else {
LoginResponse loginResponse = new LoginResponse();
loginResponse.setSuccess(false);
return Mono.just(loginResponse);
}
} else {
LoginResponse loginResponse = new LoginResponse();
loginResponse.setSuccess(false);
return Mono.just(loginResponse);
}
}
});
return response;
}
So, let's observe the steps:
- Provide a default user entity with null fields.
- Check that user does exist.
- Produce a hash of password from request and salt, stored in a database.
- Assert that passwords do match.
- Validating one-time code and issue JWT.
Asserting One-Time Codes
To validate one-time codes generated by apps, we have to provide for TOTP library both code and secret, that we saved as a part of the user entity. Take a look at the implementation:
xxxxxxxxxx
public boolean validateCode(String code, String secret) {
TimeProvider timeProvider = new SystemTimeProvider();
CodeGenerator codeGenerator = new DefaultCodeGenerator();
CodeVerifier verifier = new DefaultCodeVerifier(codeGenerator, timeProvider);
return verifier.isValidCode(secret, code);
}
Testing
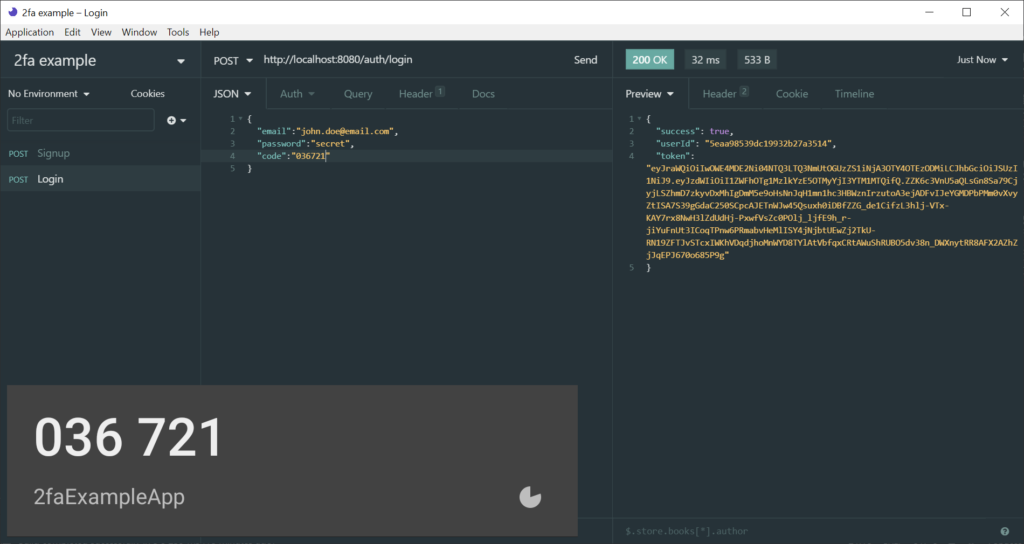
Finally, we can do testing to verify that the login process works as we planned. Let 's call the login endpoint with login request payload that contains a generated code from Google Authenticator.
An another case to check is the wrong password. No matter if we have correct code or not, the process should be terminated on the password assertion stage:

That is all for this post. We have created a simple REST API to provide two-factor authentication with TOTP for Spring Webflux. As I mentioned already, we have omitted everything in order to concentrate only on auth logic. That means you can find a full code for this article in this github repository.
References
- Dhiraj Ray Password Encryption and Decryption Using jBCrypt (2017) DZone access here.
- Sanjay Patel Using Nimbus JOSE + JWT in Spring Applications — Why and How (2018) Natural Programmer Blog access here.
- Scott Brady Creating Signed JWTs using Nimbus JOSE + JWT (2019) access here.
Published at DZone with permission of Yuri Mednikov. See the original article here.
Opinions expressed by DZone contributors are their own.

Comments