Understanding Web Standards — Shadow DOM and Custom HTML Elements
We're going to introduce some of the new functionality offered by web components, a cross-browser solution for building complex web apps.
Join the DZone community and get the full member experience.
Join For FreeGetting Familiar With New Web Standards
You might already know that frontend development requires just three technologies upon which the entire web is built: HTML, CSS, and JavaScript. In the not-too-distant past, the feature set of these standards lagged behind the functional wishes of developers and designers. They couldn't build the web sites they wanted to build with the tools they were given. To work around this, several independent teams each devised their own frameworks to supplement what was officially supported by browsers.
In one sense, these frameworks worked well. They introduced new UI patterns and dynamic websites at a time when desktop and mobile browsers were still in divergence. But at the same time, each framework was proprietary and unique. The skills and techniques you learned in one would not be transferable to another. Each framework handled page rendering differently, had a different language syntax, and in general, worked differently across browsers.
Since then, web standards have matured, to the point where many of these frameworks have been made obsolete. The new paradigm for frameworks is to embrace, not obscure, native web functionality. In this post, we're going to introduce some of the new functionality offered by web components, a cross-browser solution for building complex web apps. We'll also introduce Salesforce's Lightning Web Components (LWC) as a fast, enterprise-grade wrapper around these web standards.
Shadow DOM
The DOM, or document object model, is essential to how web pages operate. You can think of the DOM as a tree-like structure which a browser uses to understand the layout of a page. When you write HTML that looks like this:
<html> <head> <title>DOM differences</title> <style> h1 { color: green } </style></head><body> <h1>I belong to the light DOM</h1></body></html>
The browser sees a structure like this:
html | | head | | title | style | body | | h1
Recent web standards additions have introduced the concept of a shadow DOM. The shadow DOM is a web API that lets you attach a DOM subtree which elements are "hidden". Taking the example from above once again, let's assume that we want to add another h1 element--only this time, attached to the shadow DOM. The browser would interpret that tree like this:
html | | head | | title | style | body | | h1 ---------- (shadow boundary) | | h1
The shadow DOM introduces a distinction called a "shadow boundary," which is created around the elements in a shadow DOM. Essentially, any styles applied to the regular DOM are not going to leak through this shadow boundary. As well, JavaScript events that are fired in the shadow DOM won't affect elements outside of it by default (although this behavior can be intentionally overwritten). This enforces a strict sense of division, and enforces encapsulation between HTML elements.
That's a lot of technical talk: what's it actually mean? Well, let's modify our HTML page by adding a new element to the shadow DOM:
<body> <h1>I belong to the light DOM</h1> <script> const el = document.createElement("div"); const shadowRoot = el.attachShadow({ mode: "open" }); shadowRoot.innerHTML = "<h1>I belong to shadow DOM</h1>"; const container = document.querySelector("body"); container.appendChild(el); </script></body>
Here, we're creating an element entirely in JavaScript. By calling the attachShadow method, we've effectively added it to the shadow DOM. (The mode:open attribute simply means that the element can be queryable from outside of the shadow DOM' we'll get to that next.) After that, we add this new element to the body of the HTML page.
If you were to create this page and open it up, you would see this:
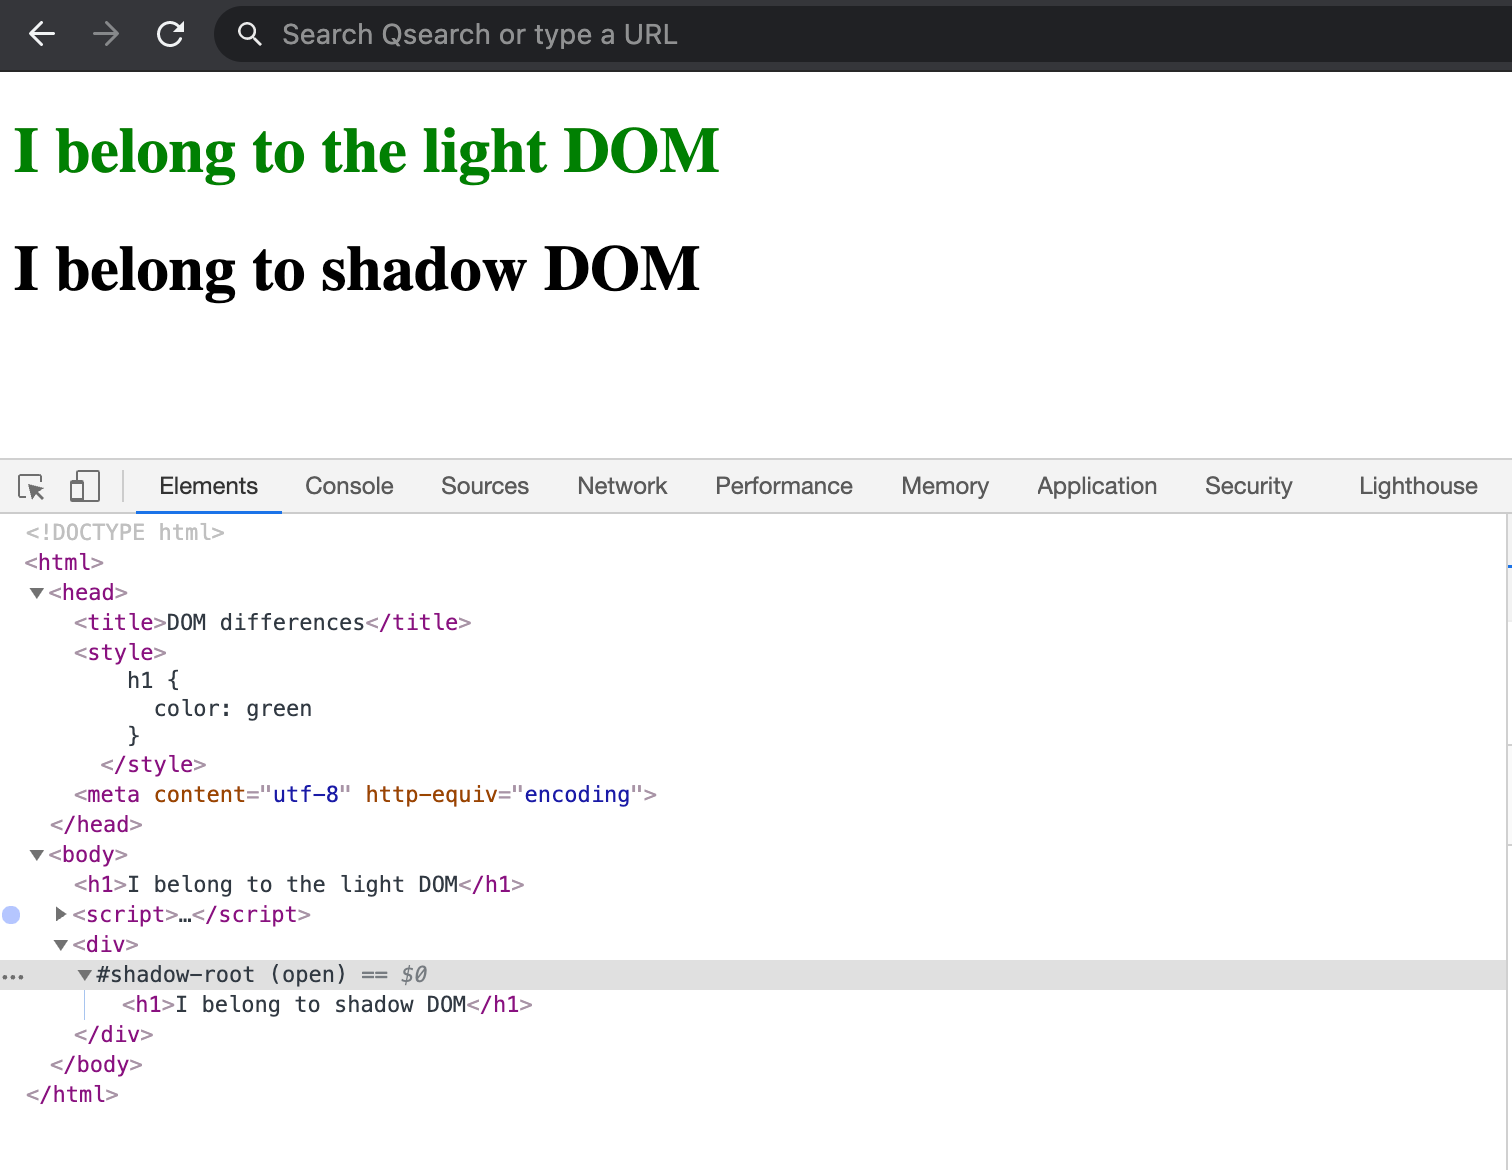
In many ways, this is surprising! After all, the CSS rule at the top of the page says that every h1 should be colored green. But, because the second h1 is actually on the shadow DOM, outside styles and JavaScript events won't affect it.
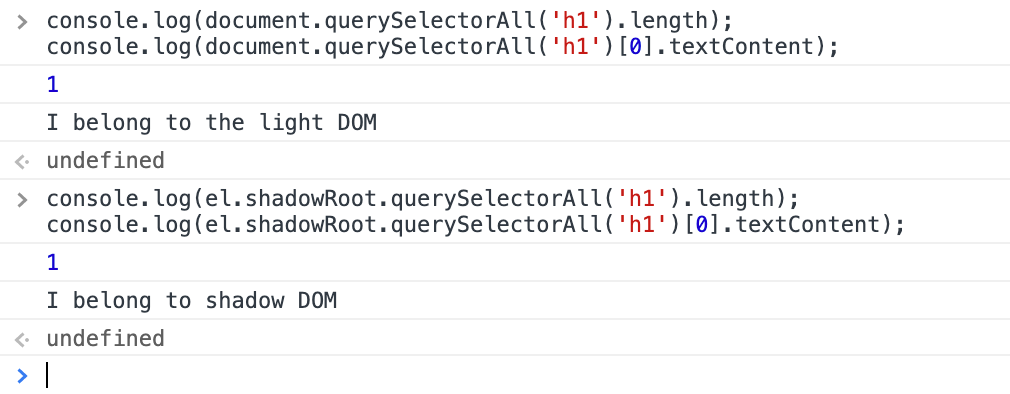
In fact, on this same page, you could even do a quick query for all of the h1 elements:
console.log(document.querySelectorAll("h1").length); console.log(document.querySelectorAll("h1")[0].textContent);
This would print out a count of 1, followed by the text message in the first DOM. That's because, from the outside, elements in the shadow DOM are not automatically accessible. But, because we set the mode to open, there is a technique we can use:
console.log(el.shadowRoot.querySelectorAll("h1").length); console.log(el.shadowRoot.querySelectorAll("h1")[0].textContent);
With the shadowRoot property, you can query the shadow DOM elements nested underneath an element.
How Does LWC Make This Easier?
Normally, one wouldn't define shadow DOM elements on the same page as the HTML. You'd create a separate JavaScript file and set up your element there:
class MyWebComponent extends HTMLElement { constructor() { super(); this.attachShadow({mode: "open"}); } connectedCallback() { console.log(this.shadowRoot.querySelector("h1")); } }
Every web component would need to follow the same pattern: create a constructor, and use attachShadow to add the element to the shadow DOM.
But, LWC simplifies all of this setup logic for you:
class MyLightningWebComponent extends LightningElement { connectedCallback() { console.log(this.template.querySelector("h1")); } }
By simply extending the LightningElement class, a component built using LWC attaches itself to the shadow DOM. This guarantees the encapsulation with a nice syntactic sugar developer's don't need to memorize.
In addition, not every browser supports the shadow DOM natively, particularly those that are over several years old. In these instances, LWC provides a polyfill that ensures the shadow DOM compatibility everywhere.
Custom Elements
Elements are the basic foundation of every HTML page. For example, a div tag holds multiple items, a span can wrap phrases, and lis can compose ordered (ol) or unordered (ul) lists. Custom elements are reusable HTML components which developers create, in order to create reusable HTML components that can act and look in any way you want, as if they were standard elements.
Suppose you wanted to create a custom element, <flag-icon>, which would display some visual indicator to a user. In vanilla JavaScript, you would create and register the custom element like this:
class FlagIcon extends HTMLElement { constructor() { super(); // Define custom element this.attachShadow({ mode: "open" }); const span = document.createElement("span"); span.innerText = "I'm a flag icon"; this.shadowRoot.appendChild(span); } }
customElements.define("flag-icon", FlagIcon);
First, you define a class (FlagIcon), which needs to extend from HTMLElement, which is a web standard. You'd need to create the element using JavaScript methods, fill in the text, and attach it to the shadow DOM. Finally, you need to remember to define the class and provide its tag name.
How Does LWC Make This Easier?
Creating a custom element using LWC reduces much of the repetition:
class MyLightningWebComponent extends LightningElement { constructor() { super(); const span = document.createElement("span"); span.innerText = "I'm a flag icon"; this.template.appendChild(span); } }
Once you extend from LightningElement, LWC knows two things: it knows you want to attach a shadow DOM to the element, our web component, as we saw previously, and it knows you want to define this as a custom element. Rather than having to write this repetitive logic, LWC handles all of this background maintenance for you, allowing you to focus on your component's look and feel.
HTML Templates
Now, it's actually rare to have custom elements define in pure JavaScript. It can get pretty tedious. That's where the <template> tag comes into play.
A <template> tag allows you to define the structure of your custom element using HTML. In other words, it defines reusable markup which you can use as the basis for your custom element. For example, we might want our <flag-icon> to look like this:
<template id="flag-icon-template"> <span>I'm a flag icon</span> </template>
You can add this markup anywhere on your page, and the browser will know not to render anything in the <template>. It's completely invisible, and the way to attach it to the page is similar to the way any custom element is defined:
class FlagIcon extends LightningElement { constructor() { super(); this.attachShadow({ mode: "open" }); const template = document.getElementById("flag-icon-template"); const clone = template.content.cloneNode(true); this.shadowRoot.appendChild(clone); } }
Here, rather than using JavaScript's createElement method, we fetch the custom element's markup through its id via getElementById. Then we attach it to the shadow DOM as before.
How Does LWC Make This Easier?
If you're using LWC, you'll need to do two steps to define the custom component:
1. Copy all that same <template> markup and add it to a file that matches the name of your custom element (like, myLightningWebComponent.html)
2. Create a JavaScript file that looks like this:
class MyLightningWebComponent extends LightningElement {
}
Yep, that's it. There's no code necessary to create a shadow tree, no code to create a custom element, no code that attaches the HTML template. Everything is done automatically for you. LWC is going to create all of that boilerplate code for you!
Conclusion
Stronger web standards have returned some sanity to frontend development. Instead of several proprietary frameworks bolting on functionality to web sites, web standards, which are guaranteed to function the same in any browser, allows developers to write clean and consistent code. LWC takes this simplicity further by abstracting away much of the repetition.
LWC can do more than what we've talked about here. There's a whole swatch of performance improvements, integrations with Salesforce, and even a whole library of components to start using.
If you'd like to know more, they've got a video on the shadow DOM, as well as custom elements and HTML templates. There's also a Trailhead trail that walks you through building several projects that use LWC.
Opinions expressed by DZone contributors are their own.
Comments