Upload Large File in a Spring Boot 2 Application Using Swagger UI
In this article, we are going to look at how to create a sample Spring Boot application for uploading large files using Swagger UI.
Join the DZone community and get the full member experience.
Join For FreeIn this article, we are going to create a sample Spring Boot application for uploading large files using Swagger UI. The API created for uploading large files can receive an HTTP multi-part file upload request.
What We Will Need to Build the Application
- JDK 1.8 or later
- Maven 3.2+
- A favorite text editor or IDE. You can also import this example code straight into your IntelliJ IDEA from GitHub. The GitHub link is provided at the end of the article.
- Spring Boot 2.0.1. RELEASE
- Spring Framework 5.0.5. RELEASE
- Spring Cloud Consul 2.0.0.M5
- Swagger 2.8.0
Consul is used to hold the externalized properties for our Spring Boot application. Read about Consul integration with Spring Boot 2
Step 1: Download Consul Agent. Once the download is complet, go to the specific directory and use the following command to start the agent.
consul agent -dev -config-dir=C:\\consul_0.7.3_windows_amd64Once the agent is started, the Consul Agent UI can be accessed via this URL: http://localhost:8500/ui/#
Step 2: Now, create your application’s YAML file with configurations under the key-value section of Consul UI (config/spring-boot-file-upload.yml).
The content of this file is :
spring:
    application:
        name: spring-boot-file-upload
    servlet:
        multipart:
            enabled: false
            max-file-size: 10MB
server:
    servlet:
        contextPath: /spring-boot-file-upload
    port: 8090
logging:
    level:
        ROOT: DEBUG
Now let us revisit the following configurations from the above file:
servlet.multipart.enabled: false
servlet.multipart.max-file-size: 10MB
For large files, we cannot use Spring Boot’s default StandardServletMultipartResolver or CommonsMultipartResolver, since the server has limited resources (disk space) or memory for buffering. So we need to disable the default MultipartResolverand define our ownMultipartResolver, which is present in the main application class.
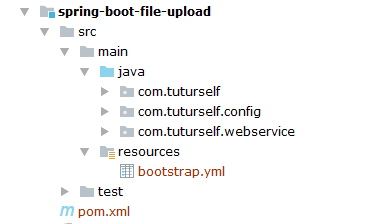
We need to provide the Consul information to our Spring Boot application via the bootstrap.yml file, which is present in the resources folder of the project.
spring:
  application:
    name: spring-boot-file-upload
  cloud:
    consul:
      host: localhost
      port: 8500
      discovery:
        tags: spring-boot-file-upload
        enabled: true
      config:
        enabled: true
        format: files
        fail-fast: true
Project Structure:
The standard project structure is as follows:

Create an Application Class
To start a Spring Boot MVC application, we first need a starter. Thanks to Spring Boot, everything is auto-configured for you. All you need to get started with this application is the following SpringBoot2FileUpload class.
package com.tuturself;

import lombok.extern.slf4j.Slf4j;
import org.springframework.boot.SpringApplication;
import org.springframework.boot.autoconfigure.EnableAutoConfiguration;
import org.springframework.boot.autoconfigure.SpringBootApplication;
import org.springframework.cloud.client.discovery.EnableDiscoveryClient;
import org.springframework.context.annotation.Bean;
import org.springframework.web.multipart.commons.CommonsMultipartResolver;

/**
 * Created by Arpan Das on 4/17/2018.
 */

@Slf4j
@EnableDiscoveryClient
@SpringBootApplication
@EnableAutoConfiguration
public class SpringBoot2FileUpload {

    public static void main(String[] args) {
        log.info("SpringBoot2FileUpload Application is Starting...");
        try {
            SpringApplication.run(SpringBoot2FileUpload.class, args);
        } catch (Exception e) {
            log.error("Error occurred while starting SpringBoot2FileUpload");
        }
        log.info("SpringBoot2FileUpload Application Started..");
    }

    @Bean(name = "multipartResolver")
    public CommonsMultipartResolver multipartResolver() {
        CommonsMultipartResolver multipartResolver = new CommonsMultipartResolver();
        multipartResolver.setMaxUploadSize(-1);
        return multipartResolver;
    }
}
As described earlier, we have defined our multipartResolver in our main application class SpringBoot2FileUpload.java and set the MaxUploadSize property to -1. Now it will read the maximum file size from the spring-boot-file-upload.yml file in Consul, which is set to 10MB.
Create a File Upload Controller
Now let us create the Controller class, FileUploadRestApi.java, where we have defined the REST API to upload the file. The API is documented using Swagger UI.
package com.tuturself.webservice;

import io.swagger.annotations.*;
import org.apache.commons.io.FileUtils;
import org.springframework.http.HttpStatus;
import org.springframework.http.MediaType;
import org.springframework.http.ResponseEntity;
import org.springframework.web.bind.annotation.PostMapping;
import org.springframework.web.bind.annotation.RequestMapping;
import org.springframework.web.bind.annotation.RequestPart;
import org.springframework.web.bind.annotation.RestController;
import org.springframework.web.multipart.MultipartFile;

import java.io.File;
import java.io.IOException;
import java.util.List;

@RestController
@RequestMapping("/upload")
@Api(value = "Guidelines", description = "Describes the guidelines for " +
        " Spring boot 2.0.1 for uploading large file using Swagger UI")
public class FileUploadRestApi {

    @PostMapping
    @ApiOperation(value = "Make a POST request to upload the file",
            produces = "application/json", consumes = MediaType.MULTIPART_FORM_DATA_VALUE)
    @ApiResponses(value = {
            @ApiResponse(code = 200, message = "The POST call is Successful"),
            @ApiResponse(code = 500, message = "The POST call is Failed"),
            @ApiResponse(code = 404, message = "The API could not be found")
    })
    public ResponseEntity<String> uploadFile(
            @ApiParam(name = "file", value = "Select the file to Upload", required = true)
            @RequestPart("file") MultipartFile file) {

        try {
            File testFile = new File("test");
            FileUtils.writeByteArrayToFile(testFile, file.getBytes());
            List<String> lines = FileUtils.readLines(testFile);
            lines.forEach(line -> System.out.println(line));
        } catch (IOException e) {
            e.printStackTrace();
            return new ResponseEntity<String>("Failed", HttpStatus.INTERNAL_SERVER_ERROR);
        }
        return new ResponseEntity<String>("Done", HttpStatus.OK);
    }
}
Creating the Swagger Configuration Class
We need to configure Swagger UI with our Spring Boot 2 application.
package com.tuturself.config;

import org.springframework.context.annotation.Bean;
import org.springframework.context.annotation.Configuration;
import springfox.documentation.builders.ApiInfoBuilder;
import springfox.documentation.builders.PathSelectors;
import springfox.documentation.builders.RequestHandlerSelectors;
import springfox.documentation.service.ApiInfo;
import springfox.documentation.service.Contact;
import springfox.documentation.spi.DocumentationType;
import springfox.documentation.spring.web.plugins.Docket;
import springfox.documentation.swagger2.annotations.EnableSwagger2;

/**
 * @author Arpan Das
 */
@Configuration
@EnableSwagger2
public class SwaggerConfig {

    @Bean
    public Docket api() {
        return new Docket(DocumentationType.SWAGGER_2)
                .select()
                .apis(RequestHandlerSelectors.basePackage("com.tuturself.webservice"))
                .paths(PathSelectors.any())
                .build().apiInfo(metaData())
                .useDefaultResponseMessages(false);
    }

    private ApiInfo metaData() {
        return new ApiInfoBuilder()
                .title("Spring Boot 2.0 File Upload example with Consul Integration & Swagger 2.8.0")
                .description("Upload file Swagger-ui 2.8.0 and Spring Boot 2 Spring Cloud Consul")
                .version("version 1.0")
                .contact(new Contact("Tutu'rself", "https://www.tuturself.com",
                      "arpan.kgp@gmail.com")).build();
    }
}
Now the application is ready. Just check for all the required dependencies in the pom.xml file.
<?xml version="1.0" encoding="UTF-8"?>
<project xmlns="http://maven.apache.org/POM/4.0.0"
         xmlns:xsi="http://www.w3.org/2001/XMLSchema-instance"
         xsi:schemaLocation="http://maven.apache.org/POM/4.0.0
         http://maven.apache.org/xsd/maven-4.0.0.xsd">

    <modelVersion>4.0.0</modelVersion>
    <groupId>com.tuturself</groupId>
    <artifactId>spring-boot-file-upload</artifactId>
    <version>1.0-SNAPSHOT</version>

    <parent>
        <groupId>org.springframework.boot</groupId>
        <artifactId>spring-boot-starter-parent</artifactId>
        <version>2.0.1.RELEASE</version>
        <relativePath/>
    </parent>

    <properties>
        <lombok.version>1.16.20</lombok.version>
        <spring-framework-version>5.0.5.RELEASE</spring-framework-version>
        <spring-cloud-consul-version>2.0.0.M5</spring-cloud-consul-version>
        <swagger.version>2.8.0</swagger.version>
        <project.build.sourceEncoding>UTF-8</project.build.sourceEncoding>
        <project.reporting.outputEncoding>UTF-8</project.reporting.outputEncoding>
        <java.version>1.8</java.version>
    </properties>

    <dependencies>

        <!-- SPRING Dependencies STARTs Here -->
        <dependency>
            <groupId>org.springframework.boot</groupId>
            <artifactId>spring-boot-starter-web</artifactId>
        </dependency>
        <dependency>
            <groupId>org.springframework</groupId>
            <artifactId>spring-context</artifactId>
            <version>${spring-framework-version}</version>
        </dependency>
        <dependency>
            <groupId>org.springframework.boot</groupId>
            <artifactId>spring-boot-starter-test</artifactId>
            <scope>test</scope>
        </dependency>
        <dependency>
            <groupId>org.springframework.cloud</groupId>
            <artifactId>spring-cloud-starter-consul-all</artifactId>
            <version>${spring-cloud-consul-version}</version>
        </dependency>
        <dependency>
            <groupId>org.springframework.cloud</groupId>
            <artifactId>spring-cloud-consul-discovery</artifactId>
            <version>${spring-cloud-consul-version}</version>
        </dependency>
        <!-- SPRING Dependencies ENDs Here -->

        <!--Swagger2 Dependencies STARTS Here -->
        <dependency>
            <groupId>io.springfox</groupId>
            <artifactId>springfox-swagger2</artifactId>
            <version>${swagger.version}</version>
        </dependency>
        <dependency>
            <groupId>io.springfox</groupId>
            <artifactId>springfox-swagger-ui</artifactId>
            <version>${swagger.version}</version>
        </dependency>
        <!-- Swagger2 Dependencies ENDS Here -->

        <!-- Supporting Dependencies STARTs Here -->
        <dependency>
            <groupId>org.projectlombok</groupId>
            <artifactId>lombok</artifactId>
            <version>${lombok.version}</version>
            <scope>provided</scope>
        </dependency>
        <dependency>
            <groupId>commons-fileupload</groupId>
            <artifactId>commons-fileupload</artifactId>
            <version>1.3.3</version>
        </dependency>
        <!-- https://mvnrepository.com/artifact/org.apache.commons/commons-io -->
        <dependency>
            <groupId>org.apache.commons</groupId>
            <artifactId>commons-io</artifactId>
            <version>1.3.2</version>
        </dependency>
        <!-- Supporting Dependencies ENDs Here -->
    </dependencies>

    <build>
        <plugins>
            <plugin>
                <groupId>org.apache.maven.plugins</groupId>
                <artifactId>maven-compiler-plugin</artifactId>
                <version>3.5.1</version>
                <configuration>
                    <compilerVersion>${java.version}</compilerVersion>
                    <source>${java.version}</source>
                    <target>${java.version}</target>
                </configuration>
            </plugin>
            <plugin>
                <groupId>org.springframework.boot</groupId>
                <artifactId>spring-boot-maven-plugin</artifactId>
                <configuration>
                    <executable>true</executable>
                </configuration>
            </plugin>
        </plugins>
        <resources>
            <resource>
                <directory>src/main/resources</directory>
                <filtering>true</filtering>
            </resource>
        </resources>
    </build>


    <repositories>
        <repository>
            <id>spring-milestones</id>
            <name>Spring Milestones</name>
            <url>http://repo.spring.io/milestone</url>
            <snapshots>
                <enabled>false</enabled>
            </snapshots>
        </repository>
    </repositories>
    <dependencyManagement>
        <dependencies>
            <dependency>
                <groupId>org.springframework.cloud</groupId>
                <artifactId>spring-cloud-dependencies</artifactId>
                <version>Finchley.M7</version>
                <type>pom</type>
                <scope>import</scope>
            </dependency>
        </dependencies>
    </dependencyManagement>
</project>
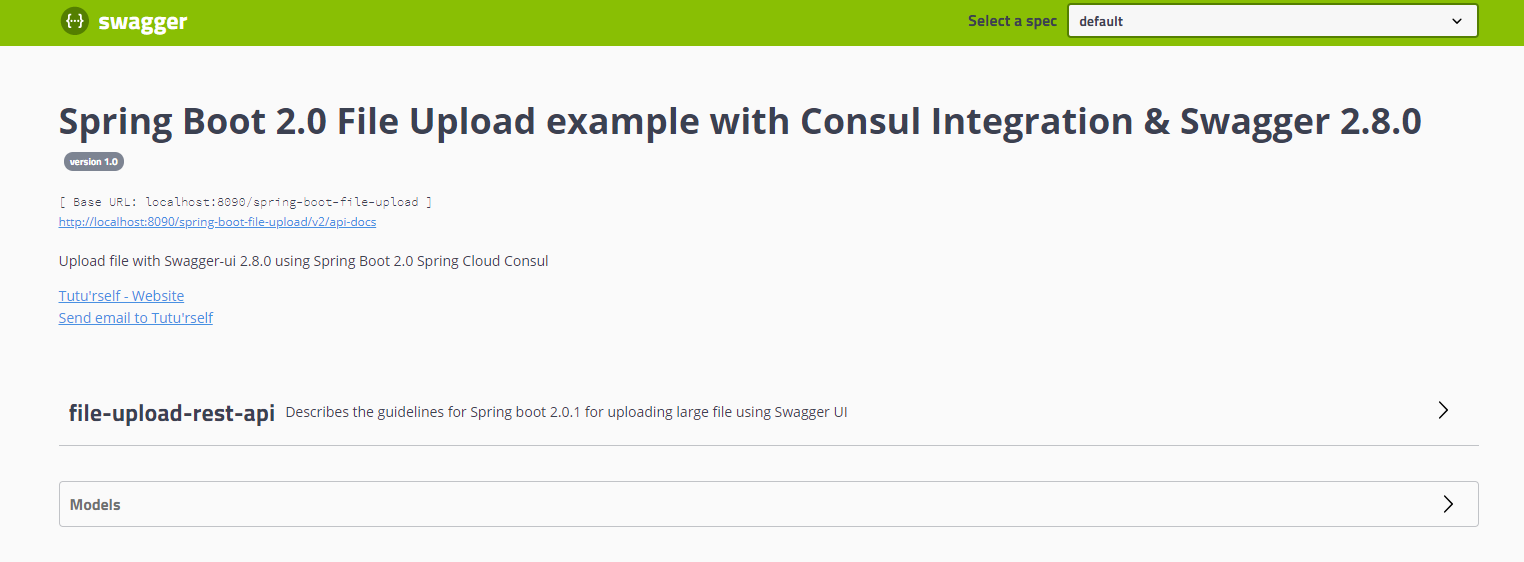
Now run the application. The Swagger UI app can be accessed via the URL, http://localhost:8080/spring-boot-consul/swagger-ui.html#

To try the POST API for uploading a file, click on it. Once it is expanded, click on Try Now and then choose a file to upload and Execute.

The project can be downloaded from GitHub: spring-boot-file-upload.
Published at DZone with permission of Arpan Das. See the original article here.
Opinions expressed by DZone contributors are their own.

Comments