Building AMQP-Based Messaging Framework on MongoDB
How to build a messaging framework using capped collection of MongoDB.
Join the DZone community and get the full member experience.
Join For FreeIntroduction
In any integration scenarios, messaging needs are inevitable. There are several messaging frameworks /tools/technology available today to chose from. Starting from old MQ we have come a long way to the world of open source-based technologies like Kafka, RabbitMQ, ActiveMQ, etc. Every other messaging frameworks came due to certain needs. With the growing trends of microservices, engineers are looking for more lightweight, independently deployable, and less costly options in the market. Every messaging framework comes with the baggage of additional infrastructure and maintenance headache. In one of my projects there has been a proposal to use the capped collection feature of MongoDB along with its tailable cursor as an alternative option to deploy any real messaging infrastructure. Now the question arises,
- Is this option suitable for all kind of messaging needs?
- Can it be a replacement of proper messaging framework like Kafka, RabbitMQ, etc.?
- What are the pitfalls?
Not to mention that this feature of MongoDB is quite old and well-known in the market and you will find a lot of articles around it. However, I believe those articles have just shown the basic way of enabling it without going deep into it. A real messaging framework has lots of challenges than just making an asynchronous way of delivering the messages. In this series of articles, we will try to address them and see if we can really build some messaging infrastructure using MongoDB by considering all the needs of a messaging framework.
Capped Collection and Tailable Cursor
Before answering the above questions, it is worth it to first understand how this capped collection and tailable cursor works in MongoDB. A capped collection of MongoDB is a collection having some specified limit. The limit could be set in terms of the maximum number of documents or/and total size. Such collection provides the behaviour of a fixed size circular linked list. As a result, it maintains the insertion order and provides very high throughput for insertion. You can create a capped collection using mongodb command. You can not delete any entries from capped collection or can update any record which can alter its initial size.
xxxxxxxxxx
db.createCollection( "log", { capped: true, size: 100000 } )
On the other hand a tailable cursor provides more of a tail -f functionality on the collection. It reads the documents as per natural order. On the contrary to the other type of cursor , a tailable cursor remains open event after the client exhausts reading all current set of documents as per the filter set. Whenever a new document is inserted the same and is same is matched to the filter, the client receives the new document. The implementation driver re-establishes the connection when the connection gets dropped.
If you have carefully followed the above behaviour, it is a behaviour of a FIFO list which we can use to build a messaging framework. Here the producers will be producing messages /inserting data to the capped collections and consumers will be receiving the same from the capped collections as and when inserted.
Create a Messaging Protocol
In any messaging framework, to exchange messages between different parties, we need some sort of protocols in place. The protocols may vary across messaging frameworks. A messaging framework like RabbitMQ follows AMQP protocol where every message goes through some exchange. Publishers publish messages to some exchange. Subscribers will bind a queue to the exchange by some rules called binding to receive the messages. The consumer will either fetch/pull from the exchange or the broker may wish to push the same to the subscriber automatically. In this article, we will see if we can implement the AMQP 0-9-1 protocol using the above MongoDB feature.
As a first step, we need to create a Broker interface that will take care of the above model. The broker must have two primary functions.
- publish: This will be used to publish a message to a specific channel/exchange.
- subscribe: This will be used to subscribe for a message at a specific exchange.
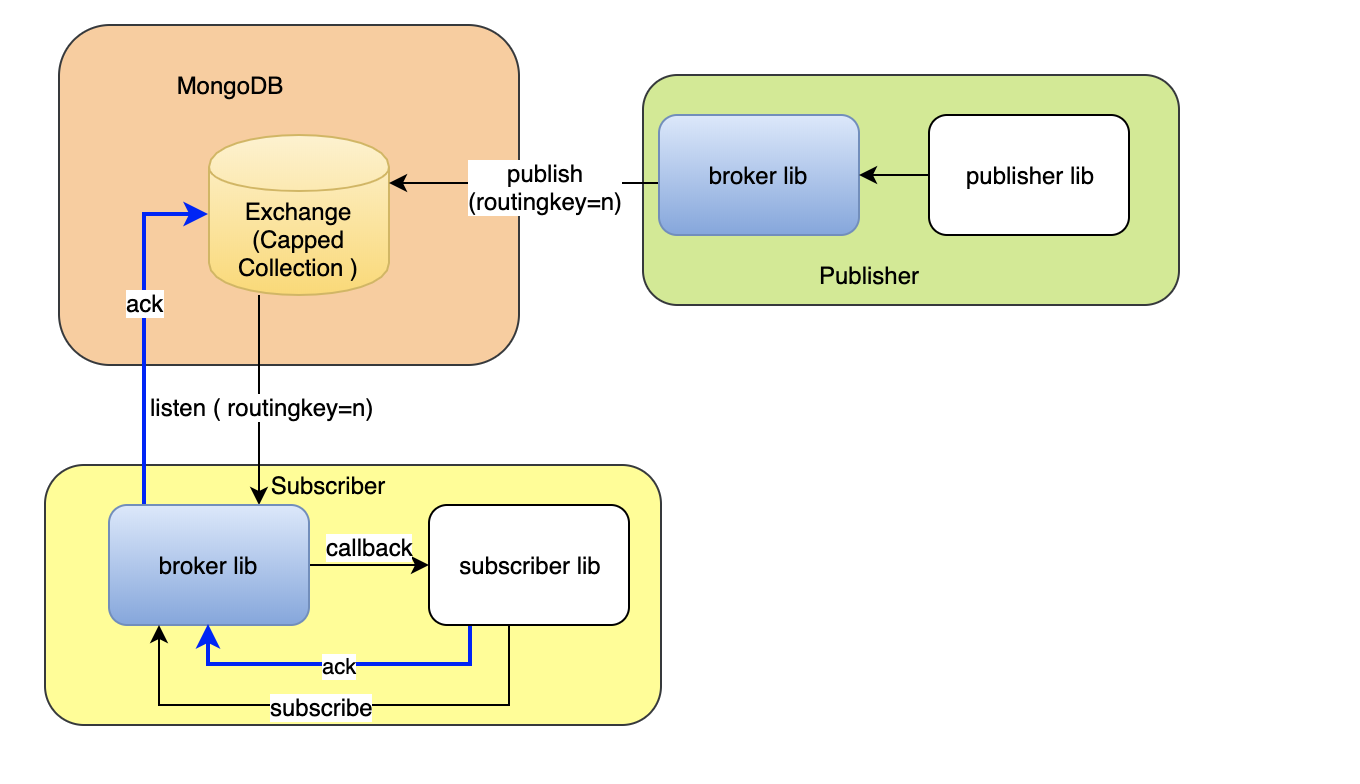
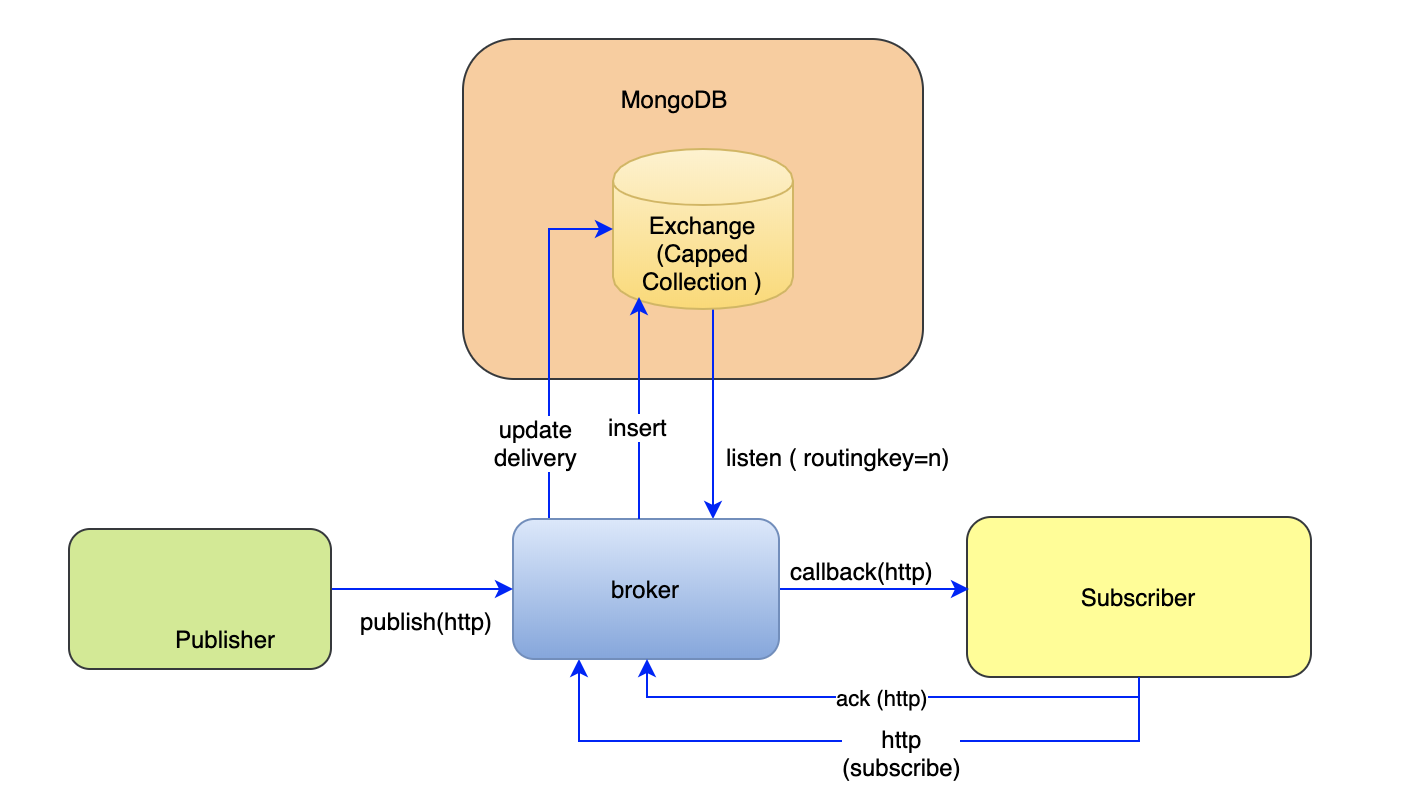
So our broker will wrap the MongoDB-based messaging service under the above interface. Now there are two options to implement this interface. Either this can be implemented as a standalone microservice or this can be implemented just as a library. We will revisit the advantage of using one vs another at the end. For simplicity of the examples, let us take the library approach for the time being. With the library approach, our architecture will look like the following.
In this example, we have taken some important considerations to implement the above interface.
- One exchange is implemented by a single capped collection.
- Every message gets published to the exchange must be associated with a routingkey.
- There could be multiple subscribers to the single exchange
- Subscribers can subscribe to listen all the messages being published to the exchange filtered by the specific routingkey. Routing key is an important concept in RabbitMQ. This defines the binding between a subscriber and the exchange through a queue. In our example a tailable cursor works as queue for each subscriber. The tailable cursor is created as per the filter criteria set by the routingkey.
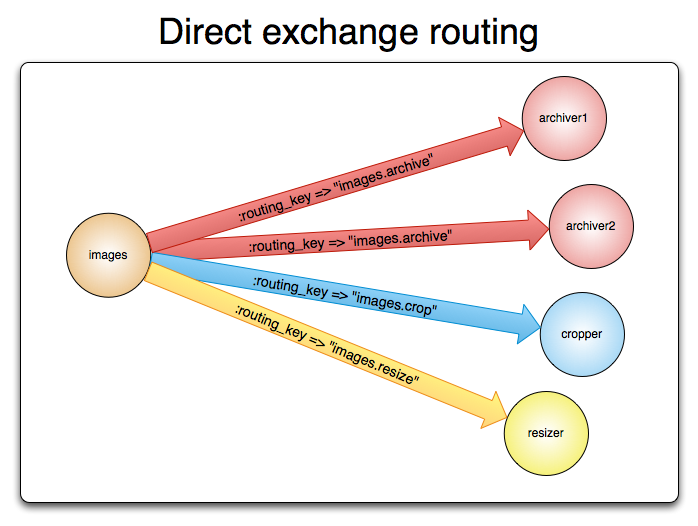
If you are well versed with the AMQP model, you may know that AMQP 0-9-1 brokers provide four exchange types:
- Direct exchange
- Fanout
- headers exchange
- topic exchange
In my series of articles, I will go one by one starting from Direct Exchange. A direct exchange delivers the messages as per the routingkey mentioned.
Create the Broker
The below code snippet implements the broker interface defined above
xxxxxxxxxx
//broker.js
const SIZE=1000000;
const MAX_QSIZE=1000
const {MongoClient}=require('mongodb')
class Broker{
constructor(client,option){
this.option=option;
this.client=client;
}
/*
* The factory function to create a Broker instance . The option takes following attributes.
* url : connection string to mongodb instance
* dbname: database name
* name: exchange name
*/
static async create(option) {
let client=null;
try{
client = await MongoClient.connect(option.url,{useUnifiedTopology: true });
const db = client.db(option.dbname);
option.qsize=option.qsize||MAX_QSIZE;
//creating capped collection if it does not exist
let exist=await db.listCollections({ name: option.name }).hasNext();
if(!exist){
let result=await db.createCollection(option.name, {capped: true, size: SIZE,max:option.qsize})
console.log(" Broker got created with max queue size ",option.qsize);
}
//creating the Broker instance
let broker=new Broker(client,option);
return broker;
}catch(e){
console.log('broker creation failed ',e)
if(!!client){
//close the connection if creation failed but connection exist
client.close()
}
throw e
}
}
/*
* subscribe by routingkey
*/
async subscribe(routingkey,next){
var filter = {routingkey:routingkey};
if('function' !== typeof next) throw('Callback function not defined');
let db=this.client.db(this.option.dbname)
let collection=await db.collection(this.option.name)
var cursorOptions = {
tailable: true,
awaitdata: true,
numberOfRetries: -1
};
const tailableCursor = collection.find(filter, cursorOptions);
//create stream from tailable cursor
var stream =tailableCursor.stream();
console.log('queue is waiting for message ...')
stream.on('data', next);
}
/*
* publish a message i.e. insert a message to the capped collection.
* routingkey : the routingkey of the message
* message : message payload. This could be string or any data type or any vald javascript object.
*/
async publish(routingkey,message){
let data={};
data.routingkey=routingkey;
data.message=message;
data._id=new Date().getTime();
let db= this.client.db(this.option.dbname);
let result=await db.collection(this.option.name).insertOne(data);
if(result.result.ok==1){
console.log('message published to exchange ',this.option.name," with routing key ",routingkey );
}
return result;
}
async destroy(){
if(this.client)
this.client.close();
}
}
module.exports=Broker
The above code snippet is a full source code of a module called broker.js. This module exposes a Broker class .
create
The caller of the module must create a broker instance by calling the static function create defined in the Broker class. The create method takes an object argument, option. Three attributes of the argument is mandatory .i.e. url, dbname, and name. The create method initializes the db connection. and creates the capped collection with the same name as the exchange name and with the maximum size defaulted to 1000. The caller can override this default size by providing a qsize attribute in the option passed to create the broker.
publish
The publish method takes two mandatory arguments. routingkey, and message. The messages are published using the routingkey. Internally, it only inserts a record to the created capped collection. The message and routingkey is grouped together inside a wrapper javascript object to define the payload of the inserted record. Thus it leaves an option to filter out the messages based on the routingkey during consumption.
subscribe
The subscribe method takes two mandatory arguments, routingkey and a callback function. It sets up a filter using the routingkey and then creates a tailable cursor using the filter ( line #71). At the end, it establishes a stream on the tailable cursor to create the continuous flow of data as and when inserted in the collection.
Ok, now our broker is ready!
Let us create the publisher and subscriber to exchange the messages.
Create the Publisher
Let us assume that there is broker for stock market. The publisher publishes the news of various stock exchanges with the value of the routingkey same as the name of the stock exchange.
xxxxxxxxxx
//publisher.js
const Broker=require('./broker');
const MONGO_URL='mongodb://localhost:27017?authSource=admin';
let options={
url:MONGO_URL,
dbname: "broker",
name: "StockMarket"
}
Broker.create(options).then(async (broker)=>{
await broker.publish("BSE","Index gone up by 5 %");
broker.destroy();
}).catch(e=>{
console.log('broker creation failed', e)
});
Create the Subscriber
Now let us create a subscriber for BSE stock exchange. The subscriber will subscribe to BSE related news.
xxxxxxxxxx
//subscriber.js
const Broker=require('./broker');
const MONGO_URL='mongodb://localhost:27017?authSource=admin';
let options={
url:MONGO_URL,
dbname: "broker",
name: "StockMarket"
}
Broker.create(options).then(async (broker)=>{
broker.subscribe("BSE",(data)=>{
let datetime=new Date();
console.log(datetime, " data received from Stockmarket for BSE----->",data.message)
})
}).catch(e=>{
console.log('broker creation failed', e)
});
Execute
Once everything is ready, let us create a npm project and copy all these files into it. To create a npm project,
- Create a directory called broker. Change the current directory to broker.
- Run npm init and provide initial values to package.json.
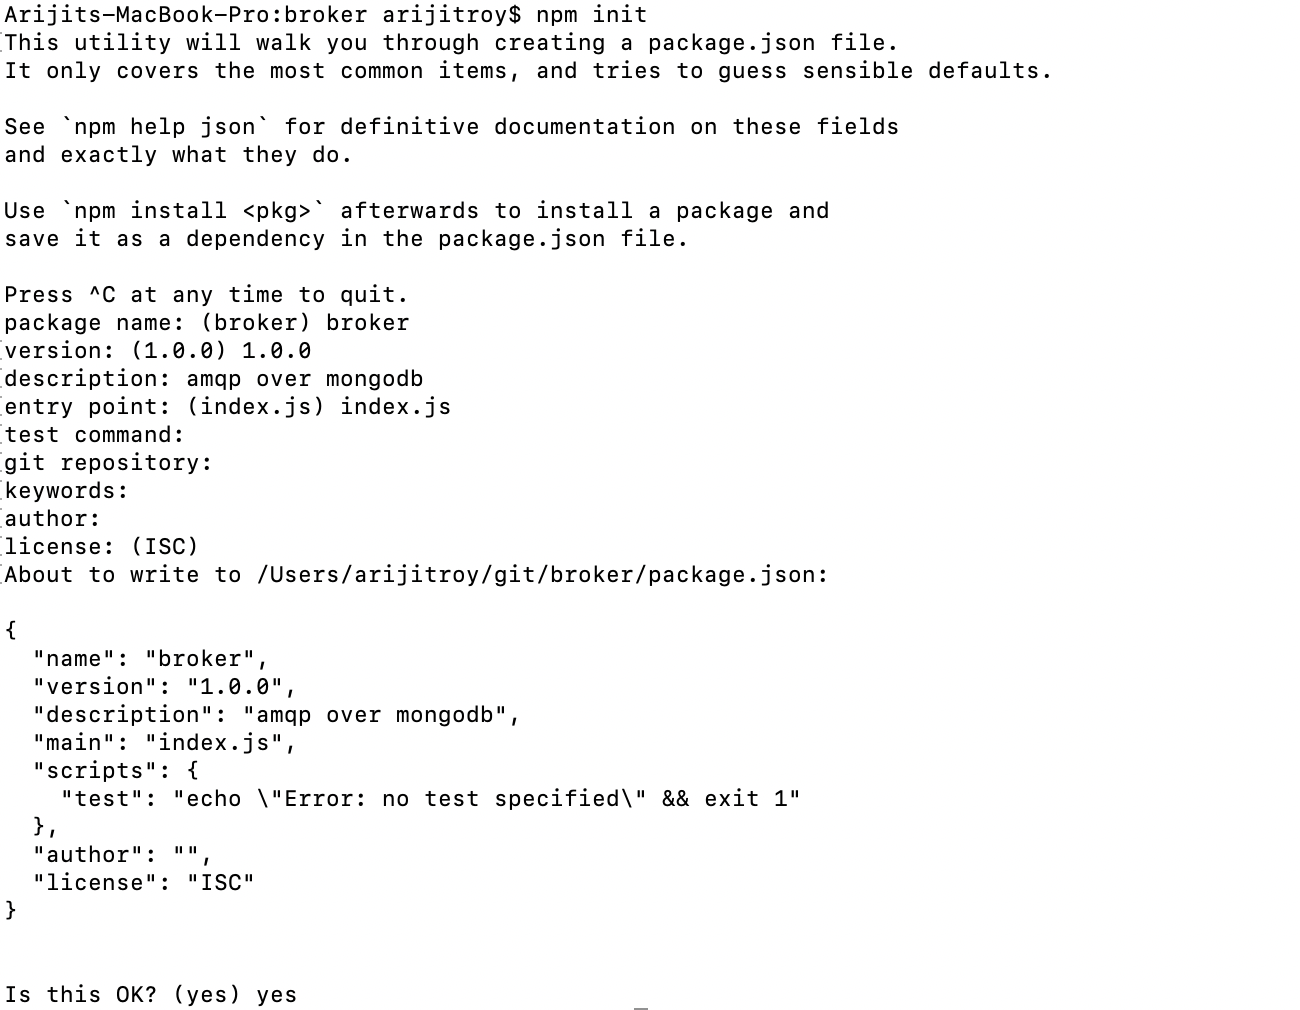
- Now the directory structure looks like following

- Run npm install mongodb --save. It will install the required mongo db driver package.
- Before going to the next step, please make sure that your MongoDB server is up and running. By default, the program expects that the MongoDB server is running at localhost at port 27017 and no authentication is enforced.
- In case your MongoDB URL and configuration is different, change the line #3 of both subscriber and publisher to point it to right mongo db instance.
- Run node publisher. This will run the publisher, create the database, capped collection, and publishes a message related to BSE news.

- Open another terminal and run node subscriber. This will trigger the subscription to be created. As the message is already there it will print the message as well.

Ooh ! the message has appeared in the console. This time the command control is still on hold . So it is still running and waiting for further messages. Do it once more , to run the publisher again in the previous console. Not to surprise, it appears in the other terminal again. So , we established the message communication between publisher and subscriber as per AMQP direct exchange protocol .
Reverse the Execution Order
Now let us reverse the order.
- Drop the capped collection . Restart the subscriber . Subscriber will show the same message "queue is waiting for message...".
- Run the publisher again to push some message.
This time we will see that no messages appeared any more in the subscriber terminal.
Probably the stream is not initialized correctly . The behaviour seems very strange ! . My doubt is, it could be some kind of bug in node mongo driver . Unless there is any data present in the collection, the tailable cursor does not initialize correctly. So any new data getting inserted afterwards are not getting delivered to the callback function anymore. To avoid this problem, let us create a workaround. If the subscription is happened to be the first subscription on the exchange and there is no data then initializes the collection with a dummy data without any routing key. This data is anyway not going to be delivered to any subscriber. But it will initialize the cursor correctly. So I added the same after the creation of collection in create method. So the revised the create method will look like following.
xxxxxxxxxx
/*
* The factory function to create a Broker instance . The option takes following attributes.
* url : connection string to mongodb instance
* dbname: database name
* name: exchange name
*/
static async create(option) {
let client=null;
try{
client = await MongoClient.connect(option.url,{useUnifiedTopology: true });
const db = client.db(option.dbname);
option.qsize=option.qsize||MAX_QSIZE;
//creating capped collection if it does not exist
let exist=await db.listCollections({ name: option.name }).hasNext();
if(!exist){
let collection=await db.createCollection(option.name, {capped: true, size: SIZE,max:option.qsize})
console.log(" Broker got created with max queue size ",option.qsize);
await collection.insertOne({ init: true ,_id: new Date().getTime()});
}
//creating the Broker instance
let broker=new Broker(client,option);
return broker;
}catch(e){
console.log('broker creation failed ',e)
if(!!client){
//close the connection if creation failed but connection exist
client.close()
}
throw e
}
}
Now re-run the same steps given for the reverse order. Now, it will start printing the message again.
Acknowledgement
Wait! Is there anything else left to be done?
- Stop the subscriber by pressing Ctrl + C . and restart it again. To our surprise, this time again , it prints two messages which were consumed already last time.

What happened? Obviously, the program was stopped and so it lost its memory. The cursor initializes it from the beginning again. In AMQP how do we ensure that a consumer does not receive the same message again and that state can sustained over restart?
With the help of acknowledgment! In our program, we missed it. The consumer needs to acknowledge that the messages got processed by it. In kafka, such cursor position is maintained by the consumer itself. But, in AMQP, it is being remembered by the broker\. Let us bring that memory into our broker. So, the revised architecture will look like following now.
To build the acknowledgment mechanism, there could be two scenarios, either the consumer wants to handle the acknowledgment by itself or it may rely on the auto acknowledgment. Auto acknowledgement is completed at the moment the message gets delivered to the consumer successfully. But auto acknowledgment may not work for all kind of application. So it is a choice to the consumer application. To implement acknowledgment, we need some kind of flag to be present in the collection to confirm that the consumer already received it or not. The behavior of the flag will be as follows:
- If the flag is initialized to false.
- If it is auto acknowledgment, then broker will set this flag to true the moment it delivers the message to consumer successfully.
- If it is not auto acknowledgment, then broker needs to provide a method to the consumer to set it when consumer needs.
For the first 2 points, we have to change the subscribe method. Earlier it was taking only routingkey as input, now we need a mechanism to pass the auto-acknowledgment flag as well. So input to the function is changed to an object input with multiple properties instead of a single string. The revised subscribe method will look like below.
xxxxxxxxxx
/*
* subscribe to a specific routingkey
* suboption : declares the subscription options . i.e. routingkey , autoAck
*/
async subscribe(suboption,next){
var filter = {routingkey:suboption.routingkey,processed:false};
//initializes autoAck default to true if not passed.
suboption.autoAck=suboption.autoAck||true;
if('function' !== typeof next) throw('Callback function not defined');
let db=this.client.db(this.option.dbname)
let collection=await db.collection(this.option.name)
var cursorOptions = {
tailable: true,
awaitdata: true,
numberOfRetries: -1
};
const tailableCursor = collection.find(filter, cursorOptions);
//create stream from tailable cursor
var stream =tailableCursor.stream();
console.log('queue is waiting for message ...')
stream.on('data', async (data)=>{
next(data);
//set the auto-ack
if(suboption.autoAck){
await collection.updateOne({_id:data._id},{$set:{processed:true}})
}
});
}
Notice the changes done in line#8. Now the filter criteria includes another flag called processed which is set to false. It means pick up only those messages which are not processed at least once. As the input to the subscribe method has got changed we have to change the subscriber.js
The revised subscriber.js will look like below after setting the auto-acknowledgment set to true.
xxxxxxxxxx
const Broker=require('./broker');
const MONGO_URL='mongodb://localhost:27017?authSource=admin';
let options={
url:MONGO_URL,
dbname: "broker",
name: "StockMarket"
}
Broker.create(options).then(async (broker)=>{
broker.subscribe({routingkey:"BSE",autoAck:true},(data)=>{
let datetime=new Date();
console.log(datetime, " data received from Stockmarket for BSE----->",data.message)
})
}).catch(e=>{
console.log('broker creation failed', e)
});
Now start from scratch.
- Drop the collection
- Run the subscriber
- Run the publisher
The messages will start appearing in the subscriber terminal.
- Now, restart the subscriber
This time no more duplicate messages got printed again as it was already processed last time.
Similarly, now you can now build the explicit acknowledgment as well by introducing a separate method in the broker. When messages are delivered to the consumer, as per AMQP, a delivery tag is required to be added and the same will be sent back to acknowledge it later. So the subscribe function is again got changed!
xxxxxxxxxx
/*
* subscribe to a specific routingkey
* suboption : declares the subscription options . i.e. routingkey , autoAck
*/
async subscribe(suboption,next){
var filter = {routingkey:suboption.routingkey,processed:false};
//initializes autoAck default to true if not passed.
suboption.autoAck=suboption.autoAck||true;
if('function' !== typeof next) throw('Callback function not defined');
let db=this.client.db(this.option.dbname)
let collection=await db.collection(this.option.name)
var cursorOptions = {
tailable: true,
awaitdata: true,
numberOfRetries: -1
};
const tailableCursor = collection.find(filter, cursorOptions);
//create stream from tailable cursor
var stream =tailableCursor.stream();
console.log('queue is waiting for message ...')
stream.on('data', async (data)=>{
// add delivery tag
data.deliveryTag={};
data.deliveryTag.id=data._id;
data.deliveryTag.subscriptionName=subscriptionName;
next(data);
//set the auto-ack
if(suboption.autoAck){
await collection.updateOne({_id:data._id},{$set:{processed:true}})
}
});
}
Look at the changes done at line#28 to add the delivery tag. The consumer is required to send back the same delivery tag to acknowledge it. Our acknowledgment method looks like below.
xxxxxxxxxx
/*
* acknowledge a message delivery
*/
async ack(deliveryTag){
let db=this.client.db(this.option.dbname);
let collection=await db.collection(deliveryTag.subscriptionName)
let result=await collection.updateOne(
{ _id: deliveryTag.id },
{ $set: { processed:true } },
);
if(result.result.ok==1){
console.log('message acknowledged ',deliveryTag.id,deliveryTag.subscriptionName)
}
}
And now the consumer needs to change again to utilize this explicit acknowledgment.
xxxxxxxxxx
const Broker=require('./broker');
const MONGO_URL='mongodb://localhost:27017?authSource=admin';
let options={
url:MONGO_URL,
dbname: "broker",
name: "StockMarket"
}
Broker.create(options).then(async (broker)=>{
broker.subscribe({routingkey:"BSE",autoAck:false},(data)=>{
let datetime=new Date();
console.log(datetime, " data received from Stockmarket for BSE----->",data.message)
broker.ack(data.deliveryTag)
})
}).catch(e=>{
console.log('broker creation failed', e)
});
So until now, we implemented a Direct Exchange of AMQP 0-9-1 protocol and it seems all good. But there is another important concept which still needs some attention. Let us figure out the complexity in our next section.
Multiple Consumers
Consider there are multiple workers of same application reading from the same queue. This means the application wants to process the queue in parallel with multiple workers. In this case, all workers are interested to same set of messages. But it is expected that the same message should not be delivered to multiple workers. At a time, it will be delivered to one worker only. In reality, the workers are selected using round-robin fashion. So, we need somehow to group the consumers/workers. In AMQP , we group it through the queue name. All the workers listening to same queue receives the messages in round robin fashion.
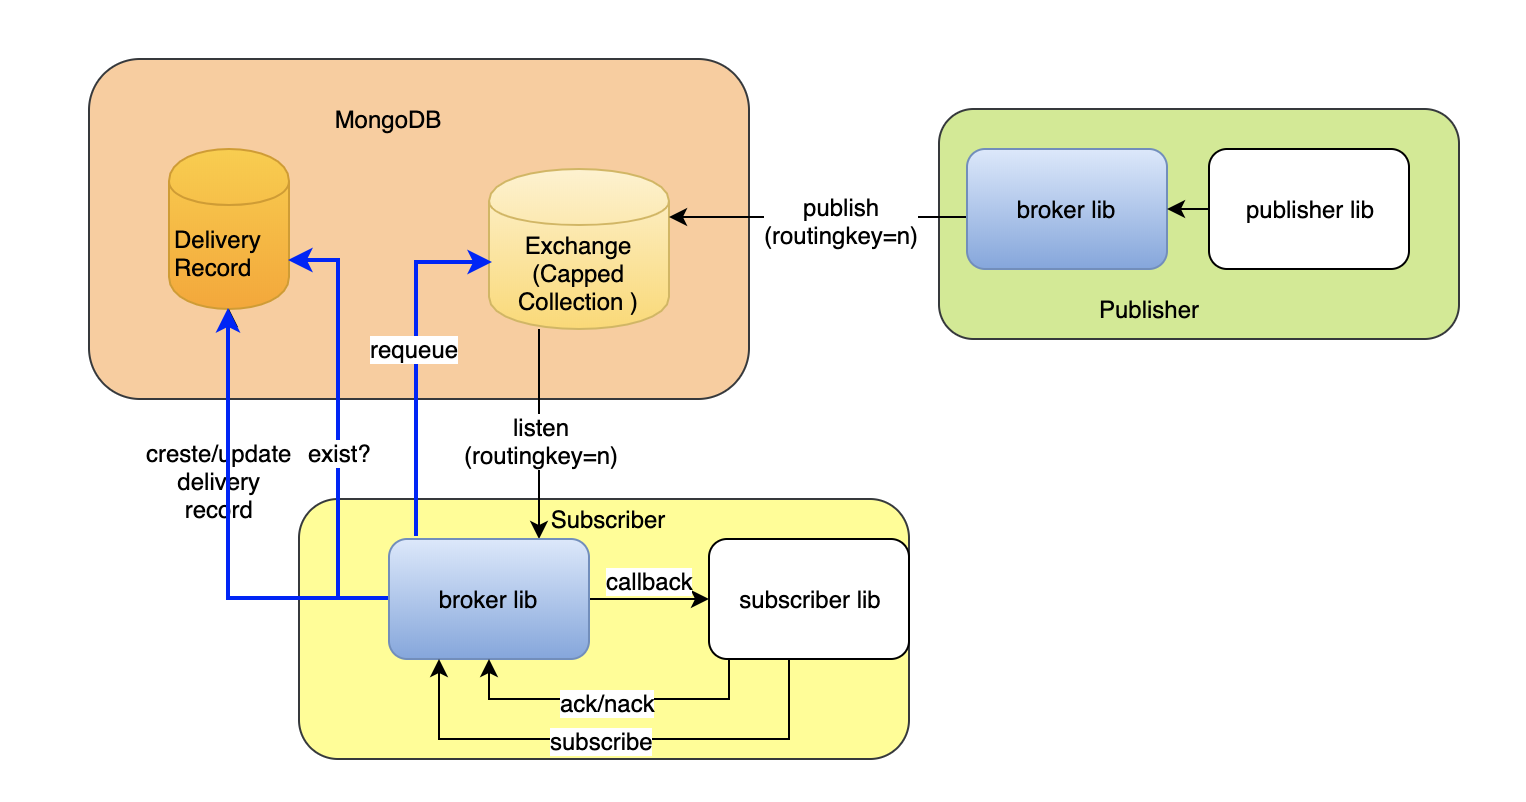
In our scenarios, till now we do not have anything which identifies the queue name or the subscription. So, let's add an additional input in our subscribe method, subscriptonName. Using subscription name we can segregate the message delivery to different workers groups. But how do we make sure that the same message is not delivered to more than one worker in the same worker group? So, we need some additional way to identify the status of the each delivery and also keep an acknowledgment based on the delivery. The worker that receives the delivery is supposed to acknowledge /reject with the same delivery. Once a message is delivered to one worker, then the broker needs to check first if the delivery was attempted successfully. For the same purpose, we will add an additional collection called delivery. Whenever a message is delivered to one of the worker, an entry is created in the delivery collection. The collection keeps the following information as part of its record to identify the message delivery uniquely.
- msgid: The id of the message.
- _id: The id of the delivery record
- exchange: The name of the exchange
- subscriptionName: The name of the subscription
- state: It maintains 3 states
- delivered: When the message is delivered to one of the workers successfully
- acknowledged: when the worker acknowledged it
- rejected: when the worker rejected it.
- deliverytimestamp: The timestamp when the delivery was attempted successfully.
- requeue: if set to true during reject, the message will be requeued to the exchange again.
- acktimestamp: The timestamp when the acknowledgment was done.
So our new subscribe method will look like below.
xxxxxxxxxx
/*
* subscribe to a specific routingkey
* suboption : declares the subscription options . i.e. routingkey , autoAck
*/
async subscribe(subscriptionName, suboption,next){
var filter = {routingkey:suboption.routingkey};
//initializes autoAck default to true if not passed.
suboption.autoAck=suboption.autoAck||true;
if('function' !== typeof next) throw('Callback function not defined');
let db=this.client.db(this.option.dbname)
let collection=db.collection(this.option.name)
let deliveryCol=db.collection("delivery");
let seekCursor=deliveryCol.find({subscriptionName:subscriptionName, exchange:this.option.name}).sort({msgid:-1}).limit(1);
let lastdelivery=await seekCursor.next();
if(lastdelivery!=null){
//Pick up the id of the last message and add it as filter.
console.log('lastdelivery ',lastdelivery.msgid)
filter['_id']={ $gt: lastdelivery.msgid};
}
var cursorOptions = {
tailable: true,
awaitdata: true,
numberOfRetries: -1
};
const tailableCursor = collection.find(filter, cursorOptions);
//create stream from tailable cursor
var stream =tailableCursor.stream();
console.log('queue is waiting for message ...')
stream.on('data', async (data)=>{
// build delivery record
data.deliveryTag={};
data.deliveryTag.msgid=data._id;
//build the id of the record using exchange name, subscription name and _id of the message.
//This is to ensure that one message is delivered to one consumer of the subscription.
data.deliveryTag._id=this.option.name+"#"+subscriptionName+"#"+data._id;
data.deliveryTag.exchange=this.option.name
data.deliveryTag.subscriptionName=subscriptionName;
data.deliveryTag.deliverytimestamp=new Date().getTime();
data.deliveryTag.requeue=false;
data.deliveryTag.acktimestamp=null;
if(suboption.autoAck){
//set the auto-ack
data.deliveryTag.acktimestamp=new Date().getTime();
data.deliveryTag.state='acknowledged';
}else{
data.deliveryTag.state='delivered'
}
//check if the msg is already delivered for the same subscription.
let delivered=await deliveryCol.find(
{
_id: data.deliveryTag._id
}).hasNext();
if(!delivered){
//insert the delivery record.
deliveryCol.insertOne(data.deliveryTag,(err,result)=>{
if(!!err){
console.log("already delivered to other worker")
}else if(result.result.ok==1){
//only in case of successful insertion
next(data);
}
});
}
});
}
One important change that we made from the previous versions of the subscribe method is that now we are not using the processed flag for acknowledgment anymore. Rather, we have added a seek cursor to find out the last delivery attempted for the subscription. Then it tries to find the messages which has arrived after the last delivery. The _id of the message is generated as per current timestamp. So to find out the messages after the last delivery, we need to find the messages for which the value of _id is greater than the msgid stored in the delivery.
If the auto acknowledgment is set, the message is considered to be acknowledged as soon as the delivery is completed. But if the auto acknowledgment is not set, the worker is supposed to callback the broker with the same delivery tag information. If the worker has been able to process it successfully, it will acknowledge or else it will reject the message. While rejecting the message it may set a flag to requeue. If the requeue flag is set, the message will be inserted back into exchange collection again. By default, this flag is set to false. Due to this reason, I added two more additional functions in Broker class.
xxxxxxxxxx
/*
* acknowledge a message delivery
*/
async ack(deliveryTag){
let db=this.client.db(this.option.dbname);
let collection=db.collection('delivery');
let result=await collection.updateOne(
{
msgid: deliveryTag.msgid,
exchange: this.option.name
},
{
$set: {
acktimestamp: new Date().getTime(),
state: 'acknowledged'
}
}
);
if(result.result.ok==1){
console.log('message acknowledged ',deliveryTag.msgid,deliveryTag.subscriptionName)
}
}
/*
* reject a message delivery
*/
async nack(deliveryTag){
let db=this.client.db(this.option.dbname);
let collection=db.collection('delivery')
let result=await collection.updateOne(
{
msgid: deliveryTag.msgid,
exchange: this.option.name
},
{
$set: {
acktimestamp: new Date().getTime(),
state: 'rejected'
}
}
);
if(result.result.ok==1){
console.log('message rejected ',deliveryTag.msgid,deliveryTag.subscriptionName)
if(deliveryTag.requeue){
let exchange=db.collection(this.option.name);
let msg=await exchange.find({_id:deliveryTag.msgid}).next();
msg._id=new Date().getTime();
exchange.insertOne(msg);
}
}
}
So, now our revised architecture looks like below.
Summing Up
What did we realize till now?
We started from a very simple thought of exploiting a special feature of MongoDB to utilize it for messaging needs. In the beginning, it looked very promising. isn't it? As if , things are already given and we just have to utilize it. But the more we went into the usecases of messaging needs, the more we found more things to consider. Till now, we have implemented only one type of exchange and I am quite sure that you will agree that we have to go a bit far to make it equivalent to other AMQP implementation available in the market. We have just implemented the basic functionalities of it. And in the process, we had to change our initial architecture 3 times. Let us summarize what we developed till now
- A direct exchange protocol
- message acknowledgement
- message delivery segregation based on subscription channel
- message requeue
- message durability
However, all the above features are designed as part of client library and not as part of central service which any subscriber /publisher will just use. The library is just giving some reusable code but it is still running inside the client runtime. Thus managing the above features are getting delegated to individual client . As I have indicated in the beginning, that the same functionalities could be provided as standalone service as well in the form of another microservice. In that approach, the central service is expected to manage and responsible for the internal resources and functionalities. Running in a separate container will free the subscribers/publishers of added responsibilities. The architecture as separate microservice will look like something as below.
Now let us look at some of the major differences.
- In our design, queues are logical and exclusive and it exists only till the connections are open. There are no physical existence of queues and so its durability. In this library-based design, it is more of representation of connection. The advantage is that we do not have a maintenance overhead of queues. But it still achieves the basic purpose of message segregation and delivery to the target recipients.
- In this design, messages are always durable as it is backed by a db. In messaging system durability is a feature but not mandatory . Durability comes with a cost of speed.
- As the exchange is implemented by capped collection we can not delete the messages at capped collection and the only way we can control the life time of a message is by the max number of messages or by the total size of the capped collection. There is no ttl set on messages. So the messages will be delivered to all the consumers who have joined late as long as the messages are present.
- we may enable ttl with the approach of soft delete after a certain time, but that may require additional overhead of managing the soft delete. The question here will be who will be managing that ? Certainly not a good idea to keep it at the subscriber/publisher side. So we need to opt for standalone microservice mode of implementation .
- In our design, we have introduced a delivery collection to maintain the state of the delivery. The records in this collection must continue to exist more than the life time of the messages in the exchange. The data will grow over the time and may need additional maintenance overhead if we want to clean up time to time.
- In this design , there is no concept of dead letter queue required as here the subscribers are pulling the messages whenever they come online and they are able to establish a stable connection. So the usecase of broker being not able to deliver to consumer does not exist. In this aspect , the implementation is more close to Kafka protocol. if we run the broker as separate microservice, then the concept of dead letter queue may becomes relevant again as the client runtime may or may not be available all the time to deliver the message.
Now, going back to our initial questions, when should we consider to build such framework instead of taking any well tested /designed/adopted code in the market to fulfill our messaging need ? Does it have any additional advantage of building such framework?
Well, in my opinion, any messaging service /framework comes with the cost of infrastructure and maintenance. If your messaging need is very limited to few percentage of usecases your application support and it follows some definitive pattern, then it might be worth to look for such feature if you are already running your application on mongo db. If you need variety of type of message routing and variety of usecases that any standard messaging framework supports, then it is worth to take up the same than investing time to rebuild that again.
The final source code version of the examples above is given in the project https://github.com/arijitr/amqp-on-mongo
We will be exploring more on developing the other patterns /exchange types in the next articles of this series.
Opinions expressed by DZone contributors are their own.
Comments