Using MuleSoft as OAuth Provider - Mule4 | OAuth2
In this tutorial, we are demonstrating a step by step guide on how to implement OAuth in MuleSoft API provided by MuleSoft itself as an OAuth Implementation Provider.
Join the DZone community and get the full member experience.
Join For FreeIn this tutorial, we are demonstrating how we can use MuleSoft itself as an OAuth Provider. By saying OAuth, we are referring to OAuth2.0.
Just for a recap, there are many OAuth Providers available nowadays such as Facebook, Google, AWS Cognito, OKTA etc. MuleSoft also provides this feature to act as an OAuth Provider so that it is easier to implement OAuth using MuleSoft itself without using any third party providers.
There are three parts in implementing the OAuth on MuleSoft API using MuleSoft itselt as an OAuth Provider.
Part 1. Creating a Mule OAuth Project (It is the project/application on which we will apply the OAuth Policy)
Part 2. Creating a Mule OAuth Implementation Project (It is the project which will validate the OAuth requests, or take it as a OAuth Implementation Provider project/application)
Part 3. Applying OAuth Policy on the Project we created in Part 1 while having the OAuth Validation URL enforced through the Project we created in Part 2
Description of all parts are given below:
Creating a Mule OAuth Project
In this part, there are three subparts:
- Designing API Specifications using Design Center
- Application implementation using Anypoint Studio
- Creating an API using API Manager
Designing API Specifications using Design Center
Create RAML in Design Center with a single Get resource.
xxxxxxxxxx
#%RAML 1.0
titlemule-oauth-project
descriptionmule-oauth-project-description
versionv1
baseUrihttps//localhost/version
protocols HTTP HTTPS
mediaTypeapplication/json
documentation
titlemule-oauth-project documentation
contentsome documentation
securitySchemes
oauth_2_0
description
The API supports OAuth2.0 for authenticating all API requests
typeOAuth 2.0
describedBy
headers
Authorization
requiredtrue
description
Used to send a valid OAuth2 Acccess Token
typestring
responses
400
body
application/json
example
{"error": "Sorry. Bad Request"}
description
Bad request.
401
body
application/json
example
{"error": "Sorry. Unauthorized"}
description
Bad or expired token. This can happen if the user revoked or expired an access token. To fix, you should re-authenticate the user.
403
body
application/json
example
{"error": "Sorry. Forbidden"}
description
Bad OAuth request (wrong consumer key, bad nonce, expired timestamp...). Unfortunately, re-authenticating the user won't help here.
/getCustomer
get
description
Get Customer by passing customer_id
queryParameters
customer_id
displayNamecustomer_id
typeinteger
descriptionCustomer ID
example12345
requiredtrue
responses
200
body
application/json
400
body
application/json
exampleInvalid Token Example
descriptionInvalid Token
401
body
application/json
exampleUnauthorized Example
descriptionUnauthorized
403
body
application/json
exampleForbidden Example
descriptionForbidden
500
body
application/json
exampleBad Response from Authorization Server Example
descriptionBad Response from Authorization Server
The purpose of having securitySchemes in the above RAML is for documenting the API Specifications. It's nothing to do with Anypoint Studio Scaffolding, though we do import it during project creation in the next subpart.
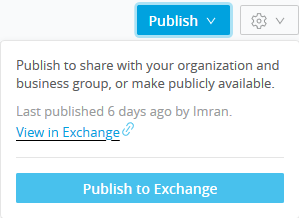
Publish that RAML in Exchange.
Application Implementation Using Anypoint Studio
Create a project/application in Anypoint Studio by importing the RAML from Exchange.
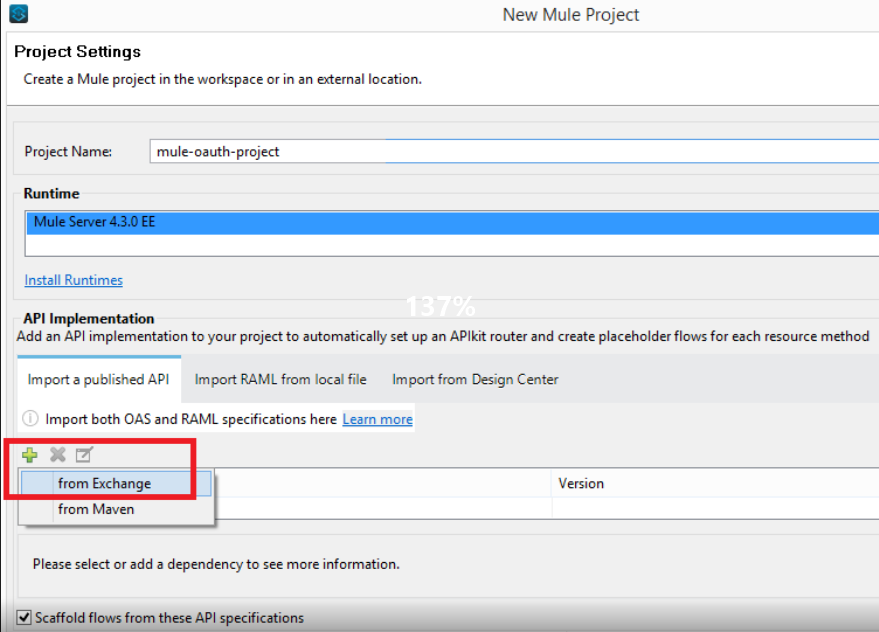
As you have imported the RAML from Exchange, you will see that after creating the project, the API specifications will be added as a zip file in project libraries rather than the API folder in project resources.
If you have imported the RAML from Design Center, you will see that after creating the project, the API specifications will be added inside the api folder in project resources.
It's a best design practice to import the RAML from Exchange rather than Design Center. In this manner, we are enforcing the user to only edit the RAML through Design Center.... so that it will not make any discrepancy in RAML versions on Studio and Design Center.
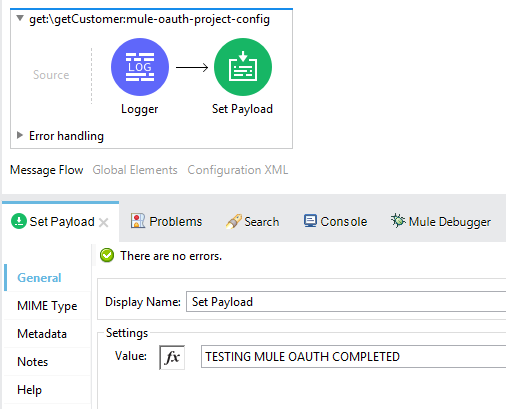
After creating the project via importing the RAML from Anypoint Exchange successfully. Now, it's time to override the default flow implementation. Therefore, we need to implement the flow so that it will return something on postman. To do so, we are just putting a Logger and a Set Payload to return some static payload back on Postman.
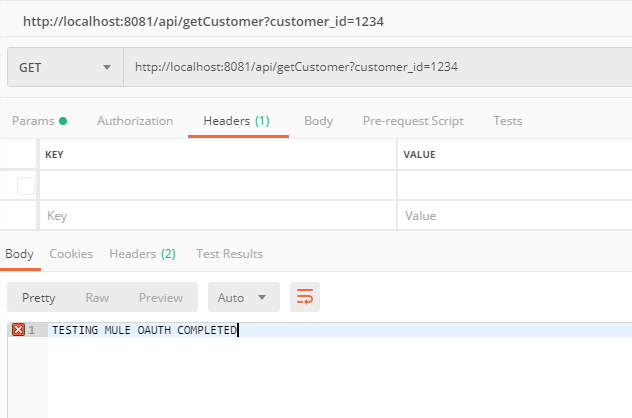
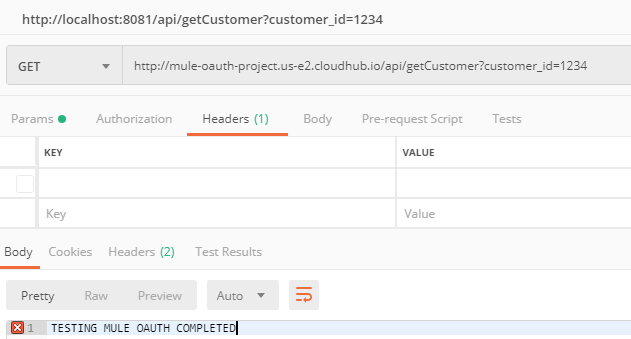
Execute it on localhost to confirm that we are getting expected outcome on postman. Please keep this is mind that having securityScheme stated in RAML doesn't mean that you will get any error if you don't provide the Authorization in header while running in localhost.
Testing the application on localhost:
Deploy the project/application in CloudHub by either uploading the exported jar file, or by deploying the project directly from Anypoint Studio.
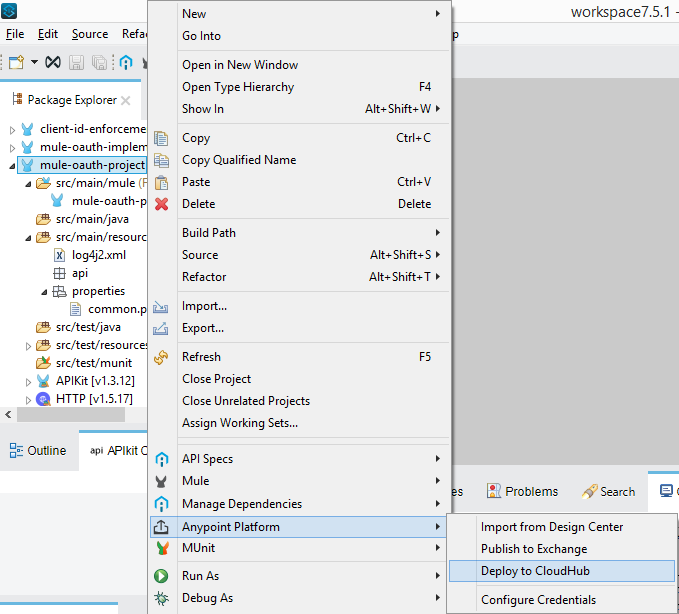
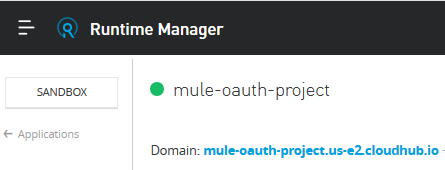
After deploying the project with default settings, confirm that the application is now listed under Runtime Manager. Click on it and copy the Domain link as highlighted below.
Testing the application on CloudHub:
Creating an API Using API Manager
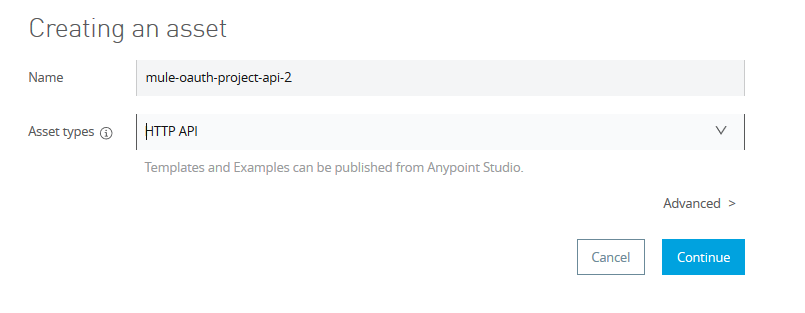
In API Manager, click on Manage API and then click on Create new API

Provide some name of your choice and select HTTP API in Asset types as follows. Leave the advance settings as it is and click Continue.
On the next page, select the options as follows and then click save.
Note: Select Endpoint with Proxy in case you would like to implement the new API as Proxy API
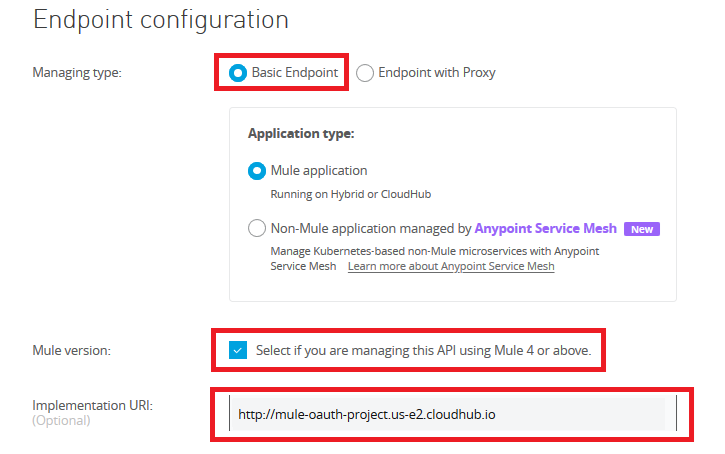
Implementation URL would be the Domain link we have just copied from the above step. Confirm that the status of the new API that we just have created is 'unregistered' now.
Inside API Manager, click on the API version underneath the API name to open its details and then copy the Autodiscovery API ID.
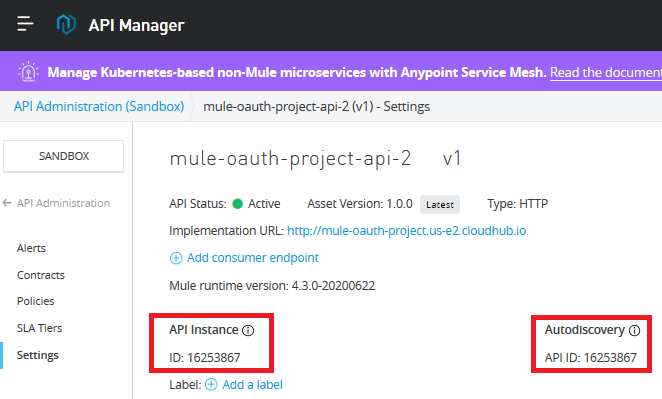
Both API Instance and Autodiscovery are having same values. Paste it in the Studio project's properties files with the name api.id.

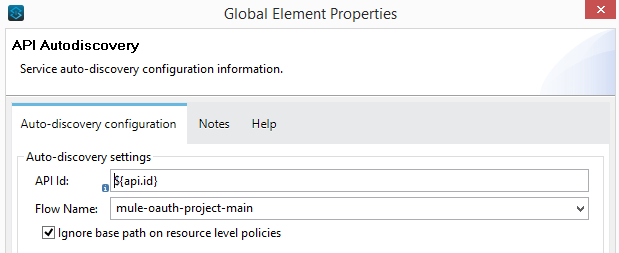
Now, refer to it in the Global Elements Autodiscovery config. Also, select the main flow in Autodiscovery config.
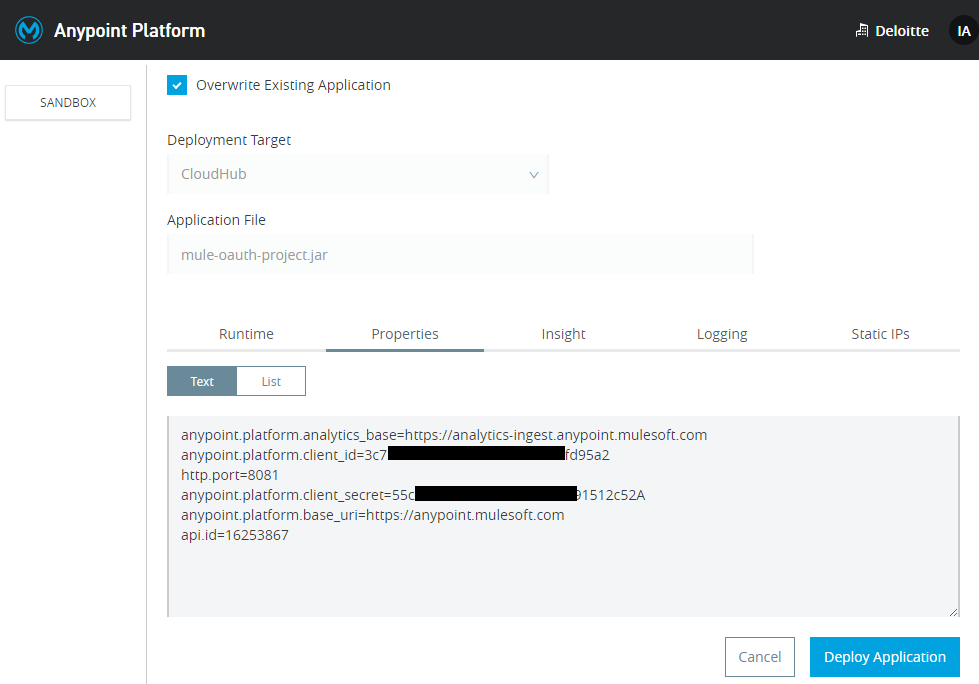
Once again deploy the project/application to CloudHub. But this time, we also need to make it sure that either at the time of deployment (i.e. if we are deploying via Anypoint Studio) or after the deployment in application settings (i.e. if we are uploading the jar file to Runtime Manager), we include below mentioned properties in the properties tab.
xxxxxxxxxx
anypoint.platform.analytics_base=https://analytics-ingest.anypoint.mulesoft.com
anypoint.platform.client_id=3c73d789c3*************fd95a2
http.port=8081
anypoint.platform.client_secret=55cAa33927************91512c52A
anypoint.platform.base_uri=https://anypoint.mulesoft.com
api.id=16253867
anypoint.platform.analytics_baseis having a hard coded value for analytics.anypoint.platform.client_idis the client_id of your chosen environment e.g Design, Sandbox, Production where you have deployed the application.anypoint.platform.client_secretis the client_secret of your chosen environment e.g Design, Sandbox, Production where you have deployed the application.anypoint.platform.base_uriis having a hard coded value.api.idis the Autodiscovery id.http.portis the port your application is running.
After successful deployment, confirm that the status of the new API is 'Active' now.

Creating a Mule OAuth Implementation Project
Create a project/application in Studio by selecting File -> New -> Mule Project. After creating the project, open the project's main xml file and click on Global Elements.
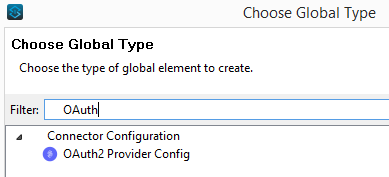
Create 'Object Store' and 'OAuth Provider' Configurations.
Note: Please make it sure that in the Mule Palette we are having ObjectStore and OAuth2 Provider. You can get them from Exchange by typing below mentioned names:
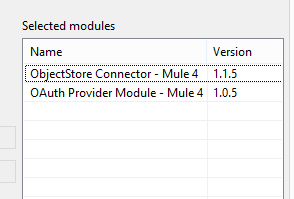
Search them in Global Elements as follows:
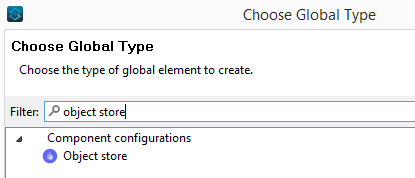 Object Store
 Global Elements
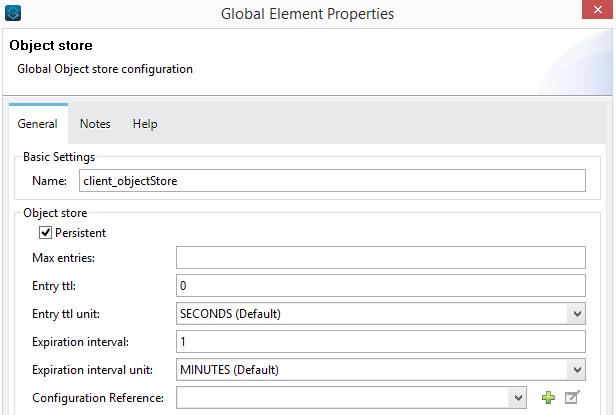
We need to create two Object Stores for persisting the client id and the token respectively. Configuration of client_objectstore for persisting the clientid is given below:
Configuration of token_objectstore for persisting the token is given below:

Configuration of OAuth Provider is given below:
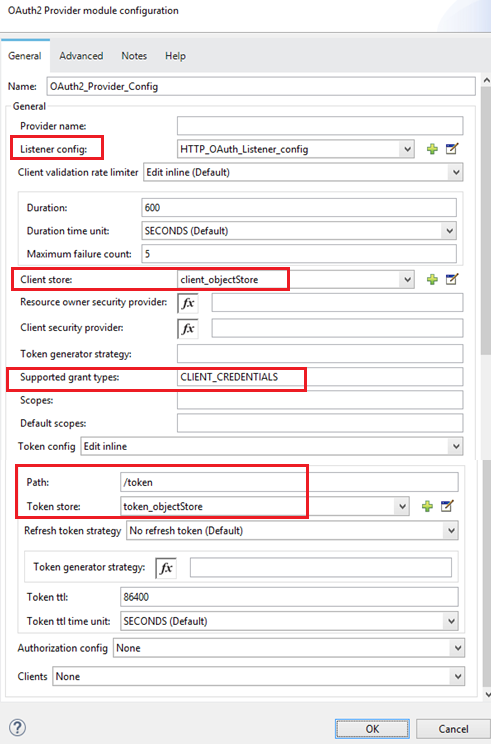
Listener config: Create a new HTTP Listener Configuration with default settings.
Client store: Select previously created client_objectStore. We are using it to persist the clientid
Supported Grant Types: we will use CLIENT_CREDENTIALS as its the most easiest one to demonstrate
Path: Its the resource to get the token i.e. by hitting this resource on Postman, we will get the token
Token store: Select previously created token_objectStore. We are using it to persist the token
Just to recap... the most common OAuth grant types and their descriptions are listed below:
Authorization Code Grant: A code is issued and used to obtain the access_token. This code is released to a front-end application (on the browser) after the user logs in. The access_token instead, is issued Server side, authenticating the client with its password and the obtained code.
Implicit Grant: after the user logs in, the access_token is issued immediately.
Client Credential Grant: the access_token is issued on the server, authenticating only the client, not the user.
Password Grant: the access_token is issued immediately with a single request containing all login information: username, user password, client id, and client secret. It could look easier to implement, but it has some complications.
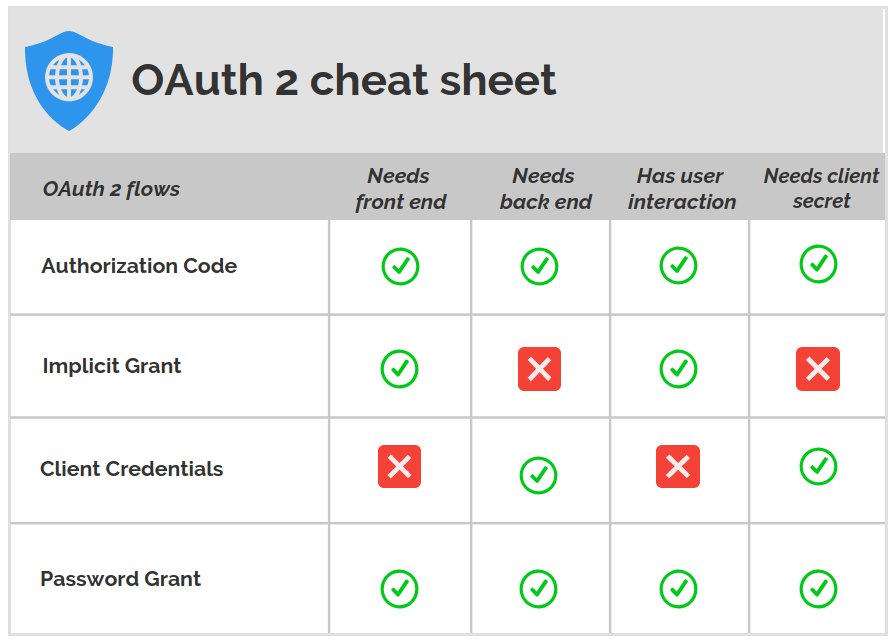 Summarizing different OAuth Grant Types | Source: https://itnext.io
Now we need to create Mule flows for creating the client, generating the token for the client, and validating the token for making sure that OAuth provided by MuleSoft is working fine.
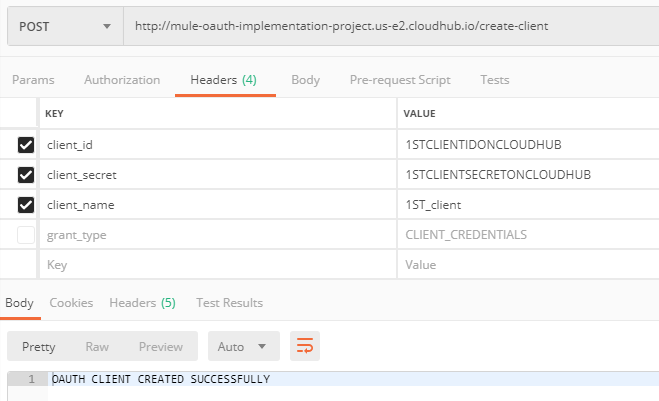
By using the 'OAuth2 Provider Create client' connector, we will implement the flow for creating the client.
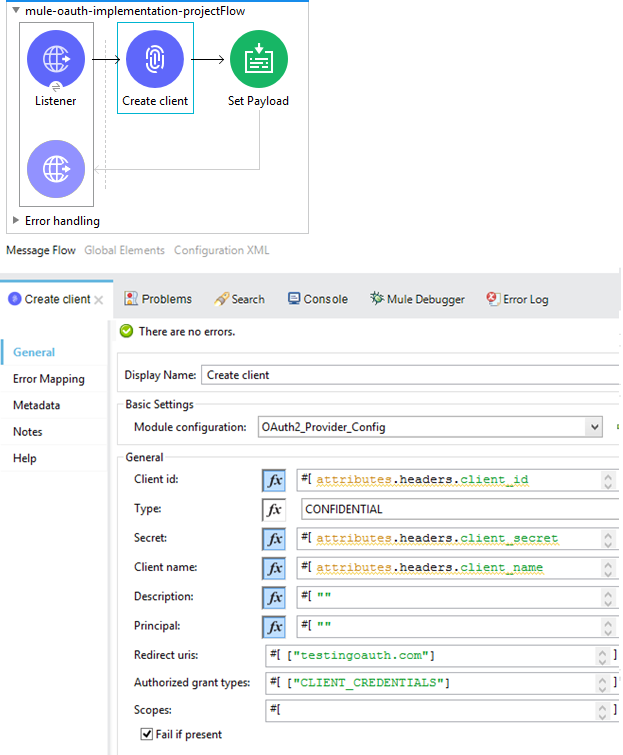
Flow for creating the client 1
Client id, Secret are the required header elements where as Client name is an optional one. You can leave the Description and Principal as empty. Redirect uris can be any string, where as Authorized grant types needs to be CLIENT_CREDENTIALS, as discussed above.
Set the payload as follows:
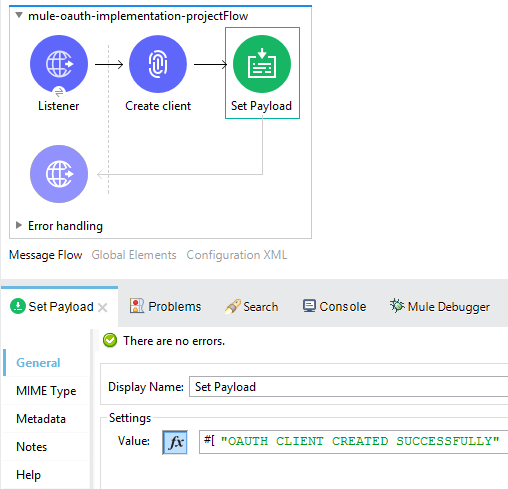
Flow for creating the client 2
Now, by using the 'OAuth2 Provider Validate token' connector, we will implement the flow for validating the token.
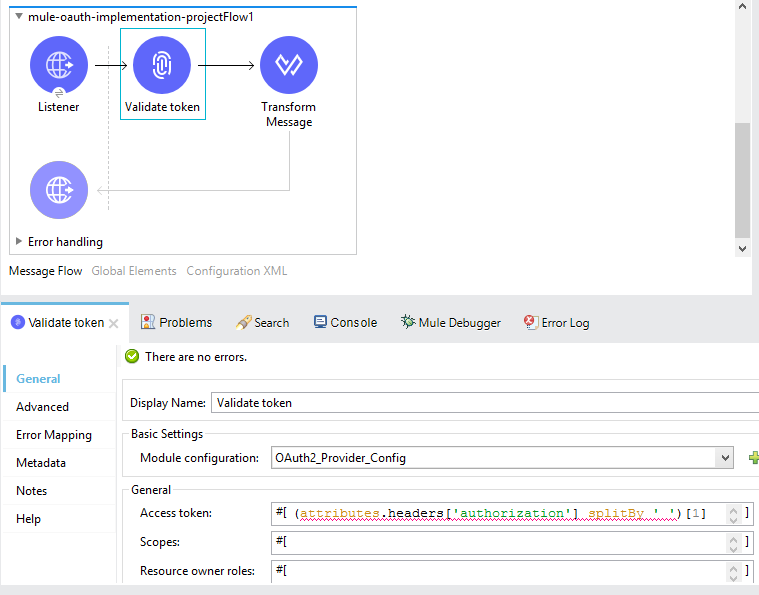
Flow for validating the client 1
Transform the payload as follows
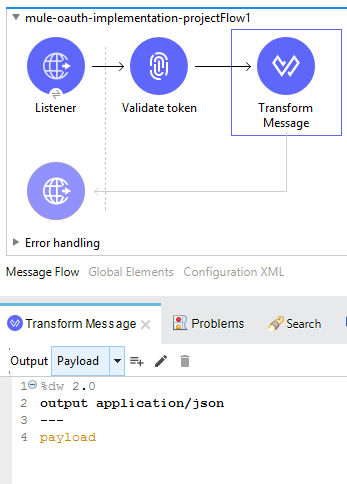
Flow for validating the client 2
You can do the localhost testing of this application as well before deploying it to CloudHub, but below are just the screenshots of its CloudHub testing.
Creating the client:
Note: No need of passing the grant_type
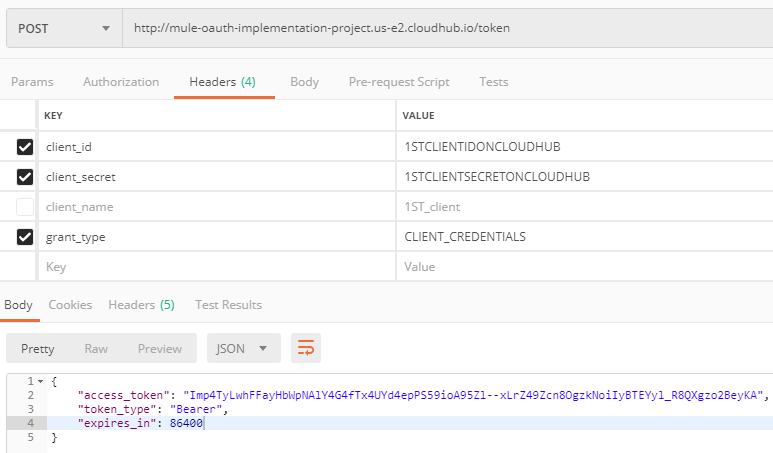
Generating the token for the client created above:
Note: no need of passing the client_name
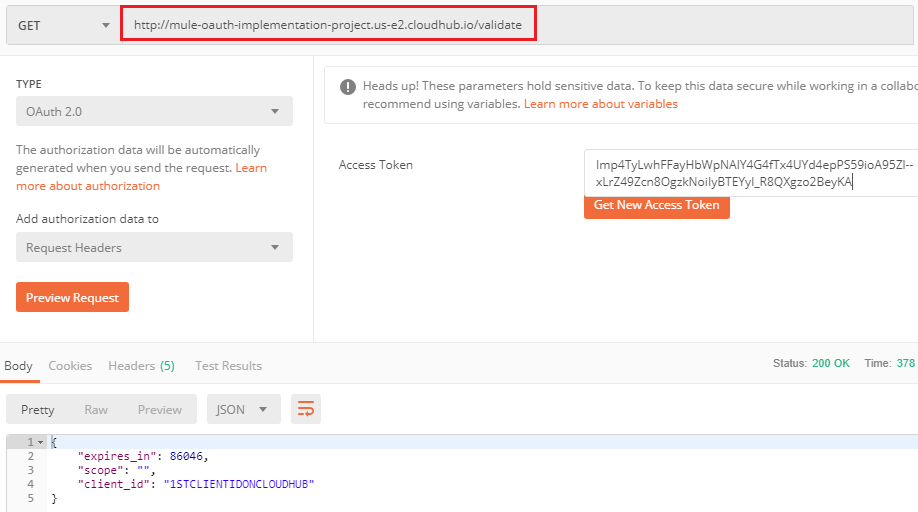
Validating the token:
On Postman, under Authorization, the TYPE can either be Bearer Token or OAuth 2.0.
This below highlighted validate resource URL needs to be supplied when we will be enforcing the OAuth Policy using API Manager.
Applying OAuth Policy
We have now confirmed that the project on which we have to apply OAuth (Part 1), and the project having OAuth implementation (Part 2) are both working fine.
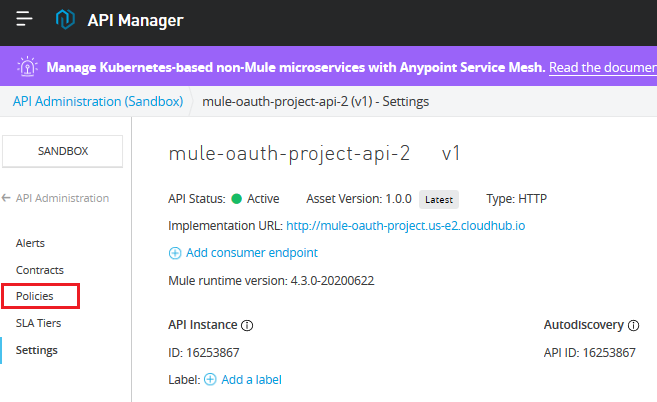
Now its time to apply the OAuth policy on the project (we created in Part 1) using API Manager.
Select API Manager -> Project -> Policies.
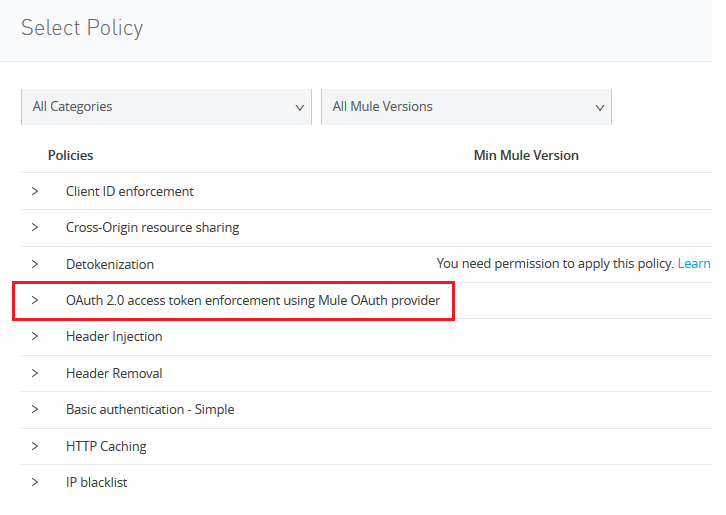
Click on 'Apply New Policy' and select OAuth as follows:
Click Configure Policy.
Enter the validate token url in the box as shown below.
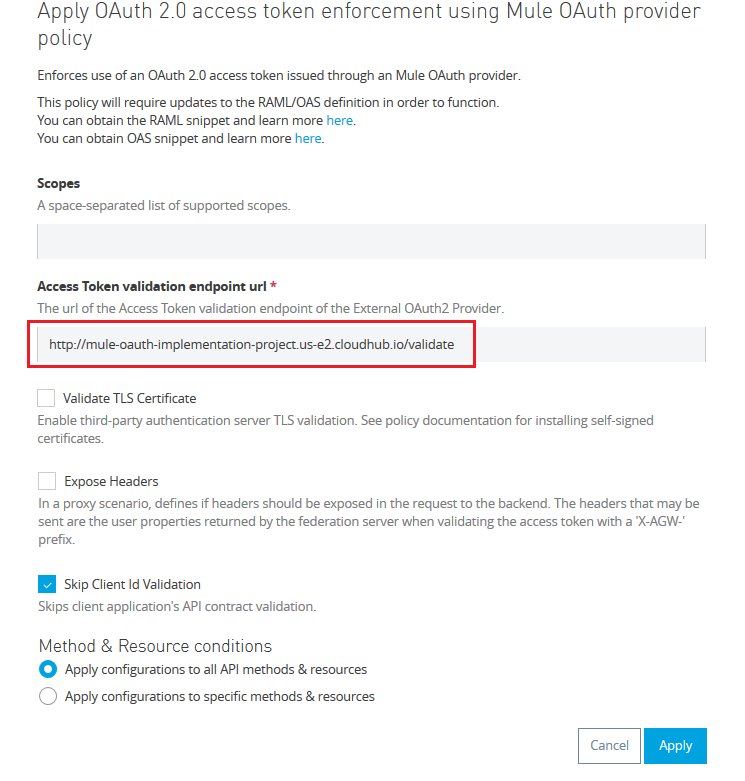
Check 'Skip Client Id Validation' in case the API is also having Client ID enforcement contract in place.
Once again test the application that we have created in Part 1. This time we will get errors if we won't provide the token or if we provide the wrong token.
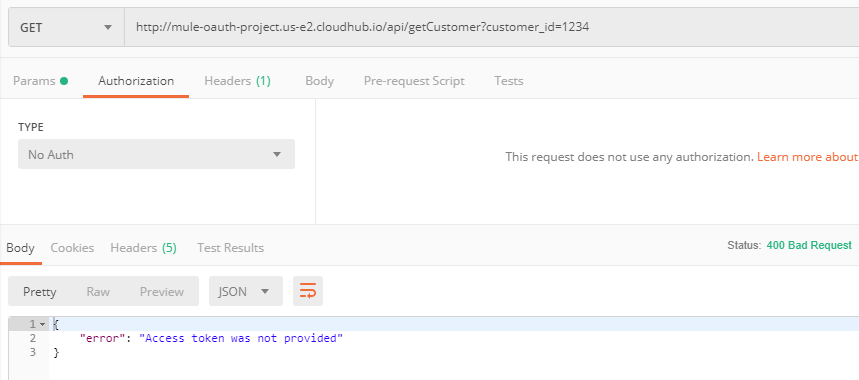
Getting 400 Bad Request when we don't provide the token.
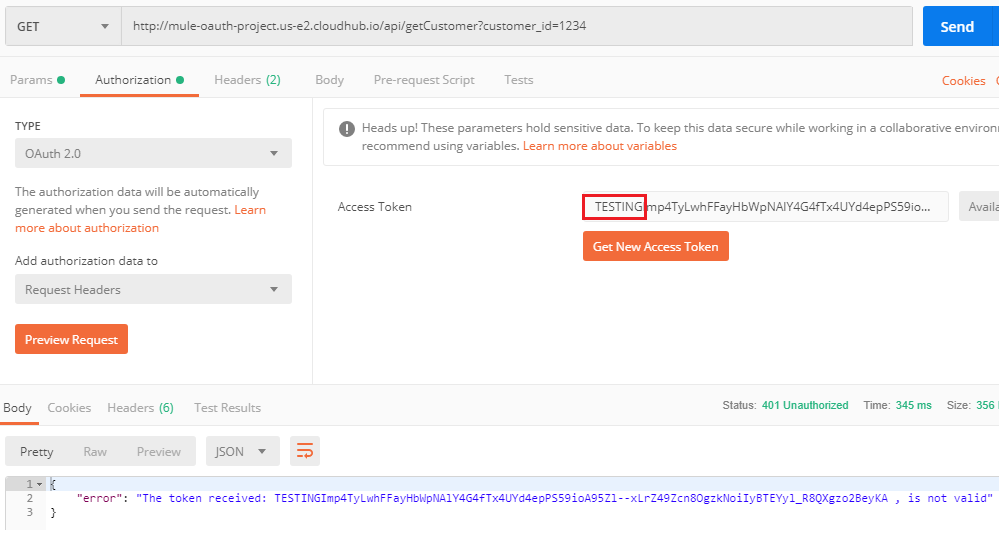
Getting 401 Unauthorized when provide the wrong token.
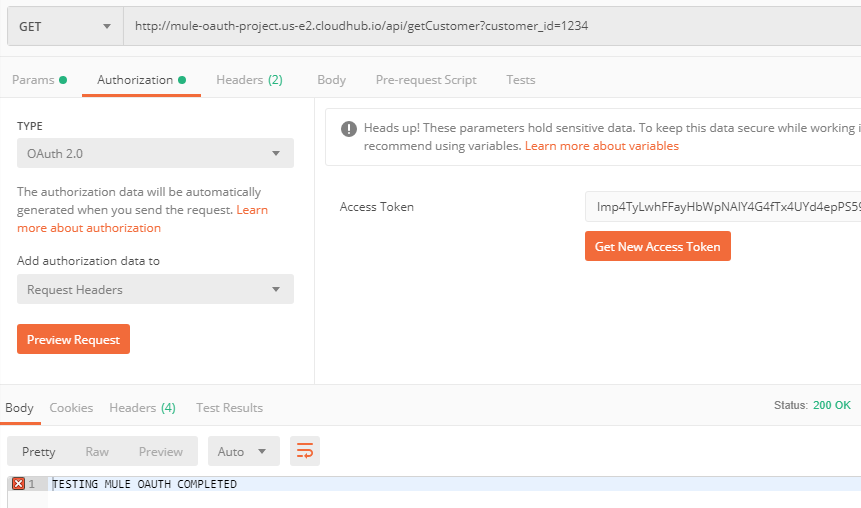
Finally, getting the expected response when we provide the correct token.
Conclusion
In this tutorial, we have seen a step by step guide on how to implement OAuth in MuleSoft API provided by MuleSoft itself as an OAuth Implementation Provider.
Opinions expressed by DZone contributors are their own.
Comments