How to Use the Spring Config Server
Learn more about how to create remote configurations in your applications.
Join the DZone community and get the full member experience.
Join For FreeThis time, we will use the package Spring Cloud Config to have remote configurations for our applications.
The idea is that our program or programs can move your settings to an external place so that our application is easily configurable and can even change their settings.
This is widely used in microservices. A same service or application can be launched many times in different containers, and it is interesting to have a central place where they can read the settings to these services.
To do this, we will create a configuration server and a client that reads your configuration of that server. The configurations server uses a GIT repository on GitHub, where we store the configuration files.
The application data are as follows:
Configuration Server
- Project: config-server
- Port: 8888
- Spring Name: config-server
- GIT server: https://github.com/chuchip/servercloudconfig.git
Configuration Client
- Project: config-client
- Port: 8080
- Spring Name: config-client
The program sources can be found here.
- Configuration server
You must only include this dependency in your Maven project.
<dependency>
     <groupId>org.springframework.cloud</groupId>
     <artifactId>spring-cloud-config-server</artifactId>
</dependency>
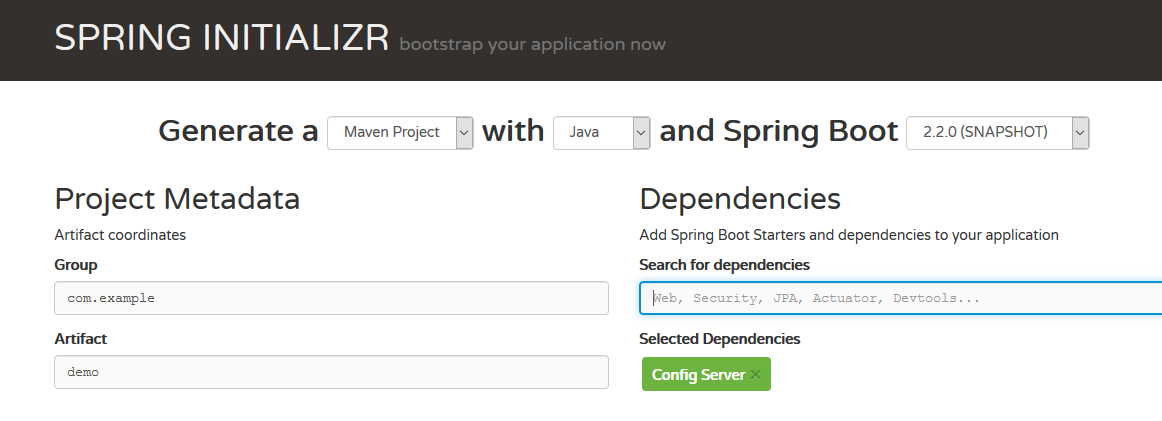
The name of the Spring Starter is the Config Server:
package com.profesorp.configserver;

import org.springframework.boot.SpringApplication;
import org.springframework.boot.autoconfigure.SpringBootApplication;
import org.springframework.cloud.config.server.EnableConfigServer;

@EnableConfigServer
@SpringBootApplication
public class ConfigServerApplication {

    public static void main(String[] args) {
        SpringApplication.run(ConfigServerApplication.class, args);
    }
}
As seen below, the only thing to highlight here is the label @EnableConfigServer.
In the file application.properties, it should be the parameter: spring.cloud.config.server.git.uri:
spring.application.name=config-server
server.port=8888

spring.cloud.config.server.git.uri=https://github.com/chuchip/servercloudconfig.git
In this case, we use a server, Git, that is hosted on GitHub. We could also specify the use of a repository, GITlocally, as follows:
spring.cloud.config.server.git.uri=file://eclipe/spring-config/Configuration servers that Spring Cloud supports are the following backends:
- GIT
- Vault
- JDBC
These backends can even be mixed so that, depending on the chosen profile, they will use one or the other. But this is beyond the scope of this document.
In the case of the GIT server, which is used in the example, the important thing is to have a file with the name of the client that is requesting data. This file will have the suffix .properties.
So, if we want to have the setting for a client application that is called config-client, which is to say the variable spring.application.name is equal to config-client, we must have a file named config-client.properties. The content of this file will be:
datosservidor.minimum=11
datosservidor.maximum=20
limites.minimum=-1
limites.maximum=2
valores.valor_fijo: VALORFIJO
valores.valor_funcion: "VALORDEFUNCION";
Note that the value can be assigned with : or = .
DO NOT use quotation marks to delimit the literal, unless you want our literal (Strings) to include those quotes.
To see past our client values, we will make a GET request specifying the client name and profile.
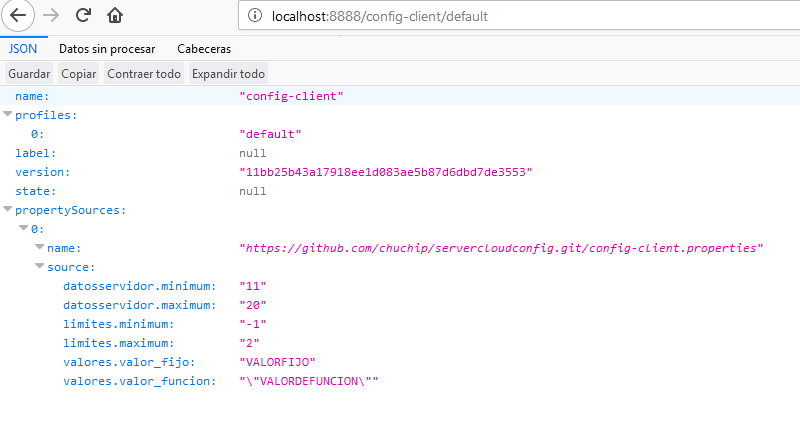 In this case, we ask for the client configuration
 config-clientand the profile default,which is the profile used if you do not specify any.
To view the settings for the profile production, you would call the URL: HTTP:// localhost: 8888 / config-client/production, which displays the following output:
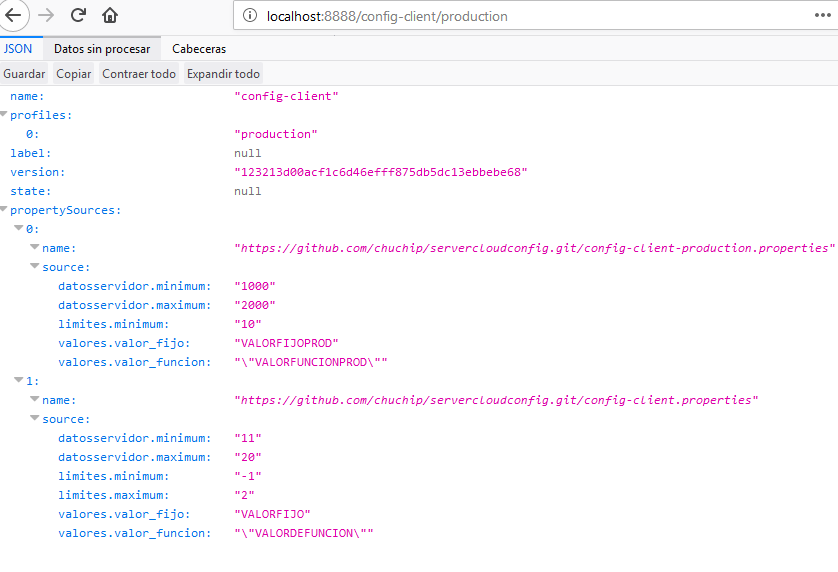
config-client-production.propertiesand then the file contents
config-client.properties.
Thus, if a variable exists in the required profile, that value will be returned. Otherwise, it looks in the profile by default, returning the value assigned, if any.
Client Settings
Once we have our configuration server working, we will create the client.
We add this dependency to our Maven file:
<dependency>
   <groupId>org.springframework.cloud</groupId>
   <artifactId>spring-cloud-starter-config</artifactId>
</dependency>
Using the Spring Initializr would add the Config Client dependency. In addition, to refresh the hot configuration, add the starter Actuator.
Now, we configure the application to specify where to listen to the configuration server. First, we will change the name of the file config.properties by the bootstrap.properties. Thus, Spring Boot knows to look for a server configuration.
In this file, we add the property spring.cloud.config.uri, specifying the URL of our server configuration.
spring.application.name=config-client
spring.cloud.config.uri=http://localhost:8888
#spring.profiles.active=production
management.endpoints.web.exposure.include=refresh
We also establish the property management.endpoints.web.exposure.includeto refreshto configure the package actuator so that you can access the URL: http://localhost:8080/actuator/refresh that will force us to refresh the configuration.
Remember that the variable spring.application.nameset the application name and indicates the name of the file in the GIT repository where the settings were sought.
With the variable spring.profiles.active, we indicate which profile will be used. If we do not put any (as is the case for this commented line), the profile used will be the default.
In this example, I use several methods to read the configuration.
Create a Component That Includes the Label
@ConfigurationProperties
In this method, which is the simplest, we indicate which is the root of the properties to read and then define the variables that Spring should fill.
In the class configuration.java, we specify that we want to configure the variables that begin with limites.
import org.springframework.boot.context.properties.ConfigurationProperties;
import org.springframework.stereotype.Component;
import lombok.Data;

@Data
@Component
@ConfigurationProperties("limites")
public class Configuration {
    private int minimum;
    private int maximum;
}
Thus, the variable dato1will have the value specified inlimites.dato1.
If your limites.dato1has a value that can not be passed to an integer, our application would fail; however, if you do not find the value, simply do not fill it without giving any error.
This component will be injected through the label @Autowired.
@Autowired
private Configuration configuration;
2. Create a Variable With the Annotation @Value
Thus, the value of server configurations will also be read. The biggest difference is that the value will be fixed as it will be assigned to run the application and never refreshed.
@Value("${valores.valor_fijo}")
String valorFijo;
The variable valorFijowill have the value assigned on the line:valores.valor_fijo.
3. Use the @Value Entry in the Parameter of a Function
Likewise, the value is read from the server configurations with the advantage that the value may be refreshed.
@GetMapping("/refrescado")
public BeanConfiguration getConfiguracionRefrescada(@Value("${valores.valor_funcion}") String valorFuncion)
    { .... }
Functioning
In our example, expose the URL /limites, refrescado,and datos.
The call limitesto return this output:
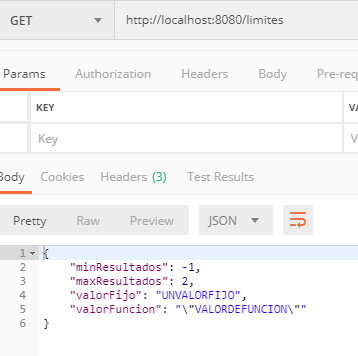
If we change the file config-client.properties and make a push and commit, such values in our GIT repository server, successive calls to this URL will show the old data because the client only reads the configuration at the star, unless you force him to refresh the data.
Imagine that we change the 'config-client.properties' file so that we now have these values:
datosservidor.minimum=10
datosservidor.maximum=20
limites.minimum=-101
limites.maximum=201
valores.valor_fijo: OTROVALORFIJO
valores.valor_funcion: "OTROVALORDEFUNCION"
Do the corresponding commit and push:
> git commit -a -m "cambiada configuracion";git push
When you call the URL http://localhost: 8080/actuator/refresh with a POST type request, Spring forces them to call the server configurations and refresh values.
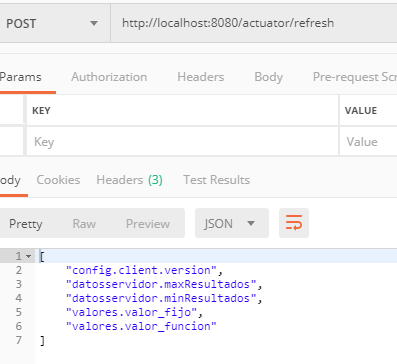
As shown, the output of this request returns the refreshed variables.
Now, if we call http://localhost: 8080/limits, we would see that the value of minResuados and maxResultados have changed. However, neither valorFijo or valorFuncion have changed.
If we call the URL http://localhost: 8080/refrescado and see that the variable valorFuncion has been updated, the call is placed on the label @Value so that the variable is read at that time. However, the variable valorFijo is not changed as established at the beginning of the program and its value remains unchanged.
One important concept to consider is that if we remove a variable in our configuration file, the value of the variable will not be made null. Instead, it keeps the previously established value. This is true whether the variable is read with @Value, like using a @ConfigurationProperties or a @Bean.
Opinions expressed by DZone contributors are their own.

Comments