Web Applications Frontend and Backend Communication Using Angular 2 HTTP Observables
If your an Angular developer, read on to learn how to get your applications' front-end and backend to communicate more effectively using HTTP methods.
Join the DZone community and get the full member experience.
Join For Free
A frequent operation in most web and mobile applications is data request and response from/to a server using a REST architectural style via an HTTP protocol. Angular 2 implements Observables in its HTTP module for working with HTTP response and request. In this tutorial, we’ll look at how to get and post data from/to backend servers using Observables.
What you’ll learn in this tutorial:
How to scaffold an Angular 2 project using Angular CLI.
Why and when to use Service in an Angular application.
Distinguish between Promise and Observable.
Seamlessly integrate the front-end with the back-end using Observables.
This tutorial should help readers answer the question of how to integrate the front-end of a web application with the backend using Angular 2 observables.
This tutorial is designed for anyone interested in Angular 2 front-end with a backend communication. Readers should have basic knowledge of the Angular 2 framework.
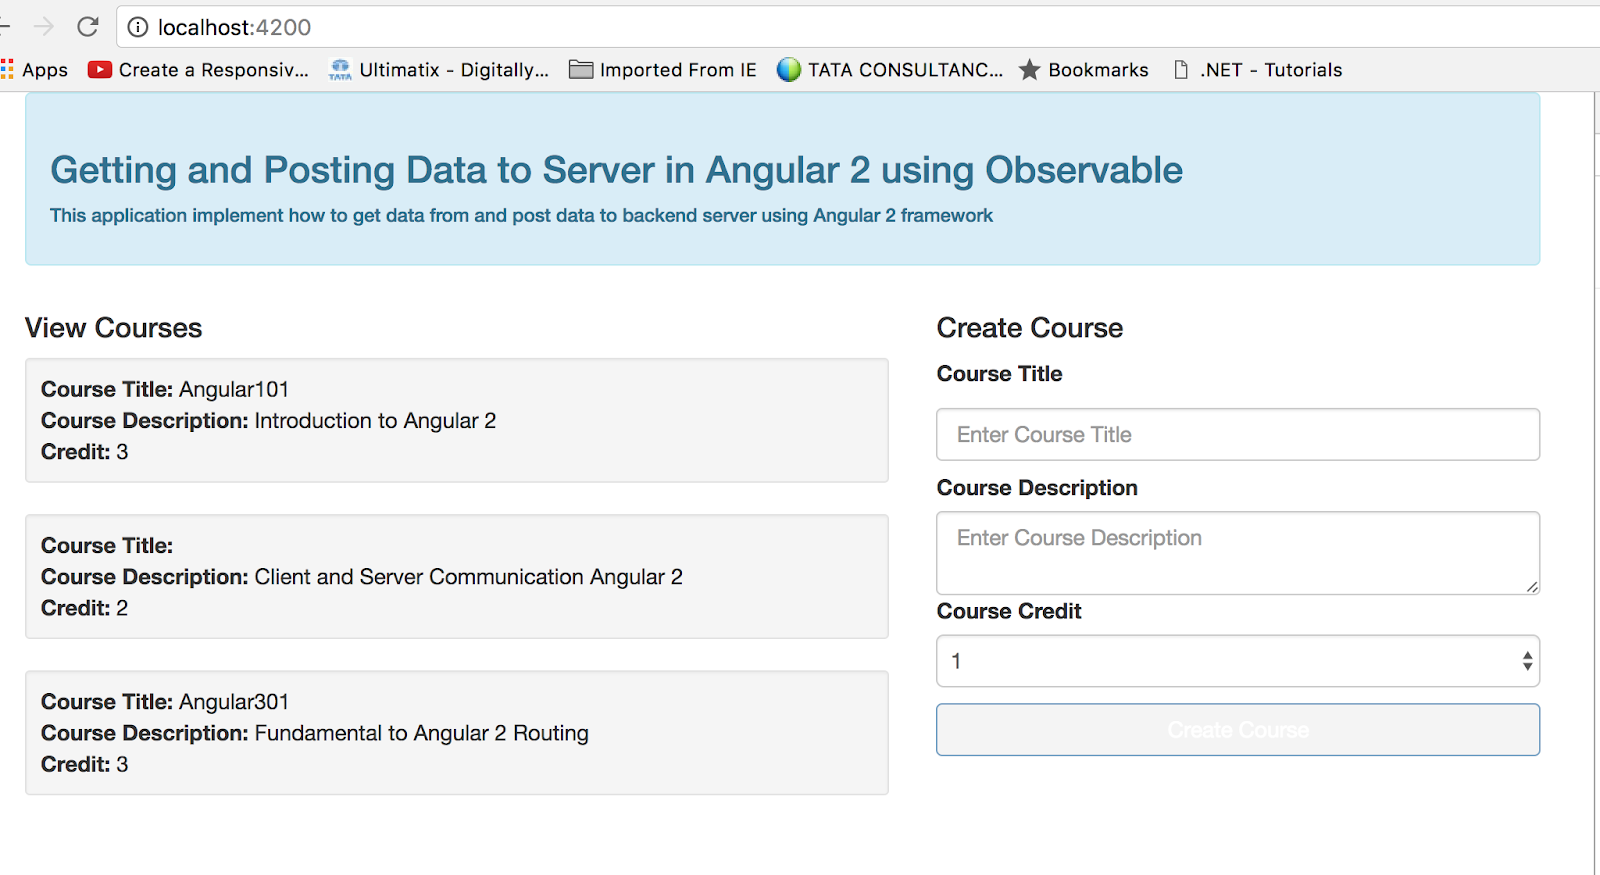
The demo application built at the end of this tutorial demonstrates how to use Observables in Angular 2. See the screenshot below:
Demo Github repo, copy the link: https://github.com/cyril-ui-developer/angular2-http-observables or click on GitHub repository
Scaffold Angular 2 Project With Angular CLI
To setup an Angular 2 project, we’ll be using Angular 2 CLI. Angular 2 CLI makes it easy to setup new Angular 2 projects. Let’s scaffold a new Angular 2 project for our demo app.
Open the command prompt. I am on a Mac, but the project setup process is similar to that of Windows.
Go to your desired directory, i.e. the root folder where you store your web projects. I named mine “projects.”
Type: ng new myAngular2HttpApp
This command creates an Angular 2 CLI project for you with the name “my-angular2-http-app.” You are free to give it any name you desire. Then, initialize the project and install package dependencies for tooling via npm. You’ll have to wait for a few minutes for this process to complete.
Upon completion, at the command prompt, type cd my-angular2-http-app and press enter key.

This changes your command prompt to my-angular2-http-app

Next, type: ng serve
The ng serve command serves an Angular 2 project via a development server environment.

Open your desired browser, and navigate to http://localhost:4200/
You should see the text: “app works!” The Angular 2 CLI creates a root app component for your project and the text “app works” is assigned to the title variable in the AppComponent class and bound to the AppComponent template.
Open the project folder in your desired web development editor, e.g. Microsoft Visual Code or Bracket. I mentioned these two primarily because they are free and I am comfortable using them.

Click on your app subfolder under src folder, then click on app.component.ts to open it. Our Angular 2 component is made up of two main sections, namely the class and the component decorator function prefix with @ metadata. According to the Angular official website, a decorator is “a function that adds metadata to a class, its members (properties, methods) and function arguments.” And “the metadata object describes how the HTML template and component class work together.”
Change the title variable value in the component class to “Getting and Posting Data to Server in Angular 2 using Observables.”
Navigate to your browser, you should see the “Getting and Posting Data to Server in Angular 2 using Observables.” Go back to the app.component.ts and add another variable, “description,” and assign a value of: “This application implements how to get data from and post data to a backend server using the Angular 2 framework.”
app.component.ts
 export class AppComponent implements OnInit{
   title = 'Getting and Posting Data to Server in Angular 2 using Observable';
   description = "This application implement how to get data from and post data to a backend server using Angular 2 framework";
 }
Go to app.template in the app subfolder, and type {{ description }}. Angular 2 is using double curly brackets - {{}} - for string interpolation. This simply means that if you have any data in the component class that you want to bind to view or template, just enter double curly brackets and put your variable in between.
app.component.html
<h3 class=""> {{title}} </h3>
<h6> {{description}} </h6>
Setup the Mock JSON-SERVER Backend
Now we have our project setup and working as expected. Next, let’s dive into client/server communication using an HTTP module. Let’s start by setting up the mock server. We’ll be using a JSON-server in this tutorial. Please feel free to connect to any server endpoint of your choice. The JSON-server, according to its GitHub repository, is a “full fake REST API with zero coding in less than 30 seconds.”
To install run: $ npm install -g json-server
This command installs the JSON-server globally on your system.
Setup the project db.json file in the root of your project. And enter the following initial JSON data that's made of an array of objects. JSON stands for Javascript Object Notation, it is a standard format like XML for exchanging data on the internet.
db.json
{
  "courses": [
    {
      "id": 1,
      "courseTitle": "Angular101",
      "courseDescription": "Introduction to Angular 2",
      "courseCredit": 3
    },
    {
      "id": 2,
      "tcourseTitle": "Angular201",
      "courseDescription": "Client and Server Communication Angular 2",
      "courseCredit": 2
    },
    {
      "id": 3,
      "courseTitle": "Angular301",
      "courseDescription": "Fundamental to Angular 2 Routing",
      "courseCredit": 3
    }
  ]
}
Open a new command prompt terminal window and change the directory to your project working directory.
Type: json-server --watch db.json to serve your local development server for your mocked backend.
The mocked backend development server should start running on localhost port 3000. Navigate to http://localhost:3000/courses. You should see an array of three objects. If you encounter any problems, you can visit the official GitHub repository for details on installation and setup https://github.com/typicode/json-server
Compare and Contrast Between Promise and Observable
Now that we have our backend server up and running, let's return to our client side implementation. There are two major ways of communicating with a server in an Angular 2 application. The first approach is to use Promises, which is the older one. The second and newer approach is Observables. Angular 2 has full support for Observables and that is what we’ll be using in this tutorial. Both Promises and Observables represent an unknown state of data that will become known now, in the future or never. The main difference is that Observable introduces some new methods of handling certain situations. Some such features are Observable returns a stream of values over time while a Promise is only called once and returns a single value. Observables are cancellable and have a retry mechanism. To implement a retry mechanism in Promise, you need access to the calling function.
Integrate AppService With Mocked RESTFul Backend Server
Enough of this theory, let's implement the Observable and integrate the frontend with mocked RESTFul backend server. One of the selling points of Angular is modularity and Dependency Injection. The modular approach helps to structure your application. So you can inject modules into where you need them. The best place to implement data access logic to the backend server in Angular 2 is the Service. Angular 2 Service is a class that contains code logic intended to be shared across the application. You define the service class once and inject it into the component or other services where you need it. This reduces code duplication and prevents you from the “Don’t Repeat Yourself “ principle we were taught in college computer science courses.
To create a service, go to the project command prompt, and type:
ng generate service app.service
This command will generate an app.service.ts file and app.service.spec.ts in the app subfolder. We’ll implement our service in ‘app.service.ts.' The ‘app.service.spec.ts’ is for unit testing. We shall not be going into unit testing in this tutorial.
Angular CLI injects the new service class in the app.module file automatically. Open app.module.ts. You should see the generated code below:
app.module.ts
import { BrowserModule } from '@angular/platform-browser';
import { NgModule } from '@angular/core';
import { FormsModule } from '@angular/forms';
import { HttpModule } from '@angular/http';
import { AppComponent } from './app.component';
import { AppService } from './app.service';
@NgModule({
  declarations: [ AppComponent ],
  imports: [ BrowserModule, FormsModule, HttpModule ],
  providers: [AppService ],
  bootstrap: [AppComponent]
})
export class AppModule { }
Also, HttpModule, FormsModuleand, AppComponent, and BrowserModule were injected when you created the project with ng new [project-name] command.
It is time to define the app data model because it will be used first in the AppService. A model is an interface or contract for the data type.
app.model.ts
export class AppModel {
  constructor(public id:number,courseTitle:string, public courseDescription:string, public courseCredit:number) { }
}
The data model defines the properties and data types of the fields in the demo application. This is absolutely optional but best practice demands you define a data model for your application.
Open the file “app.service.ts.” You should see the below boiler code generated for the app.service file by Angular CLI.
app.service.ts
import { Injectable } from '@angular/core';

@Injectable()
export class AppService {
constructor() {
   }
}
At line one, there is the ES6 import statement for importing modules. In this case, “Injectable” is imported from Angular 2 core module. The @Injectable()decorator is required if you intend to inject other services whether built-in or custom services. We shall be injecting built-in HTTP service for working with Observables. The export statement is used to export the class AppService and contains a constructor for initializing.
Next, let’s import the modules we’ll make use of into the app.service.ts.
Import { Http, Response, RequestOptions,Headers } from '@angular/http'. The HTTP, Response, RequestOptions, and Headers are Angular services for working with the HttpModule. I will explain each of them shortly.
app.service.ts
import { AppModel } from './app.model'; // The model we defined for the application.

import { Observable } from 'rxjs/Observable'; //Observable from rxjs library

import 'rxjs/add/operator/map'; // map method from rxjs library

import 'rxjs/add/operator/catch';catch method from rxjs library

import 'rxjs/add/observable/throw';throw method from rxjs library
Next, we declared the mocked backend server endpoint URL.
private endpointUrl ="http://localhost:3000/courses";
If you are using another backend endpoint, please replace "http://localhost:3000/courses” with yours.
Then, we inject the HTTP service in the constructor following the below syntax. The constructor is an ES6 syntax and Angular 2 makes use of it for dependency injection and service initialization.
app.service.ts
constructor(private http:Http) {

}
Next, define the getCourses method. This method makes a restful HTTP GET call for all courses to the backend server using Observable. First, the Observable type of AppModel is declared. The type has [] because the expected response is an array of objects. And the method returns http.get(), which takes the endpoint URL as an argument. The Response returns a need to be handled using the .map method because an observable returns a stream of values. The expected should be JSON, so the .json() method is used to format the string response to JSON. The .catch method is used to handle error situation.
app.service.ts
getCourses(): Observable<AppModel[]> {

  return this.http.get(this.endpointUrl )
  .map((response: Response) => {
  const result = response.json();
  return result;
  })
  .catch((error : Response | any) => {
  return Observable.throw(error.statusText);
  });

}
Next, define the createCourses method. This method makes a restful HTTP POST call to post the course data to the backend server using Observable. First, the Observable type of AppModel is declared. And the method returns http.post(). The http.post() takes an endpoint URL, request payload, and options as arguments. The URL is the same endpoint we get courses from. The request payload is the data object we need to send. In this case, it's a course object we’ll prepare later in the app.component. The options contain the Headers and RequestOptions instances. The HTTP POST sends data to the server and returns a success or failure response to the client. The .catch method is used to handle error situations.
app.service.ts
createCourse(obj: {}): Observable < AppModel > {

    let headers = new Headers({
        'Content-Type': 'application/json'
    });

    let options = new RequestOptions({
        headers: headers
    });

    return this.http.post(this.endpointUrl, obj, options)

        .map((response: Response) => {

            const result = response.json();

            return result;

        })

        .catch((error: Response | any) => {

            console.log(error.statusText);

            return Observable.throw(error);

        });

}
Implement the AppComponent Functionalities
Time to implement the functionalities in app.component.ts. First, we need to import and inject the AppService into the AppComponent and initialize it. The private keyword means it should be private or local to this class.

app.component.ts
Import  { AppService }  from “./app.service”

constructor(private appService: AppService) {

}
Also, import the OnInit service and the AppModel for type declaration. The implements OnInit service needs to be added to the export statement of the AppComponent class for initialization.
Then we create a fetchCourses method to subscribe the courses data from AppService. This .appService is an instance of AppService which have in the getCourses method. Remember, we created the getCourses method in AppService. The whole logic of AppService can be implemented in the AppComponent but it is not recommended because a modern web application development approach demands the principle of separation of concern. If we need to make use of the getCourses method elsewhere, then we can simply call it instead of writing the same code logic in multiple places.
The .subscribe method returns course data and we assign the data to this.courses. Also, the .subscribe returns error data to be handled by the error situation.
app.component.ts
 fetchCourseData() {
    this.appService.getCourses()
     .subscribe(
                (data: AppModel[]) => {  this.courses = data; },
                (error) =>  {this.errorMsg = error; this.errorFlag = true}
                )

    }
We need to invoke the this.fetchCourses() method in the ngOnInit() so as to make it available where the application is launched.
app.component.ts
 <h4>View Courses</h4>

    <ul *ngFor=" let course of courses" class="well well-sm">
    <li><strong>Course Title:</strong> {{course.courseTitle}}</li>
    <li><strong>Course Description:</strong> {{course.courseDescription}}</li>
    <li><strong> Credit: </strong>{{course.courseCredit}}</li>
    </ul>
That is all we need to get the courses data to AppComponent. Now bind this.courses to the template. Open app.template.html and enter:
app.component.html
<h4>Create Course</h4>
        <form #valForm="ngForm" (ngSubmit)="addCourse(valForm.value); valForm.reset();" >
        <label for="courseTitle">Course Title</label>
        <input class="form-control"
         type="text"
         name="courseTitle"
         ngModel
         placeholder="Enter Course Title"
         maxlength="30"
         #courseTitle="ngModel"
         required>
         <span class="text-invalid" *ngIf="courseTitle.invalid && courseTitle.touched">Course Title must be less or equal to 30 charaters</span>
         <label>Course Description</label>
         <textarea class="form-control"
         name="courseDescription"
         ngModel
         placeholder="Enter Course Description"
         maxlength="100"
         #courseDescription="ngModel"
         required></textarea>
           <span class="text-invalid" *ngIf="courseDescription.invalid && courseDescription.touched">Course Description must be less or equal to 100 charaters</span>
        <label>Course Credit</label>
        <!--<input class="form-control" type="number" name="courseCredit" ngModel placeholder="0"  min="0" max="3" required>-->
        <select class="form-control" name="courseCredit" ngModel [ngModel]="defaultCourseCredit">
          <option value="1">1</option><option value="2">2</option><option value="3">3</option>
        </select>
        <input class="form-control btn btn-primary"  type="submit" value="Create Course" [disabled]="!valForm.form.valid" >

      </form>
This form is a normal HTML form but it has some Angular directives. The first one I'd like to mention is the ngForm, which is used to catch the form data. Then, it is assigned to the template variable, #valForm. The ngSubmit addCourse() method takes valForm as an argument and it is used to pass the form values to the AppComponent. Next is the ngModel directive, which is used to bind the form value to the component class, App.Component. Each input field has at least one ngModel for binding. A second [ngModel] was added for property binding. The form should work without it. Also, additional logic was added to handle the HTML select control.
The submit button has the [disable] property for disabling the form until the user fills out the form. In traditional form submission, this form should have had form methods and action attributes for submitting the form to the server. Modern single page applications do not require such an approach, but instead, require you to submit form data via AJAX so as to prevent page reload.
Now, let's see what is needed in the AppComponent class to complete the post data request.
app.component.ts
 addCourse(course: AppModel) {
    this.appService.createCourse(course)
                   .subscribe(
                              (course)  => {this.courses.push(course)},
                              (error) =>   {this.errorMsg = error}
                          );
      }
We created an addCourse method and passed in the course form data from (ngSubmit)=”addCousre(valForm.value)." The .value gives us access to to the form values. Then, again, we used this .appService instance of AppService which has the createCourses method with the .subscribe and .push methods to add the course data to AppService. Remember, we created the createCourses method in APPService. Also, the .subscribe returns error data to handle error situations.
Go to the browser and fill out the add course form, then click submit. The view should update with the newly added course. If you encounter any issues, check the complete code in the GitHub repository.
Conclusion
In conclusion, implementing observables in Angular 2 makes web application front-end and backend communication seamless and smooth. I hope this tutorial helps to answer the question on how to integrate the front-end of a web application with the backend using Angular 2 Observables.
Resources:
1. Angular Official site
https://angular.io/docs/ts/latest/
2. Json-server github page
https://github.com/typicode/json-server
Opinions expressed by DZone contributors are their own.
Comments