Working With Custom Maven Archetypes (Part 3)
Join the DZone community and get the full member experience.
Join For Freein part 1 and part 2 of this series i was able to demonstrate how you can create a custom archetype and release it to a maven repository. in this final part we’ll look at what you need to do to integrate it into your development process. this will involve the following steps:
- uploading the archetype and its associated metadata to a maven repository manager .
- configuring an ide to use the archetype.
- generating a skeleton project from the archetype.
step 1 – upload your archetype
in part 2 we covered releasing and deploying the archetype. for reasons of brevity i simply demonstrated deploying a release to the local file system, but if we wish to share our archetype we must deploy it to a remote repository that can be accessed by other developers. a remote maven repository, in its simplest form, can be served up using a http server such as apache or nginx . however, these days i would recommend that you use a maven repository manager (mrm) instead, as these tools are purpose-built for serving (and deploying) maven artefacts. there are basically three options for your mrm – nexus , artifactory or archiva . a features matrix comparision is available here . all are available in open source flavours and both nexus and artifactory in particular are great tools. however, currently artifactory is the only one that supports a cloud-based service option which, as you might expect, integrates very well with our hosted continuous integration service . this allows you to provision yourself a fully-fledged mrm in very short order.
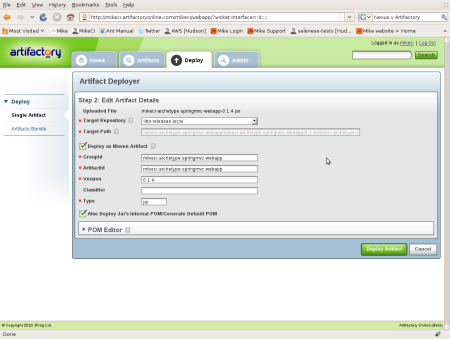
so, how do we add our archetype to the repository? this is a simple
process using the built in artifact deployer of artifactory which
allows you to upload a file and supply its maven gav co-ordinates.
next, we need to add some additional metadata about our archetype in the form of a ‘catalog’:
<?xml version="1.0" encoding="utf-8"?>
<archetype-catalog>
  <archetypes>
    <archetype>
    <groupid>com.mikeci</groupid>
    <artifactid>mikeci-archetype-springmvc-webapp</artifactid>
    <version>0.1.4</version>
    <repository>http://mikeci.artifactoryonline.com/mikeci/libs-releases</repository>
    <description>mike ci archetype for creating a spring-mvc web application.</description>
    </archetype>
  </archetypes>
</archetype-catalog>
this file should ideally be placed into an appropriate folder of a maven repository and it contains information about all of the archetypes that live within the repository. we can simply add this file to our ‘libs-releases’ repository using artifactory’s rest api:
curl -u username:password -f -d @archetype-catalog.xml -x put "http://mikeci.artifactoryonline.com/mikeci/libs-releases/archetype-catalog.xml"
step 2 – configure your ide
now that our archetype is deployed remotely, we can start to use it from within our ide – in my case – eclipse. to get good maven integration inside eclipse, you really should be using the latest release (0.10.0) of m2eclipse . once m2eclipse is installed, it provides a handy feature that allows you to add and remove archetype catalogs. you will need to add your deployed archetypes catalog to the list of catalogs accessible from within m2eclipse. this ensures that you can access your custom archetypes when you run the create a maven project wizard in eclipse as we will see shortly.
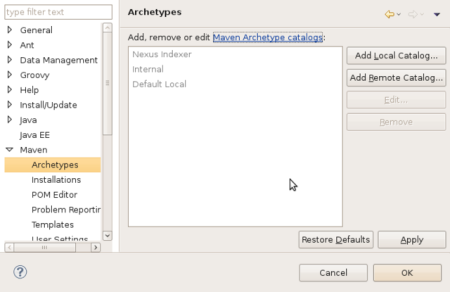
choose the menu item, windows>preferences, to open the
preferences dialog and drill down to the maven>archetypes
preferences, as shown.
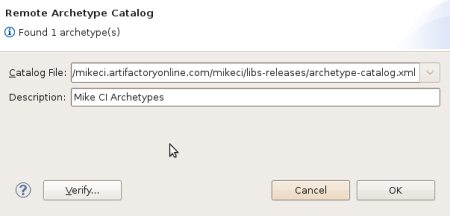
click add remote catalog to bring up the remote archetype catalog dialog. in the catalog file text box, enter the path to your remote catalog file and in the description text box, enter a name for your catalog:
step 3 – generate your project
you should now be ready to generate a skeleton maven project inside
eclipse. choose the menu item, file>new>other, to open the select
a wizard dialog. from the scrollbox, select maven project and then
click next. follow the wizard to configure your project location.
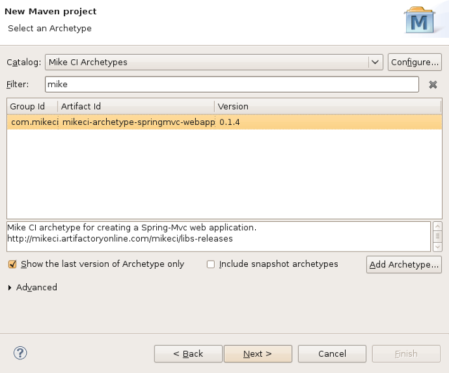
eventually, the wizard allows you to select the archetype to generate
your maven project. from the catalog drop-down list, select your custom
catalog. then locate and select your archetype :
click next and enter the gav values for your new project. et voila – you should have just created a skeleton project based upon your custom archetype using a slick ide wizard.
pretty impressive, don’t you think?
Opinions expressed by DZone contributors are their own.


Comments