

WSO2 API-M 3.2.0: Creation of a New KeyStore With a New Self-Signed Certificate and CN
Create a new KeyStore with a self-signed SSL certificate and a CN in WSO2 API-M 3.2.0 and how it can be used to invoke APIs’ in WSO2 from a remote host.
Join the DZone community and get the full member experience.
Join For FreeThis article describes the steps to create a new KeyStore with a new self-signed SSL certificate and a new CN (Common Name) in WSO2 API-M 3.2.0 and how it can be used to invoke APIs’ in WSO2 from a remote host. By default, WSO2 API-M has a KeyStore named wso2carbon.jks which contains a self-signed certificate. However, the default certificate has Common Name (CN) as localhost and this certificate can be used to invoke the APIs from the same server where WSO2 API-M is hosted. This article is useful when the client/end-user wants to invoke APIs exposed via WSO2 gateway that is hosted on a remote server and using an SSL certificate.
Steps:
1. Open a command prompt and go to <API-M_HOME>/repository/resources/security/. Then, create the new KeyStore that includes the private key by executing the following command. We will provide the hostname/domain name where WSO2 API-M is hosted as the CN value while creating this new KeyStore. For example, in this case, it is api.test.wso2.com.
keytool -genkey -alias testcert -keyalg RSA -keysize 2048 -keystore testkeystore.jks -dname "CN=<api.test.wso2.com>, OU=Home,O=Home,L=SL,S=WS,C=LK" -storepass testpassword -keypass testpassword This command will create a new KeyStore with the following details:
Keystore name testkeystore.jks
Alias of public certificate testcert
Keystore password testpassword
Private key password testpassword
2. Export the certificate (.crt file) from this newly created KeyStore using the below command.
keytool -export -keystore testkeystore.jks -alias testcert -file testwso2PubCert.crtNOTE: Copy this .crt file to a different folder which will be required in the later steps.
3. Export the public key (.pem file) from this newly created KeyStore using the below command.
keytool -export -alias testcert -keystore testkeystore.jks -file testwso2PubCert.pem4. Import the public key (.pem) you extracted in the previous step to the client-truststore.jks file using the following command.
keytool -import -alias testcert -file testwso2PubCert.pem -keystore client-truststore.jks -storepass wso2carbon5. Edit [keystore.tls] portion in the deployment.toml file to point to the new KeyStore as shown below.
[keystore.tls]

file_name = “testkeystore.jks”

type = “JKS”

password = “testpassword”

alias = “testcert”

key_password = “testpassword”
6. Restart the WSO2 API-M server.
7. The .pem file you exported before is not in base64 encoded format. Therefore, please convert your .crt file (testwso2PubCert.crt in Step 2) to .pem file in base64 encoded format by following the below steps. The .pem file in base64 format must be shared with the client/end-users which they will use to invoke the WSO2 APIs using SSL.
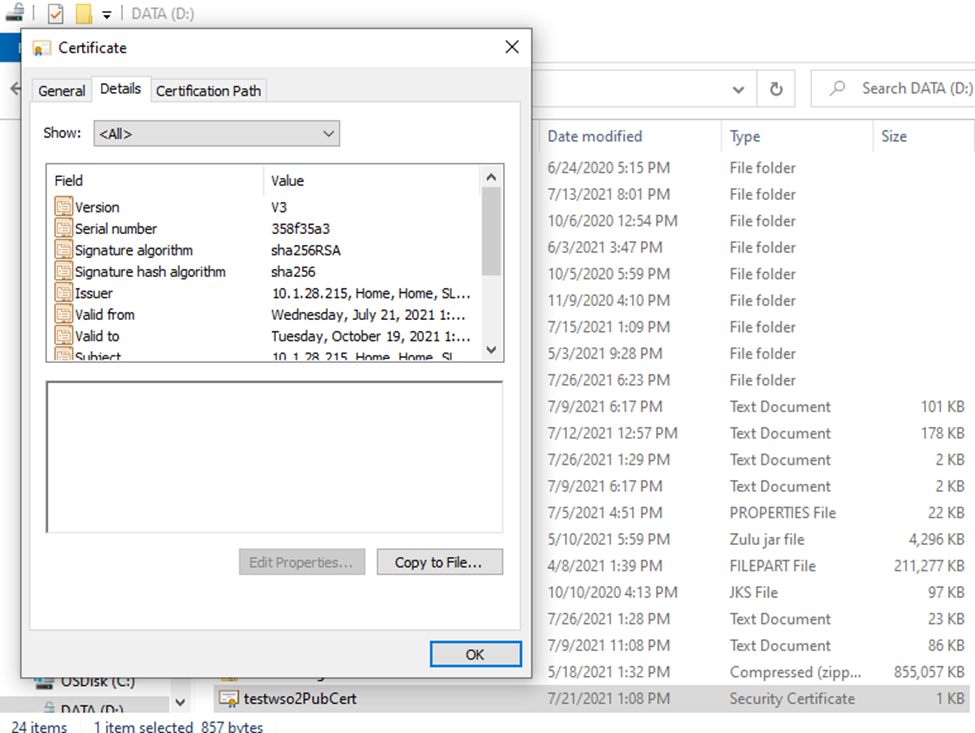
- Go to the path where the .crt file is stored. Double click on Go to Details tab, then click on Copy to File.
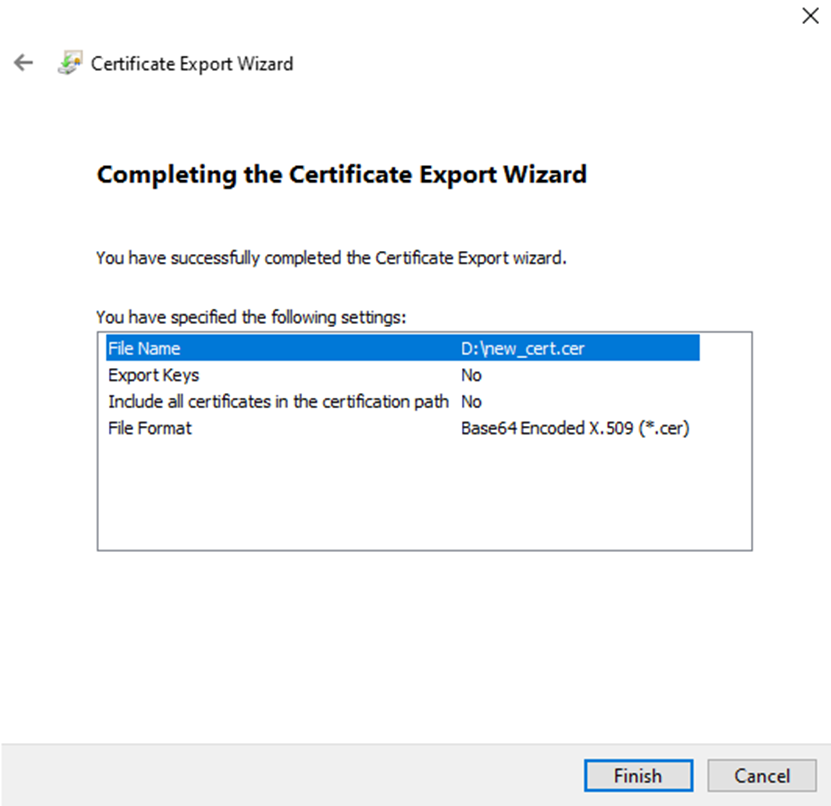
- Click Next in the Certificate Export Wizard and select the 2nd option (Base-64 encoded X.509 (.CER)) as the certificate export format. Click next.
- Enter the name as new_cert, click Next, and then click Finish.
- Now, go to PowerShell and run the below command to change your certificate file extension from .cer to .pem.rename-item D:\new_cert.cer D:\new_cert.pem
- Ensure that the file format is Base64. cat D:\new_cert.pem

Opinions expressed by DZone contributors are their own.
Comments