Before you begin working with data, you must create a new model either by working with an existing database or by creating an empty model.
Working with an existing database
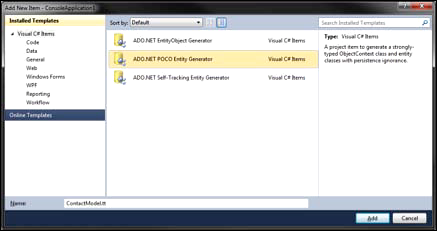
First, add a new “ADO.NET Entity Data Model”. In this example, the model is called “ContactModel. ddmx” since the data is contact type data. The Choose Model Contents dialog box opens.
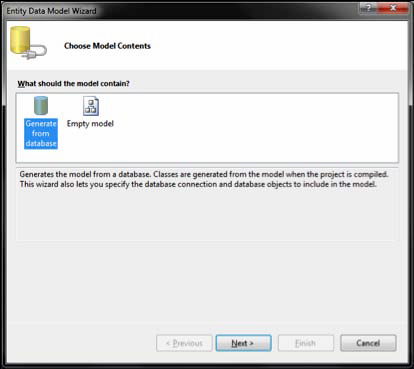
To work with an existing database, select Generate from database. Click Next. The Choose Your Data Connection dialog box opens.
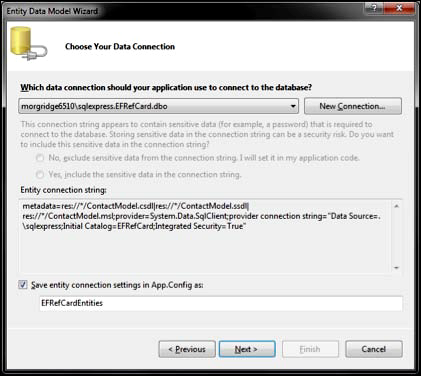
The drop-down list contains all databases that you currently have configured inside the Visual Studio Server Explorer. If the database you want is not an option in the list, click the New Connection button to add a new database.
You will see more information in the Entity connection string field than what you would see in a normal ADO.NET connection string. The entity connection string is made up of three parts:
- Metadata: points to the actual model. The model file in your solution is ContactModel.edmx, which you don’t see listed. There are three files:
- ContactModel.csdl: the conceptual model (or what you see in the entity design surface). This represents the classes you work with.
- ContactModel.ssdl: the storage model (or the physical database model).
- ContactModel.msl: the mapping between the csdl and ssdl files.
- The .emdx file is an XML file that contains all of the data for the three files. When your project is compiled, these three files are generated and embedded.
- Provider: points to the actual ADO.NET provider.
- Provider Connection String: the normal ADO.NET connection string that is specific to the provider.
The last option in the Choose your Data Connection dialog box is the “Save entity connection settings in App.Config as” field, which saves the connection string. Make sure to check this checkbox so that you do not have to build the connection string by hand. The name you give to the connection string is also what your ObjectContext class name will ultimately be named.
After you have saved your connection string, click Next. The Choose your Database Objects dialog box opens.
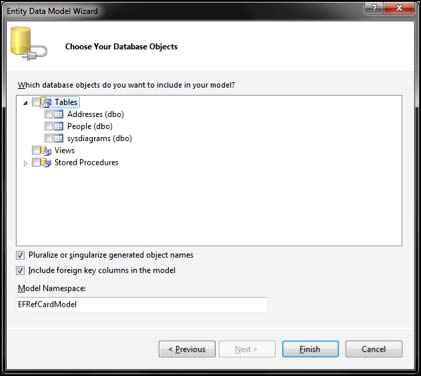
Select the tables, views, and stored procedures that you want to use. In this example, we will select the Addresses and People tables.
The two checkboxes at the bottom of the dialog box allow you to pluralize or singularize your object names or to include foreign keys in the model. Pluralizing and singularizing will help the model make more sense from a code standpoint when working with entities. In this example, the database table is named “People”. You would want the entity name to be “Person” in the singular form. If you were dealing with multiple people, you would want this to be “People”.
The information in the Model Namespace field at the bottom of the dialog box is hidden inside generated code. Since you don’t work with it directly, it is not recommended that you change this.
Click Finish. You will be taken to the model design surface that will show you the model you have created.
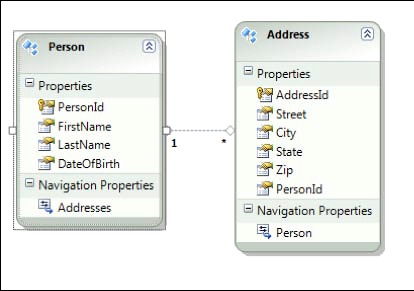
The Person and Address entities are pulled from the database. Notice that they are singular versions of the table names. The lines connecting the entities denote a one-to-many relationship between Person and Address. In other words, one Person can have multiple Addresses and one Address can only have one Person. Navigation Properties is also pluralized and singularized based on the relationship. Navigation properties are how you navigate between entities. You can use the Addresses property of a person to access that person’s address data and, in the same way, you can use the Person property off of an address to access the associated person.
Anything that you want to modify on the model can be done through the properties window in Visual Studio.
Updating the Model
When you make changes to your database, you can refresh the model by right clicking on the model design surface and selecting Update Model from Database. A dialog box similar to the Choose Your Database Objects dialog box opens. Any objects that are currently part of the model will be refreshed, and you can add any objects that are currently not part of the model.
Using Model First
To get started, add a new ADO.NET Data Model to your project by selecting Empty model in the Choose Model Contents dialog box and click Finish.
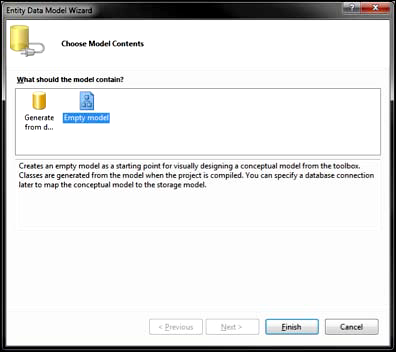
You will be taken to an empty design surface. To add an entity, right click on the design surface and select Add -> Entity. The Add Entity dialog box opens.
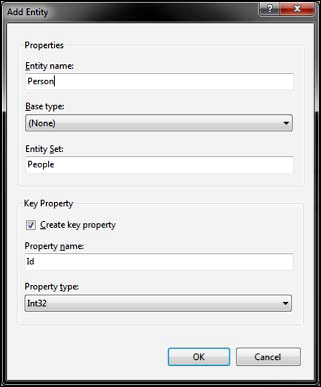
In this example, the Entity name is set to “Person”, which was pluralized to “People” in the Entity Set field. The Entity Name is the name you will use for the actual entity. The Entity Set will be the name of the plural collection as well as your database table name. If you don’t want it to be pluralized, you can change it here. However, you may encounter problems if you try to make changes to the database directly and then update it. In general, it is recommended that you stick with one design method for your database. Either use Model First consistently throughout or make your database changes externally and update the model. This will make maintaining the model consistency easier.
It is up to your design if you want to change the information in the Property name field to be more descriptive. If you do change it, make a note that you may need to tweak your association names down the road.
Click OK to return to the model design surface with your new entity:
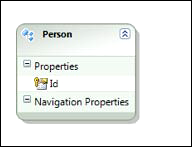
To add more items to the entity, right click on the entity and select Add -> Scalar Property. You can also use the Insert or Enter keys on your keyboard to add a new property. In this example, a FirstName property was added:
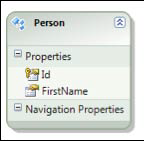
Click FirstName to view the Properties window:
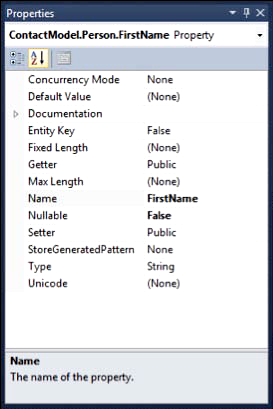
The following table includes descriptions of some of the key properties:
| Property Name |
Description |
| Fixed Length |
Set to False by default and will result in a varchar or an nvarchar. If you want a char or nchar, set this to True. |
| Max Length |
Set to MAX by default. As a string type, either a varchar(MAX)or an nvarchar(MAX) will be created. Set this to a number to set the max character length. |
| StoreGeneratedPattern |
Set to None by default. When using keys, you can set this to determine if you want this key to be an identity or a computed value. |
| Type |
Set to String by default. Sets the datatype of the property and supports almost all SQL Server datatypes. |
| Unicode |
Set to True by default, giving you the Unicode versions of the datatypes. Determines whether you will get an nvarchar or a varchar. |
Creating Associations
Once you flesh out your entities, you need a way to associate them. In SQL Server, you would simply add foreign keys to the tables. In EF, you need to create associations. To do this, right click the entity with the primary key and select Add -> Association. The Add Association dialog box opens.
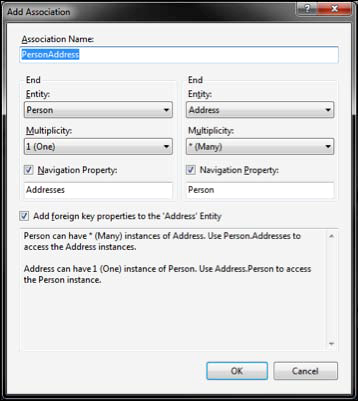
In the Add Association dialog box, you can set the two endpoints for both sides of the association as well as the association type. In this example, a one-to-many association between Person and Address is being set up. Using the Multiplicity drop-down menus, select different association types. Checking the Navigation Property checkboxes allows you to set navigation properties to be used when navigating the associations. By default, these are set to pluralized or not based on the type of association. You can rename these to more descriptive names if you want.
Check the Add foreign key properties to the ‘Address’ Entity checkbox to add foreign key properties to the non-primary key endpoint. In this example, checking this box would add a PersonId to the address table. It is important to note that the key that gets added will be a concatenation of the primary key entity name and the primary key itself. If the key was left as simply Id, the foreign key field would be PersonId. If I set the primary key field to be PersonId, the foreign key field would be PersonPersonId.

