DZone
Thanks for visiting DZone today,
Edit Profile
  • Manage Email Subscriptions
  • How to Post to DZone
  • Article Submission Guidelines
Sign Out View Profile
  • Post an Article
  • Manage My Drafts
Over 2 million developers have joined DZone.
Log In / Join
Refcards Trend Reports Events Over 2 million developers have joined DZone. Join Today! Thanks for visiting DZone today,
Edit Profile Manage Email Subscriptions Moderation Admin Console How to Post to DZone Article Submission Guidelines
View Profile
Sign Out
Refcards
Trend Reports
Events
Zones
Culture and Methodologies Agile Career Development Methodologies Team Management
Data Engineering AI/ML Big Data Data Databases IoT
Software Design and Architecture Cloud Architecture Containers Integration Microservices Performance Security
Coding Frameworks Java JavaScript Languages Tools
Testing, Deployment, and Maintenance Deployment DevOps and CI/CD Maintenance Monitoring and Observability Testing, Tools, and Frameworks
Partner Zones AWS Cloud
by AWS Developer Relations
Culture and Methodologies
Agile Career Development Methodologies Team Management
Data Engineering
AI/ML Big Data Data Databases IoT
Software Design and Architecture
Cloud Architecture Containers Integration Microservices Performance Security
Coding
Frameworks Java JavaScript Languages Tools
Testing, Deployment, and Maintenance
Deployment DevOps and CI/CD Maintenance Monitoring and Observability Testing, Tools, and Frameworks
Partner Zones
AWS Cloud
by AWS Developer Relations
The Latest "Software Integration: The Intersection of APIs, Microservices, and Cloud-Based Systems" Trend Report
Get the report
  1. DZone
  2. Refcards
  3. Apache Hadoop Deployment
refcard cover
Refcard #133

Apache Hadoop Deployment

A Blueprint for Reliable Distributed Computing

Learn how to use one of the most popular open source data projects out there. This Refcard reviews a basic blueprint for deploying Apache Hadoop HDFS and MapReduce using the Cloudera Distribution.

Free PDF for Easy Reference
refcard cover

Written By

author avatar Eugene Ciurana
Chief Architect, CIME Software Labs
Table of Contents
► Introduction ► Which Hadoop Distribution? ► Apache Hadoop Installation ► Hadoop Monitoring Ports ► Apache Hadoop Production Deployment ► What's Next? ► Staying Current
Section 1

Introduction

This Refcard presents a basic blueprint for deploying Apache Hadoop HDFS and MapReduce in development and production environments. Check out Refcard #117, Getting Started with Apache Hadoop, for basic terminology and for an overview of the tools available in the Hadoop Project.

Section 2

Which Hadoop Distribution?

Apache Hadoop is a scalable framework for implementing reliable and scalable computational networks. This Refcard presents how to deploy and use development and production computational networks. HDFS, MapReduce, and Pig are the foundational tools for developing Hadoop applications.

There are two basic Hadoop distributions:

  • Apache Hadoop is the main open-source, bleeding-edge distribution from the Apache foundation.
  • The Cloudera Distribution for Apache Hadoop (CDH) is an open-source, enterprise-class distribution for production ready environments.

The decision of using one or the other distributions depends on the organization’s desired objective.

  • The Apache distribution is fine for experimental learning exercises and for becoming familiar with how Hadoop is put together.
  • CDH removes the guesswork and offers an almost turnkey product for robustness and stability; it also offers some tools not available in the Apache distribution.

Hot Tip

Cloudera offers professional services and puts out an enterprise distribution of Apache Hadoop. Their toolset complements Apache’s. Documentation about Cloudera’s CDH is available from http://docs.cloudera.com.

The Apache Hadoop distribution assumes that the person installing it is comfortable with configuring a system manually. CDH, on the other hand, is designed as a drop-in component for all major Linux distributions.

Hot Tip

Linux is the supported platform for production systems. Windows is adequate but is not supported as a development platform.

Minimum Prerequisites

  • Java 1.6 from Oracle, version 1.6 update 8 or later; identify your current JAVA_HOME
  • sshd and ssh for managing Hadoop daemons across multiple systems
  • rsync for file and directory synchronization across the nodes in the cluster
  • Create a service account for user hadoop where $HOME=/home/hadoop

SSH Access

Every system in a Hadoop deployment must provide SSH access for data exchange between nodes. Log in to the node as the Hadoop user and run the commands in Listing 1 to validate or create the required SSH configuration.

Listing 1 - Hadoop SSH Prerequisits

keyFile=$HOME/.ssh/id_rsa.pub
pKeyFile=$HOME/.ssh/id_rsa
authKeys=$HOME/.ssh/authorized_keys
if ! ssh localhost -C true ; then \
  if [ ! -e “$keyFile” ]; then \
     ssh-keygen -t rsa -b 2048 -P ‘’ \
        -f “$pKeyFile”; \
 fi; \
 cat “$keyFile” >> “$authKeys”; \
 chmod 0640 “$authKeys”; \
 echo “Hadoop SSH configured”; \
else echo “Hadoop SSH OK”; fi


The public key for this example is left blank. If this were to run on a public network it could be a security hole. Distribute the public key from the master node to all other nodes for data exchange. All nodes are assumed to run in a secure network behind the firewall.

Hot Tip

All the bash shell commands in this Refcard are available for cutting and pasting from: http://ciurana.eu/DeployingHadoopDZone

Enterprise: CDH Prerequisites

Cloudera simplified the installation process by offering packages for Ubuntu Server and Red Hat Linux distributions.

Hot Tip

CDH packages have names like CDH2, CDH3, and so on, corresponding to the CDH version. The examples here use CDH3. Use the appropriate version for your installation.

CDH on Ubuntu Pre-Install Setup

Execute these commands as root or via sudo to add the Cloudera repositories:

Listing 2 - Ubuntu Pre-Install Setup

DISTRO=$(lsb_release -c | cut -f 2)
REPO=/etc/apt/sources.list.d/cloudera.list
echo “deb \
http://archive.cloudera.com/debian \
        $DISTRO-cdh3 contrib” > “$REPO”
echo “deb-src \
http://archive.cloudera.com/debian \
        $DISTRO-cdh3 contrib” >> “$REPO”
apt-get update


CDH on Red Hat Pre-Install Setup

Run these commands as root or through sudo to add the yum Cloudera repository:

Listing 3 - Red Hat Pre-Install Setup

curl -sL http://is.gd/3ynKY7 | tee \
        /etc/yum.repos.d/cloudera-cdh3.repo | \
        awk ‘/^name/’
yum update yum


Ensure that all the pre-required software and configuration are installed on every machine intended to be a Hadoop node. Don’t mix and match operating systems, distributions, Hadoop, or Java versions!

Hadoop for Development

  • Hadoop runs as a single Java process, in non-distributed mode, by default. This configuration is optimal for development and debugging.
  • Hadoop also offers a pseudo-distributed mode, in which every Hadoop daemon runs in a separate Java process. This configuration is optimal for development and will be used for the examples in this guide.

Hot Tip

If you have an OS X or a Windows development workstation, consider using a Linux distribution hosted on VirtualBox for running Hadoop. It will help prevent support or compatibility headaches.

Hadoop for Production

  • Production environments are deployed across a group of machines that make the computational network. Hadoop must be configured to run in fully distributed, clustered mode.
Section 3

Apache Hadoop Installation

This Refcard is a reference for development and production deployment of the components shown in Figure 1. It includes the components available in the basic Hadoop distribution and the enhancements that Cloudera released.

Figure 1

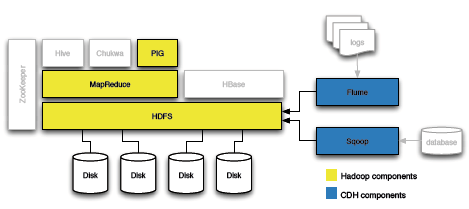
Figure 1 - Hadoop Components

Hot Tip

Whether the user intends to run Hadoop in non-distributed or distributed modes, it’s best to install every required component in every machine in the computational network. Any computer may assume any role thereafter.

A non-trivial, basic Hadoop installation includes at least these components:

  • Hadoop Common: the basic infrastructure necessary for running all components and applications
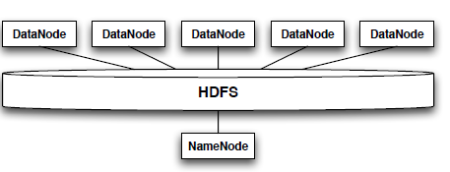
  • HDFS: the Hadoop Distributed File System
  • MapReduce: the framework for large data set distributed processing
  • Pig: an optional, high-level language for parallel computation and data flow

Enterprise users often chose CDH because of:

  • Flume: a distributed service for efficient large data transfers in real-time
  • Sqoop: a tool for importing relational databases into Hadoop clusters

Apache Hadoop Development Deployment

The steps in this section must be repeated for every node in a Hadoop cluster. Downloads, installation, and configuration could be automated with shell scripts. All these steps are performed as the service user hadoop, defined in the prerequisites section.
http://hadoop.apache.org/common/releases.html has the latest version of the common tools. This guide used version 0.20.2.

  1. Download Hadoop from a mirror and unpack it in the /home/hadoop work directory.
  2. Set the JAVA_HOME environment variable.
  3. Set the run-time environment:
Listing 4 - Set the Hadoop Runtime Environment

version=0.20.2 # change if needed
identity=”hadoop-dev”
runtimeEnv=”runtime/conf/hadoop-env.sh”
ln -s hadoop-”$version” runtime
ln -s runtime/logs .
export HADOOP_HOME=”$HOME”
cp “$runtimeEnv” “$runtimeEnv”.org
echo “export \
HADOOP_SLAVES=$HADOOP_HOME/slaves” \
>> “$runtimeEnv”
mkdir “$HADOOP_HOME”/slaves
echo \
“export HADOOP_IDENT_STRING=$identity” >> \
“$runtimeEnv”
echo \
“export JAVA_HOME=$JAVA_HOME” \
>>”$runtimeEnv”
export \
PATH=$PATH:”$HADOOP_HOME”/runtime/bin
unset version; unset identity; unset runtimeEnv


Configuration

Pseudo-distributed operation (each daemon runs in a separate Java process) requires updates to core-site.xml, hdfs-site.xml, and the mapred-site.xml. These files configure the master, the file system, and the MapReduce framework and live in the runtime/conf directory.

Listing 5 - Pseudo-Distributed Operation Config

<!-- core-site.xml -->
<configuration>
 <property>
        <name>fs.default.name</name>
        <value>hdfs://localhost:9000</value>
 </property>
</configuration>

<!-- hdfs-site.xml -->
<configuration>
 <property>
        <name>dfs.replication</name>
        <value>1</value>
 </property>
</configuration>
<!-- mapred-site.xml -->
<configuration>

 <property>
        <name>mapred.job.tracker</name>
        <value>localhost:9001</value>
 </property>
</configuration>


These files are documented in the Apache Hadoop Clustering reference, http://is.gd/E32L4s — some parameters are discussed in this Refcard’s production deployment section.

Test the Hadoop Installation

Hadoop requires a formatted HDFS cluster to do its work:


hadoop namenode -format

The HDFS volume lives on top of the standard file system. The format command will show this upon successful completion:


/tmp/dfs/name has been successfully formatted.

Start the Hadoop processes and perform these operations to validate the installation:

  • Use the contents of runtime/conf as known input
  • Use Hadoop for finding all text matches in the input
  • Check the output directory to ensure it works
Listing 6 - Testing the Hadoop Installation

start-all.sh ; sleep 5
hadoop fs -put runtime/conf input
hadoop jar runtime/hadoop-*-examples.jar\
grep input output ‘dfs[a-z.]+’


Hot Tip

You may ignore any warnings or errors about a missing slaves file.
  • View the output files in the HDFS volume and stop the Hadoop daemons to complete testing the install
Listing 7 - Job Completion and Daemon Termination

hadoop fs -cat output/*
stop-all.sh


That’s it! Apache Hadoop is installed in your system and ready for development.

CDH Development Deployment

CDH removes a lot of grueling work from the Hadoop installation process by offering ready-to-go packages for mainstream Linux server distributions. Compare the instructions in Listing 8 against the previous section. CDH simplifies installation and configuration for huge time savings.

Listing 8 - Installing CDH

ver=”0.20”
command=”/usr/bin/aptitude”
if [ ! -e “$command” ];
then command=”/usr/bin/yum”; fi
“$command” install\
hadoop-”$ver”-conf-pseudo
unset command ; unset ver


Leveraging some or all of the extra components in Hadoop or CDH is another good reason for using it over the Apache version. Install Flume or Pig with the instructions in Listing 9.

Listing 9 - Adding Optional Components

apt-get install hadoop-pig
apt-get install flume
apt-get install swoop


Test the CDH Installation

The CDH daemons are ready to be executed as services. There is no need to create a service account for executing them. They can be started or stopped as any other Linux service, as shown in Listing 10.

Listing 10 - Starting the CDH Daemons

for s in /etc/init.d/hadoop* ; do \
“$s” start; done


CDH will create an HDFS partition when its daemons start. It’s another convenience it offers over regular Hadoop. Listing 11 shows how to validate the installation by:

  • Listing the HDFS module
  • Moving files to the HDFS volume
  • Running an example job
  • Validating the output
Listing 11 - Testing the CDH Installation

hadoop fs -ls /
# run a job:
pushd /usr/lib/hadoop
hadoop fs -put /etc/hadoop/conf input
hadoop fs -ls input
hadoop jar hadoop-*-examples.jar \
grep input output ‘dfs[a-z.]+’
# Validate it ran OK:
hadoop fs -cat output/*


The daemons will continue to run until the server stops. All the Hadoop services are available.

Monitoring the Local Installation

Use a browser to check the NameNode or the JobTracker state through their web UI and web services interfaces. All daemons expose their data over HTTP. The users can chose to monitor a node or daemon interactively using the web UI, like in Figure 2. Developers, monitoring tools, and system administrators can use the same ports for tracking the system performance and state using web service calls.

Figure 2

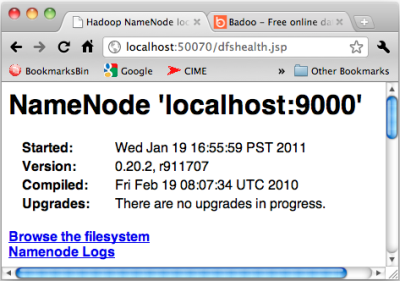
Figure 2 - NameNode status web UI

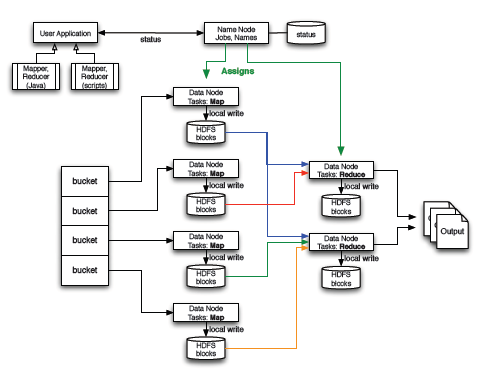
The web interface can be used for monitoring the JobTracker, which dispatches tasks to specific nodes in a cluster, the DataNodes, or the NameNode, which manages directory namespaces and file nodes in the file system.

Section 4

Hadoop Monitoring Ports

Use the information in Table 1 for configuring a development workstation or production server firewall.

Port Service
50030 JobTracker
50060 TaskTrackers
50070 NameNode
50075 DataNodes
50090 Secondary NameNode
50105 Backup Node

Table 1 - Hadoop ports

Plugging a Monitoring Agent

The Hadoop daemons also expose internal data over a RESTful interface. Automated monitoring tools like Nagios, Splunk, or SOBA can use them. Listing 12 shows how to fetch a daemon’s metrics as a JSON document:

Listing 12 - Fetching Daemon Metrics
http://localhost:50070/metrics?format=json

All the daemons expose these useful resource paths:

  • /metrics - various data about the system state
  • /stacks - stack traces for all threads
  • /logs - enables fetching logs from the file system
  • /logLevel - interface for setting log4j logging levels

Each daemon type also exposes one or more resource paths specific to its operation. A comprehensive list is available from: http://is.gd/MBN4qz

Section 5

Apache Hadoop Production Deployment

The fastest way to deploy a Hadoop cluster is by using the prepackaged tools in CDH. They include all the same software as the Apache Hadoop distribution but are optimized to run in production servers and with tools familiar to system administrators.

Hot Tip

Detailed guides that complement this Refcard are available from Cloudera at http://is.gd/RBWuxm and from Apache at http://is.gd/ckUpu1.

Figure 3

Figure 3 - Hadoop Computational Network

The deployment diagram in Figure 3 describes all the participating nodes in a computational network. The basic procedure for deploying a Hadoop cluster is:

  • Pick a Hadoop distribution
  • Prepare a basic configuration on one node
  • Deploy the same pre-configured package across all machines in the cluster
  • Configure each machine in the network according to its role

The Apache Hadoop documentation shows this as a rather involved process. The value-added in CDH is that most of that work is already in place. Role-based configuration is very easy to accomplish. The rest of this Refcard will be based on CDH.

Handling Multiple Configurations: Alternatives

Each server role will be determined by its configuration, since they will all have the same software installed. CDH supports the Ubuntu and Red Hat mechanism for handling alternative configurations.

Hot Tip

Check the main page to learn more about alternatives. Ubuntu: man update-alternatives Red Hat: man alternatives

The Linux alternatives mechanism ensures that all files associated with a specific package are selected as a system default. This customization is where all the extra work went into CDH. The CDH installation uses alternatives to set the effective CDH configuration.

Setting Up the Production Configuration

Listing 13 takes a basic Hadoop configuration and sets it up for production.

Listing 13 - Set the Production Configuration

ver=”0.20”
prodConf=”/etc/hadoop-$ver/conf.prod”
cp -Rfv /etc/hadoop-”$ver”/conf.empty \
“$prodConf”
chown hadoop:hadoop “$prodConf”
# activate the new configuration:
alt=”/usr/sbin/update-alternatives”
if [ ! -e “$alt” ]; then alt=”/usr/sbin/alternatives”; fi
“$alt” --install /etc/hadoop-”$ver”/conf \
hadoop-”$ver”-conf “$prodConf” 50
for h in /etc/init.d/hadoop-”$ver”-*; do \
“$h” restart; done


The server will restart all the Hadoop daemons using the new production configuration.

Figure 4

Figure 4 - Hadoop Conceptual Topology

Readying the NameNode for Hadoop

Pick a node from the cluster to act as the NameNode (see Figure 3). All Hadoop activity depends on having a valid R/W file system. Format the distributed file system from the NameNode, using user hdfs:

Listing 14 - Create a New File System
sudo -u hdfs hadoop name node -format

Stop all the nodes to complete the file system, permissions, and ownership configuration. Optionally, set daemons for automatic startup using rc.d.

Listing 15 - Stop All Daemons

# Run this in every node
ver=0.20
for h in /etc/init.d/hadoop-”$ver”-*; do \
“$h” stop ;\
# Optional command for auto-start:
update-rc.d “$h” defaults; \
done


File System Setup

Every node in the cluster must be configured with appropriate directory ownership and permissions. Execute the commands in Listing 16 in every node:

Listing 16 - File System Setup

mkdir -p /data/1/dfs/nn /data/2/dfs/nn
mkdir -p /data/1/dfs/dn /data/2/dfs/dn \
/data/3/dfs/dn /data/4/dfs/dn
mkdir -p /data/1/mapred/local \
/data/2/mapred/local
chown -R hdfs:hadoop /data/1/dfs/nn \
/data/2/dfs/nn /data/1/dfs/dn \
/data/2/dfs/dn /data/3/dfs/dn \
/data/4/dfs/dn
chown -R mapred:hadoop \
/data/1/mapred/local \
/data/2/mapred/local
chmod -R 755 /data/1/dfs/nn \
/data/2/dfs/nn \
/data/1/dfs/dn /data/2/dfs/dn \
/data/3/dfs/dn /data/4/dfs/dn
chmod -R 755 /data/1/mapred/local \
/data/2/mapred/local


Starting the Cluster

  • Start the NameNode to make HDFS available to all nodes
  • Set the MapReduce owner and permissions in the HDFS volume
  • Start the JobTracker
  • Start all other nodes

CDH daemons are defined in /etc/init.d — they can be configured to start along with the operating system or they can be started manually. Execute the command appropriate for each node type using this example:

Listing 17 - Starting a Node Example

# Run this in every node
ver=0.20
for h in /etc/init.d/hadoop-”$ver”-*; do \
“$h” stop ; done


Use job tracker, datanode, task tracker, etc. corresponding to the node you want to start or stop.

Hot Tip

Refer to the Linux distribution’s documentation for information on how to start the /etc/init.d daemons with the chkconfig tool.
Listing 18 - Set the MapReduce Directory Up

sudo -u hdfs hadoop fs -mkdir \
/mapred/system
sudo -u hdfs hadoop fs -chown mapred \
/mapred/system


Update the Hadoop Configuration Files

Listing 19 - Minimal HDFS Config Update

<!-- hdfs-site.xml -->
<property>
        <name>dfs.name.dir</name>
        <value>/data/1/dfs/nn,/data/2/dfs/nn
        </value>
        <final>true</final>
</property>
<property>
        <name>dfs.data.dir</name>
        <value>
         /data/1/dfs/dn,/data/2/dfs/dn,
         /data/3/dfs/dn,/data/4/dfs/dn
        </value>
   <final>true</final>
</property>  


The last step consists of configuring the MapReduce nodes to find their local working and system directories:

Listing 20 - Minimal MapReduce Config Update

<!-- mapred-site.xml -->
<property>
  <name>mapred.local.dir</name>
  <value>
        /data/1/mapred/local,
        /data/2/mapred/local
  </value>
  <final>true</final>
</property>
<property>
        <name>mapred.systemdir</name>
        <value>
          /mapred/system
        </value>
        <final>true</final>
</property>


Start the JobTracker and all other nodes. You now have a working Hadoop cluster. Use the commands in Listing 11 to validate that it’s operational.

Section 6

What's Next?

The instructions in this Refcard result in a working development or production Hadoop cluster. Hadoop is a complex framework and requires attention to configure and maintain it. Review the Apache Hadoop and Cloudera CDH documentation. Pay particular attention to the sections on:

  • How to write MapReduce, Pig, or Hive applications
  • Multi-node cluster management with ZooKeeper
  • Hadoop ETL with Sqoop and Flume

Happy Hadoop computing!

Section 7

Staying Current

Do you want to know about specific projects and use cases where Hadoop and data scalability are the hot topics? Join the scalability newsletter: http://ciurana.eu/scalablesystems

Like This Refcard? Read More From DZone

related article thumbnail

DZone Article

related refcard thumbnail

Free DZone Refcard

ABOUT US

  • About DZone
  • Send feedback
  • Careers
  • Sitemap

ADVERTISE

  • Advertise with DZone

CONTRIBUTE ON DZONE

  • Article Submission Guidelines
  • Become a Contributor
  • Visit the Writers' Zone

LEGAL

  • Terms of Service
  • Privacy Policy

CONTACT US

  • 600 Park Offices Drive
  • Suite 300
  • Durham, NC 27709
  • support@dzone.com
  • +1 (919) 678-0300

Let's be friends:

{{ parent.title || parent.header.title}}

{{ parent.tldr }}

{{ parent.linkDescription }}

{{ parent.urlSource.name }}
by
CORE
· {{ parent.articleDate | date:'MMM. dd, yyyy' }} {{ parent.linkDate | date:'MMM. dd, yyyy' }}
Tweet
{{ parent.views }} ViewsClicks
  • Edit
  • Delete
  • {{ parent.isLocked ? 'Enable' : 'Disable' }} comments
  • {{ parent.isLimited ? 'Remove comment limits' : 'Enable moderated comments' }}