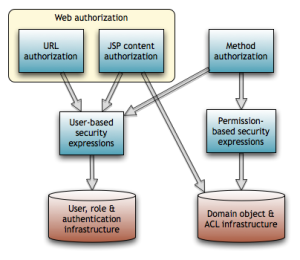
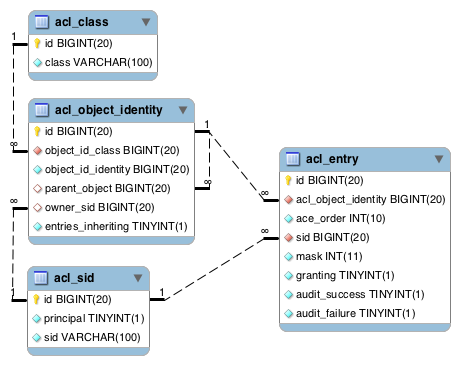
Besides authorizing web URL requests and JSP content, Spring Security supports annotation-based method authorization. We protect methods by attaching annotations containing security expressions to the classes and methods in question.
The expressions are ones we've already seen, plus an additional set of expressions allowing us to make assertions about a user's permissions on domain objects.
Permission-Based Security Expressions
Here are the permission-based security expressions that Spring Security 3 makes available for defining access rules:
| Expression |
Type |
Description |
| #paramName |
term |
Expression variable referring to a method argument by parameter name |
| filterObject |
term |
Refers to an arbitrary element when filtering a Collection. See @PreFilter and @PostFilter below. |
| returnValue |
term |
Refers to a method’s return value. See @PostAuthorize below. |
| hasPermission( domainObject, permission) |
predicate |
True iff the current user has the specified permission on the specified domain object. Permissions are read, write, create, delete or admin. |
Annotations for Method Authorization
Spring Security 3 introduces four expression-based @Pre/@Post annotations. While Spring Security continues to support the JSR- 250 standard annotations (e.g., @RolesAllowed) and the legacy @Secured annotation, the new @Pre/@Post annotations are much more powerful because they support permission-based security expressions. We'll therefore focus on those.
Use the following top-level namespace element to activate @Pre/@Post annotations:
The @Pre/@Post annotations are as follows.
@PreAuthorize(expression)
@PreAuthorize checks that the expression is true before allowing access to the method. This is probably the most useful annotation of the set.
@PreFilter(value=expression [,filterTarget=collection])
@PreFilter filters a Collection before passing it to the method. The filtering process applies expression to each element in turn, removing it from the collection if expression evaluates false. The reserved name filterObject in the expression refers to an arbitrary element. The Collection implementation must support the remove() method.
The filterTarget annotation element specifies the collection by name if the method has multiple Collection parameters. This requires compiling the target class with the debug flag on.
@PostAuthorize(expression)
@PostAuthorize checks that expression is true before returning the annotated method’s return value. The reserved name returnObject in the expression refers to the return value. Useful in cases where the method has domain object parameters that are actually IDs instead of domain objects.
@PostFilter(expression)
@PostFilter filters a Collection before returning it from the method. Similar to @PreFilter, but filters the return value.

Proxies enforce @Pre/@Post rules. Once a request makes it behind the proxy, internal calls are unprotected.
Examples
Only users with the write or admin permission can edit a message:
Only users with the read permission can get a forum:
In the example above, we use a SpEL trick to handle the fact that we can't directly reference an existing message. We can use @PostAuthorize here too, but that requires actually loading the forum before rejecting the request, which is suboptimal.
Only users with the admin role or permission can read blocked messages:
We use @PostAuthorize here because there's no way to know whether the message is visible without loading it. The role name has to be in quotes. In contrast, the permission name must not be in quotes, even though the examples in the Spring Security reference documentation erroneously contain quotes.
Here's a similar example, but this time for a list of messages:
The last two examples combined hasRole('admin') with hasPermission(..., admin). That's okay, and we did it to illustrate expressions that combine hasRole() with hasPermission(). But again consider using ACE inheritance to give the admin role itself admin permissions on all messages, and then simply remove the hasRole('admin') expression from the access rules. By pushing access decisions into the data, we can change our mind about which roles can do what without having to recompile the app.

Whitelists make sense for method security too. Place @PreAuthorize(“denyAll”) at the type level and override it as necessary at the method level.
ACL Infrastructure Configuration
The following bean dependency diagram shows the major infrastructural components for method security and ACLs. As you can see, there's a lot of supporting machinery. Please consult the Spring Security reference documentation and Javadoc for details.
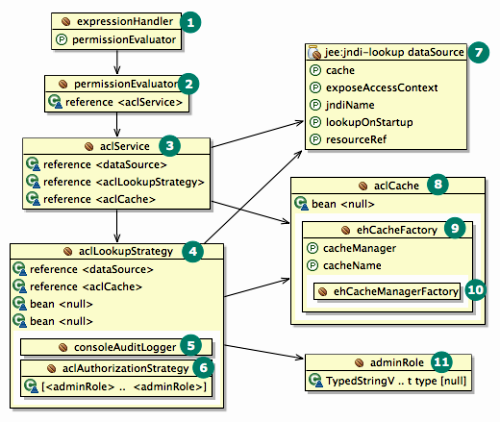
Here's the corresponding ACL configuration file (minus DataSource), with bean IDs suppressed where they're unnecessary.
