DZone
Thanks for visiting DZone today,
Edit Profile
  • Manage Email Subscriptions
  • How to Post to DZone
  • Article Submission Guidelines
Sign Out View Profile
  • Post an Article
  • Manage My Drafts
Over 2 million developers have joined DZone.
Log In / Join
Refcards Trend Reports
Events Video Library
Refcards
Trend Reports

Events

View Events Video Library

Zones

Culture and Methodologies Agile Career Development Methodologies Team Management
Data Engineering AI/ML Big Data Data Databases IoT
Software Design and Architecture Cloud Architecture Containers Integration Microservices Performance Security
Coding Frameworks Java JavaScript Languages Tools
Testing, Deployment, and Maintenance Deployment DevOps and CI/CD Maintenance Monitoring and Observability Testing, Tools, and Frameworks
Culture and Methodologies
Agile Career Development Methodologies Team Management
Data Engineering
AI/ML Big Data Data Databases IoT
Software Design and Architecture
Cloud Architecture Containers Integration Microservices Performance Security
Coding
Frameworks Java JavaScript Languages Tools
Testing, Deployment, and Maintenance
Deployment DevOps and CI/CD Maintenance Monitoring and Observability Testing, Tools, and Frameworks

Modernize your data layer. Learn how to design cloud-native database architectures to meet the evolving demands of AI and GenAI workkloads.

Secure your stack and shape the future! Help dev teams across the globe navigate their software supply chain security challenges.

Releasing software shouldn't be stressful or risky. Learn how to leverage progressive delivery techniques to ensure safer deployments.

Avoid machine learning mistakes and boost model performance! Discover key ML patterns, anti-patterns, data strategies, and more.

  1. DZone
  2. Refcards
  3. Flex & Spring Integration
refcard cover
Refcard #048

Flex & Spring Integration

Combining Flash and Java Technologies

Shows you how to integrate Flex and Spring to create a powerful platform for building robust Rich Internet Applications.

Free PDF for Easy Reference
refcard cover

Written By

author avatar Jon Rose
Flex Pratice Manager, Gorilla Logic, Inc.
author avatar James Ward
Technical Evangelist, Adobe
Table of Contents
► About Adobe Flex ► ABOUT Spring ► WHy Flex and Spring? ► Integrating Flex and spring ► User Authentication ► Conclusion
Section 1

About Adobe Flex

By Jon Rose and James Ward

Adobe Flex Software is a popular framework for building Rich Internet Applications (RIAs). The Flex framework is used to create SWF files that run inside Flash® Player. The framework was built for use by developers and follows traditional application development paradigms rather than the timelinebased development found in the Flash Professional authoring tools. Applications are built using the Flex Builder IDE™ - an Eclipse-based development environment. ActionScript® 3 is used to access data and build user interface components for web and desktop applications that run inside Flash Player or Adobe AIR® Software. The Flex Framework also uses a declarative XML language called MXML to simplify Flex development and layout.

Section 2

ABOUT Spring

The Spring Framework is one of the most popular ways to build enterprise Java applications. Unlike traditional Java EE development, Spring provides developers a full featured “lightweight container,” that makes applications easy to test and develop. Although Spring is best known for its dependency injection features, it also provides features for implementing typical server-side enterprise applications, such as declarative security and transaction management.

Section 3

WHy Flex and Spring?

Adobe Flex has strong ties to Java, which include an Eclipsebased IDE and BlazeDS, its open source server-based Java remoting and web messaging technology. In addition, most enterprise projects that use Flex build on a Java back end. With Flex and Java so often married together, it is only natural to want to integrate Flex with Spring-based Java back ends. Beyond greenfield development, many organizations want to revamp or replace the user interface of existing enterprise Spring applications using Flex. In late 2008, the Spring community recognized these cases and began working on the Spring BlazeDS Integration project to add support for Flex development with Java and Spring.

By default BlazeDS creates instances of server-side Java objects and uses them to fulfill remote object requests. This approach doesn’t work with Spring, as the framework is built around injecting the service beans through the Spring container. The Spring integration with BlazeDS allows you to configure Spring beans as BlazeDS destinations for use as remote objects in Flex.

Section 4

Integrating Flex and spring

This Refcard assumes that you are already familiar with Spring and Flex. If you need an introduction or refresher to either, check out the Very First Steps in Flex and/or Spring Configuration DZone Refcardz.

To use BlazeDS, the server-side application could be any Java application that deploys as a WAR file. This Refcard uses the Eclipse IDE to create and edit the Java project. This Refcard walks you through the following steps:

  • Set up a server-side Java project with BlazeDS and the Spring Framework
  • Configure the Java project with a basic Spring bean for use in BlazeDS
  • Write Flex application to use the Spring/BlazeDS service

Hot Tip

BlazeDS provides simple two-way communication with Java back-ends. Adobe Flash Player supports a serialization protocol called AMF that alleviates the bottlenecks of text-based protocols and provides a simpler way to communicate with servers. AMF is a binary protocol for exchanging data that can be used over HTTP in place of text-based protocols that transmit XML. Applications using AMF can eliminate an unnecessary data abstraction layer and communicate more efficiently with servers. To see a demonstration of the performance advantages of AMF, see the Census RIA Benchmark at: http://www.jamesward.org/census.The specification for AMF is publicly available, and numerous implementations of AMF exist in a variety of technologies including Java, .Net, PHP, Python, and Ruby.

Hot Tip

The open source BlazeDS project includes a Java implementation of AMF that is used for remotely communicating with server-side Java objects as well as for a publish/subscribe messaging system. The BlazeDS remoting technology allows developers to easily call methods on Plain Old Java Objects (POJOs), Spring services, or EJBs. Developers can use the messaging system to send messages from the client to the server, or from the server to the client. BlazeDS can also be linked to other messaging systems such as JMS or ActiveMQ. Because the remoting and messaging technologies use AMF over HTTP, they gain the performance benefits of AMF as well as the simplicity of fewer data abstraction layers. BlazeDS works with a wide range of Javabased application servers, including Tomcat, WebSphere, WebLogic, JBoss, and ColdFusion.

To follow along with this tutorial you will need:

  • Eclipse 3.4 for Java EE Developers: http://www.eclipse.org/downloads/
  • Flex® Builder 3 installed as a plugin for Eclipse: http://www.adobe.com/go/flex_trial
  • Tomcat 6: http://tomcat.apache.org/
  • BlazeDS (Binary Distribution):http://opensource.adobe.com/wiki/display/blazeds/BlazeDS/
  • Spring Framework 3.0 M2: http://www.springsource.org/download
  • Spring BlazeDS Integration (spring-flex-1.0.0.M2-withdependencies. zip): http://www.springsource.org/spring-flex
  • ANTLR 3.0.1 (do NOT use a newer version): http://www.antlr.org/download.html

First, set up the server-side Java web project in Eclipse by creating a web application from the blazeds.war file (found inside the blazeds zip file).

  • Import the Blazeds.war file to create the project:
    • Choose File > Import
    • Select the WAR file option. Specify the location of the blazeds.war file. For the name of the web project, type dzone-server
    • Click Finish

Now you can create a server that will run the application:

  • Select File > New > Other
  • Select Server > Server
  • Click Next
  • Select Apache > Tomcat v6.0Server
  • Click Next
  • Specify the location where Tomcat is installed and select the JRE (version 5 or higher) to use
  • Click Next
  • Select dzone-server in the Available Projects list
  • Click Add to add it to the Configured Projects list
  • Click Finish

Next, in the dzone-server project create the basic Java classes to be used by BlazeDS and Spring:


public class MyEntity {
  private String firstName;
  private String lastName;
  private String emailAddress;
  public String getFirstName() {
   return firstName;
  }
public void setFirstName(String firstName) {
  this.firstName = firstName;
  }
public String getLastName() {
  return lastName;
  }
public void setLastName(String lastName) {
  this.lastName = lastName;
  }
public String getEmailAddress() {
  return emailAddress;
  }
public void setEmailAddress(String emailAddress) {
  this.emailAddress = emailAddress;
  }
}

Listing 1: Java entity to be passed between Java and Flex


import java.util.List;
public interface MyService {
  public List<MyEntity> getMyEntities();
}

Listing 2: Java Service Interface


import java.util.ArrayList;
import java.util.List;
public class MyServiceImpl implements MyService {
  public List<MyEntity> getMyEntities() {
   List<MyEntity> list = new ArrayList<MyEntity>();
   MyEntity entity = new MyEntity();
   entity.setFirstName(“Hello”);
   entity.setLastName(“World”);
   entity.setEmailAddress(“hello@world.com”);
   list.add(entity);
   MyEntity entity2 = new MyEntity();
   entity2.setFirstName(“Hello”);
   entity2.setLastName(“Space”);
   entity2.setEmailAddress(“hello@space.com”);
   list.add(entity2);
   MyEntity entity3 = new MyEntity();
   entity3.setFirstName(“Hello”);
   entity3.setLastName(“Neighbor”);
   entity3.setEmailAddress(“hello@neighbor.com”);
   list.add(entity3);
   return list;
  }
}

Listing 3: Java Example Service Implementation

Listings 1, 2, and 3 are very basic Java classes that you’ll use as examples for this tutorial. In a real-world application, the service implementation would likely connect to one or more enterprise services for data, such as a relational database. In this case, it simply returns a hard-coded set of entities as an ArrayList.

The basic Java web project with the BlazeDS dependencies is now complete.

Next, configure the Java project with a basic Spring bean for the MyService interface:

  • Copy the Spring libraries, the Spring BlazeDS Integration Library, and the ANTLR library to the project dzoneserver/ WebContent/WEB-INF/lib directory
  • Create a basic Spring Configuration File:
    • Right Click WebContent/WEB-INF and then choose New > File
    • For the file name, type application-config.xml
    • Click Finish
    • Copy and paste the text from Listing 4 into the file

<?xml version=”1.0” encoding=”UTF-8”?>
 <beans xmlns=”http://www.springframework.org/schema/beans”
 xmlns:xsi=”http://www.w3.org/2001/XMLSchema-instance”
 xsi:schemaLocation=”
 http://www.springframework.org/schema/beans
 http://www.springframework.org/schema/beans/spring-beans-2.5.xsd”>
 <!-- Spring Beans’s -->
 <bean id=”myService” class=”MyServiceImpl” />
</beans>

Listing 4: Basic Spring Configuration

Those familiar with Spring should recognize this as a basic Spring configuration for creating a simple bean from the MyServiceImpl class. Later in this tutorial you will be using this bean through BlazeDS.

At this point, you have a basic Java web project with a default BlazeDS configuration. Now, you’ll change the default BlazeDS configuration to use the newly created Spring bean.

To begin configuring Spring BlazeDS Integration, update the web.xml file by removing the default BlazeDS configuration and replacing it with the code from Listing 5.


<>?xml version=”1.0” encoding=”UTF-8”?>
<>web-app>
 <>display-name>dzone-server<>/display-name>
 <>servlet>
   <>servlet-name>Spring MVC Dispatcher Servlet<>/servlet-name>
   <>servlet-class>
   org.springframework.web.servlet.DispatcherServlet
   <>/servlet-class>
   <>init-param>
    <>param-name>contextConfigLocation<>/param-name>
    <>param-value>/WEB-INF/application-config.xml<>/param-value>
   <>/init-param>
   <>load-on-startup>1<>/load-on-startup>
  <>/servlet>
  <>!-- Map /spring/* requests to the DispatcherServlet -->
  <>servlet-mapping>
   <>servlet-name>Spring MVC Dispatcher Servlet<>/servlet-name>
   <>url-pattern>/spring/*<>/url-pattern>
  <>/servlet-mapping>
<>/web-app>

Listing 5: web.xml

The web.xml contents in Listing 5 create a servlet filter from Spring that will process all BlazeDS requests at: http://localhost:8080/dzone-server/spring This will be the base URL for accessing the BlazeDS endpoint. Also, you should notice that this is a standard DispatcherServlet for Spring.

Now that you have Spring wired into the Java web application, you will update the basic Spring configuration from Listing 4 so that it will work with BlazeDS. Add the highlighted section from Listing 6 to your application-config.xml file.


<?xml version=”1.0” encoding=”UTF-8”?>
<beans xmlns=”http://www.springframework.org/schema/beans”
 xmlns:xsi=”http://www.w3.org/2001/XMLSchema-instance”
 xmlns:flex=”http://www.springframework.org/schema/flex”
 xsi:schemaLocation=”
 http://www.springframework.org/schema/beans
 http://www.springframework.org/schema/beans/spring-beans-2.5.xsd
 http://www.springframework.org/schema/flex
 http://www.springframework.org/schema/flex/spring-flex-1.0.xsd”>
 <!-- Spring Beans’s -->
 <bean id=”myService” class=”MyServiceImpl” />
 <!-- Simplest possible message broker -->
 <flex:message-broker />

 <!-- exposes myService as BlazeDS destination -->
 <flex:remote-service ref=”myService” />
</beans>

Listing 6: Advanced Spring Configuration for BlazeDS

Listing 6 exposes the MyServiceImpl class as a BlazeDS destination. First, the Flex® namespace is added to the configuration. Note that the XSD will not be published from Spring until the final 1.0 release, and until then you will have to add it manually to your XML catalog. With the Flex namespace added, the configuration uses the messagebroker tag to create the MessageBrokerFactoryBean. Since there is no additional configuration information provided, the MessageBroker will be created with “sensible defaults,” assuming that the service-config.xml is in WEB-INF/flex/ services-config.xml. The remote-service tag creates a destination from existing Spring beans.

Hot Tip

In Spring BlazeDS Integration release 1.0.0M2, the standard BlazeDS configuration file (servicesconfig. xml) is still used for configuration of the communication channels.

Next, update the default BlazeDS services-config.xml file (found in the WebContent/WEB-INF/flex folder) to reflect the Spring URL defined in the web.xml file. Replace the contents of the file with the code in Listing 7.


<?xml version=”1.0” encoding=”UTF-8”?>
  <services-config>
   <services>
    <default-channels>
     <channel ref=”my-amf”/>
   </default-channels>
  </services>
 <channels>
<channel-definition id=”my-amf”
class=”mx.messaging.channels.AMFChannel”>
  <endpoint
   url=”http://{server.name}:{server.port}/{context.root}/spring/
    messagebroker/amf”
   class=”flex.messaging.endpoints.AMFEndpoint”/>
  </channel-definition>
 <channel-definition id=”my-polling-amf”
class=”mx.messaging.channels.AMFChannel”>
<endpoint
  url=”http://{server.name}:{server.port}/{context.root}/spring/
   messagebroker/amfpolling”
    class=”flex.messaging.endpoints.AMFEndpoint”/>
     <properties>
    <polling-enabled>true</polling-enabled>
  <polling-interval-seconds>4</polling-interval-seconds>
 </properties>
</channel-definition>
</channels>
</services-config>

Listing 7: Update channel definition in services-config.xml

Note that the endpoint URL for the my-amf and my-polling-amf channels in Listing 7 include “spring” after the context.root parameter. This is the only configuration change you need to make in the BlazeDS default configuration files. All the remote destinations are configured in the Spring application-config. xml file.

You are now done configuring the server-side Spring / BlazeDS Java application. You may want to start up the Tomcat server to verify that your configuration is correct.

Now you can build the Flex application to use the Spring service remotely. Follow these steps to create the Flex project:

  • Select File > New > Other
  • In the Select A Wizard dialog box, select Flex Project
  • In the New Flex Project box, type in a project name: dzone-flex
  • Use the default location (which will already be checked)
  • Select Web Application (Runs In Flash Player)
  • Select None as the Application Server Type
  • Click Next
  • Specify the Output folder to be the location of the dzoneserver’s WebContent directory such as: C:\workspace\dzone-server\WebContent\
  • Click Finish

Your project will open in the MXML code editor and you’ll see a file titled main.mxml. Open the file and add the Flex® application code from Listing 8. This code accesses the MyServiceImpl class in Java and returns the results to Flex.


<?xml version=”1.0” encoding=”utf-8”?>
<mx:Application xmlns:mx=”http://www.adobe.com/2006/mxml”
   creationComplete=”srv.getMyEntities()”>
  <mx:AMFChannel id=”myamf”
uri=”/dzone-server/spring/messagebroker/amf”/>
  <mx:ChannelSet id=”channelSet” channels=”{[myamf]}”/>
 <mx:RemoteObject id=”srv”
  destination=”myService” channelSet=”{channelSet}”/>
 <mx:DataGrid dataProvider=”{srv.getMyEntities.lastResult}”/>
</mx:Application>

Listing 8: Final main.mxml source file for accessing the Spring service

The code in Listing 8 sets up the AMFChannel for accessing the Spring service. Note that the destination “flexMyService” is the same as the bean you defined in the application-config. xml Spring configuration file. Also, you might have noticed that none of the Flex code contains anything specific to Spring. The Flex code doesn’t have to change, as the client code has no knowledge of the fact that Spring is being used on the server.

To get the dzone-server to update the deployed web application you may need to right-click the dzone-server project and select Refresh.

With all steps of the tutorial completed, you can start the Tomcat server in Eclipse and access the application at the following URL: http://localhost:8080/dzone-server/main.html

Running Application

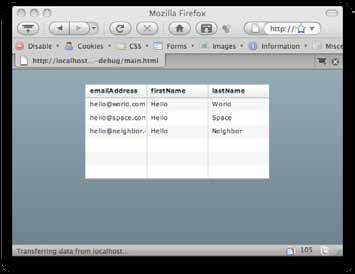
Figure 1: The running application

To allow the Flex application to be launched in Run or Debug mode from Eclipse:

  • Right-click the dzone-flex project
  • Select Properties, then Flex Build Path
  • For the Output Folder URL, type http://localhost:8080/dzone-server/
  • Click OK to update the project properties

Now you can right-click the main.mxml file and select Run As > Flex Application or Debug As > Flex Application.

The running application displays the data that was hard coded in the MyServiceImpl Java class, as seen in Figure 1. Now you have a complete sample application using Spring, BlazeDS, and Flex

Section 5

User Authentication

One of the benefits of using Spring is that it provides support for many common enterprise requirements, including security. In this section, you’ll expand on the basic application by using Spring Security to protect the service channel with role-based authentication.

To add security to the application you will need to download the following dependencies:

  • Spring Security 2.0.4: http://www.springsource.org/download/
  • AOP Alliance: http://sourceforge.net/projects/aopalliance
  • AspectJ 1.6.3: http://www.eclipse.org/aspectj/downloads.php
  • CGLib 2.2: http://cglib.sourceforge.net/
  • ASM 3.1: http://asm.ow2.org/

Then add the following files to the WEB-INF/lib directory in the dzone-server project:

  • cglib-2.2.jar
  • aspectjrt.jar (located in the aspectj.jar file)
  • asm-3.1.jar
  • asm-commons-3.1.jar
  • spring-security-acl-2.0.4.jar
  • spring-security-core-2.0.4.jar
  • spring-security-core-tiger-2.0.4.jar

<beans:beans xmlns=”http://www.springframework.org/schema/security”
 xmlns:beans=”http://www.springframework.org/schema/beans”
 xmlns:xsi=”http://www.w3.org/2001/XMLSchema-instance”
 xsi:schemaLocation=”
 http://www.springframework.org/schema/beans
 http://www.springframework.org/schema/beans/spring-beans-2.0.xsd
 http://www.springframework.org/schema/security
 http://www.springframework.org/schema/security/spring-security-
 2.0.4.xsd”>
<http auto-config=”true” session-fixation-protection=”none”/>
 <authentication-provider>
  <user-service>
   <user name=”jeremy” password=”atlanta”
  authorities=”ROLE_USER, ROLE_ADMIN” />
 <user name=”keith” password=”melbourne”
authorities=”ROLE_USER” />
</user-service>
</authentication-provider>
</beans:beans>

Listing 9: application-Context-security.xml Spring Security Configuration File

The first step is to create a very basic Spring Security configuration file. This example will use hard-coded credentials, however in a real application a database or LDAP server will likely be the source of the credentials. These methods of authentication can be easily configured with Spring Security. To learn more about Spring Security and how to add more advanced configurations, see the project home page at: http://static.springframework.org/spring-security/site/

To create a basic Spring Security Configuration File:

  • Right-click WebContent/WEB-INF and then choose New > File
  • For the file name, type applicationContext-security.xml
  • Click Finish
  • Copy the code from Listing 9 to the file

This configuration allows the user to authenticate through the Blaze DZ channel. Add the security configuration to the Spring configuration in the web.xml by updating the contextConfigLocation param-value as shown in Listing 10.


<servlet>
 <servlet-name>Spring MVC Dispatcher Servlet</servlet-name>
 <servlet-class>org.springframework.web.servlet.DispatcherServlet</
  servlet-class>
 <init-param>
  <param-name>contextConfigLocation<param-name>
  <param-value>
     /WEB-INF/application-config.xml
     /WEB-INF/applicationContext-security.xml
   </param-value>
  </init-param>
  <load-on-startup>1</load-on-startup>
</servlet>

Listing 10: web.xml File with Security Configuration Added

At this point, you need to update the Spring configuration file to secure the getMyEntities method on myService. To do this update the application-config.xml file with the code in Listing 11.


<?xml version=”1.0” encoding=”UTF-8”?>
<beans xmlns=”http://www.springframework.org/schema/beans”
  xmlns:flex=”http://www.springframework.org/schema/flex”
  xmlns:xsi=”http://www.w3.org/2001/XMLSchema-instance”
  xmlns:security=”http://www.springframework.org/schema/security”
  xsi:schemaLocation=”
  http://www.springframework.org/schema/beans
  http://www.springframework.org/schema/beans/spring-beans-2.5.xsd
  http://www.springframework.org/schema/flex
  http://www.springframework.org/schema/flex/spring-flex-1.0.xsd
  http://www.springframework.org/schema/security
  http://www.springframework.org/schema/security/spring-security-
2.0.4.xsd
  “>
  <flex:message-broker>
   <flex:secured />
  </flex:message-broker>
  <bean id=”myService” class=”MyServiceImpl”>
   <flex:remote-service/>
   <security:intercept-methods>
   <security:protect method=”getMyEntities” access=”ROLE_USER” />
  </security:intercept-methods>
 </bean>
</beans>

Listing 11: Updated application-config.xml Spring configuration file

If you run the Flex® application at this point, the getMyEntities service call will fail because the user is not authenticated.

Now that the server is configured to protect the service, you will update the Flex application to require the user to authenticate before loading data from the getMyEntities service method. The updated code shown in Listing 12 presents users with a login form (See Figure 2) until they are successfully authenticated. Once the user is authenticated, the view state is updated showing the DataGrid bound to the service results, and the service method is called.

Update the main.mxml page with the code in Listing 12. You can then run the application and login with one of the hard-coded username and password combinations from the applicationContext-security.xml configuration file.


<?xml version=”1.0” encoding=”utf-8”?>
<mx:Application xmlns:mx=”http://www.adobe.com/2006/mxml”>
<mx:Script>
  import mx.rpc.events.ResultEvent;
  import mx.rpc.events.FaultEvent;
  import mx.rpc.AsyncToken;
  import mx.rpc.AsyncResponder;
private function login():void {
var token:AsyncToken = channelSet.login(username.text, password.
text);
token.addResponder(new AsyncResponder(loginResult, loginFault));
}
private function loginResult(event:ResultEvent,
token:AsyncToken):void {
   //get data
   srv.getMyEntities();
   //change state
   currentState = “userAuthenticated”;
 }
 private function loginFault(event:FaultEvent, token:AsyncToken):void
{
invalidLogin = true;
}
</mx:Script>
<mx:AMFChannel id=”myamf”
uri=”/dzone-server/spring/messagebroker/amf”/>
<mx:ChannelSet id=”channelSet” channels=”{[myamf]}”/>
<mx:RemoteObject id=”srv”
destination=”myService” channelSet=”{channelSet}”/>
<mx:Boolean id=”invalidLogin”>false</mx:Boolean>
<!-- Login Form -->
<mx:Panel id=”loginPanel” title=”Login Form”>
<mx:Label text=”Invalid username or password”
includeInLayout=”{invalidLogin}” visible=”{invalidLogin}” />
  <mx:Form defaultButton=”{loginButton}”>
   <mx:FormItem width=”100%” label=”Username”>
    <mx:TextInput id=”username”/>
   </mx:FormItem>
  <mx:FormItem width=”100%” label=”Password”>
 <mx:TextInput id=”password” displayAsPassword=”true” />
  </mx:FormItem>
    </mx:Form>
     <mx:ControlBar>
    <mx:Button id=”loginButton” label=”Login” click=”login()”/>
   </mx:ControlBar>
  </mx:Panel>
<mx:states>
 <mx:State name=”userAuthenticated”>
   <mx:RemoveChild target=”{loginPanel}” />
    <mx:AddChild>
   <mx:DataGrid dataProvider=”{srv.getMyEntities.lastResult}” />
  </mx:AddChild>
</mx:State>
</mx:states>
</mx:Application>

Listing 12: Update Flex Application

The Flex code in Listing 12 is very basic. It presents the user with the loginPanel until loginResult() is invoked by a successful login. The username and password parameters come from a login form and are passed to the channelSet’s login() method. On a successful login, the loginResult() handler function is called, and the post-login logic is invoked. In this case, the currentState is updated to userAuthenticated, which removes the login form and adds the DataGrid bound to the service call’s results. In addition, the getMyEntities service method is called to load the data.

Login Form

Now, you have a basic Flex®, Spring, and BlazeDS application protected with authentication.

Section 6

Conclusion

In this Refcard, you first created a Spring bean that was exposed to the Flex client through BlazeDS using Spring BlazeDS Integration. Next, you secured your service by adding Spring Security, and basic Flex authentication. As you can see, the new Spring BlazeDS Integration project makes integrating Flex and Spring easy and straightforward. The combination of the two technologies creates a powerful platform for building robust RIAs. You can learn more about integrating Flex and Spring on the Spring BlazeDS Integration project site: http://www.adobe.com/devnet/flex/flex_java.html

Like This Refcard? Read More From DZone

related article thumbnail

DZone Article

Enterprise RIA With Spring 3, Flex 4 and GraniteDS
related article thumbnail

DZone Article

Spring Integration: A Hands-On Tutorial, Part 1
related article thumbnail

DZone Article

Spring Integration Kafka 1.2 is Available, With 0.8.2 Support and Performance Enhancements
related article thumbnail

DZone Article

Spring JMS, Message Automatic Conversion, JMS Template
related refcard thumbnail

Free DZone Refcard

Getting Started With Low-Code Development
related refcard thumbnail

Free DZone Refcard

JavaScript Test Automation Frameworks
related refcard thumbnail

Free DZone Refcard

Salesforce Application Design
related refcard thumbnail

Free DZone Refcard

E-Commerce Development Essentials

ABOUT US

  • About DZone
  • Support and feedback
  • Community research
  • Sitemap

ADVERTISE

  • Advertise with DZone

CONTRIBUTE ON DZONE

  • Article Submission Guidelines
  • Become a Contributor
  • Core Program
  • Visit the Writers' Zone

LEGAL

  • Terms of Service
  • Privacy Policy

CONTACT US

  • 3343 Perimeter Hill Drive
  • Suite 100
  • Nashville, TN 37211
  • support@dzone.com

Let's be friends: