DZone
Thanks for visiting DZone today,
Edit Profile
  • Manage Email Subscriptions
  • How to Post to DZone
  • Article Submission Guidelines
Sign Out View Profile
  • Post an Article
  • Manage My Drafts
Over 2 million developers have joined DZone.
Log In / Join
Refcards Trend Reports
Events Video Library
Refcards
Trend Reports

Events

View Events Video Library

Zones

Culture and Methodologies Agile Career Development Methodologies Team Management
Data Engineering AI/ML Big Data Data Databases IoT
Software Design and Architecture Cloud Architecture Containers Integration Microservices Performance Security
Coding Frameworks Java JavaScript Languages Tools
Testing, Deployment, and Maintenance Deployment DevOps and CI/CD Maintenance Monitoring and Observability Testing, Tools, and Frameworks
Culture and Methodologies
Agile Career Development Methodologies Team Management
Data Engineering
AI/ML Big Data Data Databases IoT
Software Design and Architecture
Cloud Architecture Containers Integration Microservices Performance Security
Coding
Frameworks Java JavaScript Languages Tools
Testing, Deployment, and Maintenance
Deployment DevOps and CI/CD Maintenance Monitoring and Observability Testing, Tools, and Frameworks

Last call! Secure your stack and shape the future! Help dev teams across the globe navigate their software supply chain security challenges.

Modernize your data layer. Learn how to design cloud-native database architectures to meet the evolving demands of AI and GenAI workloads.

Releasing software shouldn't be stressful or risky. Learn how to leverage progressive delivery techniques to ensure safer deployments.

Avoid machine learning mistakes and boost model performance! Discover key ML patterns, anti-patterns, data strategies, and more.

  1. DZone
  2. Refcards
  3. Getting Started with FitNesse
refcard cover
Refcard #100

Getting Started with FitNesse

Bringing Programmers and Testers Together

Learn to use Fitnesse, an open source testing framework that enables customers, testers, and programmers to easily create and edit tests.

Free PDF for Easy Reference
refcard cover

Written By

author avatar Erik Pragt
Developer, jWorks
Table of Contents
► About FitNesse ► FitNesse Overview ► Installing FitNesse ► FitNesse Command Line Options ► Tests and Suites ► Creating the Suite ► Creating a New FitNesse Test ► Writing the Fixture ► Configuring FitNesse ► Running FitNesse Tests ► Organizing Tests ► Slim Test Table Styles ► Decision Table ► Query Table ► Script Table Example ► Import Table ► Comment Table ► Library Table ► Using Symbols ► Formatting Cheat Sheet ► BDD Style Testing ► Training ► Conclusion
Section 1

About FitNesse

By Erik Pragt

FitNesse is an open source automated framework created for software testing purposes. It stimulates collaboration in software development by providing a WIKI powered test framework which enables customers, testers and programmers to easily create and edit tests in a platform independent way. FitNesse is based on Ward Cunninghams’s Framework for Integrated Test (FIT) and is now further developed by Robert C. Martin.

FitNesse is designed to support functional testing (also know as acceptance testing) by being integrated on a business level. This is different from testing on a User Interface level, where tools like Selenium, HtmlUnit, Watir and many others are used.

Section 2

FitNesse Overview

Fitnesse User Flow

FitNesse works by executing Wiki pages which call custom written Fixtures. Fixtures are a bridge between the Wiki pages and the System Under Test (SUT), which is the actual system to test. These Fixtures can be written in many programming languages like Java, C#, and Ruby.. Whenever a Wiki test is executed, the Fixtures works by calling the System Under Test (SUT) with the appropriate parameters, execute a piece of business logic in the software system, and pass the results (if any) of the SUT back to the Wiki front-end, which in turn will visually indicate if a test has passed or not.

FitNesse has two test systems, SLIM and FIT. FIT is the older test system, and is no longer actively developed. However, recent plans indicate that FIT might be further developed. Because of the complexity to maintain and support FIT on different platforms, SLIM was created. SLIM is a lightweight version of the FIT protocol. One of the design goals of SLIM was to easily port implementations to different languages. Also, in contrast to FIT, SLIM doesn’t require any dependencies on the FitNesse framework in the Fixtures code, which makes writing fixtures more easy.

Section 3

Installing FitNesse

While FitNesse is available in multiple languages (see http://www.fitnesse.org/FrontPage.FitServers), this Refcard will focus on the most actively developed version, which is the Java variant. You’ll need Java 6 to run the most recent version of FitNesse.

Below are the steps to install FitNesse:

  1. Download the most recent version from http://www.fitnesse.org/FrontPage.FitNesseDevelopment.DownLoad
  2. Run “java -jar fitnesse.org”. FitNesse will extract itself and will try to run itself on port 80.
  3. Note: when running on port 80 fails, e.g. because of security constraints or the port is already in use, try to run FitNesse by typing “java -jar fitnesse.jar -p 9090”. This will start FitNesse on port 9090
  4. Access FitNesse by pointing your web browser to http://localhost:<port-number> to see the FitNesse Front page
Section 4

FitNesse Command Line Options

FitNesse requires very little configuration, but does provide some options, which are displayed below.


Usage: java -jar fitnesse.jar [-pdrleoa]
-p <port number> {80}
-d <working directory> {.}
-r <page root directory> {FitNesseRoot}
-l <log directory> {no logging}
-e <days> {14} Number of days before page versions expire
-o omit updates
-a {user:pwd | user-file-name} enable authentication.
-i Install only, then quit.
-c <command> execute single command.
Section 5

Tests and Suites

FitNesse has the concept of Suites and Tests. Suites are sets of Tests, which is a way to organize the Tests. As an additional benefit, when executing a Suite, all Tests within the Suite are executed.

Section 6

Creating the Suite

To create a new FitNesse suite:

  • Go to the FitNesse Front page at http://localhost:9090
  • Click Edit in the left menu
  • Type the name of the Suite after the existing text, e.g. JukeboxSuite

Important: FitNesse will only create links when the text is written in CamelCase. This means that every page needs to start with an uppercase character and at least one other letter in the word is written in uppercase.

  • Click save
  • Click on the question mark [?] next to the JukeboxSuite text
  • Press save

An empty Suite has now been created, which is indicated by the ‘Suite’ text on top of the left menu.

Note: FitNesse marks a page as a Suite automatically when it starts or ends with Suite. A Wiki page can also manually be set as an Suite in the page properties by clicking ‘Properties’.

Section 7

Creating a New FitNesse Test

The Decision Table is the default test table style used by FitNesse. When not specifying a table prefix, FitNesse decides it is a Decision Table. An example Decision Table is used below to assert the proper conversion of payments into credits.

Creating a Test is similar to creating a new Suite:

  • When in a Suite, click ‘Edit’ in the left menu
  • Clear the text area and type the name of the Test, e.g. PaymentTest
  • Click save
  • Click on the question mark [?] next to the PaymentTest
  • Clear the text area and replace the text by the following:
!4 Story: the amount you pay determines the received credits.
!|credits for payment|
|payment|credits?|
|.25 |1 |
|1 |4 |
|5 |20 |
  • (There are multiple types of test styles, but the above is a Decision Table)
  • Press ‘Save’

Your first test has now been created, including some markup. This markup is ignored when executing the Test; only tables are executed. When you execute this test by clicking on ‘Test’ in the left menu, your test will fail with an error. To get the test to work, we need to do two more things: write the Fixture and configure FitNesse correctly.

Section 8

Writing the Fixture

The Fixture will be the layer between the production code (the Subject Under Test) and the FitNesse pages. There are multiple types of Fixtures, and to support the Test above, a Decision Table Fixture is needed. Consider the following code to test:


package jukebox.sut;
public class JukeBox {
   public int calculateCredits(double payment) {
      return payment * 4;
   }
}

The Fixture to test this class looks like this:


package jukebox.fixtures;
import jukebox.sut.JukeBox;
public class CreditsForPayment {
private double payment;
private int credits;
public void execute() { // executed after each table row
this.credits = new JukeBox().calculateCredits(payment);
}
public void setPayment(double payment) { // setter method
this.payment = payment;
}
public int credits() { // returning function because of question
mark in the test return this.credits;
}
}

The Fixture is created from the FitNesse page, and for each row:

  • First the setters are called (in this case setPayment),
  • Then the execute is called to do call the SUT
  • Then the result is retrieved from the Fixture and compared to the FitNesse expectation.
Section 9

Configuring FitNesse

By default, FitNesse uses FIT as it’s default Test System. Since we want to use SLIM instead, this needs to be changed. We can change this by editing the Test page again, and add the following line on top of the page:


!define TEST_SYSTEM {slim}

This line tells FitNesse to use the Slim instead of FIT, and allows FitNesse to execute our Fixtures correctly.

What we also need to do is set the classpath. Please check your IDE to see what the output classpath of the project is, and add that to the following line:


path <your-classpath-here>

As an example of the above, the following would tell FitNesse to use the libraries in the development folder:


!path c:\Development\spring.jar
!path c:\Development\hibernate.jar

The last thing we need to do is tell FitNesse in which package to find the Fixture. This can be done either by prefixing the name of the fixture class in the Wiki, or use a special kind of Table, the Import Table.

Add the following to your FitNesse Test, above the ‘credits for payment’ section:


|import|
|jukebox.fixtures|

Pressing the ‘Test’ button in the left menu will instruct FitNesse to execute the Test. The FitNesse Fixture will call the SUT, and color the Wiki page according to the test results. This will result in a green Wiki table representing a correctly executed test as can be seen in the following image.

Wiki Table

Section 10

Running FitNesse Tests

Tests, however well written, can fail due to numerous reasons. The test can be wrong, the results can be asserted incorrectly, or the Subject Under Tests is incorrect and returns the wrong results. To find out what is causing this, tests can be debugged. When you want to debug a test, start by adding ?responder=test&remote_debug=true to the URL for the test. After starting the test in FitNesse, start a remote debugging process in the right port. (Port 8000 if you are using the default settings for REMOTE_DEBUG_COMMAND, though this can be changed by customizing the REMOTE_DEBUG_COMMAND in your Wiki)

Section 11

Organizing Tests

To structure your Tests in a good way it’s a good idea to create Suites per area of functionality. For example, a Suite can be created for Managing Inventory (InventoryManagementSuite), for Sales (SalesSuite) and for Accounting (AccountingSuite). The Tests should be organized functionality wise, not technology wise. So don’t create a WebserviceTestSuite, or an XmlParseTestSuite, because in that way you tie your tests too much to the implementation and focus less on the business functionality.

Organizing your tests in a functional way allows you to run the tests in a finer granularity, where you can choose to either run all of the Suites, some of the Suites, or just a single Test.

Hot Tip

Organizing your tests in a functional way allows you to run the tests in a finer granularity, where you can choose to either run all of the Suites, some of the Suites, or just a single Test.

Section 12

Slim Test Table Styles

The first cell of a slim table determines what kind of Test Table it is. Here are the table types provided by FitNesse:

Table NameDescriptionDecision TableSupplies the inputs and outputs for decisions.Query TableSupplies the expected results of a query.Subset Query TableSupplies a subset of the expected results of a query.Ordered query TableSupplies the expected results of a query. The rows are expected to be in order.Script TableA series of actions and checks. Similar to Do Fixture.Scenario TableA table that can be called from other tables.Table TableA very flexible table which can be used for almost everything.ImportAdd a path to the fixture search path.CommentA table which will not be executed.Library TableA table that installs fixtures available for all test pages.

Section 13

Decision Table

The decision table is the default table style used by FitNesse. That is, when not specifying a prefix, FitNesse decides it is a Decision Table. As an alternative, you can prefix the Fixture name definition in the Test page with ‘decision:’ or ‘dt:’, so the example below would look like: ‘decision:cr edits for payment’. An example of a decision table is shown below:
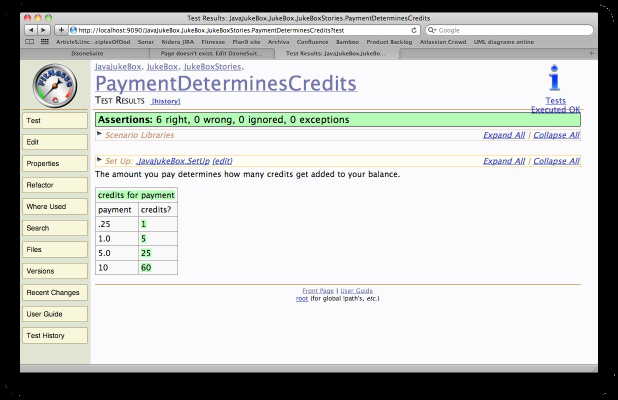

!3 Payment test
The amount you pay determines how many credits get added to your balance.
!|credits for payment|
|payment |credits?|
|.25 |1  |
|1.0 |5  |
|5.0 |25 |
|10  |60 |

The English text above outside the table is ignor ed by

FitNesse and only serves a documenting purpose. The (pipe separated) table however is executed by FitNesse. There are 3 items in the table: the fixture name (credits for payment), the header (payment & credits), and the data (the rest of the table).

Please note the exclamation mark (!) in the first row. While not explicitly needed in this example, it prevents FitNesse from interpreting camel case words as page links. Putting a exclamation mark in the first row will leave any camel case words as-is and will not turn them into page links.

The header row consists of two header names, payment and credits. Normally, each header corresponds to a set function. The ‘credits’ header contains a ? Decision Tables consider this to be an output and so calls it as a function. The return value of that function is compared to the cell contents and the cell is colored green if it matches the cell, or red if it doesn’t.

When executing this Test, FitNesse will look in the classpath for a fixture named CreditsForPayment. For each line in the table, FitNesse will call a setter for payment on the Fixture (setPayment(double payment)). After all ‘set’ functions have been called, the ‘execute’ method will be called by FitNesse. In the example below, the ‘execute’ method does the actual work. After that, the ‘credits’ function will be called (public int credits()), and the result of that call will be evaluated by FitNesse and colored accordingly. The code required to make this work is shown below.


package jukebox.fixtures;
public class CreditsForPayment {
private double payment;
private int credits;
public void setPayment(double payment) {
this.payment = payment;
}
public void execute() {
this.credits = JukeBox.calaculateCredits(payment)
}
public int credits() {
return credits;
}
}

Optional Functions

Decision tables have the option to implement optional functions, which will be called if they are defined in the Fixture. In the example above, the execute function is used. Decision tables know 3 optional functions:

FunctionDescriptionresetCalled once per row before any set or output functions care called.executeCalled once per row after all set functions have been called, but just before the first output (if any) is called.tableIs called after the constructor and before any rows are processed. It is passed the contents of the complete table in the form of a list of lists that contain all the cells except for the very first row.

Section 14

Query Table

Query tables are, as the name implies, meant to query for data. There are currently 3 kinds of query tables, which are almost identical, but with some notably exceptions.

FixtureDescriptionQueryA standard query table, which compares the complete set of data in and unordered way.Subset queryOnly those rows defined in the table need to be in the Fixture result.Ordered queryThe order of the rows in the table must be in the same order as the rows returned by the query.

A query table is used to compare the results of a query. This is helpful when you only need to make assertions about data, instead of also manipulating data in the system. An example:


|Query:songs from artist|Led Zeppelin|
|title|artist|duration|
|Stairway to Heaven|Led Zeppelin|8:36|
|Immigrant Song|Led Zeppelin|2:25|

The following code describes the fixture:


package jukebox.fixtures;
import static util.ListUtility.list;
import java.util.*;
import jukebox.sut.Song;
public class SongsFromArtist {
String artist;
    public SongsFromArtist(String artist) {
  this.artist = artist;
    }
public List <Object> query() {
  List result = new ArrayList();
  for (Song song : JukeBox.findSongsFromArtist(artist)) {
result.add(list(
list(“title”, song.getTitle()),
     list(“artist”, song.getArtist()),
list(“duration”, song.getDurationInUserFriendlyFormat())
 )
);
  }
  return result;
}
}

Note that the list function simply builds an ArrayList from it’s arguments. It’s in the ListUtility class, which is included in the fitnesse.jar.

The Fixture class must have a query method that returns a list of rows. Each row returned by the query method is a list of fields. Each field is a two-element list composed of the field name and it’s value as a String.

Each row in the table is checked to see if ther e is a match in the query response. The results of the comparison are colored accordingly, and are checked for extra or missing records. The order of the rows is irrelevant in the query tables.

If a “table” method is declared in the fixture it will be called before the query function is called. It will be passed a list of rows which are themselves lists of cells. This is the same format as the table method of Decision table.

Section 15

Script Table Example

Script tables are one of the most flexible table styles and can be used for scenario or story based testing. When using a Script table, each statement in the FitNesse test will refer to a method of the fixture used or to an earlier defined scenario. Each statement can be prefixed by one of the Script Table keywords (see below). An example:


|script:current account |
|check   |cash balance should be |0.0       |
|deposit   |.25                               |
|check    |cash balance should be |.25 |
|deposit   |.75                         |
|check     |cash balance should be |1   |
|$balance= |total deposits              |
|ensure    |withdraw               |1   |
|note      |account should not allow negative balance|

Java code


public class CurrentAccount {
public double cashBalanceShouldBe() { .... }
public void deposit(double amount) { .... }
public boolean withdraw(double amount) { .... }
public double totalDeposits() { .... }
}

When executing this test, a function alone in a row will turn red or green if it returns a boolean. Otherwise it will simply remain uncolored.

Script Table Keywords

checkFollowed by a function call. The last cell of the row is the expression to expect of the function call.check notFollowed by a function call. The last cell of the row is the expression to not be matched by what the function actually returns.ensureFollowed by a function call which return boolean (true for green, red for false)rejectOpposite of ensure, meaning true is red, false is green.noteAll other cells in that row will be ignored. Alternatives to note are if the first cell is blank, or if the first cell begins with # or *.showFollowed by a function call. A new cell is added after the test has run which will contain the return value of the function. Good for debugging.startThe rest of the row is the name and constructor arguments for a new actor (a fixture) which replaces the current actor.

Hot Tip

If a symbol assignment (see below) is in the first cell, e.g. $name= , then it should be followed by a function. The return value of the function is assigned to the symbol and can be used in later calls to other functions.

Section 16

Import Table

An Import Table is not a test table. Instead, it tell the underlying test system (the Slim Executor) which classpath prefixes to use when searching for the Fixtures. This way, the fully qualified name (the name of the class including the package name) of the Fixture can be replaced by only the classname of the Fixture.

An Import Table can be used like the following:


|import|
|com.path.to.fixture|
|ClassNameOfFixture |
Section 17

Comment Table

Similar to Import Tables, Comment Tables are not Test Tables. As the name implies, Comment Tables are used to comment out tables. Commented tables are not executed.


|comment|
|this table| is not|executed|
Section 18

Library Table

A Library Table can be used to make functions available for all pages underneath the page the Library Table is defined in. Whenever a method is called that is not available on the Fixture, then all Fixtures defined as libraries are scanned for that function so that it can be invoked.

Library tables can be defined by creating a Wiki table of which the first row contains the reserved word Library. All subsequent rows following the first are the names of fixtures. These Fixtures are located the same way in the classpath as normal Fixtures, so the rules of the Import Table apply here also. Library Tables can be used for common functionality which should be reused between tests. An example:


|Library|
|song creation|
|script|jukebox fixture|
|create song|Stairway to Heaven|
|play song|Stairway to Heaven  |

And the associated Fixture code:


public class SongCreation {
  public void createSongForArtist(String songName) {
    // song creation logic here
  }
}
public class JukeboxFixture {
  public void playSong(String songName) {
    playService.playSong(songName);
  }
}

The lookup strategy of functions is:

  • First try to find the function in the current Fixture and execute it.
  • If the function was not found, look it up in the System Under Test.
  • If the function was not found in the System Under Test, look in the list of defined libraries, in reversed order of creation. This means that the function is first looked up in the last defined library Fixture, then in the one before that, etc.
Section 19

Using Symbols

If a $<symbolName> appears in an output cell of a table, then that symbol will be loaded with that output. For example:


|DT:some decision table|
|input|output?|
|3|$V=|
|$V|8|
|9|$V|

The first row above loads the return value of the output function into the symbol V. The second row will load the previously stored value of V into the input. The third row compares the output with the previously stored value of the symbol.

Section 20

Formatting Cheat Sheet

FitNesse comes with an extensive set of formatting options to style the text in Wiki pages.

Character Formatting

Comment#textItalics"text"Bold'''text'''Style!style_<style>(text), e.g. !style_pass(passed!)Strike-through--text--Header!1 Title !2 Header !3 Small headerBullet Lists[space]* Item one [space][space]* Sub item one [space][space]* Sub item twoNumbered lists (numbers will be incremented automatically)[space]1 Item one [space]1 Item two [space]1 Item threeCentering!c center this text“As-is”/escaping!-text-!“As-is”!<text>!Formatted “as is”{{{text}}}

Line and Block Formatting

Horizontal Line-----Note!note textCollapsible section expanded!* [title] multi-line Wiki text *!Collapsible section collapsed!*> [title] multi-line Wiki text *!Hidden collapsible section!*< [title] this is hidden, but still active *!Plain text table![ my simple table ]!Literalized table![: first:Erik last:Pragt ]!

Links and References

Page links - from root.RootPage[.Childpage]Page links - siblingSameLevelPage[.ChildPage]Page links - child or symbolic>ChildPage[.ChildPage]Page links - from parent<ParentPage[.ChildPage]Cross-reference!see AnyPagePath“In page” label!anchor label-nameJump to anchor - in-line Jump to anchor - left-justified Jump to anchor - in an aliastext #label-name text .#label-name [[text][#label-name]]External links -web -local -alias -aliashttp://url-path http://files/somePath [[text][/files’’’/localPath]] [[text][AnyPagePath#label-name]]Picture - clickable!img url-to-image-file [[!img url-to-image-file][some-link]]Contents List!contentsContents Tree!contents -RContent Sub-tree!contents -R2Include page!include AnyPagePath

Variables

Variable Definition!define name {value}Variable Usage${name}Expression Evaluation${=expression=}

Global Variables

Global variables can be set by placing them in the Wiki pages, for example:


!define TEST_SYSTEM { slim }

Variable Definition!define name {value}Variable Usage${name}Expression Evaluation${=expression=}

Section 21

BDD Style Testing

Behavior Driven Development (or BDD) is an Agile software development technique that encourages collaboration between participants in a software project. BDD focuses on exposing internal logic (typically business rules) to review by stakeholder. As such, it’s a perfect match with FitNesse’s goals. FitNesse doesn’t have special support for Behavior Driven Development (BDD) style testing in the form of special Test Tables, but using a combination of Script and Scenario Tables provides the right tools to support the popular Given-When- Then style of testing User Stories.

Consider the following example:

Given a juke box with 0 credits When I deposit .25 Then the juke box should show 1 credits

Due to the flexible nature of FitNesse and Script Tables, it’s easy to support a story like the one above. There are multiple ways to implement this in FitNesse, but one of the best ways is to use a combination of Plain Text Tables and Scenario Tables.

Plain Text Tables

Plain Text Tables can be used to surr ound plain text with ![ and ]! symbols to turn the text into tables. The good thing about the Plain Text Table is that it can be combined with the FitNesse tests tables, for example the Script table. This can be done by adding the ‘script’ tag after the ![ symbol. This would result in the following Wiki text:


![ script
Given a juke box with 0 credits
When I deposit .25
Then the juke box should show 1 credits
]!

As you can see in the story, there is a combination of text and parameters. Scenario tables with a parameterized style provide a good way of handling this.

Declaring Scenarios Using Parameterized Style

Instead of using pipe symbols to separate between function names and parameters, you can also declare a scenario by embedding underscores within the name of the scenario to represent variables. Each of the underscores represent an argument which are named in a comma separated list in the cell following the scenario name.


#page driver
|script|juke box|
|scenario|Given a juke box with _ credits and _ songs|credits,songs|
|set credits|@credits|
|set songs|@songs|

FitNesse will now invoke the scenario instead of looking for a method in a Fixture. The body of the scenario uses the supplied parameter names by prefixing them with an ‘@’ sign.

The body of the scenario type will be invoked against the page driver. The page driver can be defined by using the script tag. This needs to be defined before any scenarios are defined. The page driver is just a normal Script Fixture, and all functions defined in the scenario are executed against that Fixture.

Creating a Test like this can hide the details of the test and allows you to focus on a readable test while creating reusable scenarios in the process.

Section 22

Training

Neuri Ltd (http://neuri.co.uk) and jWorks (http://www.jworks.nl) offer training courses for FitNesse and provide professional training for Test Driven Development and Agile Acceptance Testing. On a regular basis, jWorks offers free Open Source Test Workshops to promote the usage of Automated Acceptance testing.

Section 23

Conclusion

FitNesse provides an Open Source testing framework which is flexible enough to support most testing needs. An investment is needed to setup the test framework, but this investment leads to better software, less bugs and software which is easier to maintain. FitNesse allows to test quick and often, providing quick feedback on the health of the software being delivered without the need for any manual labor. This makes FitNesse a very valuable tool which would fit nicely in any software development project!

Like This Refcard? Read More From DZone

related article thumbnail

DZone Article

XCFit: Full Stack BDD for Swift Using XCUI, Cucumberish, and Fitnesse
related article thumbnail

DZone Article

Brief comparison of BDD frameworks
related article thumbnail

DZone Article

Using Python Libraries in Java
related article thumbnail

DZone Article

Infrastructure as Code (IaC) Beyond the Basics
related refcard thumbnail

Free DZone Refcard

Design Patterns
related refcard thumbnail

Free DZone Refcard

Agile Patterns
related refcard thumbnail

Free DZone Refcard

Lean Software Development
related refcard thumbnail

Free DZone Refcard

Software Configuration Management Patterns

ABOUT US

  • About DZone
  • Support and feedback
  • Community research
  • Sitemap

ADVERTISE

  • Advertise with DZone

CONTRIBUTE ON DZONE

  • Article Submission Guidelines
  • Become a Contributor
  • Core Program
  • Visit the Writers' Zone

LEGAL

  • Terms of Service
  • Privacy Policy

CONTACT US

  • 3343 Perimeter Hill Drive
  • Suite 100
  • Nashville, TN 37211
  • support@dzone.com

Let's be friends: