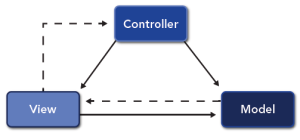
Griffon is a full life-cycle framework: it automates not just creation and maintenance of applications, but also build and deployment tasks. We’ll cover Model-View-Controller next, but let’s start with creating, running, packaging, and deploying an app with Java WebStart, going from nothing to deployed in about 5 minutes time. We could deploy as an applet, Jar, or desktop installation as well, but WebStart is the most interesting for RIAs.
Prerequisites - You should have the Java Development Kit (JDK) version 1.5+ (Version 6 recommended).
Installing Griffon - Download the latest release from http://griffon.codehaus.org/. Simply extract the .zip file somewhere on your machine. Next, create an environment variable called GRIFFON_HOME, pointing to the directory you unzipped the package, and add GRIFFON_HOME/bin to your path. The Griffon website contains instructions on how to set environment variables if you need more specific guidance. If you’ve done everything correctly then you should be able to open a command prompt, enter “griffon help”, and see a help message from Griffon.
Griffon provides many commands to help you create and manage an application, and plugins may add more commands. “griffon help” will display all the available commands for your system.
| griffon help |
Displays all the available commands for the Griffon installation |
| griffon <target> help |
Displays help for the specified target |
Creating an Application – A full application stack is only a command away. Simply run “griffon create-app” and enter the name for the app when you are prompted.
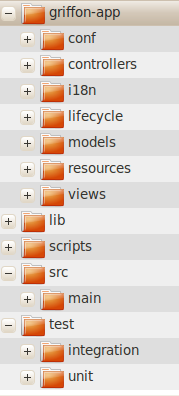
This step creates an entire project on your disk: standard directory layout, MVC groups, internationalization bundles, build scripts, IDE files, and more. The application is little more than a Hello World app at this point, but you can run it.
| griffon create-app |
Creates a new Griffon application |
Running the Application – Griffon apps are desktop applications that a user can install, Applet applications that run in a browser, and WebStart applications that run as Internet apps. Griffon hides the platform differences from you so any Griffon app you write can be deployed in any of these forms. To run the application on your desktop enter “griffon runapp”, and your Hello World style window will pop up shortly after the compile and packaging automatically finishes.

It’s not much to look at yet, but pretty good considering we have written no code. You can also run the application using “griffon run-applet” or “griffon run-webstart”.
| griffon run-app |
Compiles and runs the application as a desktop app |
| griffon run-applet |
Compiles and runs the application a browser Applet |
| griffon run-webstart |
Compiles and runs the application as a JNLP Webstart project |
Signing the Application – The Java platform offers excellent security options, but the in past configuring these options was complex. This is an optional step, you do not need to sign applications, but you should, and Griffon handles all the hard work of managing digital signatures and signing Jar files for you with just two easy steps. First create your digital signature using the JDK’s keytool program (unless your company already has done this). We’ll call ours MyKey.
You’ll be prompted to enter a password, as well as your name, company, and location. This creates the required Java key files in your home directory. Now we just need to tell our application about this key file. In a text editor, open the ./griffon-app/conf/Config.groovy configuration file. There are 5 entries that need to be changed in order to properly sign a WebStart application. In the environments.production. signingkey.params properties, add the following settings modified with your home directory and key name:
Then, under environments.production.griffon turn Jar packing off and specify your Internet deployment location.
Finished. The Jars will all be signed the next time you package the app.

Groovy property files are an improved version of Java property files. The old .properties file syntax of “key=value” can still be used if you want. However, properties are hierarchical and grouped, and the Groovy syntax makes these groupings more apparent. Plus, you can put any code you want in a property file and have it execute.
Packaging and Deployment – To package your application, run the “griffon package” target. This creates deployable files for Jar, Applet, and WebStart deployments. You’ll be prompted for your keystore password during the signature process. From here, just copy all the contents of your ./dist/webstart folder onto any webserver and your application is ready to launch over the Internet. You can see this sample deployed at http://canoo.com/griffon/starter. There is no need for a Java Servlet container, just copy the files and access the URL.
| griffon package |
Packages the application into deployable bundles |


