Even though Flex is based on Flash, you don’t need to be proficient in the latter in order to use the former.
Flex uses a language called ActionScript3 (AS3), which is itself derived from the ECMAScript standard. ECMAScript is the same basic definition on which JavaScript is based—therefore, if you have any familiarity with browser programming, it's likely that you will find your bearings in AS3 very quickly.
Flex applications are based on the concept of component. A component defines a container of behaviors and, optionally, of a user interface representation. Components can be visual or non-visual, depending on whether the provide an interface of some kind (like a button) or just functionality of some kind (like a library for connecting to a remote server).
The visual structure of a component can be easily defined using MXML, Adobe’s specialized brand of XML. Other than the use of specific namespaces, MXML is nothing more than well-formed XML code; by nesting multiple components, you can create complex GUIs without ever writing a line of code.
Creating Flex Applications
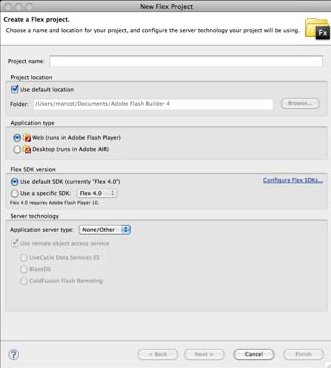
Flash® Builder 4 makes creating new applications as easy as following the steps of its New Application Wizard. Simple select New Flex® Project from the File menu, then choose a name and type for your application. If you intend to write code that will be executed inside a browser, choose "Web" for your application type; if, on the other hand, you want to build a desktop application, choose "Desktop" instead.
You newly-created Flex project will contain a component that represents the application's main entry point:
From here on, you can add more components to your application simply by typing the MXML code that represents them in the appropriate order. However, Flash Builder 4's strength resides in its visual layout editor, which allows you to arrange and wire the different components that make up your user interface using a WYSIWYG approach. For example, you can add a DataGrid object to show the contents of a data structure and then a button to fetch the data–all enclosed in a VGroup object to provide the overall layout:
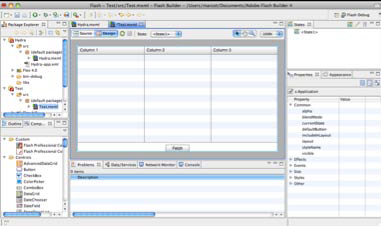
Flex’s powerful layout capabilities, like the rest of the framework, are also designed to be developer-friendly and are almost entirely based on standard CSS, with a few exceptions designed to make automated positioning easier.
Useful Flex Components
Flex provides a rich ecosystem of components that can be easily expanded to meet your needs. While many of its components are designed to closely mimic their HTML cousins, there are also a number that provide unique functionality. For example:
- AdvancedDataGrid and DataGrid: display tabular data in a rich, editable environment.
- DateChooser and DateField: simplify the process of choosing and formatting date values.
- NumericStepper: allows the user to increment and decrement a numeric value.
- RichEditableText: allows you to create a rich text editor with support for several formatting options (e.g.: italic, bold, etc.).
- VideoDisplay/VideoPlayer: provide fully-featured and completely skinnable video players that can be embedded directly in your application.
- HSlider/VSliders:allows the user to select a value by sliding a selector across a horizontal or vertical range.
- HGroup/VGroup: automatically arrange their content horizontally or vertically. Combine to easily create complex layouts.
- Accordion/TabNavigator: allow multiple content panels to stack and be displayed one at a time.
- MenuBar/TabBar: add a menu or tab bar to your component.
- Flex Charting: adds powerful charting abilities to your applications.

While Flex Charting and AdvancedDataGrid were only available in the Professional version of Flex Builder 3, they are now included in all versions of Flash Builder 4.
Connecting to PHP with AMF Introspection
One of the most interesting features of Flex is that it is designed to provide powerful data connectivity capabilities in a variety of formats and protocols, including XML, SOAP, JSON and Adobe’s own AMF. In fact, in most cases you will be able to use Flash Builder 4 to connect your Flex application to a PHP backend without having to write a single line of code in either!
In order to use Flash Builder 4's PHP-aware functionality through AMF, you need to have direct access to the root directory of a copy of your site—either through a network share or on your local computer. To get started, select Connect to Data/Service… from the Data menu, then choose PHP from the list of available connectors. Flash Builder 4 will ask you to confirm that your project type is set to PHP, then specify both the location of your site's server root and its URL:
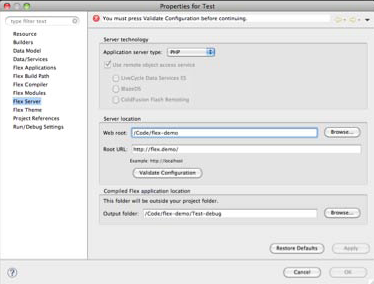
At this point, you can click "Validate Configuration" to make Flash Builder 4 run a simple test to determine whether it can access your site as expected, then OK to complete the set up process.
Now, Flash Builder 4 will ask you to choose a PHP class that will provide the entry point to which your Flex application will connect. If your code is not encapsulated in classes, you could create some simple stubs for the purpose of providing services to your Flash Builder 4 code. The wizard will automatically fill in the defaults for you based on the name of the PHP file that you select.
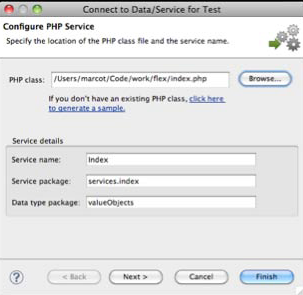

In order for this system to work, it is important that the class you want to import be stored in a file of the same name [e.g.: Index inside index.php]. Otherwise, Zend_AMF will be unable to find it.
At this point, if you website does not include a copy of Zend_AMF, a Zend Framework module that Flash Builder 4 uses to marshal data, remote procedure calls and error management, you will be asked to download and install a copy. This is required because Flash Builder 4 makes use of Action Message Format (AMF), a protocol that PHP does not support by default.

Your application does not need to use Zend Framework in order to take advantage of AMF—Flash Builder 4 will only use Zend_AMF in order to communicate with your server, independently of the rest of your code.
Flash Builder 4 will introspect your code and discover which methods the service makes available:
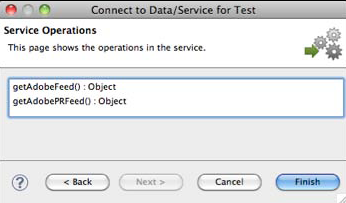
Once you click Finish, the wizard will create a series of classes inside your project that provide all the necessary functionality required to connect to your project and execute your web service.

Remember that it is your responsibility to provide a security layer where required—for example, by passing a secure key to the service as appropriate.
Establishing Data Connections
Your application is now capable of connecting to the PHP backend, but the data that the latter provides is not yet wired to any of the controls.
Luckily, this, too, is something that can be done without writing a line of code. You can, instead, use the Data/Services panel, visible in the bottom tray of the Flash Builder 4 window, where all the remote data services defined in your application are visible:

All you need to do in order to connect the data returned by a service call to any of your components is to simply drag it from the Data/Services panel to the component. Flash Builder 4 will ask you whether you intend to create a new call, or use an existing one. In the former case, you will first need to specify the type of data returned by the remote service call, because the data connection wizard has no way of determining it by means of static analysis of your code.
Flash Builder 4 can, however, auto-detect the data type returned by a service call by making a call to it, or you can specify it by hand. Where a sample service call will have no adverse effects on your PHP backend, allowing the wizard to determine the return type automatically is usually sufficient and produces all the infrastructure required to handle the data on the Flex side.
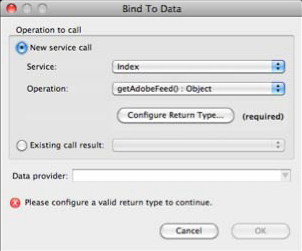

In order for your data to be used in a Flex application, it must conform to all the appropriate AS3 rules—for example, you cannont return objects with properties whose names are reserved AS3 keywords like protected or private, even if those are perfectly acceptable in PHP
Your Flex application now has access to all the data returned by your service. If, for example, you drag a service on to a DataGrid component, the latter will be automatically populated with all the appropriate data columns—all you need to do is remove those you don’t want displayed and rename the header of the others to the proper human-readable format:
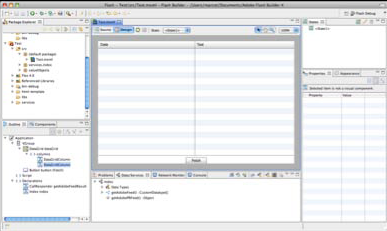
Your application is now fully functional—if you execute it, you will see that the data service is automatically called as soon as the DataGrid object finishes loading. If the call is successful, the data is immediately loaded and displayed.
If you prefer to add a manual method of refreshing the information, you can simply drag the appropriate data call on to the button—this will create all the code needed so that, when the user clicks on it at runtime, the service will be called again and all the data automatically updated.
Differences between PHP and AS3 Data
While much of the data types are interchangeable between AS3 and PHP, there are some notable differences.
- Integer values in PHP can either be 32- or 64-bit long, whereas, in AS3, they are always 64 bits. Therefore, you must be prepared for the fact that a numeric value passed from AS3 to PHP may be represented as a float even if it is, in fact, just a large integer.
- String values in AS3 are always Unicode-compliant. It is up to you to ensure Unicode compliance on the PHP side.
- Array values in AS3 can only have contiguous numeric keys starting at zero. If your PHP arrays have string keys or non-contiguous numeric keys, they will be represented as objects in AS3.You should avoid passing objects into AS3 that contain members whose keys are reserved keywords, as handling them will be inconvenient—and many of Flash Builder 4's facilities will refuse to work with them.
Under most circumstances, these issues are unlikely to affect your application because both AS3 and PHP have a significant amount of flexibility.


