DZone
Thanks for visiting DZone today,
Edit Profile
  • Manage Email Subscriptions
  • How to Post to DZone
  • Article Submission Guidelines
Sign Out View Profile
  • Post an Article
  • Manage My Drafts
Over 2 million developers have joined DZone.
Log In / Join
Refcards Trend Reports
Events Video Library
Refcards
Trend Reports

Events

View Events Video Library

Zones

Culture and Methodologies Agile Career Development Methodologies Team Management
Data Engineering AI/ML Big Data Data Databases IoT
Software Design and Architecture Cloud Architecture Containers Integration Microservices Performance Security
Coding Frameworks Java JavaScript Languages Tools
Testing, Deployment, and Maintenance Deployment DevOps and CI/CD Maintenance Monitoring and Observability Testing, Tools, and Frameworks
Culture and Methodologies
Agile Career Development Methodologies Team Management
Data Engineering
AI/ML Big Data Data Databases IoT
Software Design and Architecture
Cloud Architecture Containers Integration Microservices Performance Security
Coding
Frameworks Java JavaScript Languages Tools
Testing, Deployment, and Maintenance
Deployment DevOps and CI/CD Maintenance Monitoring and Observability Testing, Tools, and Frameworks

How does AI transform chaos engineering from an experiment into a critical capability? Learn how to effectively operationalize the chaos.

Data quality isn't just a technical issue: It impacts an organization's compliance, operational efficiency, and customer satisfaction.

Are you a front-end or full-stack developer frustrated by front-end distractions? Learn to move forward with tooling and clear boundaries.

Developer Experience: Demand to support engineering teams has risen, and there is a shift from traditional DevOps to workflow improvements.

  1. DZone
  2. Refcards
  3. Spring Roo
refcard cover
Refcard #139

Spring Roo

Open-Source Rapid Application Development for Java

Get started on your first project with theg Spring Roo open source RAD. You'll be guided through the source code, common commands, dynamic finders, remoting support, incremental database reverse engineering, and removing Spring Roo.

Free PDF for Easy Reference
refcard cover

Written By

author avatar Stefan Schmidt
Developer, XMedia
Table of Contents
► About Spring Roo ► Architectural Overview ► First Hops ► But Wait... There's More! ► Tips and Tricks ► Conclusion
Section 1

About Spring Roo

By Stefan Schmidt

Spring Roo is a popular open-source rapid application development (RAD) tool for Java developers. It enables the developer to build best-practice, high-quality, lock-in-free enterprise applications in minutes – a task that would otherwise take days if not weeks. Developers using Roo can fundamentally and sustainably improve their productivity without compromising engineering integrity or flexibility. Roo is highly modular: it allows developers to extend its functionality by installing new add-ons in a secure and trusted way.

You can load the Spring Roo shell in the background and let it monitor your project or directly interact with it by issuing shell commands. The shell offers many usability features such as tab completion, context awareness, help and hinting support and automatic roll-back. Roo even keeps a log of your shell commands so you can easily replay them if desired.

Section 2

Architectural Overview

Projects created with Spring Roo are standard Java enterprise applications using the Spring Framework. This means you’ll find all the typical artifacts such as Java source files, XML configuration files, properties files and view artifacts such as jspx files in your project. Besides automatic configuration of Maven build artifacts, logging and dependency injection, Roo allows you to connect to or transparently create new backend databases. It achieves that by automatically configuring the Spring application context for your database and object relational mapping (ORM) tool through the Java Persistence API (JPA) standard. Transaction management is also configured out of the box. Furthermore, it can take care of maintaining your JUnit integration tests, Web front-ends and other common project layers.

Image 1

Spring Roo’s Unique Approach

One of the major benefits of using Spring Roo is its deep integration of AspectJ’s inter-type declaration (ITD) features. This allows Roo to automatically produce and maintain boiler-plate code such as getter and setter methods in a different compilation unit (the .aj file). AspectJ ITD files are kept separate from the normal .java code you’d write as a developer so Roo can maintain the file’s lifecycle and contents completely independently of whatever you are doing to the .java files. Your .java files do not need to do anything unnatural like reference the generated ITD file and the whole process is completely transparent.

Spring Roo selectively merges the best of the passive and active code generation models. Roo will passively ‘watch’ (i.e., read and monitor) any activity in your project’s .java sources and automatically adjust the AspectJ ITDs in the background to support your activities. For example, typical domain classes only contain field definitions that are either added through Roo shell commands (passive generation – the user asks for it) or manually added by the developer in the IDE. Boilerplate code like toString(), accessors and mutators for the fields as well as many other functionalities are then transparently added and managed in the ITDs. Roo will actively make adjustments in the ITDs when the developer renames or deletes the field from his Person.java file. Note that source code members like the toString() or getName() and setName() methods in a separate file (.aj) are fully available for code completion in modern IDEs such as STS and IntelliJ thanks to fully integrated support for AspectJ Eclipse.

Image 2

Since the ITDs are not expected to be edited by the developer, Roo can manage the contents of an ITD actively. This allows Roo to integrate new features in Spring Framework once they become available or make the code more efficient simply by updating the ITD sources when upgrading to a new version of Spring Roo.

A Development-Time Only Tool

The ITD files are automatically managed by the Spring Roo shell, which is kept running in the background while developing your project. The contents of the ITDs can be controlled and customized by Java annotations placed in your .java source files. These annotations always start with @Roo and are source level retention only: hence, they are not compiled in your .class files. This means that Roo-managed applications deployed to production environments have absolutely no dependency on Roo itself. You can observe this by taking a look at your application runtime class path; for example, in Web applications, your WEBINF/ lib directory will contain no Roo-related JARs.

The use of Spring Roo as a productivity RAD tool that is present only at development time brings many advantages; you avoid lock-in, keep full flexibility for future extensions and gain better performance due to the absence of additional runtime dependencies. Furthermore, there is no scope for possible Roo bugs to affect your project, and there is no risk of upgrading to a later version of Roo due to the lack of executable code anywhere in your project class path.

Roo’s Default Architecture

Depending on the requirements of the application, there are a number of approaches to designing and subsequently layering a Java enterprise application. Persistence logic is often encapsulated in a Data Access Object (DAO) layer in combination with an additional repository layer. In front of these persistence layers, developers frequently use a façade or service layer, which can contain business logic that applies to multiple domain types. In MVC-style Web applications, there is a controller layer and finally there is a domain layer. There are ,of course, any number of alternative approaches to architecting enterprise Java applications.

In a typical Roo application, you’ll only use an entity layer (which is similar to a domain layer) and a web layer. An optional services layer might be added if your application requires it, although a DAO layer is rarely added. The domain entity approach taken by Roo is conceptually related to the active record pattern employed by many modern RAD frameworks. Through the use of separate ITDs for adding different functionalities to a target type, Roo applications still adheres to the separation of concerns principle.

For more information on high-level features and concepts employed by Spring Roo, refer to the first sections of the reference documentation.

Section 3

First Hops

Spring Roo is easy to install as standalone tool and runs on Windows, Mac OSX and Linux alike. Integrated development environments (IDEs) for Java such as the SpringSource Tool Suite (STS), Eclipse (+ AJDT) and JetBrains IntelliJ also integrate Spring Roo directly into their toolset.

The only prerequisites for running the Spring Roo shell are a working Java 6 SDK and Apache Maven (2.0.9+) installation. Once these two are installed, you can go ahead and download and unpack the Spring Roo distribution. You can find the ~7MB download for the latest release of Spring Roo at http://www.springsource.com/ download/community?project=Spring%20Roo. Once downloaded, simply unpack it into and add it to your path. Windows users can add %ROO_HOME%\bin to their path and *nix users can create a symbolic link to $ROO_HOME/bin/roo.sh.

Alternatively, you can install STS, which includes an integrated version of the Spring Roo shell without any need for further configuration.

Once this is complete, you can simply start your Spring Roo shell in a fresh directory:

Welcome to Spring Roo

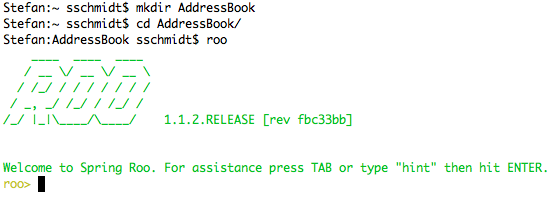
The Spring Roo Shell

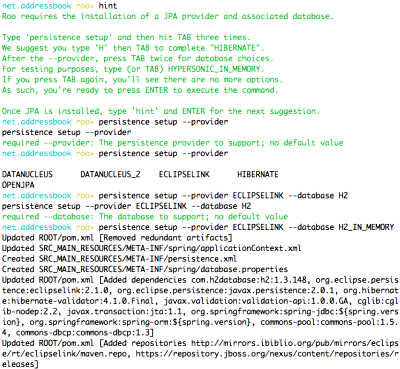
The Spring Roo shell offers hinting support for newcomers. This way you can learn about the suggested steps beginning with the creation of a new project, followed by configuration of persistence features to the creation of your first domain classes.

Tab completion plays a central role when using the Spring Roo shell. By simply hitting the Tab key, the Roo shell will offer commands, command attributes or even brief comments about the functionality offered by a command or a command attribute. Typing the first letters of a command followed by Tab will complete the command. Subsequent uses of Tab will complete mandatory command attributes until a user selection or input is required. Note, the integrated Roo shell in STS uses the Ctrl + Space key combination familiar to Eclipse users in lieu of the Tab completion in the standalone Roo shell.

The Roo shell will automatically hide commands, which are not applicable in the current context. For example, the ‘persistence setup’ command will not be shown when using Tab before a new project has been created using the ‘project’ command. Roo also offers help for any of the commands it offers. To see help details for the ‘persistence setup’ command, simply type ‘help persistence’ and Roo will present a short description and also all mandatory and optional command attributes along with a brief description for each. Finally, the Roo shell will automatically rollback changed files in case a problem is encountered.

Your First Roo Project

The first action to take in a new Spring Roo managed project is to create a new project:


roo> project –topLevelPackage net.addressbook
Created /home/sschmidt/AddressBook/pom.xml
Created SRC_MAIN_JAVA
Created SRC_MAIN_RESOURCES
Created SRC_TEST_JAVA
Created SRC_TEST_RESOURCES
Created SRC_MAIN_WEBAPP
Created SRC_MAIN_RESOURCES/META-INF/spring
Created SRC_MAIN_RESOURCES/META-INF/spring/applicationContext.xml
Created SRC_MAIN_RESOURCES/log4j.properties

As you can see, Roo has created a standard Maven project layout with a Spring application context and a Log4J configuration. After the creation of the project, you can type ‘hint’ and follow the suggestions for your next steps. Note, the integrated ‘hinting’ support is context sensitive. This means that the ‘hint’ command is aware of state of your project and adjusts its suggestions accordingly. For example, after the creation of a new project, the ‘hint’ command will suggest to configure your persistence setup.

Roo Code

Then in the same fashion, you can create your first domain entity (along with a JUnit integration test) and create a few fields for it:


roo> entity --class ~.domain.Person --testAutomatically
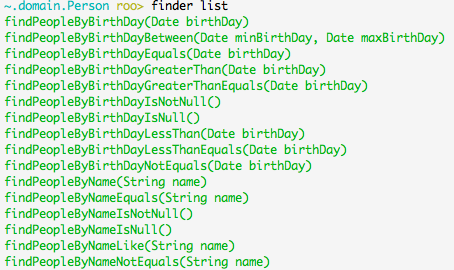
~.domain.Person roo> field string --fieldName name
~.domain.Person roo> field date --fieldName birthDay --type java.util.Date

Of course, you can refine your domain model through the Spring Roo shell or directly in your .java source code, create new types, fields, references, etc.

Once your work is complete, you may want to test the integrity of your domain model by running the Roo generated integration tests. You can do that by running ‘perform tests’ in the Roo shell, ‘mvm test’ in your normal shell or through your IDE. The integration tests will execute against your configured database and the test data will be cleaned up automatically after the tests have completed.

Taking a Look at the Source Code

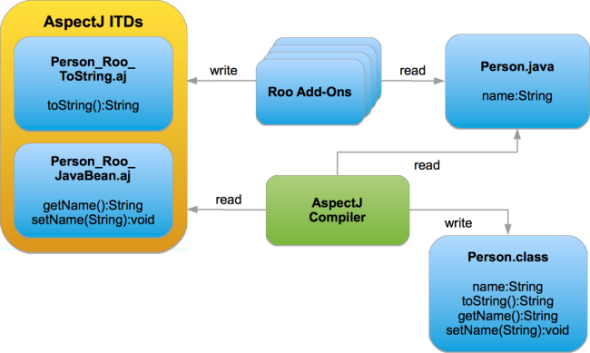
A quick look at Person.java reveals the advantage of using
AspectJ ITDs:


package net.addressbook.domain;

import org.springframework.roo.addon.entity.RooEntity;
import org.springframework.roo.addon.javabean.RooJavaBean;
import org.springframework.roo.addon.tostring.RooToString;
import java.util.Date;
import javax.persistence.Temporal;
import javax.persistence.TemporalType;
import org.springframework.format.annotation.DateTimeFormat;

@RooJavaBean
@RooToString
@RooEntity
public class Person {

        private String name;

        @Temporal(TemporalType.TIMESTAMP)
        @DateTimeFormat(style = “S-”)
        private Date birthDay;

}

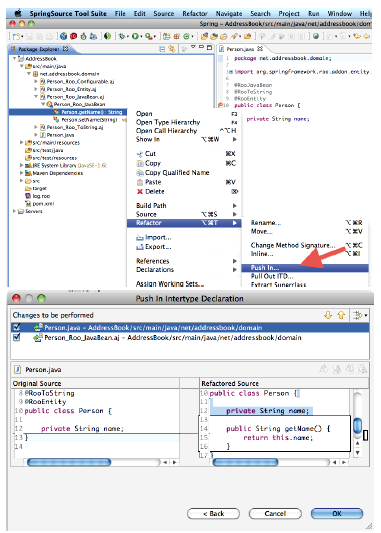
As mentioned before, the repetitive boilerplate code for things like the toString() method, mutators and accessors are managed by Spring Roo in separate AspectJ ITDs in the background, leaving you with a more concise code artifact that is much easier to manage and comprehend. Roo has also taken care of correctly configured JPA annotations (such as @Temporal) and Spring annotations (such as @DateTimeFormat) to your fields where appropriate to provide correct persistence and conversion behavior. You’ll notice the @RooToString annotation has also been added automatically that triggers Roo to produce the following ITD:


package net.addressbook.domain;

import java.lang.String;

privileged aspect Person_Roo_ToString {

        public String Person.toString() {
                StringBuilder sb = new StringBuilder();
                sb.append(“Name: “).append(getName()).append(“, “);
                sb.append(“BirthDay: “).append(getBirthDay());
                return sb.toString();
        }
}

You will notice that the toString() method looks just like a normal Java method with the only difference of the AspectJ target type definition in front of the method name. Furthermore, AspectJ type definitions use the ‘privileged aspect’ definition instead of ‘public class’ you would see in typical Java sources.

As discussed in the previous section, Spring Roo integrates all persistence related functionality through an ITD into the target type. This allows for a lean architecture without compromising on functionality or flexibility. Take a look into the Person_Roo_Entity.aj ITD to see the code generated and maintained by Roo. By default Roo will generate the following methods to support persisting your Person domain entity (listing contains the most relevant methods only):

Method Name Purpose
void persist() Save a new person record.
Person merge() Update an existing person record.
void remove() Remove an existing person record.
Person findPerson(ID) Find a person record by ID.
List<Person> findAllPeople() Retrieve a list of all persistent Person records.
List<Person> findPersonEntries(from, to) Retrieve a list of persistent Person records for a given range.
long countPeople() Return a count of all Person records.

roo> controller all --package ~.web

This command will automatically scaffold a complete Spring MVC Web UI which features:

  • Best-practice Spring MVC out of the box
  • REST support (JSON integration optional)
  • Round tripping of view artifacts (jspx)
  • Customizable tag library (tags)
  • Integrated templating support (Tiles)
  • Theming support (Spring MVC & CSS)
  • Pagination support
  • i18n & i11n built-in
  • Form validation based on JSR 303
  • Rich Dojo UI widgets for data selectors, etc

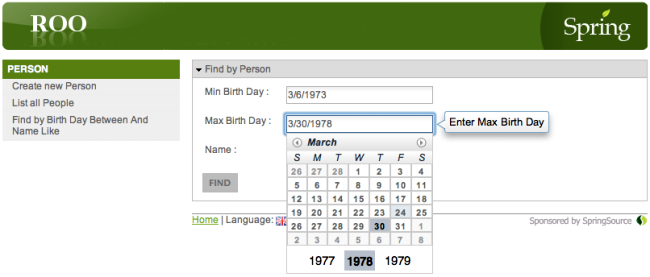
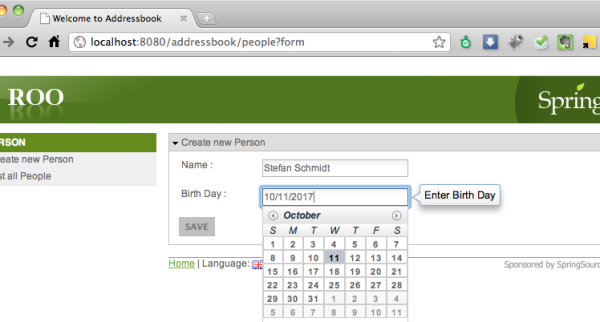
You can easily deploy your Web application to the configured Tomcat or Jetty Web containers in your project by issuing ‘mvm tomcat:run’ or ‘mvm jetty:run’ respectively and then navigate to your Web application in a Web browser:

Web Browser

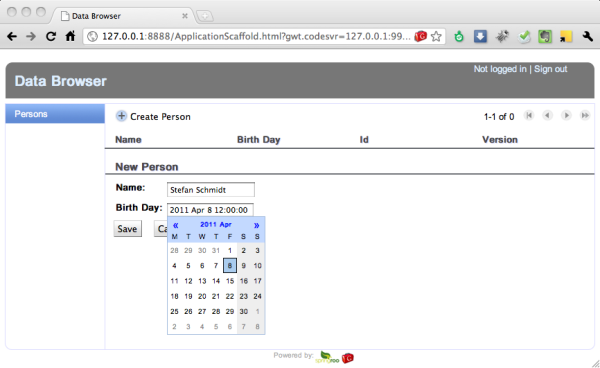
If you prefer a UI scaffolded using Google Web Toolkit (GWT), you can issue the following command:

This command will provide a complete GWT-based UI with similar features to the MVC UI shown above:

Data Browser

Common Commands

Let’s recap what you have done so far by issuing just a few commands. You have created a fully configured and working enterprise Java application using Maven, Spring Framework with features such as dependency injection, transaction support, MVC, JSP, Tiles, CSS, Dojo, JPA, AspectJ, Java Bean Validation (server and client side), JUnit, Log4J and more.

The following table summarizes some of the common commands you should know about to get started with a new Spring Roo project:

Command Purpose
project --topLevelPackage [..] Creates a new Spring Roo managed project.
persistence setup --provider
[..] --database [..]
Installs or update a persistence provider and a database connection for your project.
entity --class [..] Creates a new persistent entity in your project.
field string | number |
boolean | date | set | [..]
Inserts a private field into the specified java file.
enum type | constant [..] Inserts enum types and constants into your project.
test integration | mock | stub Creates a new integration | mock | stub tests for the specified entity.
controller all | scaffold [..] Creates a Spring MVC UI for your domain model.
gwt setup Creates a GWT UI for your domain model.
security setup Installs a Spring Security configuration for your project.
logging setup --level [..] Configures logging in your project.

For a more complete reference of all available commands (and command options), refer to the command index at:
http://static.springsource.org/spring-roo/reference/html-single/index.html#command-index

Section 4

But Wait... There's More!

As you have guessed, so far we have barely scratched the surface of Spring Roo. There are many more features offered by Roo.

Incremental Database Reverse Engineering

With the Roo 1.1.x release, a new add-on called ‘incremental database reverse engineering’ (DBRE) was added to Roo’s toolset. DBRE allows you to create a complete JPA-based domain entity layer based on the introspection of tables in your database. In addition, DBRE can maintain your domain entity model incrementally to synchronize all changes to the data model.

For example, data model changes such as adding, removing or renaming tables or columns in your database will be detected by DBRE. DBRE has been designed to enable developers to repeatedly re-introspect a database schema and synchronize all changes with the application domain model on demand. This approach is different to traditional JPA reverse engineering tools, which introspect a database schema and produce a Java application tier only once.

DBRE Setup

The typical workflow when using the DBRE feature for the first time is to create a new project with the Spring Roo shell:


roo> project --topLevelPackage net.addressbook.dbre

This is then followed by setting up your persistence configuration:


roo> persistence setup --provider HIBERNATE --database POSTGRES
--databaseName addressbook --userName rootest --password rootest

If you have not previously installed the database driver, add-on you need to do so (this is a one-off operation):


roo> add-on search postgres /* search for the postgres jdbc add-on */
roo> add-on install id 2 /* install search result #2 for postgres add-on,
assuming the author is trusted */

You can now try out the DBRE add-on by using the ‘database introspect’ command, which displays the database structure, or schema, in XML format. This can be used to preview the domain model structure which DBRE will create based on your data schema.

Finally, you can use the database reverse engineer command to create your domain entity model based on the database schema:


roo> database reverse engineer --schema addressbook

Once the domain model has been created, you can scaffold a Web UI of your choice (see previous section).

Dynamic Finders

Another popular Spring Roo add-on is the dynamic finder add-on. This add-on allows you to define search query methods for your entity domain model based on method names. The dynamic finder add-on can suggest any number of these names using the ‘finder list’ command and you can then select an appropriate finder, name to let the dynamic finder add-on take care of code generating the appropriate query:

Search 1

You can also combine fields and subsequently filter search results as follows:

Search 2

Once you have found the appropriate finder you can install it with the ‘finder add’ command:

Search 3

Note, the finder add-on creates a new AspectJ ITD, which introduces the findPeopleByBirthDayBetweenAndNameLike(Date minBirthDay, Date maxBirthDay, String name) method to the Person.java target type.

Furthermore, the Spring MVC scaffolding can automatically scaffold a search form for your finders:

Search Finder

Remoting Support

Java Message Service (JMS)

Spring Roo offers an add-on to integrate JMS functionality into your application. Specifically, this add-on allows you to define a message sender, a message listener and even the configuration of an in-memory message queue service (based on Apache ActiveMQ). Optionally, to support asynchronous execution of the message sending functionality you can easily add the new @Async feature introduced in Spring Framework v3.

To get started, the Roo JMS add-on offers the ‘mms setup’ command:


roo> jms setup --provider ACTIVEMQ_IN_MEMORY

The add-on will take care of adding all necessary configurations and dependencies to your application.

The ‘field mms template’ command allows you to configure a JMS sender in an arbitrary target type in your application:


roo> field mms template --class ~.domain.Person --async

This will create a dependency injected field of type JmsTemplate and also a sendMessage(Object message) method in the target type.

Finally, you can use the ‘mms listener class’ command to create a new class in your application, which will receive messages from the queue:


roo> mms listener class --class ~.jms.MyListener

Email support

The Spring Roo email add-on offers commands to configure Spring Framework email support in your application context. For example, it offers the ‘email sender setup’ command:


roo> email sender setup --hostServer smtp.gmail.com --port 587
--protocol SMTP --username foo --password foo

Similar to the JMS add-on, the email add-on also offers a field command which offers an optional asynchronous configuration:


roo> field email template --class ~.domain.Person --async

This will create a dependency injected field of type MailSender and also a sendMessage(String mailFrom, String subject, String mailTo, String message) method in the target type.

JSON serialization support

The JSON add-on offers JSON support in the domain layer as well as the Spring MVC scaffolding. A number of methods are provided to facilitate serialization and deserialization of JSON documents into domain objects. To install JSON integration, you can use ‘json all’ command:


roo> json all

This will install a number of methods in each discovered domain type:

Method Function
String toJson() Serializes Person to a JSON representation.
Person fromJsonToPerson(String json) Creates a Person instance from a JSON document.
String toJsonArray (Collection<Person> collection) Serializes a collection of people to a JSON array representation.
Collection<Owner> fromJsonArrayToOwners(String json) Creates a Person collection from a JSON document.
Section 5

Tips and Tricks

Taking Control

Sometimes, the developer may want to customize the way a certain member is implemented that is provided through a Roo ITD. Since code changes to the Roo managed ITDs are not preserved, the developer needs a way to take control over the member without loosing Roo’s benefits of maintaining the rest of the members provided in the ITDs.

Spring Roo offers a convenient approach to this called ‘push-in refactoring’. Push-in refactoring is achieved by simply moving the member that needs customization from the ITD to the associated .java source file. You can do this manually in a text editor by simply copying the code from the ITD and pasting it into the target .java file (and removing the AspectJ target type definition from the member signature) or by leveraging the ‘pushin refactoring’ support in Eclipse / STS.

Refactoring Support

Roo will automatically detect if a member (i.e., a method or field), which it could code-generate in an ITD, is present in the target .java source file and refrain from adding it to the ITD (or remove it if it is currently present). Due to its passive approach with regards to any code found in .java source files, Roo will simply read your member and make adjustments to the ITDs if appropriate. This will allow you to customize the member in your .java sources without any interference by Roo.

Removing Roo in Three Easy Steps

As mentioned in the first section of this Refcard, Spring Roo does not lock the developer in. Due to its nature of being a development-time only RAD tool, it is almost trivial to remove all Roo artifacts from your project.

Hot Tip

Before removing Spring Roo from your project, we recommend to back up your project by simply using the ‘backup’ command.

Step 1: Push-in refactor

As discussed in the previous section, Eclipse / STS offer push-in refactoring of individual members. In fact, it does not only offer this for individual members but also for complete types, packages or even your complete project. So a push-in refactoring of your project will move all source code from the Spring Roo managed AspectJ ITDs into their respective Java source targets.

Step 2: Remove all @Roo annotations from source code

While your project is now free of AspectJ ITDs, your .java files will still have @Roo annotations within them. In addition, there will be import directives at the top of your .java files to import those @Roo annotations. You can easily remove these unwanted members by clicking Search > Search > File Search in Eclipse / STS, containing text “\n.*[@\.]Roo[^t_]+?.*$” (without the quotes), file name pattern “*.java” (without the quotes), ticking the “Regular expression” check-box and clicking “Replace”. When the following window appears and asks you for a replacement pattern, leave it blank and continue.

Search Window 1

Step 3: Annotation JAR Removal

Now that all references to annotations contained in your org.springframework.roo.annotations-*.jar library are removed from your Java sources, you can open your project pom.xml and search for the following dependency:


<!-- ROO dependencies -->
<dependency>
        <groupId>org.springframework.roo</groupId>
        <artifactId>org.springframework.roo.annotations</artifactId>
        <version>${roo.version}</version>
        <scope>provided</scope>
</dependency>

You can delete (or comment out) the entire <dependency> element. If you’re running STS or Eclipse with m2Eclipse installed, there is no need to do anything further. If you used the command-line mvm command to create your Eclipse .classpath file, you’ll need to execute mvm eclipse:clean eclipse:eclipse to rebuild the .classpath file.

Roo has now been entirely removed from your project and you should rerun your tests and user interface for verification of expected operation.

Re-enabling Roo ITDs

If you wish to re-enable support for Roo ITDs in your project, you need to add/enable the Roo annotations jar dependency in the project pom.xml, annotate the relevant java sources with the @Roo annotations and then use the Eclipse / STS Refactor > Pull Out ITD feature to move the source code out of your java sources. This is required because Roo takes a passive approach to managing your java source files. This means it would not touch any code in your java source files unless you explicitly tell it to.

Section 6

Conclusion

Spring Roo delivers serious productivity gains to Java developers. It offers integration with popular, proven Java technologies you already know. It is easy to learn, easy to use and easy to extend. It builds on Java’s strengths. It supports the developers to create best-practice enterprise Java applications with excellent performance while maintaining engineering flexibility with no runtime, no lock-in and no risk.

Spring Roo Resources

Website:http://www.springsource.org/roo
Twitter:http://twitter.com/springroo

Like This Refcard? Read More From DZone

related article thumbnail

DZone Article

Creating Application using Spring Roo and Deploying on Google App Engine
related article thumbnail

DZone Article

CUBA Platform: An Open-Source Java Framework for Rapid Application Development
related article thumbnail

DZone Article

Exploring the IBM App Connect Enterprise SELECT, ROW and THE Functions in ESQL
related article thumbnail

DZone Article

Memory Leak Due to Uncleared ThreadLocal Variables
related refcard thumbnail

Free DZone Refcard

Java Application Containerization and Deployment
related refcard thumbnail

Free DZone Refcard

Introduction to Cloud-Native Java
related refcard thumbnail

Free DZone Refcard

Java 15
related refcard thumbnail

Free DZone Refcard

Java 14

ABOUT US

  • About DZone
  • Support and feedback
  • Community research
  • Sitemap

ADVERTISE

  • Advertise with DZone

CONTRIBUTE ON DZONE

  • Article Submission Guidelines
  • Become a Contributor
  • Core Program
  • Visit the Writers' Zone

LEGAL

  • Terms of Service
  • Privacy Policy

CONTACT US

  • 3343 Perimeter Hill Drive
  • Suite 100
  • Nashville, TN 37211
  • [email protected]

Let's be friends: