Build a To-Do Application With React and Firebase
To-do applications are one of the ways you can use to manage a set of tasks. As developers, learning how to build a to-do application will also help to understand certain
Join the DZone community and get the full member experience.
Join For FreeTo-do applications are one of the ways you can use to manage a set of tasks. As developers, learning how to build a to-do application will also help to understand certain concepts one of which includes an understanding of how to build an application with a database.
In this article, you will learn how to build a to-do web app by making use of React.js and Firebase Database.
Table of Contents
- prerequisites
- How to Create the Firebase Project
- Creating the Firestore Database
- How to Create the React Project
- Setting up the Project Structure
- How to Integrate Firebase in React
- Integrate Bootstrap 5 into React
- Designing the User Interface
- Adding Data to the Firestore in React
- Fetching Data from the Firestore in React
- Deleting Data from the Firestore in React
- Updating Data in the Firestore in React
- How to Integrate the Checkbox Functionality
- How to order Data by Timestamp in Firebase
- Conclusion
Watch the video version of this article below:
Prerequisites
To install the npm packages needed for this React application such as Firebase, you need to have Node.js downloaded.
Visual Studio code serves as the code editor we will use to build this project.
The Firebase Console serves as the backend as a service database that helps us to store and manage our data, through the use of the Cloud Firestore.
How to Setup the Firebase Project
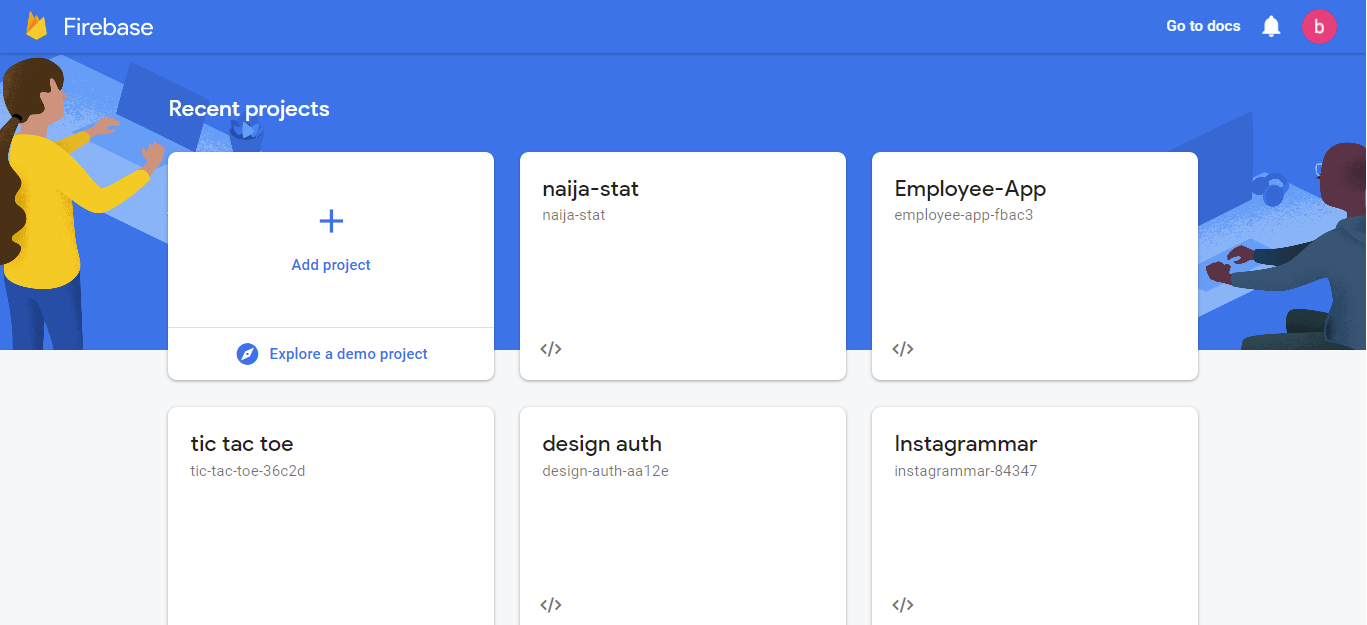
To set up Firebase, you head to the Firebase console website and create a new project by using your Google account. Once you are logged into Firebase you will see an existing project, you can click on the add project button, as seen below.
After clicking on the add project button, we get navigated to a new page which requires 3 steps before the Firebase project is created:
- The first step requires us to name the Firebase project, which we will call todo.
- The second step asks if we want to enable Google Analytics, you should disable it by using the toggle button.
- Finally, we can now click on the create project button.
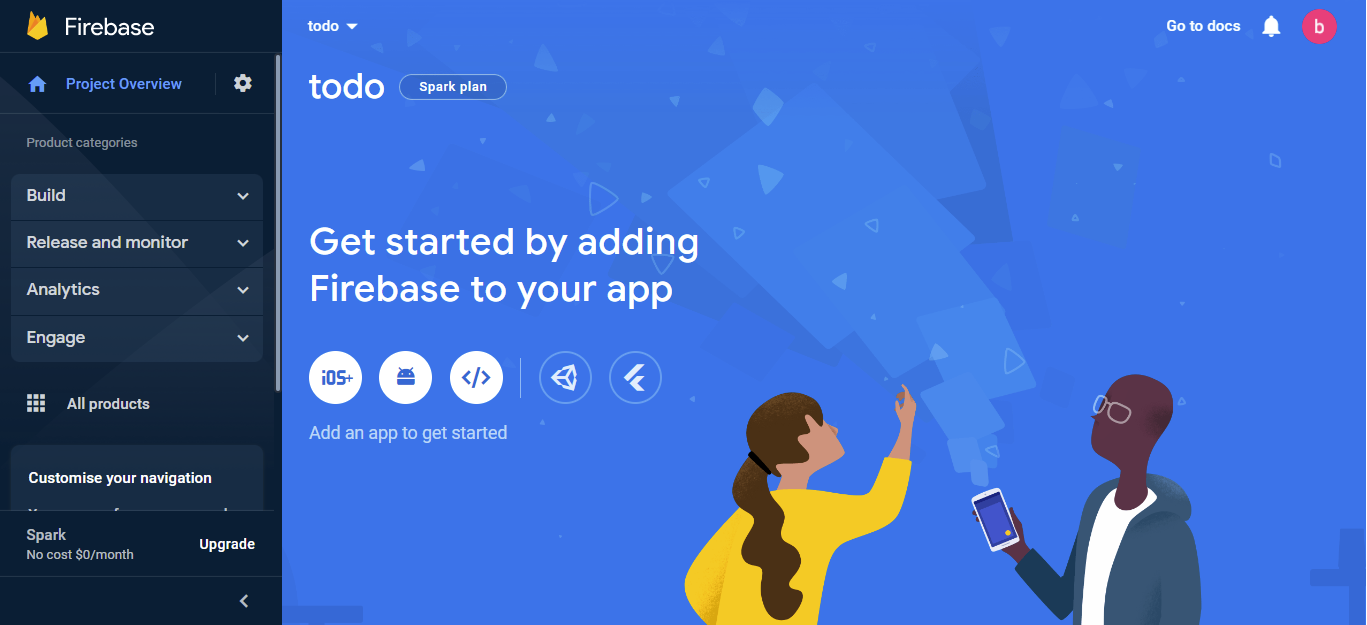
Once the project is created, we click on the continue button which navigates us to the next screen, which is now our default Firebase project dashboard.
We have now completed the creation of a new Firebase project.
Creating the Firestore Database
Inside the Firebase dashboard, on the left-hand panel, we take the following steps:
- Click on the Build dropdown.
- Within the Build dropdown, select Firestore Database, this displays a page where we can click on the Create database button.
- Next, a modal pops up asking if we want Production mode or Test mode. You can choose Test mode since the app is currently in the development stage.
- The next step asks for where we want our Cloud Firestore to be located, you can choose the location closest to your area due to the possibility of latency.
Once we click on enable, we get redirected to the Cloud Firestore page which will currently have an empty Collection.
How to Create the React Project
We are going to create a new React project by making use of CRA (Create-React-App). Since we have node.js installed, we can run the following commands:
npm i create-react-appOnce the installation of CRA is complete, we can now create a new React project with the following command below:
npm init react-app todo

cd todo

code .
We have now created a new React project called todo, navigated into the project directory, and opened the project in Visual Studio Code.
We can now begin the setup of the React application.
Setting up the Project Structure
To set up the architecture of our React project, you can implement the steps below:
- In the src directory, create two folders named components and services.
- The components folder will contain two new document files. The first js file is called Todo.js, while the second file is called EditTodo.js.
- In the services folder, create a js file called firebase.config.js. This file will contain the configuration of the firebase which we can export to different components.
- Finally, still within the src directory, we head to the App.js file. Here, we clear the boilerplate inside of
divwith theclassNameof App and then import the Todo.js component as seen in the following lines of code:
import './App.css';

import Todo from './components/Todo';


function App() {

return (

<div className="App">

 <Todo ></Todo>

</div>

 );

}

export default App;
With the above, we now have the basic structure of our React project set up.
How to Integrate Firebase in React
To add the Firebase web SDK to our new app, the first thing we need to do is run the following command inside our terminal:
npm install firebaseNext, you open up the firebase.config.js file inside of the services folder and then use the following imports to configure firebase into the React app:
import { initializeApp } from "firebase/app";

import { getFirestore } from "firebase/firestore";
Furthermore, you need to grab the project configuration settings from the Firebase dashboard. On the left-hand panel of the dashboard, click on project overview and select project settings.
Scroll to the bottom of the page and select the web icon as shown below:
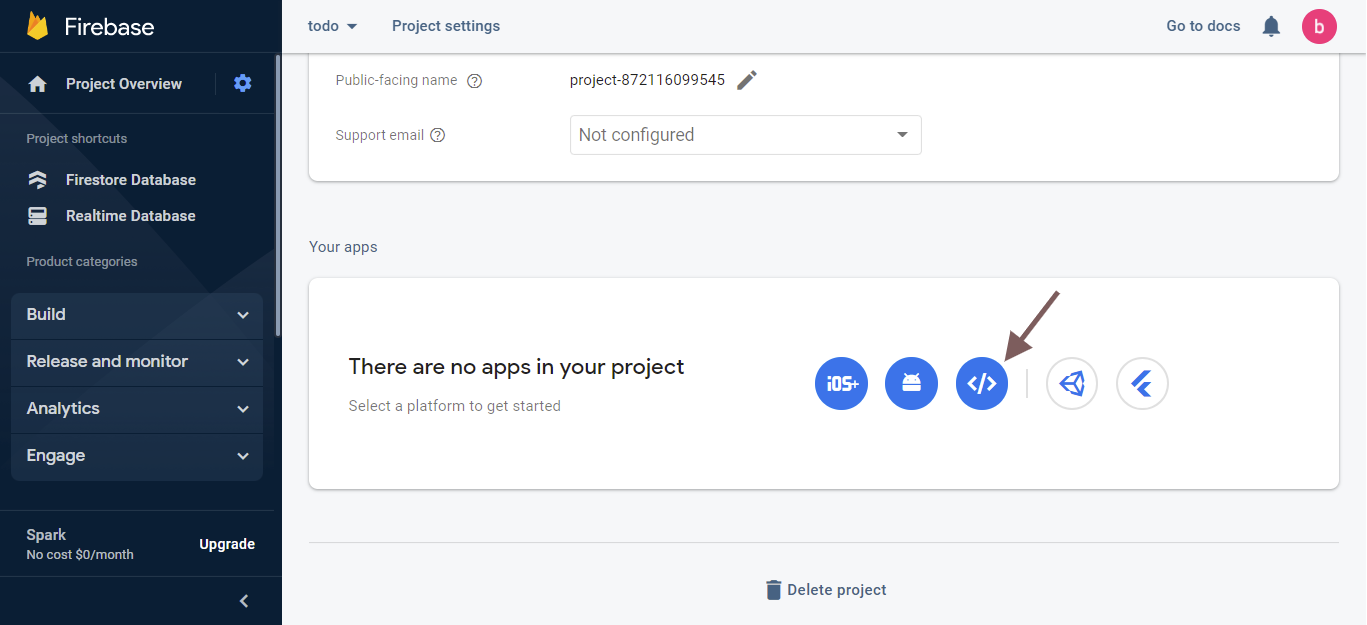
Once the web icon gets selected, a new page shows up asking you to give the app a nickname. You can proceed to call it todo or any other word you prefer, then click on register app. Firebase will now generate the Firebase configuration settings, which contains the spiky, storage bucket, auth domain, project id, app id, etc. as seen below:
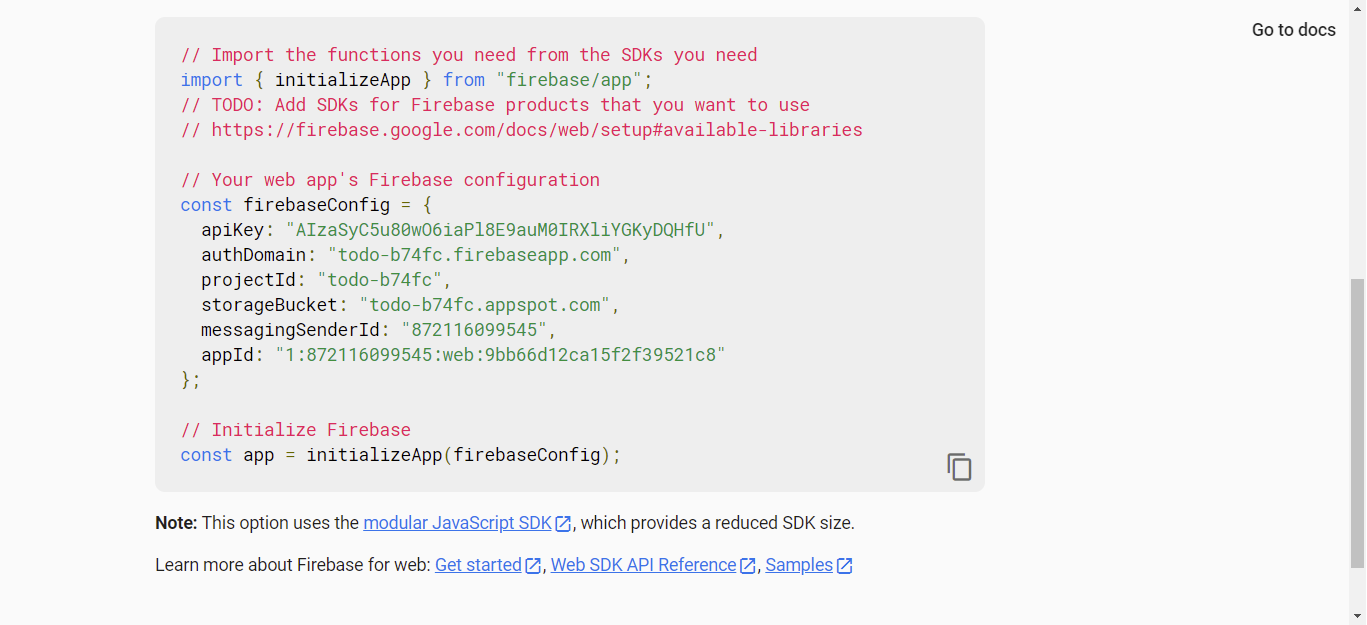
We can now grab this and paste it inside our firebase.config.js file:
import { initializeApp } from "firebase/app";

import { getFirestore } from "firebase/firestore";

// Your web app's Firebase configuration

const firebaseConfig = {

    apiKey: "AIzaSyC5u80wO6iaPl8E9auM0IRXliYGKyDQHfU",

    authDomain: "todo-b74fc.firebaseapp.com",

    projectId: "todo-b74fc",

    storageBucket: "todo-b74fc.appspot.com",

    messagingSenderId: "872116099545",

    appId: "1:872116099545:web:9bb66d12ca15f2f39521c8"

};
The final step needed to complete the Firebase configuration is to initialize Firebase by making use of the config variable and then export it so it becomes available in all our components, as seen in the following lines of code:
import { initializeApp } from "firebase/app";

import { getFirestore } from "firebase/firestore";

// Your web app's Firebase configuration

const config = {

    apiKey: "AIzaSyC5u80wO6iaPl8E9auM0IRXliYGKyDQHfU",

    authDomain: "todo-b74fc.firebaseapp.com",

    projectId: "todo-b74fc",

    storageBucket: "todo-b74fc.appspot.com",

    messagingSenderId: "872116099545",

    appId: "1:872116099545:web:9bb66d12ca15f2f39521c8"

};

const app = initializeApp(config);

export const db = getFirestore(app);
With this, our Firebase configuration is successfully created and we do not need to make use of any other Firebase services.
Integrate Bootstrap 5 into React
To integrate Bootstrap 5 you will need to head over to the Bootstrap 5 website and grab the CDN link for both the CSS and JavaScript. You can then head back to the React project in VS Code, open the public directory, and proceed to select the index.html file.
In the index.html file, we can paste the CDN links for both the CSS and JavaScript within the head section. With that, we should have the result below:
<link href="https://cdn.jsdelivr.net/npm/[email protected]/dist/css/bootstrap.min.css" rel="stylesheet" integrity="sha384-EVSTQN3/azprG1Anm3QDgpJLIm9Nao0Yz1ztcQTwFspd3yD65VohhpuuCOmLASjC" crossorigin="anonymous">
Now we have access to all Bootstrap 5 classes across our components.
Designing the User Interface
To implement the design for the React project you will start by clearing the boilerplate code inside of the App.css file. You can now proceed to open the index.css file and then paste the following styles:
body{

  margin-top:20px;

  background: #f8f8f8;

}

.todo-list {

  margin: 10px 0

}


.todo-list .todo-item {

  padding: 15px;

  margin: 5px 0;

  border-radius: 0;

}


div.checker {

  width: 18px;

  height: 18px

}


div.checker input{

  width: 18px;

  height: 18px

}


div.checker {

  display: inline-block;

  vertical-align: middle;

}


.done {

  text-decoration: line-through;

}
Above, what we did was ensure all the elements that will be displayed on the browser are properly arranged.
Next, proceed to the Todo.js file and paste the code below within the return statement:
import React from 'react'
const Todo = () => {
return (
<>
<div className="container">
<div className="row">
<div className="col-md-12">
<div className="card card-white">
<div className="card-body">
<button
data-bs-toggle="modal"
data-bs-target="#addModal"
type="button"
className="btn btn-info">Add Todo
</button>
<div className="todo-list">
<div className="todo-item">
<hr />
<span>
<div className="checker" >
<span className="" >
<input
type="checkbox"
/>
</span>
</div>
Go hard or Go Home<br />
<i>10/11/2022</i>
</span>
<span className=" float-end mx-3">
<EditTodo ></EditTodo></span>
<button
type="button"
className="btn btn-danger float-end"
>Delete</button>
</div>
</div>
</div>
</div>
</div>
</div>
</div>
{/* Modal */}
<div
className="modal fade"
id="addModal"
tabIndex="-1"
aria-labelledby="addModalLabel"
aria-hidden="true">
<div className="modal-dialog">
<form className="d-flex">
<div className="modal-content">
<div className="modal-header">
<h5
className="modal-title"
id="addModalLabel">
Add Todo
</h5>
<button
type="button"
className="btn-close"
data-bs-dismiss="modal"
aria-label="Close">
</button>
</div>
<div className="modal-body">
<input
type="text"
className="form-control"
placeholder="Add a Todo"
/>
</div>
<div className="modal-footer">
<button
className="btn btn-secondary"
data-bs-dismiss="modal">Close
</button>
<button className="btn btn-primary">Create
Todo</button>
</div>
</div>
</form>
</div>
</div>
</>
)
}
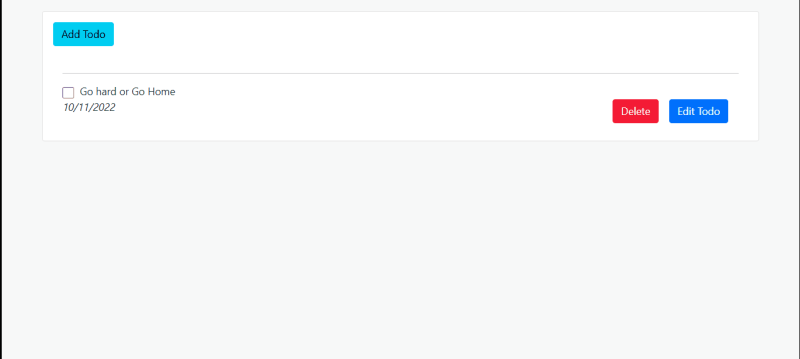
export default TodoIn the above code:
- The
divwith theclassNameof.containerdisplays the card that contains all items in our Todo list, while thedivwith theidofaddModalcontains the modal where all the todo can be created using the save button called Add todo.
The final part of our design is in the EditTodo.js file. The EditTodo.js file will only contain the modal that allows us to edit each to-do list item. The code can be seen below:
import React from 'react'

const EditTodo = () => {

 return (

     <>

      <button

         type="button"

         className="btn btn-primary"

         data-bs-toggle="modal"

         data-bs-target="#exampleModal"

       >

          Edit Todo

       </button>


       <div

         className="modal fade"

         id="exampleModal"

         tabIndex="-1"

         aria-labelledby="editLabel"

         aria-hidden="true">

       <div className="modal-dialog">

          <div className="modal-content">

            <div className="modal-header">

              <h5

                className="modal-title"

                id="editLabel">

                Update Todo Details

              </h5>

              <button

                  type="button"

                  className="btn-close"

                  data-bs-dismiss="modal"

                  aria-label="Close">

              </button>

             </div>

             <div className="modal-body">


              <form className="d-flex">

                 <input

                   type="text"

                   className="form-control"

                 />

              </form>


              </div>

              <div className="modal-footer">

               <button

                 type="button"

                 className="btn btn-secondary"

                 data-bs-dismiss="modal">Close

               </button>

               <button

                 type="button"

                 className="btn btn-primary"

               >Update Todo</button>

              </div>

            </div>

          </div>

        </div>

      </>

    )

  }

export default EditTodo
The design for the application is now complete. If you run the command npm start in the terminal and the code compiles, you should see the result below in the browser:
Adding Data to the Firestore in React
To implement the Add data functionality in our todo application, we start by importing some modules from Firebase/firestorm which can be seen below:
import { collection, addDoc, serverTimestamp } from 'firebase/firestore'
- A
Collectionis a folder that contains Documents and Data. All the data saved on our Todo application will be saved in a Collection called, which we will create soon. addDocis a high-level method used to add data to a Collection?- The
serverTimestampcontains the values of both time and date values for each Document in a Collection.
We then need to import the firebase.config.js file in our Todo.js file to allow us to have access to the firebase methods:
import { db } from '../services/firebase.config'
Using the import from our firebase.config.js file, we can now instantiate a reference to our Collection:
const collectionRef = collection(db, 'todo');- As seen in the code above, we created a variable called
collectionRef. ThecollectionRef thevariable takes in the collection method. This method has two arguments. The first argument calleddbreferences the firebase service, while the second argument will create a new Collection called todo, which will contain all necessary Documents created.
Next, we create two variables using the useStatehook:
const [createTodo, setCreateTodo] = useState("")
- The first thing we did here is to import the state hook in React:
import React, { useState } from 'react- Then we created a getter and a setter called
createTodoandsetCreateTodorespectively.
To proceed, we move to the modal created within the JSX and implement the next couple of things:
- Within the form tag, we create an
onSubmitevent handler calledsubmitTodo.
<form className="d-flex" onSubmit={submitTodo}>- In the input tag within the form tag, we create an `onChange` event handler that allows us to get the value typed inside of the form:
onChange={(e) => setCreateTodo(e.target.value)}
The final implementation we need to make before adding data to the database becomes functional is to configure the onSubmitevent handler previously created. The code for this can be seen below:
//Add Todo Handler

const submitTodo = async (e) => {

e.preventDefault();

try {

   await addDoc(collectionRef, {

   todo: createTodo,

   isChecked: false,

   timestamp: serverTimestamp()

  })

   window.location.reload();

  } catch (err) {

    console.log(err);

  }

}- Above, we made the
submitTodovariable asynchronous by making use of theasync/awaitkeyword inJavaScript. - We then created a parameter in the arrow function called, which serves as an event. This ensures we are able to make use of the
e.preventDefault()method which prevents the form from reloading after submission. - Next within the
try/catchblock, we call theaddDocmethod which takes two arguments. The first argument is thecollectionRefvariable we created previously, while the second argument contains the object to be passed into the Firestore database.
These objects include the todo values inside of the input field, the checkbox value which is currently set as false, and then the timestamp in which the todo was created in the database.
- We then make use of the
window.location.reload()function inJavaScriptto refresh the form upon successful submission, while making use of catch to handle the error.
With this, we can now create a new to-do and view it in our database.
Fetching Data from the Firestore in React
To fetch the data from the Firestore in Firebase, we need to make two importation in our Todo.js file. These include the useEffect hook in React and thegetDocs from firebase/firestore:
import React, { useState, useEffect } from 'react'

import { collection, addDoc, serverTimestamp, getDocs } from 'firebase/firestore'
We then need to create the setter(setTodo) and getter(todos) variables to help us access the data from the Firestore:
const [todos, setTodo] = useState([])
The data can now be fetched inside of the useEffecthook:
useEffect(() => {

const getTodo = async () => {

   await getDocs(collectionRef).then((todo) => {

   let todoData = todo.docs.map((doc) => ({ ...doc.data(), id:

   doc.id }))

   setTodo(todoData)

}).catch((err) => {

   console.log(err);

})

}

   getTodo()

}, [])- Inside the
useEffecthook, we created a variable calledgetTodothat takes in an asynchronous arrow function. - Then we called the
getDocsmethod from Firebase. ThegetDocsmethod requires an argument, so we pass in thecollectionRef. ThegetDocsreturns a promise that we need to chain to using.then. - The promise returns an array that we need to map through to access the required data from the database, which are the todo list items as well as the
id. - The
todoDatavariable holds the data coming from the database. To have access to the data in our JSX, we will then put thetodoDataas an argument in our setter which is calledsetTodo. - We then proceed to handle the error in case there is any using the catch keyword before we finally call the
getTodofunction to initialize it on page load.
Now that we have access to our data from the database, we need to make it visible on the page. The data we have comes in the form of an array and we need to loop through it in the HTML file. This will be done within the divwith the classNameof todo-list as seen below:
{todos.map(({ todo, id }) =>

 <div className="todo-list" key={id}>

   <div className="todo-item">

     <hr />

      <span>

       <div className="checker" >

         <span className="" >

          <input

            type="checkbox"

          />

          </span>

          </div>

            {todo}<br />

           <i>10/11/2022</i>

          </span>

          <span className=" float-end mx-3">

           <EditTodo ></EditTodo>

          </span>

         <button

            type="button"

            className="btn btn-danger float-end"

         >Delete

         </button>

       </div>

  </div>

)}- In the code above, we call the
todosgetter that contains our data which comes in an array format. - Next, we make use of the map array method to loop through the data, restructured the data by making use of curly brackets
{}, and then extract thetodosas well as theid. - Finally, we called the
keyattribute in React, pass inidso as to enable React to track the data loaded on the page. The static text beside the also gets cleared before replacing it with the todo data.
We can now proceed to save our changes.
Deleting Data from the Firestore in React
To implement the delete functionality, we need to import two Firestore functions which are doc, deleteDoc.
import { collection, addDoc, serverTimestamp, getDocs, doc, deleteDoc } from 'firebase/firestore'
Next, we create a function called deleteTodo:
//Delete Handler

const deleteTodo = async (id) => {

    try {

      if (window.confirm("Are you sure you want to delete this Task!"))

    {

    const documentRef = doc(db, "todo", id);

    await deleteDoc(documentRef)

    window.location.reload()

    }

    } catch (err) {

      console.log(err);

    }

}- Within the
tryblock, we start by displaying a prompt to the user if they want to proceed to delete the Todo. - We then create a new variable called
documentRef. We then call thedocmethod which requires 3 arguments which are the firebase service, the collection name as well as thetodo.idthat we want to delete. - Next, we call the
deleteDocmethod from Firestore and then pass it in thedocumentRefas an argument. This will enable the specific todo to be deleted from the database. Once this is done, we refresh the page by calling thewindow.location.reload()function. - We then use the
catchblock to handle any possible error by login into the console.
Now that our delete function is ready, all we have to do is to initialize it inside our delete button as seen below:
<button

   type="button"

   className="btn btn-danger float-end"

   onClick={() => deleteTodo(id)}

   >Delete

</button>- All we did was make use of the
onClickevent handler to call thedeleteTodo()function anytime a specific todo is deleted. It should also be noted that theidtheparameter passed inside of the function was made accessible to us in thedocumentRefthe variable we created earlier.
Updating Data in the Firestore in React
To implement the functionality to update data, we need to pass the data coming from the database as props to our EditTodo.js component:
{todos.map(({ todo, id }) =>

 <div className="todo-list" key={id}>

   <div className="todo-item">

    <hr />

     <span>

     <div className="checker" >

     <span className="" >

     <input

       type="checkbox"

     />

      </span>

      </div>

         {todo}<br />

        <i>10/11/2022</i>

      </span>

      <span className=" float-end mx-3">

       <EditTodo todo={todo} id={id} ></EditTodo>

        </span>

    <button

       type="button"

        className="btn btn-danger float-end"

        onClick={() => deleteTodo(id)}

     >Delete

    </button>

    </div>

   </div>

)}
We passed both the tododata as well as the idas props and it now becomes accessible in the EditTodo.js file. Inside the EditTodo.js, we extract the data by making use of curly brackets {}:
const EditTodo = ({ todo, id }) => {We then make the necessary imports required to update the data, which include the following React and Firebase terms:
useState(React Hook)db(The Firebase Service instance)-
doc(The Firestore Document reference) updateDoc(Used to update a Document inside of a Collection)
The extracted data can now be set in the state using the useState hook:
const [todos, setTodos] = useState([todo])- As seen above, we created new variables called
todos,setTodos, and then set the initial value in theuseStateto thetododata coming from the database.
Next, we create the function that implements the update todo:
const updateTodo = async (e) => {

 e.preventDefault()

 try {

    const todoDocument = doc(db, "todo", id);

    await updateDoc(todoDocument, {

    todo: todos

   });

     window.location.reload();

   } catch (err) {

     console.log(err);

   }

}- Above, we created a variable called, which holds the asynchronous arrow function.
- Next, we called, to prevent the form from reloading.
- Then we create a
try/catchblock. Within thetryblock, we create a variable calledtodoDocument. This variable holds document reference which requires 3 arguments(db,todo,id). With this, we are able to update a specific todo from the Firebase database using itsid. - In the next line, we call the
updateDocthe method that updates data in the Firestore. This method takes two arguments. The first argument is the, while the second is the updated todos text value which was the getter that was created earlier in theuseStatehook. - Lastly, we refresh the page when the request is successful or display an error on the console if one occurs.
There are two implementations left to do. One is making the modal dynamic, while the other is calling our update data function in the JSX.
To make the modal dynamic, we need to change the values of theid in theJSX, so we add the following code:
<button

   type="button"

   className="btn btn-primary"

   data-bs-toggle="modal"

   data-bs-target={`#id${id}`}      >

       Edit Todo

 </button>

<div

   className="modal fade"

   id={`id${id}`}

   tabIndex="-1"

   aria-labelledby="editLabel"

   aria-hidden="true">

   <div className="modal-dialog">

   <div className="modal-content">

   <div className="modal-header">

     <h5 className="modal-title" id="editLabel">Update Todo Details</h5>

   <button

     type="button"

     className="btn-close"

     data-bs-dismiss="modal"

     aria-label="Close">

   </button>

</div>- We begin by replacing the static text in the
data-bs-targetattribute called#exampleModal, with the dynamicidcoming from the Firestore. - Within our modal, we replace the static id called
id="exampleModal", with theidfrom our Firestore. The modal is now dynamic.
Next, to update the data, we need to call the setTodossetter inside the input field using theonChange the event handler in React:
<input

   type="text"

   className="form-control"

   defaultValue={todo}

   onChange={e => setTodos(e.target.value)}

/>- The
defaultValuehelps to refill the form with the existing to-do in the database. - The
onChangeevent handler helps to get the values of the input field and save it into thesetTodossetter.
Finally, we can call the updateTodofunction inside our submit button:
<div className="modal-footer">

 <button

    type="button"

    className="btn btn-secondary"

    data-bs-dismiss="modal">

        Close

 </button>

 <button

    type="button"

    className="btn btn-primary"

    onClick={e => updateTodo(e)}

 >Update Todo

 </button>

</div>- As seen above, we can now successfully update a specific todo using the
onClicktheevent handler in React.
How to Integrate the Checkbox Functionality
To begin the checkbox implementation, we will create a variable using the useState hook:
const [checked, setChecked] = useState([]);Next, we pass the data from the Firestore into the setter called setCheckedinside of the effect:
useEffect(() => {

 const getTodo = async () => {

    await getDocs(collectionRef).then((todo) => {

    let todoData = todo.docs.map((doc) => ({ ...doc.data(), id:

     doc.id }))

    setTodo(todoData)

    setChecked(todoData)

   }).catch((err) => {

      console.log(err);

   })

  }

      getTodo()

}, [])
In the JSX, we will extract the isCheckedvalue in the database and use it to conditionally set the CSS class used to line-through a specific todo which signifies the todo is done as seen below:
{todos.map(({ todo, id, isChecked }) =>

<div className="todo-list" key={id}>

<div className="todo-item">

<hr />

<span className={`${isChecked === true ? 'done' : ''}`}>
We proceed to configure the input field used for our checkbox by using the following code:
<input

  type="checkbox"

  defaultChecked={isChecked}

  name={id}

  onChange={(event) => checkHandler(event, todo)}

/>- Above we use the
defaultCheckedattribute to set the default value of the checkbox coming from the Firestore which is a Boolean. - Next, we pass in the
idinto the name attribute. - Using the
onChangeevent handler, we set the event and the todo data into a function calledcheckHandler, which we will create and configure below:
//Checkbox Handler

const checkHandler = async (event, todo) => {

 setChecked(state => {

 const indexToUpdate = state.findIndex(checkBox => checkBox.id.toString() === event.target.name);

 let newState = state.slice()

 newState.splice(indexToUpdate, 1, {

 ...state[indexToUpdate],

  isChecked: !state[indexToUpdate].isChecked,

 })

 setTodo(newState)

 return newState

});- The summary of the above function helps to track the state of a specific checkbox when checked and unchecked by using the `findIndex` method in JavaScript.
- We then create a variable called
newState. This variable makes use of theslice()andsplice()methods in JavaScript. Theslice()method helps us to return the selected checkbox(s) in the array, as a new array, while thesplice()themethod helps us to save only elements that were checked into the array. - Next, we then save the newly modified array into the
setTodosetter before we return data using the return keyword.
The final step we need to take is to save the selected checkbox values in the database. We will do this by, making use of the runTransaction method in JavaScript. The runTransactionthe method will be called within the checkHandler function:
// Persisting the checked value

try {

const docRef = doc(db, "todo", event.target.name);

await runTransaction(db, async (transaction) => {

      const todoDoc = await transaction.get(docRef);

        if (!todoDoc.exists()) {

           throw "Document does not exist!";

        }

      const newValue = !todoDoc.data().isChecked;

      transaction.update(docRef, { isChecked: newValue });

     });

      console.log("Transaction successfully committed!");

     } catch (error) {

       console.log("Transaction failed: ", error);

}- The first thing we need to do is import
runTransactionfromfirebase/firestore. - We then checked the database to see if the particular document being queried exists or not. If it doesn't exist we throw a message that says "Document does not exist!".
- If the document exists, we call the
transaction.updatemethod and then pass in the value of theisCheckedvariable which then updates it in the Firestore database.
How to Order Data by Timestamp in Firebase
To order the data in our Firestore database, the first thing to do is to clear all the current data we currently have by deleting the entire collection on the Firebase Database. This will allow the newly created documents to get ordered correctly.
We then need to import two methods from firebase/firestore called orderByand query by using the following imports:
import { collection, addDoc, serverTimestamp, getDocs, doc, deleteDoc, runTransaction, orderBy, query } from 'firebase/firestore'- The
orderBymethod helps to sort the data coming from the database in either ascending, descending, or timestamp in which the data was created. In our case, we will be making use of the latter, while the query method as the name implies allows us to query data from the database.
Next, within the useEffect, we will remove the collectionRefwe passed as a parameter into the getDocsmethod and replace it with a newly created query variable as seen below:
const q = query(collectionRef, orderBy('timestamp'))

await getDocs(q).then((todo) =>{- Above, we create a variable called, which uses the
orderBymethod to sort the data by the in which they were created. We then pass this variable to thegetDocsmethod that gets the data from the Database.
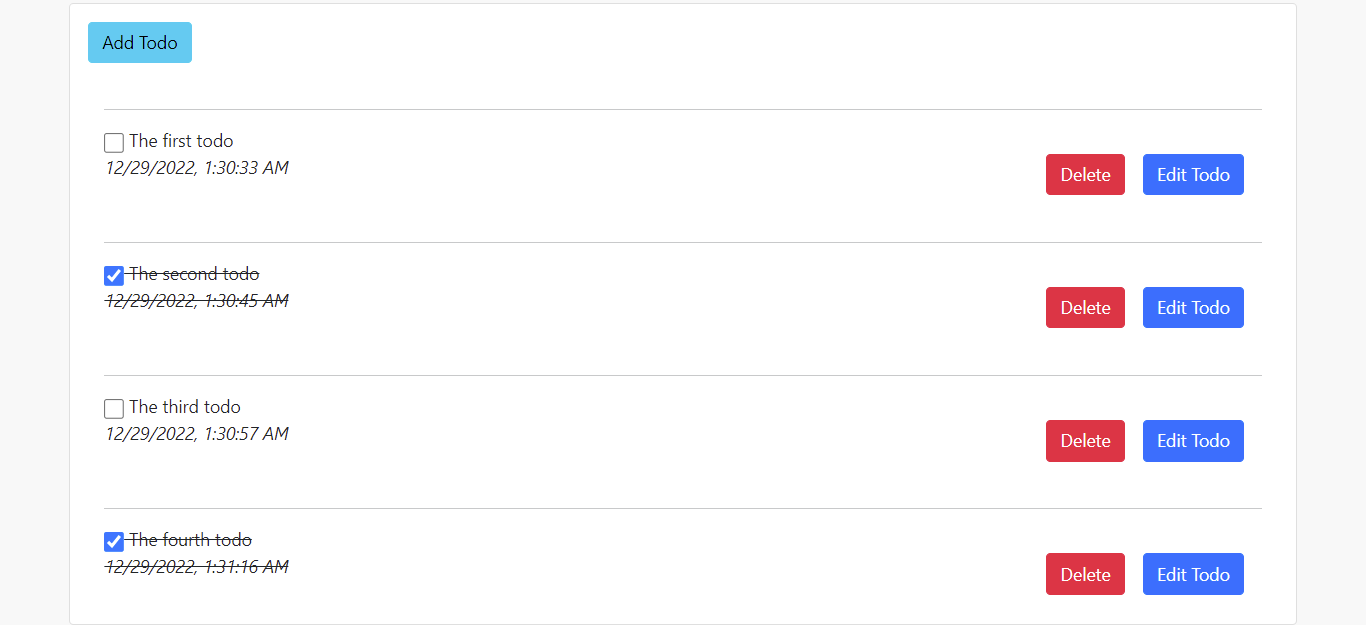
To conclude this project, we will display the date and time on which the todo was created on the browser:
{todos.map(({ todo, id, isChecked, timestamp }) =>- We begin by extracting the
timestampvalue from the database.
We then need to clear the static date value inside the italics(<li></li>) tag:
<i>{new Date(timestamp.seconds * 1000).toLocaleString()}</i>- We created a Date object and then got the seconds from the
timestampwhile multiplying it by1000. This is because `JavaScript` works with time inmilliseconds. We then use thetoLocaleString()method to return the data object as a string.
With this, we have the result below:
Conclusion
You have now completed the tutorial! You now know the basics of how to create a to-do application using React and Firebase Database. Now you can proceed to build your own web app from scratch and then integrate additional functionalities like Firebase login and sign-in, Firebase tools, firebase deployment, and other Firebase services into your React application.
Also, the link to the complete source code of this article can be found on this Github repository.
Published at DZone with permission of deji adesoga. See the original article here.
Opinions expressed by DZone contributors are their own.
Comments