CRUD REST API With Jakarta Core Profile Running on Java SE
In this blog post, I want to explore running a Jakarta EE Core profile application on Java SE without an application server.
Join the DZone community and get the full member experience.
Join For FreeIn this blog post, I want to explore running a Jakarta EE Core profile application on Java SE without an application server. Java/Jakarta Experts — Markus Karg, Rudy De Busscher, and Francesco Marchioni have already blogged and demonstrated how to achieve this on their blog respectively at Coding Microservice From Scratch, Run your Jakarta Application without Runtime and Getting started with Jakarta RESTful Services. I wanted to take this further and explore the possibilities/ways to create a JAX-RS/Jakarta CRUD REST API with the Jakarta Core profile running on Java SE.
The REST service API built in this tutorial is for CRUD Operations (Create, Read, Update, Delete), which corresponds to the standard HTTP methods (POST, GET, PUT, DELETE) and, in this post, used for managing employee data model in the application.
First, create a Java with Maven > Java Application in Netbeans and add the following dependency to the pom.xml. In addition to the Jakarta Core Profile, dependencies to support JSON-B, JSON-P, HTTP Server, and Jersey + Weld integration are also added to the pom.xml file of the project and is explained more in detail here by Rudy — Run your Jakarta Application without Runtime. The project pom.xml file should look like this:
<?xml version="1.0" encoding="UTF-8"?>
<project xmlns="http://maven.apache.org/POM/4.0.0"
         xmlns:xsi="http://www.w3.org/2001/XMLSchema-instance"
         xsi:schemaLocation="http://maven.apache.org/POM/4.0.0 http://maven.apache.org/xsd/maven-4.0.0.xsd">
    <modelVersion>4.0.0</modelVersion>

    <groupId>omos.microsystems.coreprofile.app</groupId>
    <artifactId>coreprofile-app</artifactId>
    <packaging>jar</packaging>
    <version>1.0-SNAPSHOT</version>

    <properties>
        <maven.compiler.source>11</maven.compiler.source>
        <maven.compiler.target>11</maven.compiler.target>
        <project.build.sourceEncoding>UTF-8</project.build.sourceEncoding>
        <jersey.version>3.1.0</jersey.version>
    </properties>

    <dependencies>
        <dependency>
            <groupId>jakarta.platform</groupId>
            <artifactId>jakarta.jakartaee-core-api</artifactId>
            <version>10.0.0</version>
            <scope>provided</scope>
        </dependency>

        <!-- Jersey + Weld -->
        <dependency>
            <groupId>org.glassfish.jersey.inject</groupId>
            <artifactId>jersey-cdi2-se</artifactId>
            <version>${jersey.version}</version>
        </dependency>

        <!-- JSON-B Support -->
        <dependency>
            <groupId>org.glassfish.jersey.media</groupId>
            <artifactId>jersey-media-json-binding</artifactId>
            <version>${jersey.version}</version>
        </dependency>

        <!-- JSON-P Support -->
        <dependency>
            <groupId>org.glassfish.jersey.media</groupId>
            <artifactId>jersey-media-json-processing</artifactId>
            <version>${jersey.version}</version>
        </dependency>

        <!--  HTTP server-->
        <dependency>
            <groupId>org.glassfish.jersey.containers</groupId>
            <artifactId>jersey-container-jdk-http</artifactId>
            <version>${jersey.version}</version>
        </dependency>

        <!-- Need this to hide warning for a default provider MessageBodyWriter was not found. -->
        <dependency>
            <groupId>jakarta.activation</groupId>
            <artifactId>jakarta.activation-api</artifactId>
            <version>2.0.1</version>
        </dependency>

    </dependencies>

    <build>
        <finalName>coreprofile-app</finalName>
    </build>
    <profiles>
        <profile>
            <id>exec</id>
            <build>
                <plugins>
                    <plugin>
                        <groupId>org.apache.maven.plugins</groupId>
                        <artifactId>maven-shade-plugin</artifactId>
                        <version>3.3.0</version>
                        <executions>
                            <execution>
                                <goals>
                                    <goal>shade</goal>
                                </goals>
                                <configuration>
                                    <shadedArtifactAttached>false</shadedArtifactAttached>
                                    <transformers>
                                        <transformer implementation="org.apache.maven.plugins.shade.resource.ManifestResourceTransformer">
                                            <mainClass>omos.microsystems.coreprofile.app.CoreprofileApp</mainClass>
                                        </transformer>
                                        <transformer implementation="org.apache.maven.plugins.shade.resource.AppendingTransformer">
                                            <resource>META-INF/services/jakarta.ws.rs.ext.RuntimeDelegate</resource>
                                        </transformer>
                                    </transformers>
                                </configuration>
                            </execution>
                        </executions>
                    </plugin>
                </plugins>
            </build>
        </profile>
    </profiles>
</project>
Next, create the Java Class that extends the application class in Jakarta REST. The Java Class created for this project is named JakartaRestConfiguration.java and is shown below
package omos.microsystems.coreprofile.app;

import jakarta.ws.rs.ApplicationPath;
import jakarta.ws.rs.core.Application;

@ApplicationPath("")
public class JakartaRestConfiguration extends Application {

}
Next, modify the main method of the Java class of the application to start the JAX-RS/Jakarta REST server within the code. The code to handle that is shown below:
package omos.microsystems.coreprofile.app;

import jakarta.ws.rs.SeBootstrap;
import java.util.concurrent.CountDownLatch;
import org.glassfish.jersey.server.ResourceConfig;

public class CoreprofileApp {

    public static void main(String[] args) throws Exception {

        SeBootstrap.Configuration.Builder configBuilder = SeBootstrap.Configuration.builder();
        configBuilder.property(SeBootstrap.Configuration.PROTOCOL, "HTTP")
                .property(SeBootstrap.Configuration.HOST, "localhost")
                .property(SeBootstrap.Configuration.PORT, 8080);

        ResourceConfig resourceConfig = new ResourceConfig();
        resourceConfig.packages(JakartaRestConfiguration.class.getPackageName());
        SeBootstrap.start(resourceConfig, configBuilder.build());

        keepRunning();
    }
         private static void keepRunning() {
        CountDownLatch latch = new CountDownLatch(1);
        try {
            latch.await();
        } catch (InterruptedException e) {
            throw new RuntimeException(e);
        }
    }
}
Next, create a META-INF folder inside the src/main/resources directory, and add an empty beans.xml file to it. The beans.xml file should look like this
<beans/>The project directory structure is a standard Maven directory structure and looks like the image shown below:
Project Structure

Next, create a Java Class named Employee.java to be used as the domain model for the application. The Restful web services that are about to be created would allow clients to perform CRUD operations on this employee class. The Employee.java class is shown below
package omos.microsystems.coreprofile.app;

import java.util.Objects;

public class Employee {

    private int id;
    private String firstname;
    private String lastname;
    private String jobTitle;

    public Employee() {
    }

    public Employee(int id) {
        this.id = id;
    }

    public Employee(int id, String firstname, String lastname, String jobTitle) {
        this.id = id;
        this.firstname = firstname;
        this.lastname = lastname;
        this.jobTitle = jobTitle;
    }
    // Note that getter , setter, hashcode and equals method are removed for brevity

    @Override
    public String toString() {
        return "Employee{" + "id=" + id + ", firstname=" + firstname + ", lastname=" + lastname + ", jobTitle=" + jobTitle + '}';
    }

}
Next, create an EmployeeService.java class that will be used for our DAO (Data Access Object) to manage CRUD operations on the employee object. In this project, a list is used for the database/data source to store the employee data to keep things simple, as no real database is used. The EmployeeService.java class looks like this:
package omos.microsystems.coreprofile.app;

import jakarta.enterprise.context.ApplicationScoped;
import java.util.ArrayList;
import java.util.List;

@ApplicationScoped
public class EmployeeService {

    public EmployeeService() {
    }

    static List<Employee> employeeList = new ArrayList();

    static {
        employeeList.add(new Employee(1, "Thomas", "Paine", "Sales"));
        employeeList.add(new Employee(2, "Bill", "Withers", "Accountant"));
        employeeList.add(new Employee(3, "Fela", "Kuti", "Software Developer"));

    }

    public List<Employee> getAllEmployees() {
        return employeeList;
    }

    public int addEmployee(Employee employee) {
        int newId = employeeList.size() + 1;
        employee.setId(newId);
        employeeList.add(employee);
        return newId;
    }

    public void delete(Employee employee) {
        employeeList.remove(employee);
    }

    public boolean update(Employee employee) {
        int index = employeeList.indexOf(employee);
        if (index >= 0) {
            employeeList.set(index, employee);
            return true;
        }
        return false;
    }

    public static List<Employee> getEmployeeList() {
        return employeeList;
    }

}
Next, create an EmployeeResource.java class that provides the REST API endpoints/URIs for the application. The table below summarizes the URIs/Endpoints of the application.
| METHOD | EndPoint/URI | Description |
|---|---|---|
| GET | http://localhost:8080/employees | Return a list of all Employees |
| GET | http://localhost:8080/employees/1 | Return an Employee whose ID is 1 |
| POST | http://localhost:8080/employees | Create a new Employee resource |
| PUT | http://localhost:8080/employees/1 | Update an Employee whose ID is 1 |
| DELETE | http://localhost:8080/employees/1 | Delete an Employee whose ID is 1 |
The EmployeeResource.java class should look like this:
package omos.microsystems.coreprofile.app;

import jakarta.enterprise.context.ApplicationScoped;
import jakarta.inject.Inject;
import jakarta.ws.rs.Consumes;
import jakarta.ws.rs.DELETE;
import jakarta.ws.rs.GET;
import jakarta.ws.rs.POST;
import jakarta.ws.rs.PUT;
import jakarta.ws.rs.Path;
import jakarta.ws.rs.PathParam;
import jakarta.ws.rs.Produces;
import jakarta.ws.rs.core.MediaType;
import jakarta.ws.rs.core.Response;
import java.net.URI;
import java.net.URISyntaxException;
import java.util.List;
import java.util.Optional;

@Path("/employees")
@ApplicationScoped
public class EmployeeResource {

    @Inject
    EmployeeService employeeService;

    @GET
    @Produces(MediaType.APPLICATION_JSON)
    @Consumes(MediaType.APPLICATION_JSON)
    public Response getAll() {
        List<Employee> result = employeeService.getAllEmployees();
        return Response.ok(result).build();
    }

    @POST
    @Consumes(MediaType.APPLICATION_JSON)
    public Response add(Employee employee) throws URISyntaxException {
        int newEmployeeId = employeeService.addEmployee(employee);
        URI uri = new URI("/employees/" + newEmployeeId);
        return Response.created(uri).build();
    }

    @PUT
    @Consumes(MediaType.APPLICATION_JSON)
    @Path("{id}")
    public Response update(@PathParam("id") int id, Employee employee) {
        Optional<Employee> match = employeeService.getAllEmployees().stream().filter(c -> c.getId() == id).findFirst();
        Employee updateEmployee = match.get();
        updateEmployee.setFirstname(employee.getFirstname());
        updateEmployee.setLastname(employee.getLastname());
        updateEmployee.setJobTitle(employee.getJobTitle());
        employeeService.update(updateEmployee);
        return Response.ok().build();
    }

    @GET
    @Path("{id}")
    @Produces(MediaType.APPLICATION_JSON)
    @Consumes(MediaType.APPLICATION_JSON)
    public Response getEmployee(@PathParam("id") int id) {
        Optional<Employee> match = employeeService.getAllEmployees().stream().filter(c -> c.getId() == id).findFirst();
        Employee emp = match.get();
        if (match.isPresent()) {
            return Response.ok(emp, MediaType.APPLICATION_JSON).build();
        } else {
            return Response.status(Response.Status.NOT_FOUND).build();
        }
    }

    @DELETE
    @Path("{id}")
    public Response delete(@PathParam("id") int id) {
        Optional<Employee> match = employeeService.getAllEmployees().stream().filter(c -> c.getId() == id).findFirst();
        Employee newEmployee = match.get();
        employeeService.delete(newEmployee);
        return Response.ok().build();
    }
}
In the EmployeeResource.java class shown above,
- We use the
@Pathannotation defined in the class to specify the URI path to which the resource responds. - We use the
@Injectto inject the EmployeeService. - We annotate the
getAll()method with the@GETannotation, which corresponds to the HTTP GET request method which returns a list of employees in JSON format. - We annotate the
add(Employee employee)method with the@POSTannotation, which corresponds to the HTTP POST request method and is used to add a new employee of JSON content type. - We annotate the
update(@PathParam(“id”) int id, Employee employee)method with the@PUTannotation, which corresponds to the HTTP PUT request method and takes the ID of the employee, which is passed as a path parameter to the request URI using the@PathParamannotation and updates an existing item with the ID passed to it as a path parameter passed to it in the request URI. - We annotate the
getEmployee(@PathParam(“id”) int id)method with the@GETannotation and also annotate this method with@Path(“{id}”)which returns information about a specific employee based on the supplied ID is given in the URI in JSON format using the@Produces(MediaType.APPLICATION_JSON)annotation. - We annotate the
delete(@PathParam(“id”) int id)method with the@DELETEannotation, which corresponds to the HTTP DELETE request method and deletes an Employee object that matches the ID of the Employee passed to it as a path parameter in the request URI.
Testing the REST Service
To test the REST Service, Open a Terminal or Command Prompt and navigate to the project directory and type the command below to compile, package, and build an executable jar:
mvn clean package -PexecThe above command produces an executable jar file with the name finalprojectname.jar, which is located in the target directory. Now we have a Jakarta REST application packaged as an executable JAR file which can be run/executed almost anywhere.
Execute the jar file with the following command java -jar pathToJar
java -jar target/coreprofile-app.jarThe output produced from this command on a terminal should look similar to the output shown below:
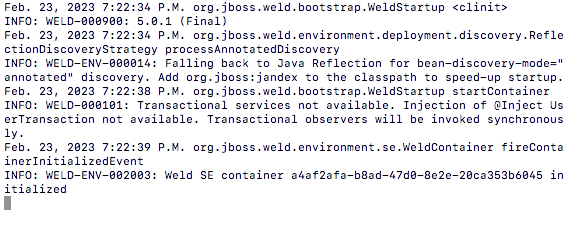
This indicates that the jersey HTTP server is running with the JAX-RS/Jakarta REST service API/endpoints.
Testing the service can be done either through the browser, using Postman, or by using the curl command from the Terminal.
Testing the Rest Service With a Browser
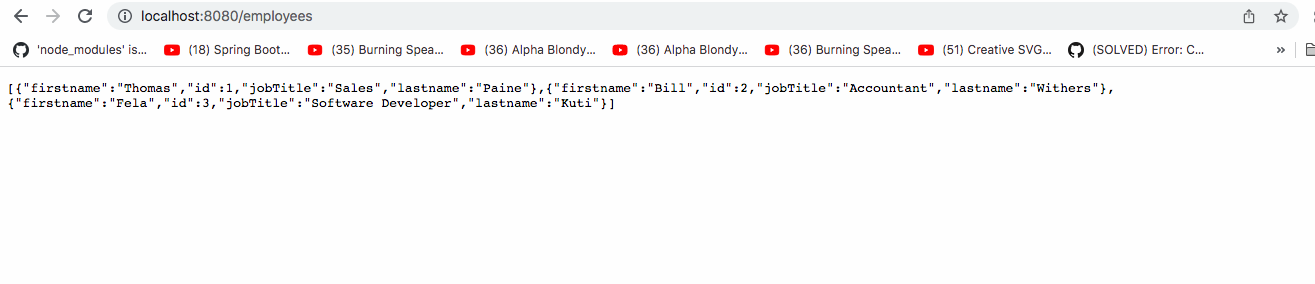
To test the web service through a browser, open Google Chrome or a browser of your choice and enter the following URL http://localhost:8080/employees in the address bar, which returns a list of all the employees as shown below
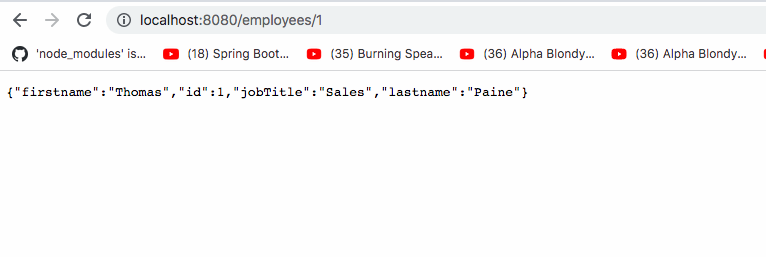
To get an employee with an ID of 1 in the web browser, enter http://localhost:8080/employees/1 in the address bar with the output shown below
Testing the REST Service With Curl
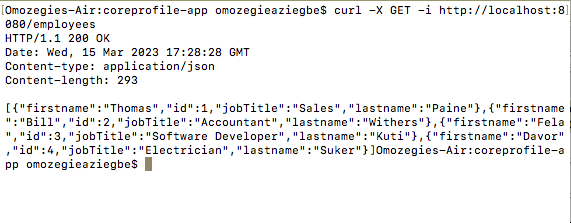
To test the HTTP GET method to get all the employees, enter the following command in a Termanl to test with the curl network utility.
curl -X GET -i http://localhost:8080/employeesThe output of the above command is shown below:
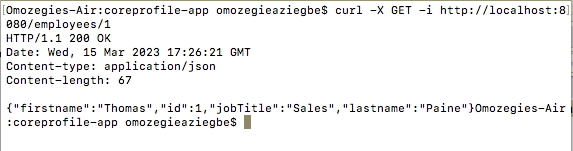
To get an employee with an ID of 1, type the following in a terminal:
curl -X GET -i http://localhost:8080/employees/1An Employee with an ID of 1 is found and returned, as shown in the output below:
To test the HTTP POST method to add a new employee object, type in the following command:
curl -X POST -i http://localhost:8080/employees -H 'Content-Type: application/json' -d '{"firstname":"Davor","lastname":"Suker", "jobTitle": "Electrician"}'The response from the server shows the following information:

This can be confirmed by using the curl -X GET -i http://localhost:8080/employees command again to view the newly created employee. The output is:
To test the HTTP PUT method to update an employee, enter the following command to update an employee with ID - 2. Note that the ID of the employee is passed as a path parameter in the request URI.
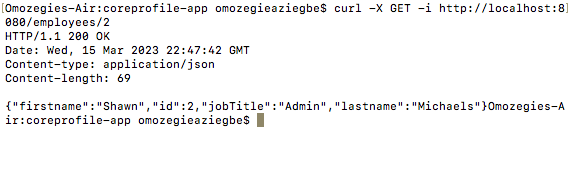
curl -X PUT -i http://localhost:8080/employees/2 -H 'Content-Type: application/json' -d '{"firstname": "Shawn", "lastname":"Michaels", "jobTitle": "Admin"}'To verify the update, enter the following command:
curl -X GET -i http://localhost:8080/employees/2The output is:
 To test for the HTTP DELETE method, enter the following in the terminal to delete an employee with ID - 3. Notice that the ID of the employee is passed as a path parameter in the request URI.
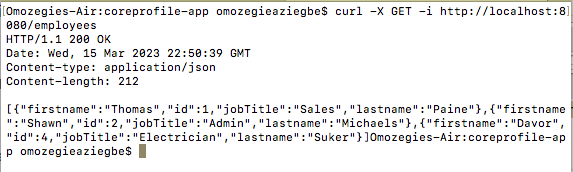
curl -X DELETE -i http://localhost:8080/employees/3 -H "Accept: application/json"This would remove the employee with an ID of 3. To verify this, When you try to view the list of Employees again with curl -X GET -i http://localhost:8080/employees, you will notice that the Employee with an ID of 3 has been removed/deleted, as shown in the output below.
Next up would be to use the Jersey JDK HTTP Web Server to serve both the Jakarta Core Profile REST endpoints and static resources (HTML, CSS, Javascript), both packaged and deployed as a single unit. We are also going to check how to package and deploy the Jakarta Core Profile REST application and an Angular application as a single unit. This method would eliminate (CORS) cross-origin resource sharing problems associated with web applications as both applications would be served from the same origin.
Opinions expressed by DZone contributors are their own.
Comments