Indoor Location Services: Introduction to IoT Networking
While many IoT posts focus on developing the things, this post focuses on the network that's connecting the things. But beyond the network, we'll also talk about the APIs involved. In this post, I'll specifically show you how to go about setting up blue dot functionality for indoor location services.
Join the DZone community and get the full member experience.
Join For FreeA Different Perspective
As I read the many excellent articles on the Internet of Things, I'm noticing a trend. Most of the articles are how to code or create the things. There are articles on prototyping sensors, projects with Arduino boards, and tutorials on how to use various protocols. One area where some additional writing might add value is in the area of the network needed to support IoT. But, not just the network—rather, the network and the APIs it can deliver to application programmers.
Disclosure
I work for Cisco Systems, Inc. I will be trying to write this, and future blog posts, with a neutral perspective. But, Cisco examples will be used the most simply because that is what I know.
IoT and Digital Disruption
One thing is certain. IoT is coming on like a freight train. And, our world will be better for it. I like my Fitbit. It helps me make sure to get enough exercise. I like my ring.com doorbell. It makes me feel more secure. Clearly, the things are winning me over... and I'm not alone.
There are four key ingredients you need for an IoT solution:
- You need a thing
- You need a network
- You need data
- You need an algorithm
Most “things” are some kind of sensor that gathers or acts on data. A smartphone is definitely a thing. The “network” is needed because the thing needs to send and/or receive data to be effective. The “data” is the key ingredient. Data is what the app needs to be useful. And the “algorithm” is, as you probably know, what makes the app work. However, we often minimize the importance of number two—the network. I’m going to focus on that part.
To repeat, the network is a crucial part of an IoT solution. You need the whole solution—not just the thing or the app. So, let’s move forward together and consider some network technologies relative to IoT.
A Simple and Interesting Use Case
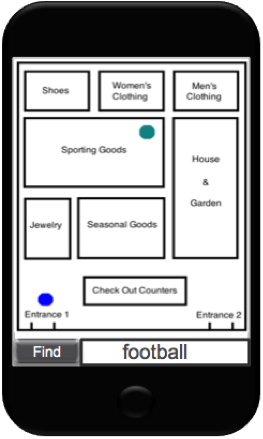
One really great use case in the world of digital disruption is called “blue dot” functionality, or location services. Basically, there’s a blue dot on a map depicting where you are. Then, there may be a green dot on the map showing where you want to go. And, using the interface, you can figure out which direction you need to move in order to make the blue dot head towards the green dot—you head towards your destination.
In the diagram below, I’m showing a mockup of a retail app where a customer is looking for a football. The customer is at the blue dot. The footballs are at the green dot. Now, they know where they are in relation to the football and can go find it.
To add on to this, have you ever wished it were easier to find your seat at a stadium? Or, how about finding a particular office inside of a large medical facility—especially when you're running late for your appointment? The use cases for location technology seem unending to me.
In this blog, we explore the introductory code necessary to do this. You might be thinking Isn't this like Google Maps? And, you would be close to right... but not quite. This technology works indoor, while Google Maps depends on GPS for location and only works outdoors. Let’s look at what's going behind the scenes to figure out how to use these location services.

Basic IoT Networking
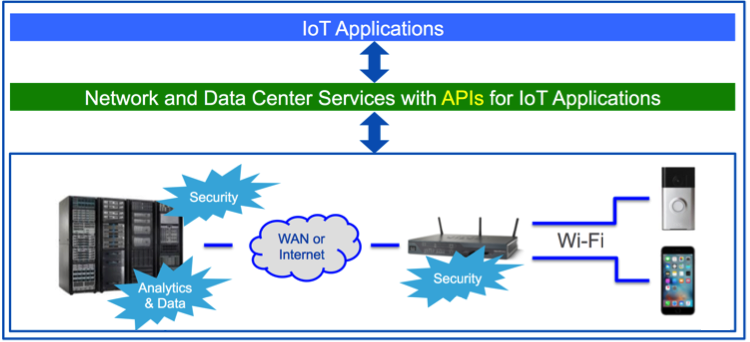
Below, you can see a simplified picture of some key elements and ideas regarding a network for IoT. On the far right, you'll see a ring.com doorbell and an iPhone—I have both at home. Moving to the left, note a wireless router, an Internet connection, and a data center. You could think of this as starting in the core (left) and moving outwards to the edge (right).

At the core is going to be some corporate data center or cloud compute facility. You need this compute facility in order to gather and analyze data from sensors and then to send commands and outputs to a display or other devices. And, obviously, we need a network to connect the data center to the things.
But wait, there’s more! The data center and the network can, and should, do so much more for you. A digital-ready network should be able to provide useful APIs for your applications. That’s where I’d like to start with this blog.
Getting More From Wi-Fi
Wi-Fi can offer more than just the ability to connect your device to a network. Some Wi-Fi access points can enable indoor location services if you add the right software. I would bet (hope!) that everybody reading this has used GPS on a smartphone before. Google Maps on mobile is pretty awesome... but, have you tried it inside a large building? It doesn't work. So, have you ever wondered how you might build an app to find things indoors? Ever wished you could have help finding an item in a large store using an app? The rest of this blog is going to introduce the technology that makes this possible and explain how you might go about using the network platform in your application.
Before we go much further, I want to explain a difference between terminology. The common term I have heard for this technology is called, "Blue-Dot Navigation" And, one would expect that the dots would actually be blue. But, in the examples below, we're going to see green dots. Don't let the color of the dots throw you. It's pretty arbitrary. Just remember, you can find yourself on a map and you can find what you are looking for on the map—both depicted by some dots!
We’re going to use Cisco Connected Mobile Experience software, or CMX, for this blog. Cisco has this and other technologies designed to provide a network platform for digital disruption. Today, we’re only talking about this one bit of software; specifically, we want to explore how the APIs of CMX make it possible to create a nice feature in an innovative application. I would argue that creating this feature without using this technology would be pretty difficult.
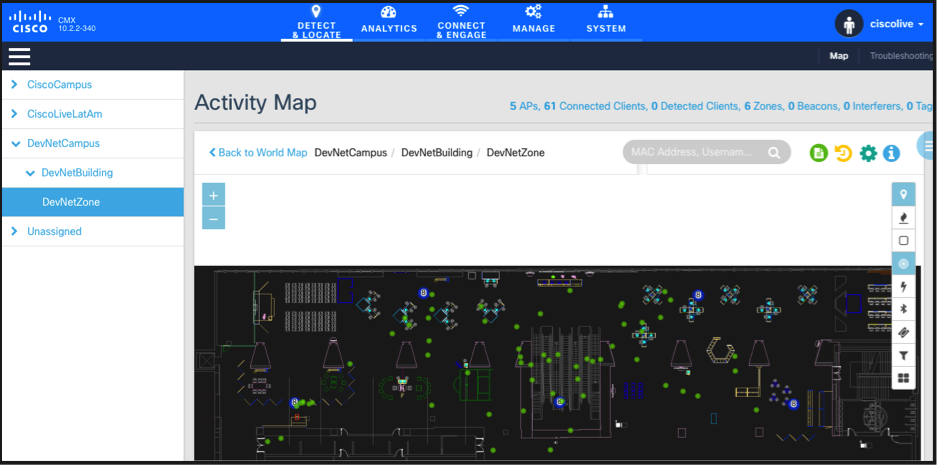
Below, you can see a picture of a location with a bunch of green dots (green, instead of blue—it's just a color) representing “clients” connected to an access point. For this blog, clients are just devices—smartphones with Wi-Fi. We’ll assume that there is a relationship between a particular client and a real person. When you figure out that a particular person is associated with a particular Wi-Fi device (smartphone), you can use that information to figure out when they are in your store. But, we’re going deeper and taking it to the next step—placing the dot on the map.
If you are new to networking, an access point is just a Wi-Fi device to which your smartphone connects when you want Wi-Fi. In order for location services to work, your store or venue would need to have several of them strategically located. You can learn more about that on the Cisco website linked above if you'd like.

The important thing to notice here is that there are green dots where people are. Again, don't worry about the color of the dots. Just remember that we can put dots on the screen to represent people. Also, if you look at the map, you can see the floor layout. This kind of detail would be crucial to include in your map if you wanted people to be able to find things. Below, I’ll help you to get started with this technology.
Let’s cover some assumptions first. We’re going to assume you have a Cisco network platform that includes access points in strategic locations and that you are also running Cisco Connected Mobile Experience (CMX) software. We’ll also assume this has already been set up by your network administrator and they have exposed the APIs for your use as the application programmer for your company. Since you may not have this available, you can use the Cisco DevNet sandboxes to try this out without having it yourself.
First, you can look around at the GUI version of the CMX software here.
If you haven't done so already, now is a good time to register with Cisco DevNet. Just go to developer.cisco.com and click on “register.”
Once you are a valid user, you need to go to the DevNet CMX Sandbox to get the username and password the API is expecting if you want to actually do the stuff in this blog. Note: This is not the username and password you use to log in. We have different usernames and passwords for the various APIs for which we provide sandboxes.
Most Cisco APIs, including the CMX API, are REST with JSON data. This blog is going to show you REST commands and JSON data. If you are unfamiliar with this, our “Coding 101” lab can get you going. Again, you will need a free account to get access.
Before we get to the code, here’s a screenshot of what this looks like on the GUI version of CMX. Simply go to the CMX Sandbox, log in, and navigate to DevNetCampus, DevNetBuilding, and DevNetZone to see this. Again, this is the login to the sandbox, not your personal login.

OK, on to the code. First, we’ll just grab some data about the map. We already went into the GUI to look around, so I can see that we have “DevNetCampus,” “DevNetBuilding,” and “DevNetZone” as a hierarchy to find our map. You can also find “CiscoCampus,” “Building 9,” and “IDEAS!” as other areas to explore. You can change the command below to make it get other data in the sandbox.
Notice that we’re using the “DevNetCampus,” “DevNetBuilding,” and “DevNetZone” data. This command returns the information below and we can find the map dimensions in the result. The REST call is an HTTPS call which uses the Server Address followed by “/api/config/v1/maps/info/” and that is then followed by the specifics of which map you want. For example:
https://msesandbox.cisco.com:8081/api/config/v1/maps/info/DevNetCampus/DevNetBuilding/DevNetZone
This command returns a fair bit of JSON data. Below is the snippet that we want. In an application, we would need a parser to find just the data we want and store it in variables.
{
  "aesUid": 723413320329068590,
  "calibrationModelId": 723413320329068547,
  "objectVersion": 0,
  "name": "DevNetZone",
  "dimension": {
    "length": 81.9,
    "width": 307,
    "height": 16.5,
    "offsetX": 0,
    "offsetY": 0,
    "unit": "FEET"
  }
The key data this provides for us is the dimensions for our map. You can see length is equal to 81.9 feet and width equals 307 feet as our “Maximum Y and Maximum X” respectively. That's the size of our map. 0,0 is upper left. 81.9, 307 would be in the lower right corner.
Next, we’re going to get the actual graphic of our map. Below is the command to pull the map from CMX:
https://msesandbox.cisco.com:8081/api/config/v1/maps/image/DevNetCampus/DevNetBuilding/DevNetZone
That’s going to return our map image below:

Now what we need to do is figure out how to get the X, Y coordinates of a person (or “client”). This gets a little tricky, and for today, I'm going to skip a couple steps in order to simplify. Let’s assume a couple more things:
- You only allow Wi-Fi access with a login. Having this would make it super easy to look up the person’s MAC address, which we are going to use to get their location.
- Your application is able to figure out a person’s MAC address based on the username they used to log into the system. Basically, you would use the app to store usernames and MAC addresses in a simple database (probably would have more than that).
For today, we will browse around the GUI version and look for an active MAC address. We’ll pretend we have an actual app that finds our MAC address for us. Below is a video of how you browse the map for a client, grab their MAC address, and then build the command to get their location.
And, to show you the code, now that we have a MAC address, we can do the following REST call to get their location:
https://msesandbox.cisco.com:8081/api/location/v2/clients?:00:00:2a:01:00:1b
Again, that returns more than we need (78 lines of JSON). What we want is the part below:
 "mapCoordinate": {
      "x": 19.10597,
      "y": 67.94626,
      "z": 0,
      "unit": "FEET"
    }
Now we have dimensions of our map, our map graphic, and the X, Y coordinate of the person we want to put on the map as a blue dot. At this point, I think we have learned all that we wanted for this blog. Obviously, I haven't shown you how to get the X,Y coordinates of what the person may be looking for. In my mind, I would have a database which looked something like this table below. If you want to put a blue dot on a map revealing where someone is in your app, you are well on your way with this technology. Then, with some additional data, like where things are in your venue, you can help people navigate by placing another dot according to the information in your database.

Some of our Cisco DevNet experts have created a little application called “Glance.” Glance is a software we demonstrate at shows like Cisco Live. It enables us to locate people and things within the DevNet area at the shows. Glance seems to attract a substantial audience at the shows. It’s built, in part, on CMX technology as shown in this blog. If you want to learn more about Glance, you should visit DevNet Creations and check it out. There's a fun little demo. You’ll need to log in. Hopefully, you already did that in the above steps!
Next Time
In this blog, I introduced you to indoor location services. And, I hope that you enjoyed learning about something you can do with a digital ready network platform. Next time around, I'll show you something entirely different that the network side of things can do for you. I don’t want to give away the whole goose just yet, but I can tell you that it is likely to be in the area of either security or collaboration.
What Do You Think?
I hope this little intro blog post has provided some useful information. Are you ready to get more details about some of the things a network platform can do for you? I hope so. Let me know in the comments which things you are most interested in learning about and we’ll see what we can do. Alternatively, you can hit me up on Twitter: @coggerin.
I’d also like point you to a couple places where you can find some things we’ve got ready and waiting for you to try out. First, you can head over to Cisco DevNet and visit the IoT or Network Programming areas. Also, we have recently started a Digital Network Architecture Community of Interest. There, you can discuss things with Cisco experts and your peers. We would love to hear from you about this blog post and related topics.
Thanks for reading!
Opinions expressed by DZone contributors are their own.

Comments