A Guide to Understanding Vue Lifecycle Hooks
Vue has a lot of lifecycle hooks, and what can be confusing is what each one means or does. We'll be covering what each lifecycle hook does, and how to use them.
Join the DZone community and get the full member experience.
Join For FreeLike other frameworks, Vue has a number of lifecycle hooks that allow us to attach code to specific events that occur while a Vue application is being created or used - for example, when the component loads, when a component is added to the DOM, or when something is deleted.
Vue has a lot of lifecycle hooks, and what can be confusing is what each one means or does. In this guide, we'll be covering what each lifecycle hook does and how to use them.
Prerequisites
If you are unfamiliar with Vue, you might want to check out my guide on creating your first Vue applications before doing this one. Alternatively, you can read my guide on creating a to-do list in Vue if you are slightly more familiar.
Lifecycle Hooks in Vue
The critical thing to note here is that Vue has two paradigms for lifecycle hooks. One uses the Compositions API, something introduced in Vue 3, and the other is the "Options API," which is the prototypical pattern of defining Vue components. This guide will start with the Options API and then build off that to show how things work in the compositions API.
Example of Options API
If you are unfamiliar with the Options API, it is the version of Vue that looks like the code below:
export default {
    name: 'Component Name',
    data() {
        return {
            phoneNumber: '123-123-123'
        }
    },
    mounted() {

    }
}
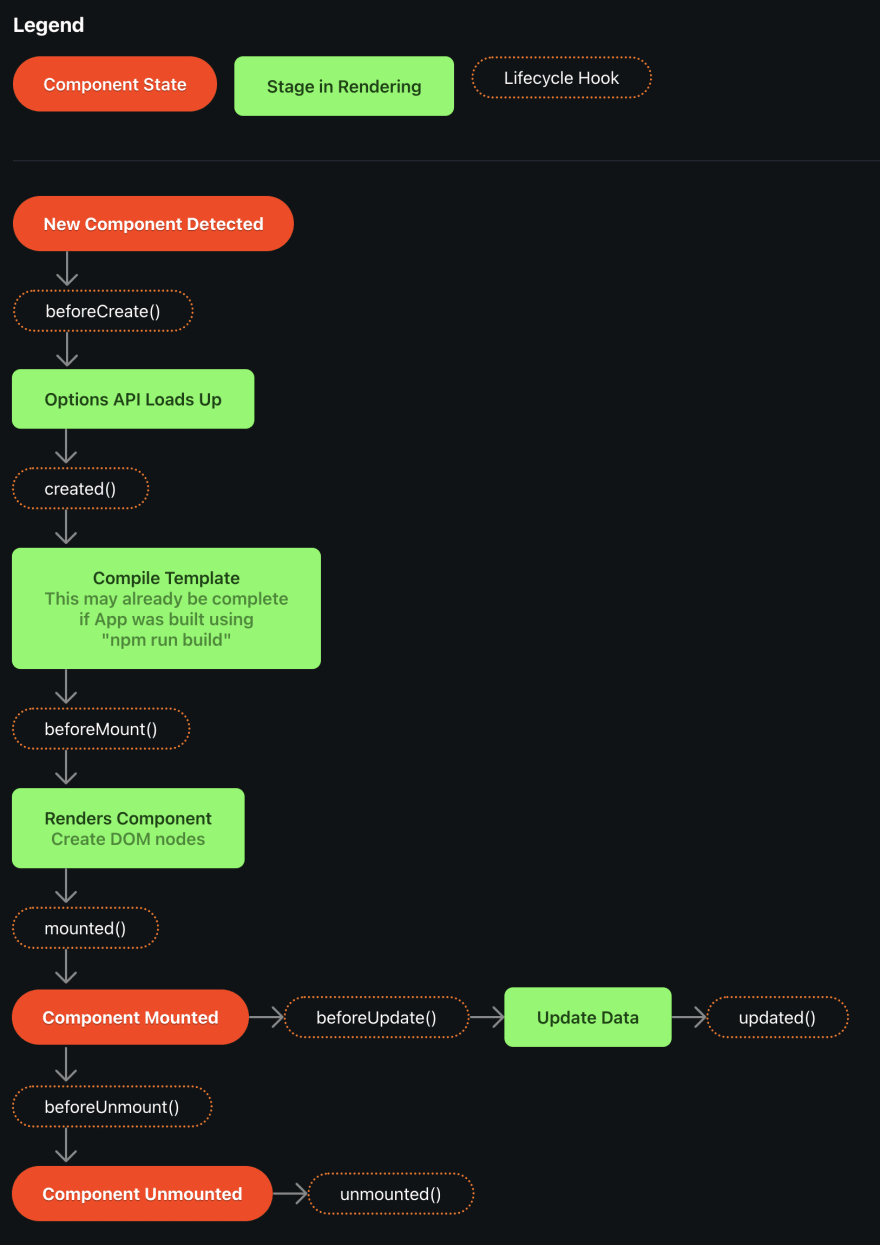
Lifecycle Hooks Diagram
To understand when each lifecycle hook fires, let's look at a diagram. Below, an image depicts when each lifecycle hooks fires.
Running a Lifecycle Hook
To run any lifecycle hook with the Options API, you can add it to your Javascript prototype. For example, if you want to use beforeCreate(), the first hook fired after a new component is detected, you could add it like this:
export default {
    name: 'Component Name',
    data() {
        return {
            someData: '123-123-123'
        }
    },
    mounted() {
        // Any code you want to fire immediately before the Options API loads up
    }
}
Now that we've covered the different hooks let's look at what they do and when they happen.
beforeCreate()
Called at the point the component is initialized. data() and computed properties are not available at this point. It is useful for calling APIs that do not adjust the component's data. If you update data() here, it will be lost once the Options API loads up.
created()
Called after the instance has finished processing all state operations. You have access to reactive data, computed properties, methods, and watchers. $el, which is where Vue stores the component HTML, is not available yet, since the DOM element is not created. If you want to fire something like an API, or update, you can do it here.
beforeMount()
This hook runs immediately before rendering occurs. The template has been compiled and stored in memory, but it has not been attached to the page yet. Therefore, none of the DOM elements have been created yet. $el is still unavailable at this stage.
This is not called when doing a server-side rendering of a site.
mounted()
The component is mounted and shown on the page. $el is now available, so you can now access and manipulate the DOM from Vue. This will only fire after all child components are fully mounted. It's useful to use this when you want to do something to the DOM after it has loaded, like perhaps changing a particular element within it.
This is not called when doing a server-side rendering of a site.
beforeUpdate()
Sometimes, you will change data in your Vue component by updating it in a watcher or by user interaction. When you change data() or cause a re-render in your component, an update event will fire. Immediately before the re-render occurs, beforeUpdate() will fire. After this event, the component will be re-rendered and updated with the latest data. You can use this hook to access the current state of the DOM and even update data() it.
This is not called when doing a server-side rendering of a site.
updated()
After an update is fired and the DOM updated to match the latest data, updated() will fire. This happens immediately after the re-render. Now, if you access $el, or anything else about the DOM content, it will show the new, re-rendered version. If you have a parent component, the child component updated() is called first, followed by the parent updated() hook.
This is not called when doing a server-side rendering of a site.
beforeUnmount()
If a component is removed, then it becomes unmounted. Before the component is completely removed, beforeUnmount() fire. This event still has access to the DOM elements and anything else to do with the component. This is useful in deletion events; for example, you can use this event to notify a server that a user has deleted a Node in a table, for instance. You still have access to, as well as data, watchers, and methods if you need to use them.
This is not called when doing a server-side rendering of a site.
unmount()
Once completely removed, the unmount() event fires. This can be used to clean up other data or event listeners or timers to let them know that this component no longer exists on the page. You still have access to, as well as data, watchers, and methods if you need to use them.
This is not called when doing a server-side rendering of a site.
Using Vue Lifecycle Hooks With the Composition API
If you are used to using the Options API, the above hooks will make a lot of sense. If you've mainly used Vue 3, you may be more used to using the Composition API. The Composition API is complementary to the Options API, but we use hooks slightly differently. Let's take a look at how it works.
created() And beforeCreated() Are Replaced With setup()
In the compositions, API, created() and beforeCreated() are not accessible. Instead, they are replaced with setup(). This makes sense since there is no 'Options API' to load. Any code you would have put in created() or beforeCreated(), can now safely go in setup()
Hooks Can Be Used Alongside setup()
Hooks can still be used alongside setup, in the same way they are in the Options API, which is pretty intuitive. For example:
export default {
    data() {
        return {
            msg: 1
        }
    },
    setup() {
        console.log('Component setup complete')
    },
    mounted() {
        console.log(this.$el)
    },
}
However, another way you may see this done is by defining the hooks within the setup() the function itself, using composition API functions. If we do things this way, the hooks are named slightly differently:
beforeMount()becomesonBeforeMount()mounted()becomesonMounted()beforeUpdate()becomesonBeforeUpdate()updated()becomesonUpdated()beforeUnmount()becomesonBeforeUnmount()unmounted()becomesonUnmounted()
These functions do the same thing I described in the previous section, but they are called slightly differently. All of these hooks must be called within either the setup() function or in a setup script. For example, you must either run your hooks within a setup function like this:
export default {
    setup() {
        // All hooks must go here
    }
}
Or alternatively, within a script tag with the setup attribute like so:
<script setup>
// All hooks must go within this setup script
</script>
As such, if you want to call hooks using this methodology, your code will look like this instead:
export default {
    setup() {
        // All hooks must go here
        onBeforeMount(() => {
            // Code for beforeMount()
        });
        onBeforeUpdate(() => {
            // Code for beforeUpdate()
        })
    }
}
There is no fundamental performance improvement or reason why this is better. It is just another way of doing it - and in some cases, it'll make your code easier to read and maintain. For other instances, you might be better off using the Options API, so use whichever you feel more comfortable with.
Conclusion
The Vue Lifecycle is quite complicated, but it gives us many tools to run code, update data, and make sure our components display the way we want them to. In this guide, we've covered how it works, when to use each part of the lifecycle, and how the Compositions API works a little differently from the Options API regarding lifecycle hooks.
Published at DZone with permission of Johnny Simpson. See the original article here.
Opinions expressed by DZone contributors are their own.
Comments