A Simple MicroProfile JWT Token Provider With Payara Realms and JAX-RS
Create a MicroProfile JWT token provider.
Join the DZone community and get the full member experience.
Join For Free
In this tutorial, I will demonstrate how to create a "simple" (yet practical) token provider using Payara realms as users/groups store. With a couple of tweaks, it's applicable to any MicroProfile implementation (since all implementations support JAX-RS).
In short this guide will:
- Create a public/private key in RSASSA-PKCS-v1_5 format to sign tokens.
- Create user, password and fixed groups on Payara file realm (groups will be web and mobile).
- Create a vanilla JakartaEE + MicroProfile project.
- Generate tokens that are compatible with MicroProfile JWT specification using Nimbus JOSE.
Create a Public/Private Pair
MicroProfile JWT establishes that tokens should be signed by using RSASSA-PKCS-v1_5 signature with SHA-256 hash algorithm.
The general idea behind this is to generate a private key that will be used on token provider, subsequently the clients only need the public key to verify the signature. One of the "simple" ways to do this is by generating an SSH keypair using OpenSSL.
First, it is necessary to generate a base key to be signed:
openssl genrsa -out baseKey.pemFrom the base key generate the PKCS#8 private key:
openssl pkcs8 -topk8 -inform PEM -in baseKey.pem -out privateKey.pem -nocryptUsing the private key you could generate a public (and distributable) key
openssl rsa -in baseKey.pem -pubout -outform PEM -out publicKey.pemFinally, some crypto libraries like bouncy castle only accept traditional RSA keys, hence it is safe to convert it using also openssl:
openssl rsa -in privateKey.pem -out myprivateKey.pemAt the end myprivateKey.pem, could be used to sign the tokens and publicKey.pem could be distributed to any potential consumer.
Create User, Password, and Groups on Payara Realm
According to Glassfish documentation, the general idea of realms is to provide a security policy for domains, being able to contain users and groups and consequently assign users to groups. These realms could be created using:
- File containers.
- Certificates databases.
- LDAP directories.
- Plain old JDBC.
- Solaris.
- Custom realms.
For tutorial purposes, a file realm will be used but any properly configured Realm should work.
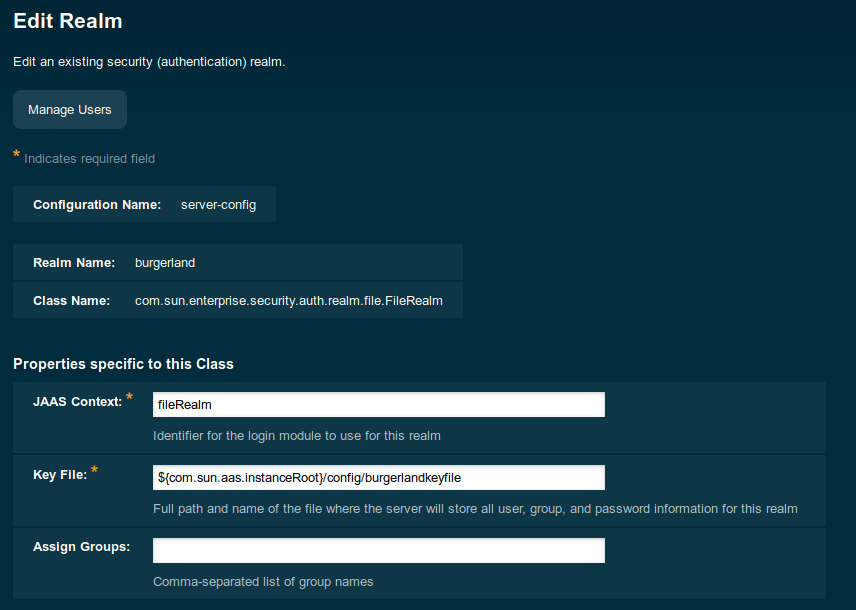
On vanilla Glassfish installations domain 1 uses server-config configuration to create the realm you need to go to server-config -> Security -> Realms and add a new realm. In this tutorial, burgerland will be created with the following configuration:
- Name: burgerland.
- Class name: com.sun.enterprise.security.auth.realm.file.FileRealm.
- JAAS Context: fileRealm.
- Key file: ${com.sun.aas.instanceRoot}/config/burgerlandkeyfile.

Once the realm is ready, we can add two users/password with different roles (web, mobile). For this tutorial, they'll beronald and king. The final result should look like this:

Create a Vanilla JakartaEE Project
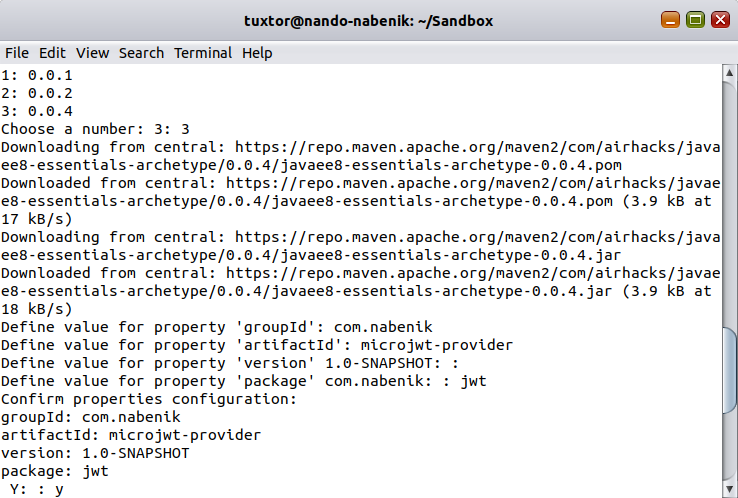
In order to generate the Tokens, we need to create a greenfield application; this could be achieved by using javaee8-essentials-archetype with the following command:
mvn archetype:generate -Dfilter=com.airhacks:javaee8-essentials-archetype -Dversion=0.0.4As usual, the archetype assistant will ask for project details. The project will be named microjwt-provider:

Now, it is necessary to copy the myprivateKey.pem file generated at section 1 to project's classpath using Maven structure, specifically to src/main/resources. To avoid any confussion I also renamed this file to privateKey.pem. The final structure will look like this:
microjwt-provider$ tree
.
├── buildAndRun.sh
├── Dockerfile
├── pom.xml
├── README.md
└── src
    └── main
        ├── java
        │   └── com
        │       └── airhacks
        │           ├── JAXRSConfiguration.java
        │           └── ping
        │               └── boundary
        │                   └── PingResource.java
        ├── resources
        │   ├── META-INF
        │   │   └── microprofile-config.properties
        │   └── privateKey.pem
        └── webapp
            └── WEB-INF
                └── beans.xml
You could get rid of source code since the application will be bootstrapped using a different package structure :-).
Generating MP Compliant Tokens From Payara realm
In order to create a provider, we will create a project with a central JAX-RS resource named TokenProviderResource with the following characteristics:
- Receives a POST+Form params petition over
/auth - Resource creates and signs a token using privateKey.pem certificate.
- Returns token in response body.
- Roles will be established using
web.xmlfile. - Roles will be mapped to Payara realm using
glassfish-web.xmlfile. - User, password, and roles will be checked using Servlet 3+ API.
Nimbus JOSE and Bouncy Castle should be added as dependencies in order to read and sign tokens, these should be added at pom.xml file.
<dependency>
    <groupId>com.nimbusds</groupId>
    <artifactId>nimbus-jose-jwt</artifactId>
    <version>5.7</version>
</dependency>
<dependency>
    <groupId>org.bouncycastle</groupId>
    <artifactId>bcpkix-jdk15on</artifactId>
    <version>1.53</version>
</dependency>
Later, an enum will be used to describe the fixed roles in a type-safe way:
public enum RolesEnum {
WEB("web"),
MOBILE("mobile");

private String role;

public String getRole() {
return this.role;
}

RolesEnum(String role) {
this.role = role;
}
}
Once dependencies and roles have been established for the project, we will implement a plain old Java bean in charge of token creation. First, to be compliant with MicroProfile token structure, a MPJWTToken bean is created. This will also contain a fast object to JSON string converter, but you could use any other marshaller implementation.
public class MPJWTToken {
private String iss;
    private String aud;
    private String jti;
    private Long exp;
    private Long iat;
    private String sub;
    private String upn;
    private String preferredUsername;
    private List<String> groups = new ArrayList<>();
    private List<String> roles;
    private Map<String, String> additionalClaims;

    //Gets and sets go here

    public String toJSONString() {

        JSONObject jsonObject = new JSONObject();
        jsonObject.appendField("iss", iss);
        jsonObject.appendField("aud", aud);
        jsonObject.appendField("jti", jti);
        jsonObject.appendField("exp", exp / 1000);
        jsonObject.appendField("iat", iat / 1000);
        jsonObject.appendField("sub", sub);
        jsonObject.appendField("upn", upn);
        jsonObject.appendField("preferred_username", preferredUsername);

        if (additionalClaims != null) {
            for (Map.Entry<String, String> entry : additionalClaims.entrySet()) {
                jsonObject.appendField(entry.getKey(), entry.getValue());
            }
        }

        JSONArray groupsArr = new JSONArray();
        for (String group : groups) {
            groupsArr.appendElement(group);
        }
        jsonObject.appendField("groups", groupsArr);

        return jsonObject.toJSONString();
    }
Once JWT structure is complete, a CypherService is implemented to create and sign the token. This service will implement the JWT generator and also a key "loader" that reads privateKey file from classpath using Bouncy Castle.
public class CypherService {

public static String generateJWT(PrivateKey key, String subject, List<String> groups) {
        JWSHeader header = new JWSHeader.Builder(JWSAlgorithm.RS256)
                .type(JOSEObjectType.JWT)
                .keyID("burguerkey")
                .build();

        MPJWTToken token = new MPJWTToken();
        token.setAud("burgerGt");
        token.setIss("https://burger.nabenik.com");
        token.setJti(UUID.randomUUID().toString());

        token.setSub(subject);
        token.setUpn(subject);

        token.setIat(System.currentTimeMillis());
        token.setExp(System.currentTimeMillis() + 7*24*60*60*1000); // 1 week expiration!

        token.setGroups(groups);

        JWSObject jwsObject = new JWSObject(header, new Payload(token.toJSONString()));

        // Apply the Signing protection
        JWSSigner signer = new RSASSASigner(key);

        try {
            jwsObject.sign(signer);
        } catch (JOSEException e) {
            e.printStackTrace();
        }

        return jwsObject.serialize();
    }

    public PrivateKey readPrivateKey() throws IOException {

        InputStream inputStream = CypherService.class.getResourceAsStream("/privateKey.pem");

        PEMParser pemParser = new PEMParser(new InputStreamReader(inputStream));
        JcaPEMKeyConverter converter = new JcaPEMKeyConverter().setProvider(new BouncyCastleProvider());
        Object object = pemParser.readObject();
        KeyPair kp = converter.getKeyPair((PEMKeyPair) object);
        return kp.getPrivate();
    }
}
CypherService will be used from TokenProviderResource as an injectable CDI bean. One of my motivations to separate key readings from the signing process is that the key reading should be implemented respecting the resource lifecycle. As a result, the key will be loaded at CDI @PostConstruct callback.
Here, the full resource code:
@Singleton
@Path("/auth")
public class TokenProviderResource {

    @Inject
    CypherService cypherService;

    private PrivateKey key;

    @PostConstruct
    public void init() {
        try {
            key = cypherService.readPrivateKey();
        } catch (IOException e) {
            e.printStackTrace();
        }
    }

    @POST
    @Produces(MediaType.APPLICATION_JSON)
    @Consumes(MediaType.APPLICATION_FORM_URLENCODED)
    public Response doTokenLogin(@FormParam("username") String username, @FormParam("password")String password,
                               @Context HttpServletRequest request){

        List<String> target = new ArrayList<>();
        try {
            request.login(username, password);

            if(request.isUserInRole(RolesEnum.MOBILE.getRole()))
                target.add(RolesEnum.MOBILE.getRole());

            if(request.isUserInRole(RolesEnum.WEB.getRole()))
                target.add(RolesEnum.WEB.getRole());

        }catch (ServletException ex){
            ex.printStackTrace();
            return Response.status(Response.Status.UNAUTHORIZED)
                    .build();
        }

        String token = cypherService.generateJWT(key, username, target);

            return Response.status(Response.Status.OK)
                    .header(AUTHORIZATION, "Bearer ".concat(token))
                    .entity(token)
                    .build();

    }

}
JAX-RS endpoints, in the end, are abstractions over Servlet API. Consequently, you could inject the HttpServletRequest or HttpServletResponse object on any method (doTokenLogin). In this case, it is usefull, since I'm triggering a manual login using Servlet 3+ login method.
As noticed by many users, Servlet API does not allow to read user roles in a portable way. Thus, I'm just checking if a given user is included in fixed roles using the previously defined enum and adding these roles to the target ArrayList.
In this code, the parameters were declared as @FormParam consuming x-www-form-urlencoded data, making it useful for plain HTML forms, but this configuration is completely optional.
Mapping Project to Payara Realm
The main motivation to use Servlet's login method is basically because it is already integrated with Java EE security schemes; using the realm will be a simple two-step configuration:
- Add the realm/roles configuration at
web.xmlfile in the project. - Map Payara groups to application roles using
glassfish-web.xmlfile.
If you wanna know the full description of this mapping, I found a useful post here.
First, I need to map the application to burgerland realm and declare the two roles. Since I'm not selecting an auth method, the project will fallback to the BASIC method. However, I'm not protecting any resource so, credentials won't be explicitly required on any HTTP request:
<?xml version="1.0" encoding="UTF-8"?>
<web-app xmlns="http://xmlns.jcp.org/xml/ns/javaee"
         xmlns:xsi="http://www.w3.org/2001/XMLSchema-instance"
         xsi:schemaLocation="http://xmlns.jcp.org/xml/ns/javaee http://xmlns.jcp.org/xml/ns/javaee/web-app_3_1.xsd"
         version="3.1">

    <login-config>
        <realm-name>burgerland</realm-name>
    </login-config>
    <security-role>
        <role-name>web</role-name>
    </security-role>
    <security-role>
        <role-name>mobile</role-name>
    </security-role>
</web-app>
Payara groups and Java web application roles are not the same concepts, but these could actually be mapped using glassfish descriptor glassfish-web.xml:
<?xml version="1.0" encoding="UTF-8"?>
<!DOCTYPE glassfish-web-app PUBLIC "-//GlassFish.org//DTD GlassFish Application Server 3.1 Servlet 3.0//EN" "http://glassfish.org/dtds/glassfish-web-app_3_0-1.dtd">
<glassfish-web-app error-url="">
    <security-role-mapping>
        <role-name>mobile</role-name>
        <group-name>mobile</group-name>
    </security-role-mapping>
    <security-role-mapping>
        <role-name>web</role-name>
        <group-name>web</group-name>
    </security-role-mapping>
</glassfish-web-app>
Finally the new application is deployed and a simple test demonstrates the functionality of token provider:

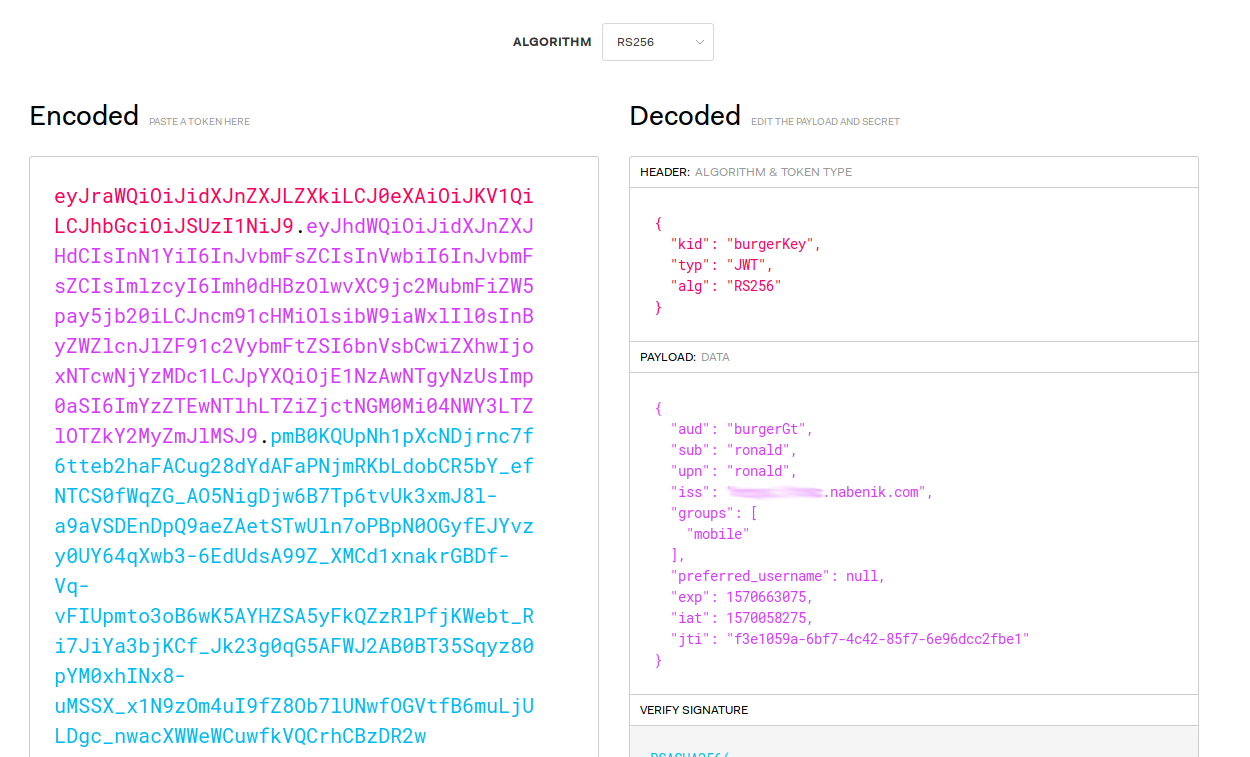
The token could be explored using any JWT tool, like the popular jwt.io, here the token is a compatible JWT implementation:

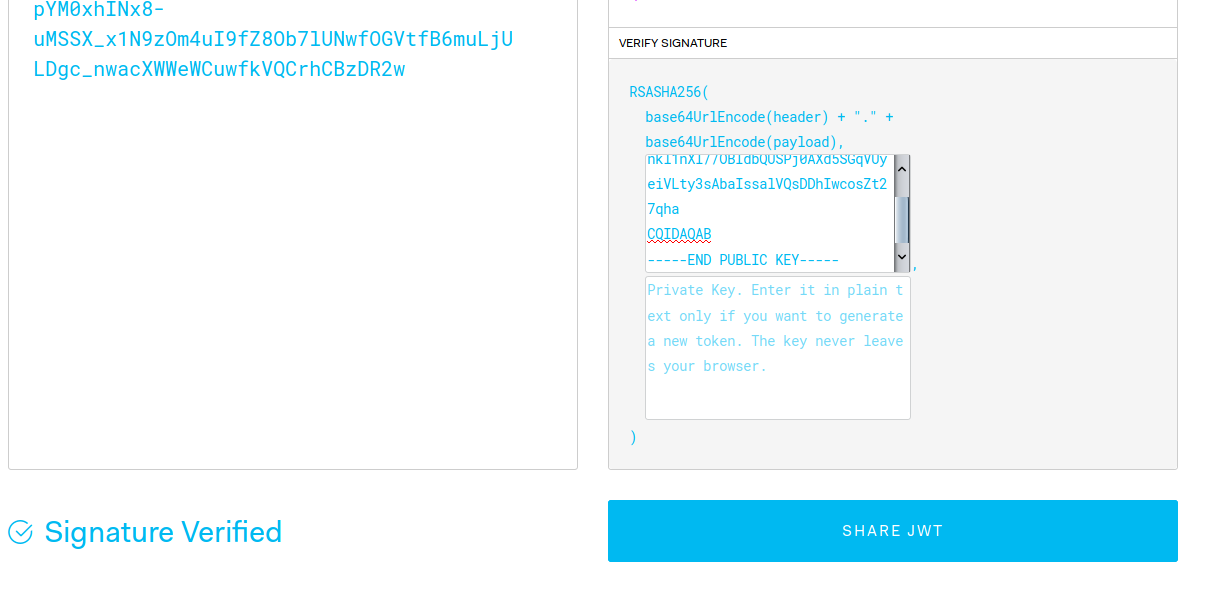
And as stated previously, the signature could be checked using only the PUBLIC key:

As always, full implementation is available at GitHub.
Further Reading
Published at DZone with permission of Víctor Orozco. See the original article here.
Opinions expressed by DZone contributors are their own.

Comments