ActiveMQ: Securing the ActiveMQ Web Console in Tomcat
By
 ·
·
Interview
·
·
Interview
Likes
(0)
Likes
There are no likes...yet! 👀
Be the first to like this post!
It looks like you're not logged in.
Sign in to see who liked this post!
Comment
Save
12.3K Views
Join the DZone community and get the full member experience.
Join For FreeThis post will demonstrate how to secure the ActiveMQ WebConsole with a username and password when deployed in the Apache Tomcat web server. The Apache ActiveMQ documentation on the Web Console provides a good example of how this is done for Jetty, which is the default web server shipped with ActiveMQ, and this post will show how this is done when deploying the web console in Tomcat.
To demonstrate, the first thing you will need to do is grab the latest distribution of ActiveMQ. For the purpose of this demonstration I will be using the 5.5.1-fuse-09-16 release which can be obtained via the Red Hat Support Portal or via the FuseSource repository:
To demonstrate, the first thing you will need to do is grab the latest distribution of ActiveMQ. For the purpose of this demonstration I will be using the 5.5.1-fuse-09-16 release which can be obtained via the Red Hat Support Portal or via the FuseSource repository:
Once you have the distributions, extract and start the broker. If you don't already have Tomcat installed you can grab it from the link above as well. I am using Tomcat 6.0.36 in this demonstration. Next, create a directory called activemq-console in the Tomcat webapps directory and extract the ActiveMQ Web Console war by using the jar -xf command.
With all the binaries installed and our broker running we can begin configuring our web app and Tomcat to secure the Web Console. First, open the ActiveMQ Web Console's web descriptor, this can be found in the following location: activemq-console/WEB-INF/web.xml, and add the following configuration:
Now lets configure the Tomcat server to validate our activemq role we just specified in the web app. Out-of-the-box Tomcat is configured to use the UserDataBaseRealm. This is configured in [TOMCAT_HOME]/conf/server.xml. This instructs the web server to validate against the tomcat-users.xml file which can be found in [TOMCAT_HOME]/conf as well. Open the tomcat-users.xml file and add the following:
The last thing we need to do before starting our Tomcat server is add the required configuration to communicate with the broker. First, copy the activemq-all jar into the Tomcat lib directory. Next, open the catalina.sh/catalina.bat startup script and add the following configuration to initialize the JAVA_OPTS variable:

Once you enter the user name and password you should get logged into the ActiveMQ Web Console. As I mentioned before the user name and password are base64 encoded and each request is authenticated against the UserDataBaseRealm. The browser will retain your username and password in memory so you will need to exit the browser to end the session.
What you have seen so far is a simple authentication using the UserDataBaseRealm which contains a list of users in a text file. Next we will look at configuring the ActiveMQ Web Console to use a JDBCRealm which will authenticate against users stored in a database.
Lets first create a new database as follows using a MySQL database:
Now the Tomcat server can be started again. This time when you login to the ActiveMQ Web Console use the username and password specified when loading the database tables.
That's all there is to it, you now know how to configure the ActiveMQ Web Console to use Tomcat's UserDatabaseRealm and JDBCRealm.
The following sites were helpful in gathering this information:
http://activemq.apache.org/web-console.html
http://www.avajava.com/tutorials/lessons/how-do-i-use-a-jdbc-realm-with-tomcat-and-mysql.html?page=1
http://oreilly.com/pub/a/java/archive/tomcat-tips.html?page=1
 <security-constraint>
   <web-resource-collection>
     <web-resource-name>Authenticate entire app</web-resource-name>
     <url-pattern>/*</url-pattern>
        <http-method>GET</http-method>
        <http-method>POST</http-method>
   </web-resource-collection>
   <auth-constraint>
        <role-name>activemq</role-name>
   </auth-constraint>
   <user-data-constraint>
        <!-- transport-guarantee can be CONFIDENTIAL, INTEGRAL, or NONE -->
     <transport-guarantee>NONE</transport-guarantee>
   </user-data-constraint>
  </security-constraint>
  <login-config>
   <auth-method>BASIC</auth-method>
  </login-config>
This configuration enables the security constraint on the entire
application as noted with /* url-pattern. Another point to notice is
the auth-constraint which has been set to the activemq role, we will
define this shortly. And lastly, note that this is configured for basic
authentication. This means the username password are base64 encoded
but not truly encrypted. To improve the security further you could
enable a secure transport such as SSL.Now lets configure the Tomcat server to validate our activemq role we just specified in the web app. Out-of-the-box Tomcat is configured to use the UserDataBaseRealm. This is configured in [TOMCAT_HOME]/conf/server.xml. This instructs the web server to validate against the tomcat-users.xml file which can be found in [TOMCAT_HOME]/conf as well. Open the tomcat-users.xml file and add the following:
 <role rolename="activemq"/>
 <user username="admin" password="admin" roles="activemq"/>
This defines our activemq role and configures a user with that role.
The last thing we need to do before starting our Tomcat server is add the required configuration to communicate with the broker. First, copy the activemq-all jar into the Tomcat lib directory. Next, open the catalina.sh/catalina.bat startup script and add the following configuration to initialize the JAVA_OPTS variable:
JAVA_OPTS="-Dwebconsole.jms.url=tcp://localhost:61616 -Dwebconsole.jmx.url=service:jmx:rmi:///jndi/rmi://localhost:1099/jmxrmi -Dwebconsole.jmx.user= -Dwebconsole.jmx.password="Now we are ready to start the Tomcat server. Once started, you should be able to access the ActiveMQ Web Console at the following URL: http://localhost:8080/activemq-console. You should be prompted with something similar to this dialog:
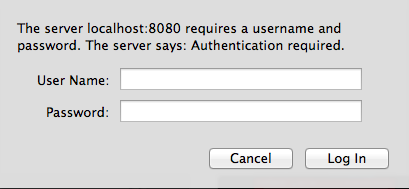
Once you enter the user name and password you should get logged into the ActiveMQ Web Console. As I mentioned before the user name and password are base64 encoded and each request is authenticated against the UserDataBaseRealm. The browser will retain your username and password in memory so you will need to exit the browser to end the session.
What you have seen so far is a simple authentication using the UserDataBaseRealm which contains a list of users in a text file. Next we will look at configuring the ActiveMQ Web Console to use a JDBCRealm which will authenticate against users stored in a database.
Lets first create a new database as follows using a MySQL database:
 mysql> CREATE DATABASE tomcat_users;
 Query OK, 1 row affected (0.00 sec)
 mysql>
Provide the appropriate permissions for this database to a database user:
 mysql> GRANT ALL ON tomcat_users.* TO 'activemq'@'localhost';
 Query OK, 0 rows affected (0.02 sec)
 mysql>
Then you can login to the database and create the following tables:
 mysql> USE tomcat_users;
 Database changed
 mysql> CREATE TABLE tomcat_users (
   -> user_name varchar(20) NOT NULL PRIMARY KEY,
   -> password varchar(32) NOT NULL
   -> );
 Query OK, 0 rows affected (0.10 sec)
 mysql> CREATE TABLE tomcat_roles (
   -> role_name varchar(20) NOT NULL PRIMARY KEY
   -> );
 Query OK, 0 rows affected (0.05 sec)
 mysql> CREATE TABLE tomcat_users_roles (
   -> user_name varchar(20) NOT NULL,
   -> role_name varchar(20) NOT NULL,
   -> PRIMARY KEY (user_name, role_name),
   -> CONSTRAINT tomcat_users_roles_foreign_key_1 FOREIGN KEY (user_name) REFERENCES tomcat_users (user_name),
   -> CONSTRAINT tomcat_users_roles_foreign_key_2 FOREIGN KEY (role_name) REFERENCES tomcat_roles (role_name)
   -> );
 Query OK, 0 rows affected (0.06 sec)
 mysql>
Next seed the tables with the user and role information:
 mysql> INSERT INTO tomcat_users (user_name, password) VALUES ('admin', 'dbpass');
 Query OK, 1 row affected (0.00 sec)
 mysql> INSERT INTO tomcat_roles (role_name) VALUES ('activemq');
 Query OK, 1 row affected (0.00 sec)
 mysql> INSERT INTO tomcat_users_roles (user_name, role_name) VALUES ('admin', 'activemq');
 Query OK, 1 row affected (0.00 sec)
 mysql>
Now we can verify the information in our database:mysql> select * from tomcat_users; +-----------+----------+ | user_name | password | +-----------+----------+ | admin | dbpass | +-----------+----------+ 1 row in set (0.00 sec) mysql> select * from tomcat_users_roles; +-----------+-----------+ | user_name | role_name | +-----------+-----------+ | admin | activemq | +-----------+-----------+ 1 row in set (0.00 sec) mysql>If you left the Tomcat server running from the first part of this demonstration shut it down at this time so we can change the configuration to use the JDBCRealm. In the server.xml file, located in [TOMCAT_HOME]/conf, we need to comment out the existing UserDataBaseRealm and add the JDBCRealm:
 <!--
    <Realm className="org.apache.catalina.realm.UserDatabaseRealm"
        resourceName="UserDatabase"/>
 -->
    <Realm className="org.apache.catalina.realm.JDBCRealm"
        driverName="com.mysql.jdbc.Driver"
        connectionURL="jdbc:mysql://localhost/tomcat_users?user=activemq&password=activemq"
        userTable="tomcat_users" userNameCol="user_name" userCredCol="password"
        userRoleTable="tomcat_users_roles" roleNameCol="role_name" />
Looking at the JDBCRealm, you can see
we are using the mysql JDBC driver, the connection URL is configured to
connect to the tomcat_users database using the specified credentials,
and the table and column names used in our database have been specified.Now the Tomcat server can be started again. This time when you login to the ActiveMQ Web Console use the username and password specified when loading the database tables.
That's all there is to it, you now know how to configure the ActiveMQ Web Console to use Tomcat's UserDatabaseRealm and JDBCRealm.
The following sites were helpful in gathering this information:
http://activemq.apache.org/web-console.html
http://www.avajava.com/tutorials/lessons/how-do-i-use-a-jdbc-realm-with-tomcat-and-mysql.html?page=1
http://oreilly.com/pub/a/java/archive/tomcat-tips.html?page=1
Apache Tomcat
Console (video game CLI)
Database
Published at DZone with permission of Jason Sherman. See the original article here.
Opinions expressed by DZone contributors are their own.
Comments