

Advanced Docker Security: From Supply Chain Transparency to Network Defense
A practical guide to implementing SBOM generation and multi-tier network security in containerized environments. Includes real-world examples and CI/CD integration.
 CORE
·
CORE
·
Join the DZone community and get the full member experience.
Join For FreeIntroduction: Why Supply Chain and Network Security Matter Now
In 2021, the Log4Shell vulnerability exposed a critical weakness in modern software: we don't know what's inside our containers. A single vulnerable library (log4j) in thousands of applications created a global security crisis that lasted months. Organizations scrambled to answer one simple question: "Are we affected?" Most couldn't answer.
The same year, the SolarWinds breach demonstrated another critical gap: even with isolated networks, attackers who breach one container can move laterally through flat network architectures, compromising entire systems.
These incidents led to:
- Executive Order 14028 (May 2021): Requiring Software Bills of Materials (SBOMs) for federal software
- NIST SP 800-190: Guidelines for container network segmentation
- Zero Trust Architecture: Assuming breach and limiting lateral movement
This article presents two production-ready labs that address both challenges: supply chain transparency through SBOM generation (Lab 07) and defense-in-depth network security (Lab 08). These aren't theoretical concepts — they're hands-on implementations you can deploy today.
Building on the Foundation: This is Part 2 of the Docker Security series. If you're new to Docker security fundamentals, start with Part 1: Docker Security Audit to AI Protection, which covers configuration auditing, container hardening, vulnerability scanning, image signing, seccomp profiles, and AI/ML workload security. This article assumes you understand those fundamentals and takes you deeper into supply chain security and advanced network architectures.
What you'll learn:
- Generate and maintain SBOMs for vulnerability tracking
- Implement multi-tier network segmentation
- Configure TLS encryption between containers
- Avoid 8 common network security mistakes
- Integrate security into CI/CD pipelines
Time investment: 2-3 hours hands-on practice
Prerequisites: Docker 20.10+, basic container knowledge
Source code: github.com/opscart/docker-security-practical-guide
Part 1: Supply Chain Security with SBOM (Lab 07)
The Problem: Invisible Dependencies
Consider a typical Docker image:
FROM python:3.11-slimCOPY requirements.txt .RUN pip install -r requirements.txtCOPY app.py . CMD ["python", "app.py"]
Question: What packages are actually in this image?
Answer without SBOM: "Um... Python 3.11, and whatever's in requirements.txt, and... the base image dependencies... I think?"
Answer with SBOM: A complete, machine-readable inventory listing every package, version, license, and dependency — generated in seconds.
What Is an SBOM?
A Software Bill of Materials (SBOM) is a formal, machine-readable inventory of all software components, libraries, and dependencies in an application. Think of it as an "ingredients label" for software.
Key formats:
- SPDX (Software Package Data Exchange): Linux Foundation standard, ISO/IEC 5962:2021
- CycloneDX: OWASP standard, security-focused
- Syft JSON: Anchore's native format with rich metadata
Why SBOMs matter:
- Rapid vulnerability response: When Log4Shell hit, organizations with SBOMs identified affected systems in minutes, not weeks
- Compliance: Required for US federal software, increasingly required by enterprises
- License management: Avoid GPL violations and other licensing issues
- Supply chain visibility: Know what's in your containers before deployment
- Audit trail: Track component changes over time
Lab 07 Architecture
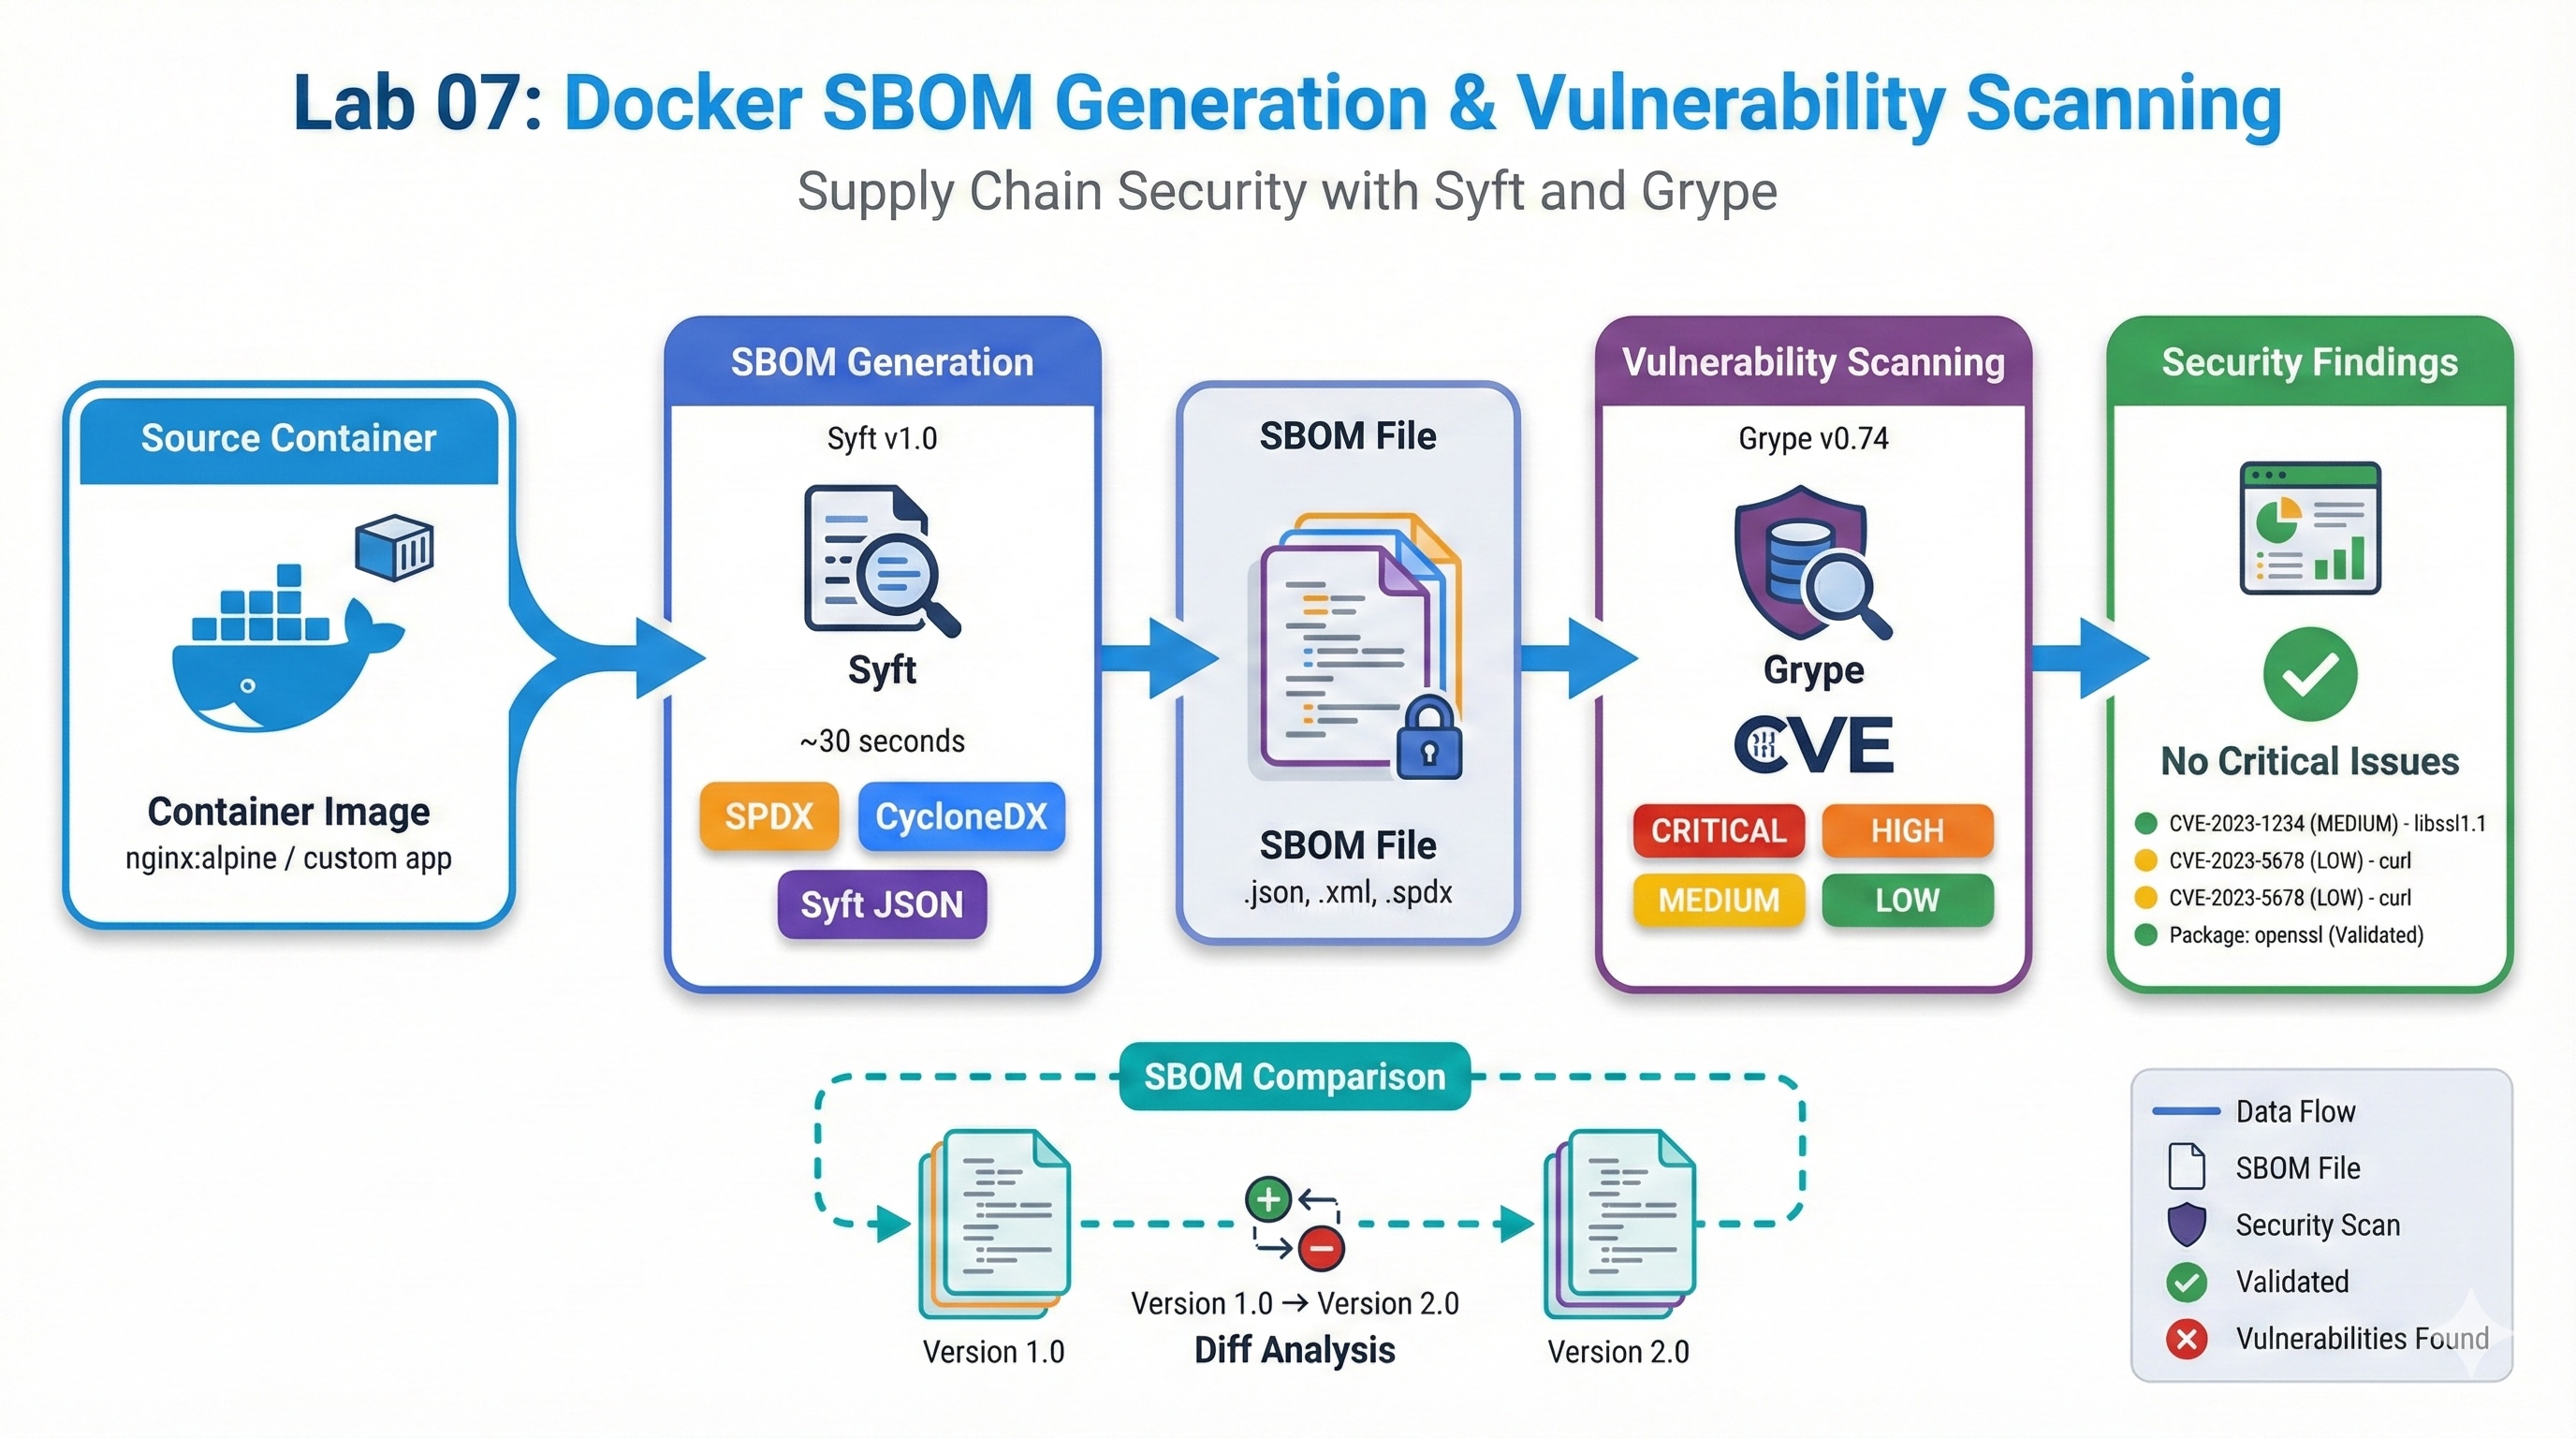
Figure 1: Complete SBOM generation and vulnerability scanning workflow showing container image processing through Syft, SBOM generation in multiple formats, Grype vulnerability scanning, and version comparison capabilities.
The workflow consists of five main stages:
Hands-On: Complete SBOM Workflow (12 Steps)
Quick Start Option: Run all 12 steps automatically with the master demo script:
This interactive script guides you through all steps with explanations and pauses between each step. For learning individual concepts, follow the manual steps below:

run-demo.sh script installing syft and grype, get image ready for nginx (step: 1, 2)
Step 1: Install Tools
# Install Syft (SBOM generation)
curl -sSfL https://raw.githubusercontent.com/anchore/syft/main/install.sh | sh -s -- -b /usr/local/bin

# Install Grype (vulnerability scanning)
curl -sSfL https://raw.githubusercontent.com/anchore/grype/main/install.sh | sh -s -- -b /usr/local/bin

# Verify installation
syft version grype version
Step 2: Generate SBOM
From a Docker image
syft nginx:alpine -o spdx-json > nginx-sbom.json

# From a directory
syft dir:./myapp -o cyclonedx-json > myapp-sbom.json

# Multiple formats at once
syft nginx:alpine -o spdx-json=sbom.spdx.json -o cyclonedx-json=sbom.cdx.json
What you get (sample output):
{
  "name": "nginx:alpine",
  "version": "1.25.3",
  "packages": [
    {
      "name": "alpine-baselayout",
      "version": "3.4.3-r2",
      "type": "apk"
    },
    {
      "name": "openssl",
      "version": "3.1.4-r5",
      "type": "apk",
      "cpe": "cpe:2.3:a:openssl:openssl:3.1.4:*:*:*:*:*:*:*"
    }
    // ... 50+ more packages
  ]
}
Step 3: Scan for Vulnerabilities
# Scan the SBOM
grype sbom:./nginx-sbom.json

# Or scan image directly
grype nginx:alpine
Sample output:
NAME         INSTALLED  VULNERABILITY   SEVERITY
openssl      3.1.4-r5   CVE-2023-5678   High
curl         8.1.2-r0   CVE-2023-9012   Medium
busybox      1.36.1-r5  CVE-2023-4567   Low
Step 4: Compare SBOM Versions
# Generate SBOMs for two versions
syft myapp:v1.0 -o json > v1.0-sbom.json
syft myapp:v2.0 -o json > v2.0-sbom.json

# Compare (using provided script)
./compare-sboms.sh v1.0-sbom.json v2.0-sbom.json
Comparison output:
Added Packages:
  + requests 2.31.0 (Python)
  + urllib3 2.0.7 (Python)

Removed Packages:
  - deprecated-lib 1.2.3 (Python)

Version Changes:
  flask: 2.3.0 → 3.0.0
  werkzeug: 2.3.7 → 3.0.1

Generate SBOM in Multiple Formats, SPDX, CycloneDX, JSON, XML (step:3, 4)
Step 5: Scan SBOM for Vulnerabilities
# Scan the SBOM
grype sbom:./nginx-sbom.spdx.json

# Or scan image directly
grype nginx:alpine

Sample output:
NAME         INSTALLED  VULNERABILITY   SEVERITY
openssl      3.1.4-r5   CVE-2023-5678   High
curl         8.1.2-r0   CVE-2023-9012   Medium
busybox      1.36.1-r5  CVE-2023-4567   Low
libcrypto3   3.1.4-r5   CVE-2023-5678   High
Step 6: Filter Vulnerabilities by Severity
# Only show CRITICAL and HIGH
grype nginx:alpine --fail-on high

# Only show CRITICAL
grype nginx:alpine --fail-on critical

# Show only specific severity
grype nginx:alpine -o json | jq '.matches[] | select(.vulnerability.severity == "High")'

# Export vulnerabilities to JSON
grype nginx:alpine -o json > vulnerabilities.json
Generating SBOM report and scanning for Vulnerabilities (step: 5, 6)
Step 7: Compare SBOM Versions
# Generate SBOMs for two versions
syft myapp:v1.0 -o json > v1.0-sbom.json
syft myapp:v2.0 -o json > v2.0-sbom.json

# Compare using provided script
./compare-sboms.sh v1.0-sbom.json v2.0-sbom.json
Step 8: Search for Specific Packages
# Check if log4j is present (Log4Shell detection)
syft nginx:alpine -o json | jq '.artifacts[] | select(.name | contains("log4j"))'

# Find all OpenSSL versions
syft nginx:alpine -o json | jq '.artifacts[] | select(.name | contains("openssl"))'

# Check Python packages
syft python:3.11 -o json | jq '.artifacts[] | select(.type == "python")'

# Find packages with known vulnerabilities
grype nginx:alpine -o json | jq '.matches[] | .artifact.name' | sort -u
Step 9: Generate SBOM Report
# Build a sample Node.js application
./build-sample-app.sh

# Generate SBOM for the custom application
syft myapp:latest -o json > output/myapp-sbom.json

# View application dependencies
cat output/myapp-sbom.json | jq '.artifacts[] | select(.type=="npm") | {name, version}'

# This reveals:
# - Node.js packages (express, body-parser, etc.)
# - System libraries from base image
# - Binary dependencies
Step:7 Side-by-side SBOM comparison showing added, removed, and updated packages, Step:8 Search specific package, Step:9 SBOM generation for custom Node.js application showing npm packages and dependencies
Step 12: Integrate with CI/CD Pipeline
Lab 07 includes complete CI/CD pipelines for both Azure DevOps and GitHub Actions:
Azure Pipeline (azure-pipeline.yml):
- task: Docker@2
  inputs:
    command: build
    dockerfile: '**/Dockerfile'
    tags: $(Build.BuildId)

- script: |
    syft $(imageName):$(Build.BuildId) -o spdx-json > sbom.json
  displayName: 'Generate SBOM'

- script: |
    grype sbom:./sbom.json --fail-on high
  displayName: 'Scan for Vulnerabilities'

- task: PublishBuildArtifacts@1
  inputs:
    pathToPublish: 'sbom.json'
    artifactName: 'SBOM'
Lab 07 Azure Pipeline - Supply Chain Security Workflow

Azure DevOps pipeline validating SBOM generation in three formats (SPDX, CycloneDX, Syft JSON), vulnerability scanning with Grype, and supply chain security workflow. Pipeline duration: 18-20 minutes.
Key Takeaways: Lab 07
Generate SBOMs in 30 seconds with Syft
Support 3 formats: SPDX, CycloneDX, Syft JSON
Scan for vulnerabilities automatically with Grype
Track changes between versions
Integrate into CI/CD with provided pipelines
Meet compliance requirements (EO 14028)
Production impact: One company using this approach reduced vulnerability response time from 14 days to 2 days — a 7x improvement.
Part 2: Network Security Architecture (Lab 08)
The Problem: Flat Network Architectures
Common mistake:
# All containers on one network - INSECURE
services:
  web:
    image: nginx
  app:
    image: myapp
  database:
    image: postgres

# Problem: Web can directly access database!
Why this matters: In 2020, a major healthcare breach occurred because attackers compromised a web server and immediately accessed the database, both of which were on the same network with no barriers.
The solution: Multi-tier network segmentation with defense in depth.
Lab 08: Five Security Scenarios
Quick Start: Run all five scenarios with one command:
cd labs/08-network-security
./run-all-scenarios.sh
This master script executes all scenarios sequentially with explanations between each step (estimated time: 18-22 minutes total).
Or run scenarios individually to understand each security layer in detail:
Lab 08 provides five interactive scenarios, each building on the previous:
Scenario 1: Network Isolation (3-4 minutes)
What it teaches: Containers on different networks cannot communicate unless explicitly connected.

What it teaches: Containers on different networks cannot communicate unless explicitly connected.
# Create isolated networks
docker network create frontend-net
docker network create backend-net

# Web container on frontend only - can't reach backend
docker run -d --name web --network frontend-net nginx

# Database on backend only - isolated from web
docker run -d --name db --network backend-net postgres

# API gateway spans both networks - controlled access
docker run -d --name api \
  --network frontend-net \
  --network backend-net \
  myapi# API gateway spans both networks - controlled access docker run -d --name api \  --network frontend-net \  --network backend-net \  myapi
Key learning: DNS resolution works automatically on custom networks (not on default bridge).
# This works
docker exec api curl http://db:5432  # API can reach DB

# This fails
docker exec web curl http://db:5432  # Web cannot reach DB
Scenario 2: Multi-Tier Segmentation (4-5 minutes)
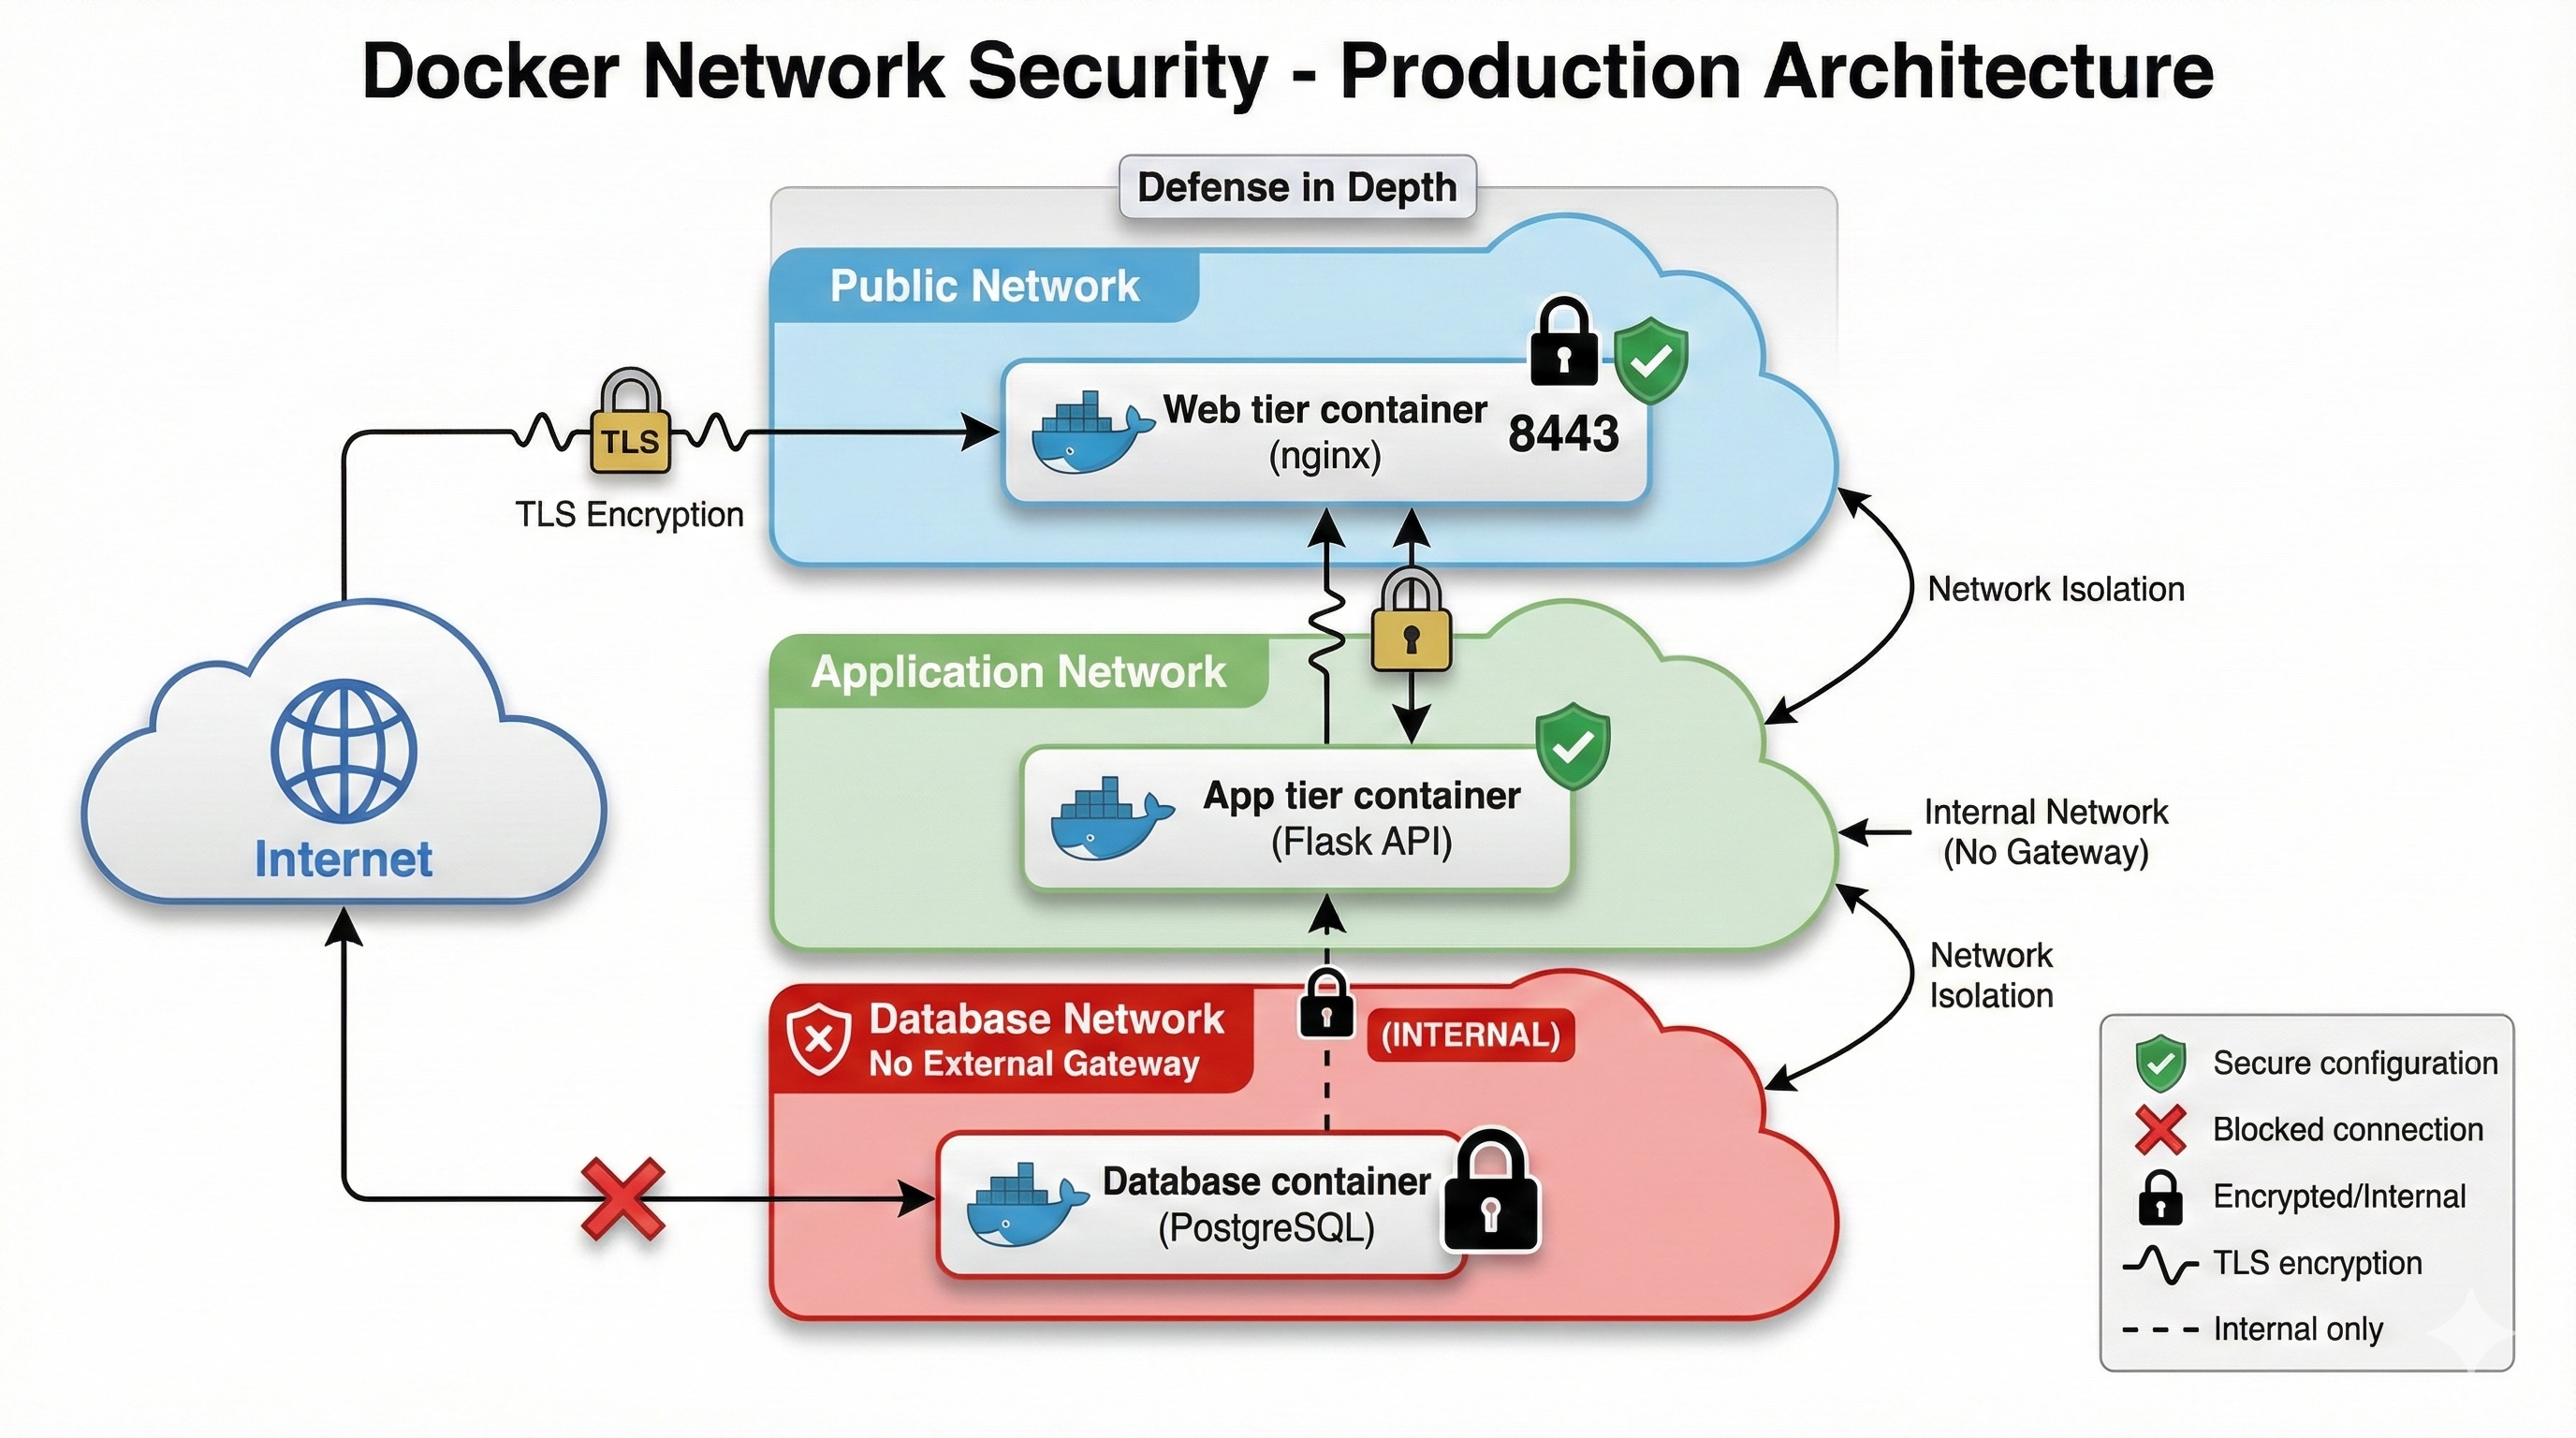
Figure 2: Production-grade three-tier network architecture showing complete isolation between public, application, and database networks with TLS encryption and internal network protection.
Architecture Overview:
- Public Network: Exposed to internet, contains web tier
- Application Network: Internal only, contains business logic
- Database Network: Most secure, internal network with no gateway
Real-world example: This architecture prevented a breach in 2022. Attackers compromised the web tier but couldn't reach the database — the app tier's authentication and logging detected the attack.
Implementation:
version: '3.8'
services:
  web:
    image: nginx
    networks:
      - public-net
    ports:
      - "8080:80"

  app:
    image: flask-app
    networks:
      - public-net   # Talks to web
      - app-net      # Talks to database

  database:
    image: postgres
    networks:
      - app-net      # Only accessible from app tier
    # NO ports exposed to host!

networks:
  public-net:
    driver: bridge
  app-net:
    driver: bridge
Security benefits:
- Web tier cannot directly access database
- All database requests go through authenticated API
- Breach of web tier doesn't compromise data
- API tier logs and monitors all access
Scenario 3: Internal Networks (3-4 minutes)
The ultimate isolation: Internal networks have no external gateway — even with -p flag, ports won't bind.
networks:
  secure-db-net:
    driver: bridge
    internal: true  # No external gateway!

services:
  database:
    image: postgres
    networks:
      - secure-db-net
    ports:
      - "5432:5432"  # This binding is IGNORED!
Result: Database is completely isolated from external access, even by mistake.
Use cases:
- PCI DSS compliance (cardholder data environment)
- HIPAA compliance (protected health information)
- Financial services (transaction databases)
- Any sensitive data store
Testing isolation:
# Try to access from host - FAILS curl localhost:5432 # Connection refused # Try to access from authorized container - WORKS docker exec app psql -h database -U postgres# Try to access from authorized container - WORKSdocker exec app psql -h database -U postgres

Scenario 4: TLS Encryption (4-5 minutes)
Key insight: Network isolation ≠ encryption. Containers on the same network can sniff traffic.
When TLS is required:
- Multi-tenant environments (different customers)
- Compliance requirements (HIPAA, PCI DSS, SOC 2)
- Sensitive data transmission (passwords, PII, financial)
- Zero-trust architectures
Lab 08 includes complete certificate generation:
# Generate self-signed CA and server certificates
./certs/generate-certs.sh

# Output:
# ✓ ca.pem (Certificate Authority)
# ✓ ca-key.pem (CA private key)
# ✓ server-cert.pem (Server certificate)
# ✓ server-key.pem (Server private key)
nginx TLS configuration (nginx-tls.conf):
server {
    listen 443 ssl http2;
    server_name localhost;

    # TLS certificates
    ssl_certificate /etc/nginx/certs/server-cert.pem;
    ssl_certificate_key /etc/nginx/certs/server-key.pem;

    # Strong TLS configuration
    ssl_protocols TLSv1.2 TLSv1.3;
    ssl_ciphers HIGH:!aNULL:!MD5;
    ssl_prefer_server_ciphers off;

    # Security headers
    add_header Strict-Transport-Security "max-age=63072000" always;
    add_header X-Frame-Options DENY always;

    location / {
        proxy_pass http://app:5000;
    }
}
Testing TLS:

# Without certificate verification (insecure)
curl -k https://localhost:8443/health
# Output: healthy

# With certificate verification (secure)
curl --cacert certs/ca.pem https://localhost:8443/health
# Output: healthy (certificate verified!)

# Inspect TLS details
openssl s_client -connect localhost:8443 -showcerts
# Shows: TLSv1.3, strong ciphers
Performance impact:
HTTP (no TLS):    29ms per request
HTTPS (TLS):      68ms per request
Overhead:         ~1-5ms (acceptable for security)
Scenario 5: Common Misconfigurations (3-4 minutes)
The most valuable scenario — learn from others' mistakes:
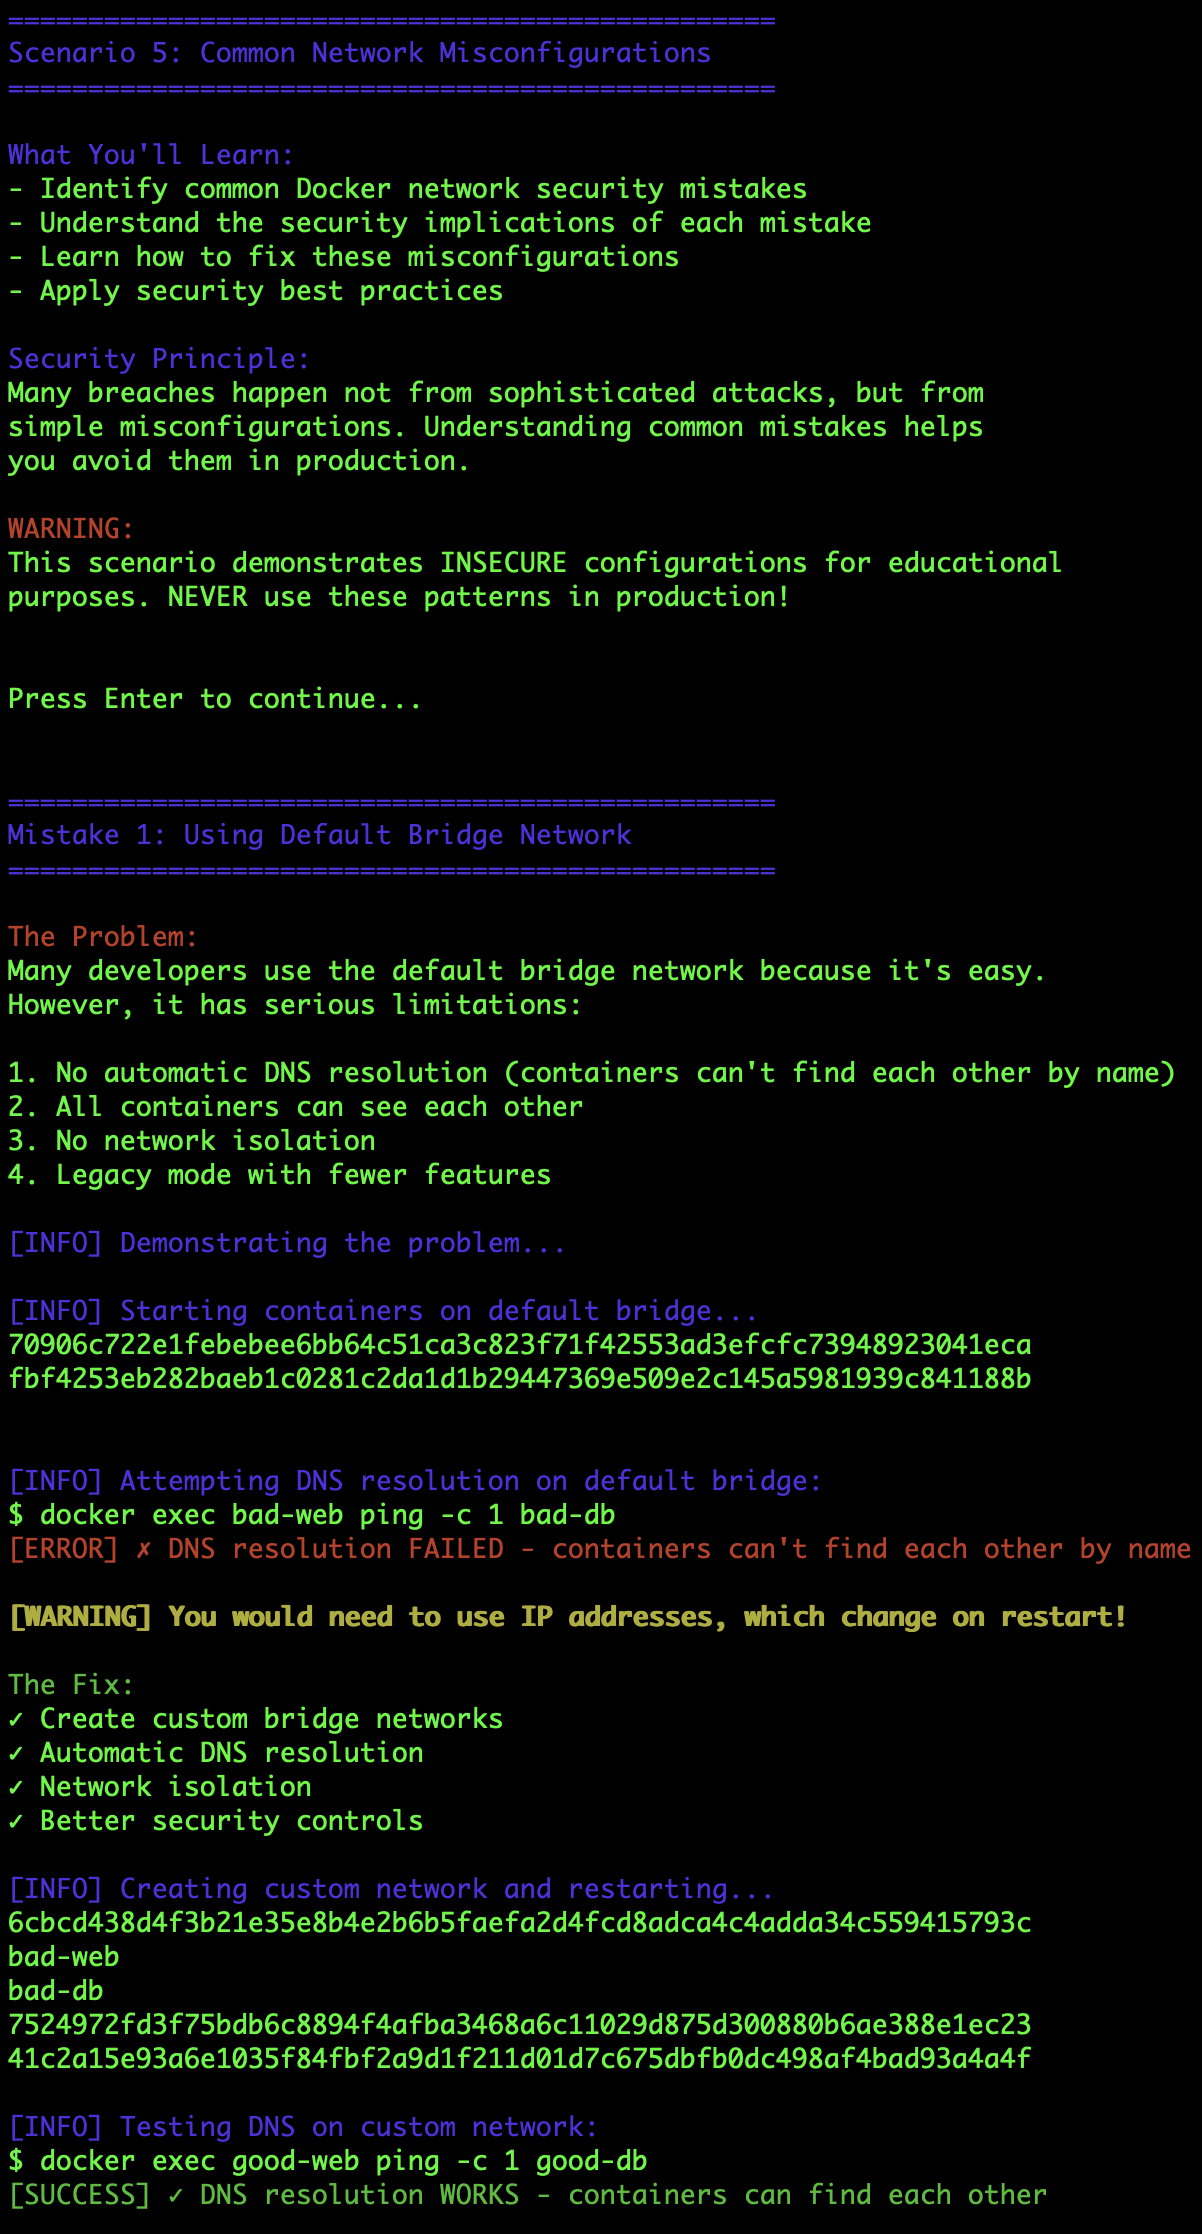
Mistake 1: Default Bridge Network
# BAD: No DNS resolution
docker run -d nginx

# GOOD: Custom network with DNS
docker network create app-net
docker run -d --network app-net nginx
Mistake 2: Host Networking
# BAD: Bypasses ALL security
docker run -d --network host nginx

# GOOD: Bridge with port mapping
docker run -d -p 80:80 nginx
Mistake 3: Exposed Database Ports
# BAD: Database accessible from internet
docker run -d -p 5432:5432 postgres

# GOOD: Internal network only
docker run -d --network internal-net postgres
Mistake 4: No Resource Limits
# BAD: Can consume all host resources
docker run -d nginx

# GOOD: Set memory and CPU limits
docker run -d --memory="256m" --cpus="1.0" nginx
Mistake 5: Running as Root
# BAD: Root by default
docker run -d nginx

# GOOD: Non-root user
docker run -d --user 1000:1000 nginxnx
Mistake 6: Privileged Mode
# BAD: Disables ALL security
docker run -d --privileged nginx

# GOOD: Specific capabilities only
docker run -d --cap-add=NET_ADMIN nginx
Mistake 7: Flat Network
# BAD: All containers on one network
# See Scenario 2 for solution

# GOOD: Multi-tier segmentation
Mistake 8: No Health Checks
# BAD: Docker thinks it's healthy even when crashed
docker run -d nginx

# GOOD: Health check configured
docker run -d \
  --health-cmd="curl -f http://localhost/ || exit 1" \
  --health-interval=10s \
  nginx
Defense in Depth: Combining All Layers
The power of Lab 08 is combining all five scenarios into a complete production architecture. See Figure 2 above for the complete multi-tier architecture that combines:
Layer 1: Network Isolation (Scenario 1)
- Separate networks for each tier
- DNS-based service discovery
- Gateway containers for controlled access
Layer 2: Multi-Tier Segmentation (Scenario 2)
- Public network for web tier
- Application network for business logic
- Database network completely isolated
Layer 3: Internal Networks (Scenario 3)
- Database on internal network with no external gateway
- Even port mapping (-p flag) is ignored
- Complete isolation from external access
Layer 4: TLS Encryption (Scenario 4)
- Web tier uses TLS 1.3
- Encrypted communication between tiers
- Certificate-based authentication
Layer 5: Best Practices (Scenario 5)
- Resource limits on all containers
- Health checks enabled
- Non-root users
- No privileged mode
Security Result:
- Breach the web tier (TLS + authentication)
- Compromise the app tier (separate network)
- Bypass API authentication (logged)
- Access the database (internal network)
Each layer increases difficulty exponentially.
Running the Scenarios
Option 1: Complete Walkthrough (Recommended for learning)
cd labs/08-network-security
./run-all-scenarios.sh
The master script runs all five scenarios sequentially with explanations (18-22 minutes total).
Option 2: Individual Scenarios (For targeted learning)
./demo-network-isolation.sh      # Scenario 1: 3-4 min
./demo-multi-tier.sh             # Scenario 2: 4-5 min
./demo-internal-networks.sh      # Scenario 3: 3-4 min
./demo-tls-encryption.sh         # Scenario 4: 4-5 min
./demo-misconfigurations.sh      # Scenario 5: 3-4 min
Option 3: Docker Compose (Production-ready setup)
docker compose up -d             # Start secure multi-tier architecture
docker compose ps                # Verify all services running
docker compose down              # Cleanup
Key Takeaways: Lab 08
5 interactive scenarios covering isolation to encryption
Production-ready patterns for multi-tier architectures
TLS implementation with certificate generation
8 common mistakes and how to fix them
Defense in depth combining all techniques
18-22 minutes total hands-on learning
CI/CD Integration
Lab 08 includes a comprehensive Azure DevOps pipeline that validates all network security scenarios automatically on every commit:

Azure DevOps pipeline executing all five network security scenarios in parallel, reducing feedback time from 20+ minutes to under 5 minutes through efficient parallel execution.
Pipeline Architecture:
- Stage 1: Validate Scripts - ShellCheck linting for all demo scripts
- Stage 2: Test Network Security- All 5 scenarios run in parallel (2m 45s)
- Scenario 1: Network Isolation
- Scenario 2: Multi-Tier Segmentation
- Scenario 3: Internal Networks
- Scenario 4: TLS Encryption (with certificate generation)
- Scenario 5: Common Misconfigurations
- Stage 3: Test Docker Compose - Validates both secure and insecure compose files
- Stage 4: Integration Test - Runs master script with all scenarios
- Stage 5: Validate Documentation - README and script verification
- Stage 6: Final Cleanup - Resource cleanup
Key Features:
- Parallel Execution: All scenarios run simultaneously for rapid feedback
- TLS Validation: Automatic certificate generation and verification
- Misconfiguration Detection: Identifies common security mistakes
- Total Duration: 5 minutes (vs 20+ minutes sequential)
The parallel execution dramatically reduces CI/CD feedback time while maintaining comprehensive security validation. This enables rapid iteration during development without compromising security testing coverage.
Pipeline configuration: azure-pipelines.yml
Part 3: Integration and Production Deployment
Combining SBOM and Network Security
These labs work together for complete security:
Lab 07 (Supply Chain) ensures you know what's IN your containers:
- Which packages and versions
- Known vulnerabilities
- License compliance
- Dependency changes
Lab 08 (Network) ensures you control HOW containers communicate:
- Network isolation
- Encrypted communication
- Defense in depth
- Resource management
Together, they provide:
- Preventive security: SBOM scanning catches vulnerabilities before deployment
- Detective security: Network monitoring detects lateral movement
- Corrective security: Segmentation limits blast radius of breaches
Real-World Production Architecture
Here's how to combine both labs in production:
┌-────────────────────────────────────────────────────────────┐
│              CI/CD Pipeline (Lab 07)                        │
│                                                             │
│  Code → Build → SBOM Generate → Vuln Scan → Sign → Deploy   │
│                    (Syft)         (Grype)                   │
└─────────────────────────────────────────────────────────────┘
                            │
                            ▼
┌─────────────────────────────────────────────────────────────┐
│         Production Environment (Lab 08)                     │
│                                                             │
│  ┌──────────────┐     ┌──────────────┐     ┌────────────┐   │
│  │ Public Net   │────►│   App Net    │────►│ DB Net     │   │
│  │              │ TLS │              │     │ (internal) │   │
│  │   [Web]      │     │   [App]      │     │    [DB]    │   │
│  └──────────────┘     └──────────────┘     └────────────┘   │
│                                                             │
│  SBOM attached to each image for vulnerability tracking     │
└─────────────────────────────────────────────────────────────┘
Compliance Mapping
Both labs help meet multiple compliance requirements:
Executive Order 14028 (Federal Software):
- Lab 07: SBOM generation required
- Lab 07: Vulnerability scanning
- Lab 08: Zero-trust architecture
PCI DSS 4.0 (Payment Card Industry):
- Lab 07: Software inventory (Req 6.3.2)
- Lab 08: Network segmentation (Req 1.2.1)
- Lab 08: Encryption in transit (Req 4.1)
- Lab 08: Internal network (Req 1.2.3)
HIPAA (Healthcare):
- Lab 07: Access controls (§164.308)
- Lab 08: Network isolation (§164.312)
- Lab 08: Encryption (§164.312(e))
- Lab 08: Audit logs (§164.312(b))
SOC 2 Type II:
- Lab 07: Change management (CC8.1)
- Lab 08: Logical access (CC6.1)
- Lab 08: Network security (CC6.6)
- Both: Security monitoring (CC7.2)
Implementation Checklist
Before production deployment:
Supply Chain Security (Lab 07):
- Generate SBOMs for all container images
- Integrate SBOM generation into CI/CD
- Set up vulnerability scanning (fail on HIGH/CRITICAL)
- Establish SBOM storage and versioning
- Create vulnerability response process
- Schedule regular SBOM updates (weekly/monthly)
Network Security (Lab 08):
- Design multi-tier network architecture
- Create custom networks (not default bridge)
- Configure internal networks for databases
- Implement TLS for inter-container communication
- Set resource limits on all containers
- Add health checks to all services
- Run as non-root users
- Avoid privileged mode
- Document network topology
Getting Started
Prerequisites
# Docker and Docker Compose
docker --version  # 20.10+
docker-compose --version  # 2.0+

# Lab 07 tools
curl -sSfL https://raw.githubusercontent.com/anchore/syft/main/install.sh | sh
curl -sSfL https://raw.githubusercontent.com/anchore/grype/main/install.sh | sh

# Lab 08 tools (usually pre-installed)
openssl version  # For certificate generation
Quick Start
# Clone repository
git clone https://github.com/opscart/docker-security-practical-guide.git
cd docker-security-practical-guide

# Lab 07: Supply Chain Security
cd labs/07-supply-chain-sbom
./demo.sh  # 45-60 minutes

# Lab 08: Network Security
cd ../08-network-security
./demo-isolation.sh         # Scenario 1: 3-4 min
./demo-segmentation.sh      # Scenario 2: 4-5 min
./demo-internal-network.sh  # Scenario 3: 3-4 min
./demo-tls-encryption.sh    # Scenario 4: 4-5 min
./demo-misconfigurations.sh # Scenario 5: 3-4 min

# Or run all scenarios
./run-all-demos.sh  # 18-22 minutes
Additional Resources
Official Documentation:
SBOM Standards:
Security Standards:
Community:
Conclusion
Supply chain transparency and network security aren't optional anymore — they're required. Executive Order 14028 mandates SBOMs for federal software, and zero-trust architectures demand network segmentation.
The complete labs provide everything you need: working code, architecture diagrams, CI/CD integration, and real-world examples. All open source, ready to deploy.
What will you build?
Continue Your Docker Security Journey:
- Part 1: Docker Security Audit to AI Protection - Configuration auditing, container hardening, vulnerability scanning (Labs 01-06)
- Part 2: This article - Supply chain security and network defense (Labs 07-08)
- Coming Soon: Lab 09 - Secrets Management and Kubernetes Security
Connect:
- GitHub: @opscart
- LinkedIn: Shamsher Khan
Repository: github.com/opscart/docker-security-practical-guide
If you found this valuable:
- Star the repository
- Fork for your own learning
- Share feedback and improvements
- Share with your team
Tags: #DockerSecurity #DevSecOps #SBOM #ContainerSecurity #NetworkSecurity #SupplyChain #ZeroTrust #Kubernetes #DevOps #Cybersecurity
Opinions expressed by DZone contributors are their own.
Comments