AlertDialog and DialogFragment Example in Xamarin Android
Dialog is like any other window that pops up in front of current window, used to show some short message, taking user input or to ask user decisions.
Join the DZone community and get the full member experience.
Join For FreeDialog is like any other window that pops up in front of current window, used to show some short message, taking user input or to ask user decisions. Unlike Toast, a dialog is generally used where user attention is mandate. Android supports several different ways to create a dialog such as AlertDialog and FragmentDialog. In this example we will cover all the aspect of AlertDialog and DialogFragment.
1. Using AlertDialog in Xamarin.Android
AlertDialog is the subclass of Dialog that can display one, two or three buttons. If you only want to display a String in this dialog box, use the SetMessage() method.
The following code snippet can be used to create a simple AlertDialog with two buttons Delete and Cancel.
//set alert for executing the task
AlertDialog.Builder alert = new AlertDialog.Builder (this);
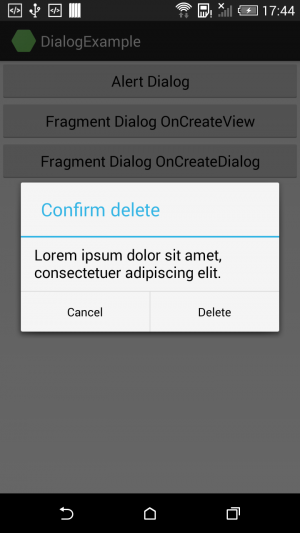
alert.SetTitle ("Confirm delete");
alert.SetMessage ("Lorem ipsum dolor sit amet, consectetuer adipiscing elit.");
alert.SetPositiveButton ("Delete", (senderAlert, args) => {
Toast.MakeText(this ,"Deleted!" , ToastLength.Short).Show();
});
alert.SetNegativeButton ("Cancel", (senderAlert, args) => {
Toast.MakeText(this ,"Cancelled!" , ToastLength.Short).Show();
});
Dialog dialog = alert.Create();
dialog.Show();
The above code snippet will produce the output as shown in the following screenshot.
2. Using DialogFragment in Xamarin.Android
Since the release of Android 3.0 (API level 11), fragments can show as a dialogue and call as DialogFragment. If you’re supporting older Android versions, you can make use of the fragment-compatibility support library.
To create a dialogue fragment, we will be using DialogFragment class. This class is derived from the Fragment and behaves much like a fragment with all available fragment life cycle methods. Android recommends using DialogFragment over AlerDialog.
You need to perform the following steps to create a DialogFragment
- Create a new class that extends from DialogFragment class.
- Like regular Fragments, override
OnCreateView()callback to attach the dialog layout. - Alternatively, you can override
OnCreateDialog()the method and return a Dialog instance. This method is used to port your old AlertDialog code without much modification.
In this example, we will see both OnCreateView() and OnCreateDialog() callback.
3. Dialog fragment using OnCreateDialog()
The following code snippet shows how to create dialog by overriding OnCreateDialog() method.
using System;
using System.Collections.Generic;
using System.Linq;
using System.Text;
using Android.App;
using Android.Content;
using Android.OS;
using Android.Runtime;
using Android.Util;
using Android.Views;
using Android.Widget;

namespace DialogExample
{
    public class DialogFragment2 : DialogFragment
    {
        public static DialogFragment2 NewInstance(Bundle bundle){
            DialogFragment2 fragment = new DialogFragment2 ();
            fragment.Arguments = bundle;
            return fragment;
        }

        public override Dialog OnCreateDialog (Bundle savedInstanceState)
        {
            AlertDialog.Builder alert = new AlertDialog.Builder (Activity);
            alert.SetTitle ("Confirm delete");
            alert.SetMessage ("Lorem ipsum dolor sit amet, consectetuer adipiscing elit.");
            alert.SetPositiveButton ("Delete", (senderAlert, args) => {
                Toast.MakeText(Activity ,"Deleted!" , ToastLength.Short).Show();
            });

            alert.SetNegativeButton ("Cancel", (senderAlert, args) => {
                Toast.MakeText(Activity ,"Cancelled!" , ToastLength.Short).Show();
            });

            return alert.Create();
        }
    }
}
4. Dialog fragment using OnCreateView()
DialogFragment is like any other fragment, the same lifecycle rules are applied. Now we have to override onCreateView method to attach the layout to view the hierarchy and construct the dialogue fragment.
Let us first define the layout for your fragment. In this example, I have used two TextViews and Button. My layout looks as follows:
<?xml version="1.0" encoding="utf-8"?>
<LinearLayout xmlns:android="http://schemas.android.com/apk/res/android"
    android:orientation="vertical"
    android:layout_width="fill_parent"
    android:layout_height="fill_parent"
    android:padding="10dp">
    <TextView
        android:text="Lorem ipsum"
        android:textAppearance="?android:attr/textAppearanceLarge"
        android:layout_width="match_parent"
        android:layout_height="wrap_content"
        android:id="@+id/textView1" />
    <TextView
        android:text="Lorem ipsum dolor sit amet, consectetuer adipiscing elit...."
        android:textAppearance="?android:attr/textAppearanceSmall"
        android:layout_width="match_parent"
        android:layout_height="wrap_content"
        android:id="@+id/textView2"
        android:layout_marginTop="10dp" />
    <Button
        android:text="Close"
        android:layout_width="match_parent"
        android:layout_height="wrap_content"
        android:id="@+id/CloseButton"
        android:layout_marginTop="10dp" />
</LinearLayout>
Now let us inflate the layout from OnCreateView() method. My DialogFragment class looks as follows:
using System;
using System.Collections.Generic;
using System.Linq;
using System.Text;
using Android.App;
using Android.Content;
using Android.OS;
using Android.Runtime;
using Android.Util;
using Android.Views;
using Android.Widget;

namespace DialogExample
{
    public class DialogFragment1 : DialogFragment
    {
        public static DialogFragment1 NewInstance(Bundle bundle){
            DialogFragment1 fragment = new DialogFragment1 ();
            fragment.Arguments = bundle;
            return fragment;
        }

        public override View OnCreateView (LayoutInflater inflater, ViewGroup container, Bundle savedInstanceState)
        {
            // Use this to return your custom view for this Fragment
            View view =  inflater.Inflate(Resource.Layout.DialogFragment1Layout, container, false);
            Button button = view.FindViewById<Button> (Resource.Id.CloseButton);
            button.Click += delegate {
                Dismiss();
                Toast.MakeText(Activity ,"Dialog fragment dismissed!" , ToastLength.Short).Show();
            };

            return view;
        }
    }
}
The above code snippet will produce the output as shown in the following screenshot.

5. Adding DialogFragment
We are pretty much done! Add the following code snippet in your Activity to instantiate and display the dialog;
FragmentTransaction ft = FragmentManager.BeginTransaction();
//Remove fragment else it will crash as it is already added to backstack
Fragment prev = FragmentManager.FindFragmentByTag("dialog");
if (prev != null) {
    ft.Remove(prev);
}

ft.AddToBackStack(null);

// Create and show the dialog.
DialogFragment1 newFragment = DialogFragment1.NewInstance(null);

//Add fragment
newFragment.Show(ft, "dialog");Published at DZone with permission of Nilanchala Panigrahy. See the original article here.
Opinions expressed by DZone contributors are their own.
Comments