How to Build a React Native Chat App for Android
In this article, learn to develop a React Native in-app chat and messaging with MirrorFly's SDK, including dependency setup and pre-built UI kit implementation.
Join the DZone community and get the full member experience.
Join For FreeIn this tutorial, we will walk you through the complete process of integrating the MirrorFly Chat SDK into your React Native app. With this React Native Chat SDK, you can create a real-time chat app within 10 minutes.
Moving forward, we'll cover the following steps:
- Install the SDK
- Initialize SDK
- Register users
- Connect to the MirrorFly server
- Send and receive messages
Before you begin, please ensure you have the following prerequisites:
- Node: 14.20.0
- npm: 6.14.10
- react-native: 0.69.12
Now, let's begin the integration.
Get Started
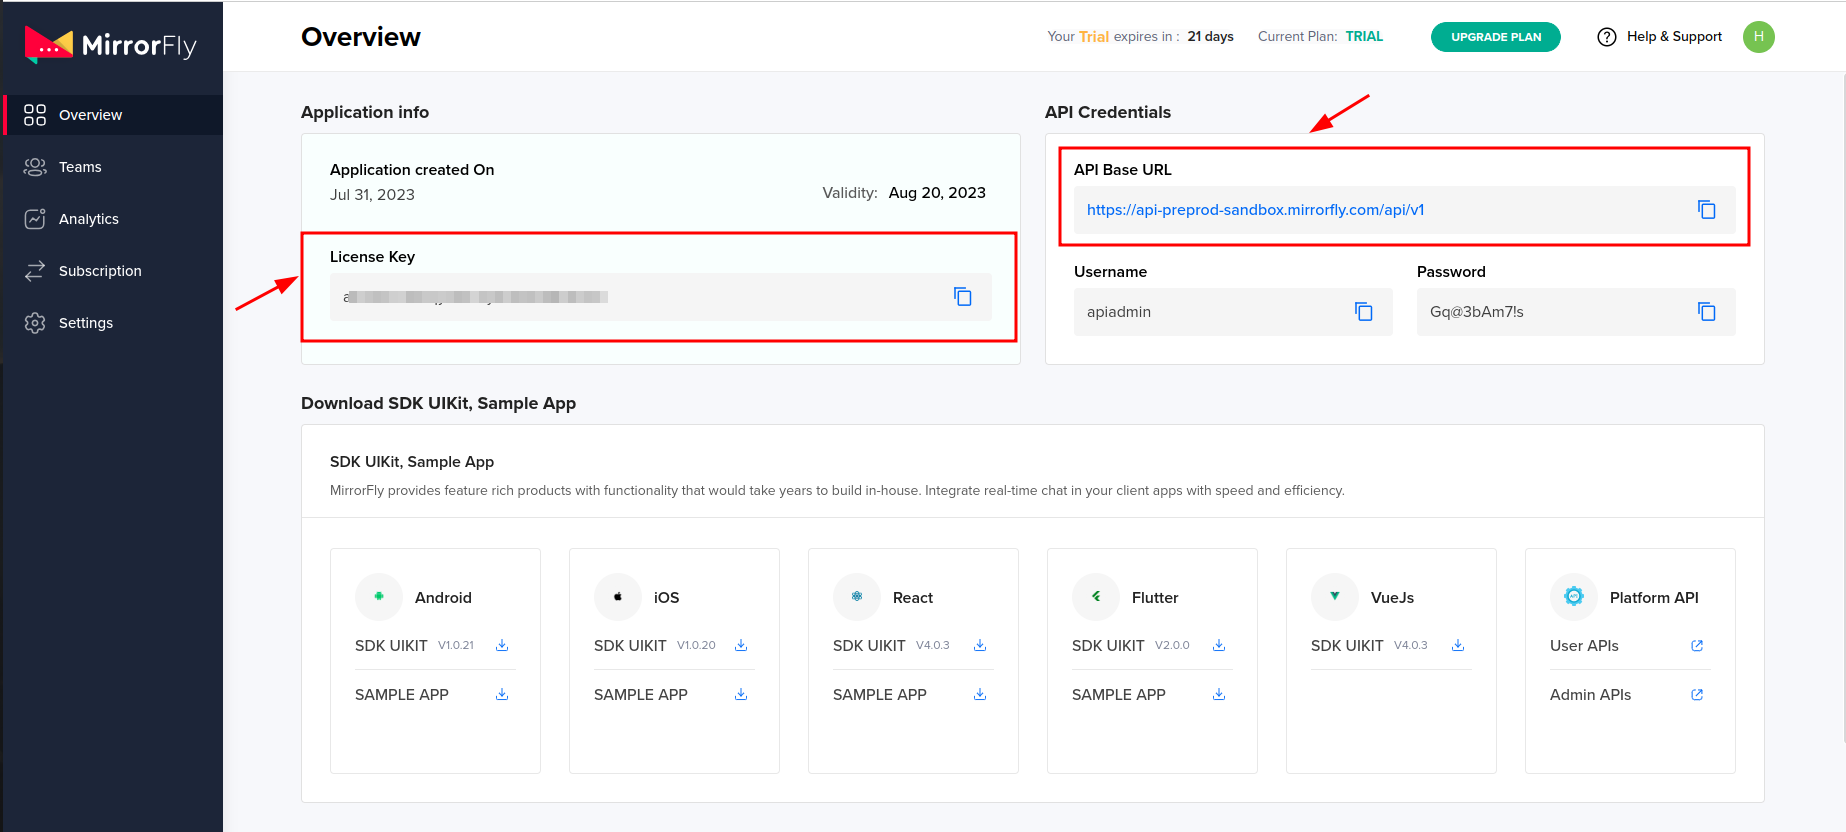
- Go to the MirrorFly Console Page.
- Create your MirrorFly account.
- Install the npm dependencies.
TypeScript
{
"@react-native-async-storage/async-storage": "^1.17.7",//Any version
"react-native-get-random-values": "1.7.1",//must use version >=1.7.1
"react-native-document-picker" :"8.1.1",// must use version >=8.1.1
'realm': "^10.8.0",
'react-native-fs':  "^2.18.0",
'@react-native-community/netinfo': "^8.0.0",
'moment': "2.29.4",
'rn-fetch-blob': "^0.12.0",
'react-native-compressor': "1.6.1",
'react-native-convert-ph-asset': "^1.0.3",
'react-
Now, the integration begins.
Step 1: Install Dependencies
- Begin by updating your package.json files.
- Carefully check for any duplicate packages. This is particularly crucial if you encounter issues on iOS.
npm installStep 2: Copy SDK Files
- Go to the dist folder of the MirrorFly Chat SDK and copy all the extracted files.
- Create a new directory in your React Native project and paste all the copied SDK files into it.
Step 3: Create SDK.js
- Inside your project, create a new file named SDK.js.
- Import the SDK into the SDK.js file:
import './index';
const SDK = window.SDK;
export default SDK;
Step 4: Initialize Chat SDK
Now that you've successfully integrated the SDK into your project, it's time to initialize it.
- To achieve this, you'll be using the initializeSDK method.
- Paste the license key you obtained in the Get Started section on the licensekey param.
const initializeObj = {
 apiBaseUrl: `API_URL`,
 licenseKey: `LICENSE_KEY`,
 isTrialLicenseKey: `TRIAL_MODE`,
 callbackListeners: {},
 };
 await SDK.initializeSDK(initializeObj);
Step 5: Register a User
To utilize the chat functionality, you must first register a user. Use the register method for this purpose:
await SDK.register(`USER_IDENTIFIER`); Upon successful registration, you will receive a response containing a username and password, which are essential for connecting to the server.
Sample response:
{
 statusCode: 200,
 message: "Success",
 data: {
 username: "123456789",
 password: "987654321"
 }
 }
Step 6: Connect to MirrorFly Server
Utilize the credentials acquired during registration to establish a connection to the MirrorFly server. You can achieve this by using the connect method:
await SDK.connect(`USERNAME`, `PASSWORD`);
Sample response:
 {
 message: "Login Success",
 statusCode: 200
 }
Step 7: Send a Message
To send a message to another user, employ the sendTextMessage method:
await SDK.sendTextMessage(`TO_USER_JID`, `MESSAGE_BODY`,`MESSAGE_ID`,`REPLY_TO`);
Ensure that you provide the JID of the recipient, the message body, a unique message ID, and an optional reference to the message being replied to.
Sample response:
 {
 "message": "",// String - Success/Error Message
 "statusCode": "" // Number - status code
 }
Step 8: Receive a Message
To receive messages from other users, implement the messageListener function. This function will be triggered each time you receive a new message. You can add this callback method during the initialization process.
function messageListener(response) {
 console.log("Message Listener", response);
}
Step 9: Get Recent Chats
To get the recent chat list on your app, you need to add the following code:
await SDK.getRecentChatsDB();
Sample response:
{
 "message": "",// String - Success/Error Message
 "statusCode": "" // Number - status code
 "data": [
 {
 "chatType": "chat",
 "createdAt": "2023-09-06 10:52:46",
 "deleteStatus": 0,
 "fromUserId": "", // String - fromUserId
 "msgBody": {
 "nickName": "",
 "mid": "",// String - user mid
 "message": "",// String - User Text Mesaage
 "message_type": "",// String - User Text Mesaage Type
 "replyTo": "",
 "mentionedUsersIds": ""
 },
 "msgId": "",// String - user msgId
 "msgStatus": 1,
 "msgType": "",// String - msgType
 "muteStatus": 0,
 "publisherId": "",// String - user Number
 "timestamp":"",// number timestamp
 "toUserId": "",
 "unreadCount": 0,
 "userId": "",// String - userId
 "userJid": "",// String - userJid
 "profileDetails": {
 "nickName": "",// String - User Name
 "image": "",// String - image
 "status": "",//String - User status
 "colorCode": "#7b0b88",
 "userId": "",// String - userId
 "userJid": "",// String - userJid
 "email": "",//String - User Email-Id
 "mobileNumber": "",//String - User mobile number
 "isAdminBlocked": 0
 }
 },
 ]
 }
Step 10: Message Receipts
To get the message seen status, you’ll need to use the following method:
await SDK.sendSeenStatus(`TO_USER_JID`, `MESSAGE_ID`);
Step 11: Delete Message from the Sender
To delete a message sent from the sender's end, you'll need to use the following code
await SDK.deleteMessagesForMe(`TO_JID`, `MESSAGE_IDS`);
Sample response:
 {
     statusCode: "", // Number - status code
      message: "", // String - Success/Error Message
 }
Step 12: Delete Message from Both Sender and Receiver
To delete a message sent from both the sender and recipient's end, you'll need to use the following code:
await SDK.deleteMessagesForEveryone(`TO_JID`, `MESSAGE_IDS`);
Sample response:
{
 statusCode: "", // Number - status code
 message: "", // String - Success/Error Message
 }
Step 13: Push Notifications
To enable push notifications, you need to integrate Firebase into your app. Follow the steps below to achieve this:
- Go to the Firebase console and create a new project with your app package name. Ex:
com.testapp. - Next, download the google-service.json.
- Go to your /android/app/ folder in your App and add the google-service.json file.
React Native Firebase Installation
Install the Firebase package for react native using the following code:
Using NPM
npm install --save @react-native-firebase/app
@react-native-firebase/messaging
Using Yarn
yarn add @react-native-firebase/app
 @react-native-firebase/messaging
Add Firebase Configurations to Android
You must enable the google-services plugin to allow Firebase to use the credentials in Android.
To do this, you'll need to modify two files in the Android directory.
You need to add the google-services plugin as a dependency inside of your /android/build.gradle file.
 buildscript {
   dependencies {
   // ... other dependencies
   classpath ("com.google.gms:google-services:4.3.15")
   // Add me --- /\
  }
 }
Next, add the following to the /android/app/build.gradle file to execute the file.
 apply plugin: 'com.android.application'
 apply plugin: 'com.google.gms.google-services' // <- Add this line
Lastly, add the following to your AndroidManifest.xml file and execute the plugin.
<uses-permission android:name="android.permission.POST_NOTIFICATIONS"/>
Register User With FCM Token
import messaging from '@react-native-firebase/messaging';
 const fcmToken = await messaging().getToken();
 await SDK.register('USER_IDENTIFIER', 'FCM_TOKEN');
Sample response:
 {
 statusCode: 200,
 message: "Success",
 data: {
 username: "123456789",
 password: "987654321"
 }
 }
Configuration for Background Message Handling
Add the following code to the index.js file.
import messaging from '@react-native-firebase/messaging';
 const fcmToken = await messaging().getToken();
 await SDK.register('USER_IDENTIFIER', 'FCM_TOKEN');
Sample response:
{
 msgType: "", // String - value "receiveMessage"
 chatType: "", // String - Chat Type - "chat" - Single
 publisherJid: "", // String - Jid - One Who Sends the Message
 publisherId: "", // String - Id - One Who Sends the Message
 fromUserJid: "", // String - From User Jid -
 // Will Be Same as PublisherJid in Case of Single Chat
 fromUserId: "", // String - From User Id
 toUserJid: "", // String - Jid - One Who Receives the Message
 toUserId: "", // String - To User Id - One Who Receives the Message
 metaData: {}, //Object - Meta data for the message
 msgBody: {
 message: "", // String - Message Body
 message_type: "", // String - Message Type text, image, video, audio & file
 nickName: "", // String - User Nickname
 mentionedUsersIds: [] // Array - Mentioned Ids In case of Group
 media: { // For Media Message Only
 androidHeight: 0,
 androidWidth: 0,
 audioType: "" // String - "file" or "recording"
 caption: "", // String - Media Caption
 duration: "", // String - Duration - For Audio/Videos
 fileName: "", // String - File Name
 file_key: "", // String - File Key
 file_size: "", // Number - File Size
 file_url: "", // String - File Url
 is_downloaded: "", // Number - Downloaded Status
 is_uploading: "", // Number - Uploading Status
 local_path: "", // String - Local Path
 msgId: "", // String - Message Id
 originalHeight: 0, // Number
 originalWidth: 0, // Number
 thumb_image: "", // Base64 - Thumb Image
 webHeight: 0, // Number
 webWidth: 0, // Number
 }
 },
 msgId: "", // String - Message Id
 topicId: "", //String - Topic Id for the message
 msgStatus: "", // Number - Message Status
 timestamp: 1681185232284, // Number - TimeStamp - Milliseconds
 profileDetails:{
 {
 email: "", // String
 fromUser: "", // String
 image: "", // String - File Url
 mobileNumber: "", // String
 nickName: "", // String
 status: "", // String
 thumbImage: "", // Base64 - Thumb Image
 userId: "", // String
 }
 }
Conclusion
Now, we've come to the end of this tutorial. To give a quick recap, you came across the complete steps to add chat functionality to your React native app using MirrorFly SDK. Next, you've learned the steps to add features like send/receive messages, chat receipts, and push notifications (by integrating Firebase).
If you have any questions about these steps, you can directly contact the tech support team or refer to this documentation.
Video
Opinions expressed by DZone contributors are their own.
Comments