An Introduction to HDFS
In this article, a big data expert takes a look at how to use HDFS and how to use it to create create node HDFS clusters.
Join the DZone community and get the full member experience.
Join For Freewe are going to start a series of blog on hdfs, zookeeper, hbase, and opentsdb and will see how to setup an opentsdb cluster using these services. in this blog, we will study about hdfs.
hdfs
the hadoop distributed file system (hdfs) is a java-based distributed file system that is fault-tolerant , scalable, and extremely easy to expand . it is designed to run on commodity hardware and can be deployed on low-cost hardware. hdfs is the primary distributed storage for hadoop applications. it provides interfaces for applications to move closer to data.
architecture
hdfs architecture contains a namenode, datanode, and secondary namenode.
hdfs has a master/slave architecture.
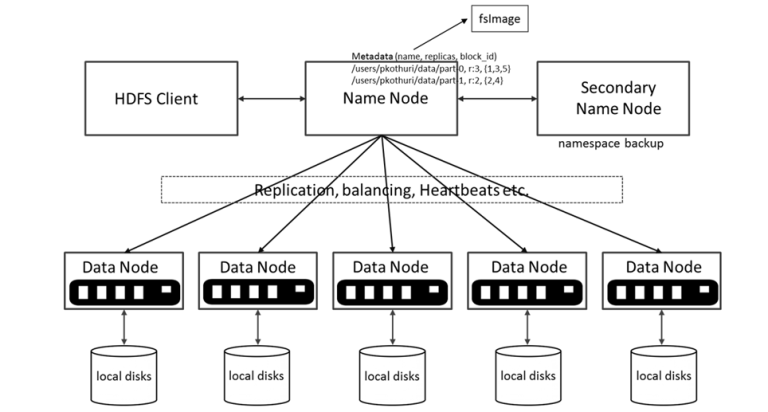
namenode - an hdfs cluster consists of a single namenode (master server), which manages the file system namespace and regulates access to files by clients. it maintains and manages the file system metadata; e.g. what blocks make up a file, and on which datanodes those blocks are stored.
datanode - there are a number of datanodes, usually one per node in the cluster, which manages storage attached to the nodes that they run on. datanode in hdfs stores the actual data. we can add more datanodes to increase the space available.
secondary namenode - the secondary namenode service is not a standby secondary namenode, despite its name. specifically, it does not offer high availability (ha) for the namenode.
why secondary namenode?
- the namenode stores modifications to the file system as a log appended to a native file system file.
- when a namenode starts up, it reads the hdfs state from an image file, fsimage, and then applies edits from the edits log file.
- it then writes new hdfs state to the fsimage and starts normal operation with an empty edits file.
- since namenode merges fsimage and edits files only during start up, the edits log file could get very large over time on a busy cluster.
- another side effect of a larger edits file is that the next restart of namenode takes longer.
- the secondary namenode merges the fsimage and the edits log files periodically and keeps edits log size within a limit.
- it is usually run on a different machine than the primary namenode, since its memory requirements are on the same order as the primary namenode.
key features
failure tolerant - data is duplicated across multiple datanodes to protect against machine failures. the default is a replication factor of 3 (every block is stored on three machines, if you have 3 datanodes avalible).
scalability - data transfers happen directly with the datanodes so your read/write capacity scales fairly well with the number of datanodes.
space - need more disk space? just add more datanodes and re-balance.
industry standard - other distributed applications are built on top of hdfs (hbase, map-reduce).
hdfs is designed to process large data sets with write-once-read-many semantics, it is not for low latency access.
data organization
- each file written into hdfs is split into 64 mb or 128 mb data blocks.
- each block is stored on one or more nodes.
- each copy of the block is called a replica.
block placement policy
- the first replica is placed on the local node.
- the second replica is placed in a different rack.
- the third replica is placed in the same rack as the second replica.
setup an hdfs cluster
for creating an hdfs cluster, we are going to use docker. for docker image details, see: https://hub.docker.com/u/uhopper/
steps
- create a docker swarm network.
docker swarm init --advertise-addr <node1 ip>
$ docker swarm init --advertise-addr 192.168.99.100
swarm initialized: current node (dxn1zf6l61qsb1josjja83ngz) is now a manager.

to add a worker to this swarm, run the following command:

    docker swarm join \
    --token swmtkn-1-49nj1cmql0jkz5s954yi3oex3nedyz0fb0xx14ie39trti4wxv-8vxv8rssmk743ojnwacrr2e7c \
    192.168.99.100:2377

to add a manager to this swarm, run 'docker swarm join-token manager' and follow the instructions.


copy "docker swarm join \......" returned by the above command and execute in other 2 node vm to join the swarm.

after joining the swarm create a overlay network:

$ docker network create -d overlay generic-class-net


*follow https://docs.docker.com/network/network-tutorial-overlay/#walkthrough
view the code on gist .
namenode
-
create environtment variable file (namenode_env) for namenode in vm1
cluster_name=genericclasss
hdfs_conf_dfs_namenode_datanode_registration_ip___hostname___check=false
hdfs_conf_dfs_datanode_max_transfer_threads=16000
hdfs_conf_dfs_replication=3
hdfs_conf_dfs_namenode_avoid_read_stale_datanode=true
hdfs_conf_dfs_namenode_avoid_write_stale_datanode=true
hdfs_conf_dfs_namenode_write_stale_datanode_ratio=1.0f
hdfs_conf_dfs_namenode_check_stale_datanode=true
core_conf_fs_defaultfs=hdfs://namenode:8020
view the code on gist .
-
create namenode on vm1:
docker run -dit --name namenode -p 50070:50070 -p 8020:8020 --env-file namenode_env --network generic-class-net -h namenode uhopper/hadoop-namenodeview the code on gist .
- create the enviorment vriable file (datanode_env) for datanode in all 3 vms.
cluster_name=genericclasss
hdfs_conf_dfs_namenode_datanode_registration_ip___hostname___check=false
core_conf_fs_defaultfs=hdfs://namenode:8020
hdfs_conf_dfs_client_use_datanode_hostname=false
network.host=_eth0_
hdfs_conf_dfs_namenode_avoid_read_stale_datanode=true
hdfs_conf_dfs_namenode_avoid_write_stale_datanode=true
hdfs_conf_dfs_namenode_write_stale_datanode_ratio=1.0f
hdfs_conf_dfs_namenode_check_stale_datanode=true
view the code on gist .
- create datanode1 on vm1:
docker run -dit --env-file datanode_env -p 50075:50075 -p 50020:50020 -p 41430:41430 -p 50010:50010 --network generic-class-net -h datanode1 --name datanode1 uhopper/hadoop-datanodeview the code on gist .
- create datanode2 on vm2:
docker run -dit --env-file datanode_env -p 50075:50075 -p 50020:50020 -p 41430:41430 -p 50010:50010 --network generic-class-net -h datanode2 --name datanode2 uhopper/hadoop-datanodeview the code on gist .
- create datanode3 on vm3.
docker run -dit --env-file datanode_env -p 50075:50075 -p 50020:50020 -p 41430:41430 -p 50010:50010 --network generic-class-net -h datanode3 --name datanode3 uhopper/hadoop-datanodeview the code on gist .
in all vms, check that all the containers are up and running by executing
docker ps
.
once all the containers are up and running, go to your vm1, open a browser, and open http://localhost:50070/dfshealth.html#tab-datanode.
you will see output like:
![]()

hdfs cli:

in this post, we studied hdfs and how to create 3 node hdfs clusters. in the next post, we will look at zookeeper and will create a zookeeper cluster.
references:
https://hadoop.apache.org/docs/stable/hadoop-project-dist/hadoop-hdfs/hdfsuserguide.html https://hadoop.apache.org/docs/r2.4.1/hadoop-project-dist/hadoop-hdfs/hdfsuserguide.html https://docs.docker.com/network/network-tutorial-overlay/#walkthrough https://hub.docker.com/u/uhopper/
this article was first published on the generic class blog.
Published at DZone with permission of Nitin Ranjan. See the original article here.
Opinions expressed by DZone contributors are their own.
Comments