Angular Tutorial: State Management with NgRx
A tutorial on how to use NgRx to work with state in an Angular appliation, with all the TypeScript you need to get started.
Join the DZone community and get the full member experience.
Join For FreeDo we need state management in every Angular application? Maybe not always, so how do we implement state management elegantly for the applications in which we do need it? NgRx is one of the libraries used for application state management. It is a Redux implementation for Angular.
First, let’s look at the problem we are trying to solve, and then understand the concepts behind the NgRx, and, finally, we'll jump into the coding.
Application State
What is the application state? Theoretically, it is the entire memory of the application, but, typically, it is the data received via API calls, user inputs, presentation UI State, app preferences, etc. Simply put, it is the data that can differentiate two instances of the same application. A simple concrete example of an application state would be a list of customers maintained in an application.
The Problem We're Trying to Solve
For simplicity, let's assume we have a list of customers in the application, and that is the state that we are trying to manage. Some API calls and user inputs could change the state ( i.e. the list ) by adding or removing customers. The state change should be reflected in the UI and other dependent components. Surely, in this particular case, we can have a global variable to hold the list and then add/remove customers from/to it and then write the code to update the UI and dependencies. But, there are many pitfalls in that design that are not the focus of this article. The NgRx is a great design for most of state management requirements. Indeed, it has a bit of boilerplate in comparison with other competitors like NGXS, Akita, or plain RxJS.
NgRx App State Management
Let’s look at the NgRx implementation — there are several components to understand.
Store: The store is what holds the app's state.
Action: A unique event dispatched from components and services that describe how the state should be changed. For example, ‘Add Customer’ can be an action that will change the state (i.e. add a new customer to the list).
Reducer: All the state changes happen inside the reducer; it responds to the action and, based on that action, it will create a new immutable state and return it to the store.
Selector: Selector is a function used for obtaining a part of the state from the store.
Effect: A mechanism that listens for dispatched actions in an observable stream, processes the server response, and returns new actions either immediately or asynchronously to the reducer to change the state. Please note that we are not using 'effect' in this example app.
This is the interaction between those components in NgRx.
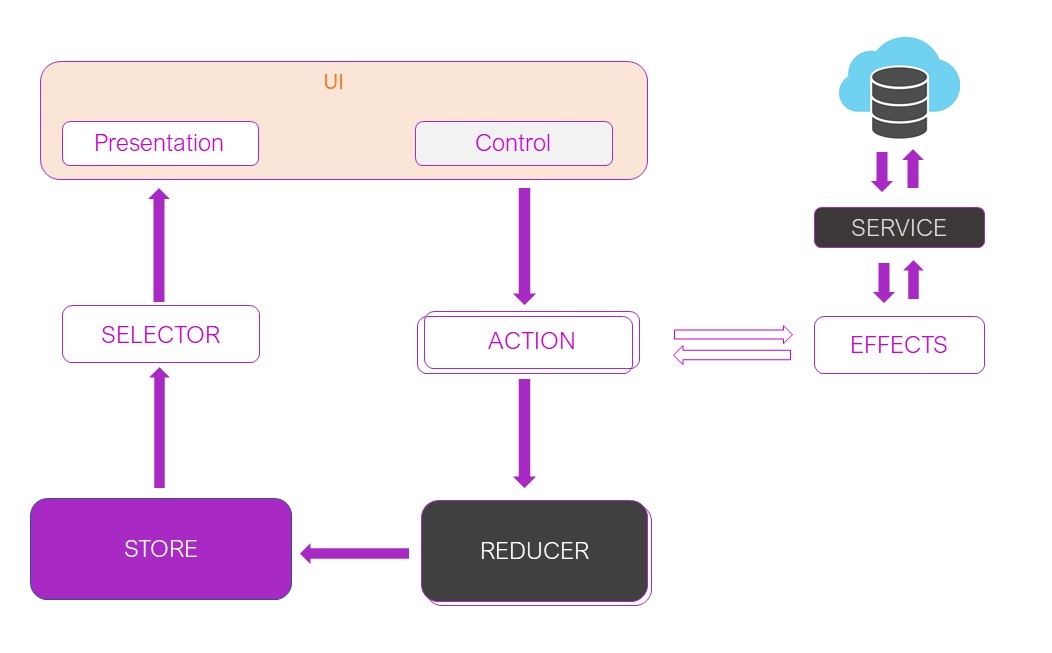
The user interface and other components dispatch actions. Actions can have a payload that needs to change the state. The reducer creates a new state as described by the specified action and returns it to the store. Once the store updates with the new state, it will notify the UI and all dependent components. Each UI reacts to the state change and its view gets updated to reflect the changes.
This is the representation of our example state, the customer list.
The “Add New Customer” UI control dispatches the AddCustomer action with the new customer as a payload in that action. The reducer takes the AddCustomer action and the new customer comes as a payload and creates a new immutable collection with the existing customers. Then, it will update the store with the new customer list. Finally, it will notify the UI using the Observables and the UI gets updated with the new customers' list.
Finally, the Coding
The code for this app is available here.
Prerequisites:
Make sure Node.js and Angular CLI are installed. Information can be found below links
Nodejs: https://nodejs.org/
Angular CLI: https://cli.angular.io/
To find out the Node.js and Angular CLI versions in your machine, run
node --version
ng --version
1. Create an Angular App With Angular CLI
Let's create a new Angular Application
ng new angular-state-management --style=scss --routing=false
It will create all the required files and install the dependencies. This will take a few minutes.
2. Load the Project Into the IDE (I'm Using IntelliJ IDEA)
3. Run the App
Let's run the app created by the CLI, just to make sure everything has been created correctly so far.
cd angular-state-management
npm start
Check that the app is running on http://localhost:4200/.
4. Install NgRx and Tools
NgRx Schematics provides scaffolding. NgRx commands get integrated into the Angular CLI, and most of the NgRx elements can be created using angular CLI. So, let's add NgRx Schematics. (You can use a new terminal window or exit out from the running angular app by pressing the Ctrl+C key )
ng add @ngrx/schematics@latest
Configure the Schematics so that NgRx commands are available in Angular CLI by default.
ng config cli.defaultCollection @ngrx/schematics
Let’s install the NgRx, dependencies, and dev-tools now.
npm install @ngrx/store --save
npm install @ngrx/effects --save
npm install @ngrx/entity --save
npm install @ngrx/store-devtools --save
Notice that package.json has been updated.
5. Add an NgRx Store to the App
Let’s generate NgRx Store in the app.
ng generate @ngrx/schematics:store State --root --module app.module.ts
Notice that the following line has been added to the app.module.ts
StoreModule.forRoot(reducers, { metaReducers }),
6. Create a sub Module for Customer
Let's create a separate module for Customers following the 'separation of concerns' principle.
ng generate module Customer
7. Create a Customer model
Now, we are starting to add some code. First, let’s create a 'Customer' using the CLI.
ng generate class models/customer
As another option, you can add it using the editor.
The customer.ts file has been created in the src\app\models folder. Add 'name' property to it.
x
export class Customer {
name = '';
}
8. Add Actions
Now, we are going to add NgRx-related code. As our diagram above shows, the state that we are going to manage is the collection of customers. We can change the collection of the customer's state using the actions. For this particular case, we have one action that can change the state:
We are not generating failure action, So just select 'N'.
ng generate action customer/store/action/Customer
? Should we generate success and failure actions? No
? Do you want to use the create function? Yes
CREATE src/app/ngrx/customer.actions.spec.ts (218 bytes)
CREATE src/app/ngrx/customer.actions.ts (132 bytes)
Create a TypeScript file, customer.actions.ts, in the src/app folder for customer actions using the editor.
Add the following code to the customer.actions.ts file:
xxxxxxxxxx
import { createAction, props } from '@ngrx/store';
import {Customer} from '../../../models/customer';
export const addCustomer = createAction(
'[Customer] Add Customer',
(customer: Customer) => ({customer})
);
9. Add a Customer Reducer
Let’s add the reducer; all state changes are happening inside the reducer based on the selected ‘Action.’ If the state is changing, then the reducer will create a new customer rather than mutating the existing customer list. In the case of the state change, the reducer is always going to return a newly created customer list object.
Generate reducer for Customers. Again, say "No" to adding failure, success actions.
ng generate reducer customer/store/reducer/Customer
? Should we add success and failure actions to the reducer? No
? Do you want to use the create function? Yes
CREATE src/app/ngrx/customer.reducer.spec.ts (334 bytes)
CREATE src/app/ngrx/customer.reducer.ts (237 bytes)
Add code to the reducer.
xxxxxxxxxx
import {Action, createReducer, on} from '@ngrx/store';
import * as CustomerActions from '../action/customer.actions';
import {Customer} from '../../../models/customer';
export const customerFeatureKey = 'customer';
export interface CustomerState {
customers: Customer[];
}
export const initialState: CustomerState = {
customers: []
};
export const customerReducer = createReducer(
initialState,
on(CustomerActions.addCustomer,
(state: CustomerState, {customer}) =>
({state,
customers: [state.customers, customer]
}))
);
export function reducer(state: CustomerState | undefined, action: Action): any {
return customerReducer(state, action);
}
10. Add Selector
Generate a selector to get the customers from the Store.
ng generate selector customer/store/selector/Customer
Modify the code as below:
xxxxxxxxxx
import {createFeatureSelector, createSelector} from '@ngrx/store';
import * as fromCustomer from '../reducer/customer.reducer';
export const selectCustomerState = createFeatureSelector<fromCustomer.CustomerState>(
fromCustomer.customerFeatureKey,
);
export const selectCustomers = createSelector(
selectCustomerState,
(state: fromCustomer.CustomerState) => state.customers
);
11. Add a UI Component for View Customers
Generate CustomerView component
ng generate component customer/CustomerView
Add code to the customers-view.compoment.ts file.
Declare the customers that are observable at the top of the class and modify the constructor and use the selector to get Observable of Customers
customers$: Observable<Customer[]>
constructor(private store: Store<CustomerState>) {
 this.customers$ = this.store.pipe(select(selectCustomers));
}
With required dependencies at the top, the customers-view.compoment.ts file should look like this now:
xxxxxxxxxx
import {Component} from '@angular/core';
import {Observable} from 'rxjs';
import {Customer} from '../../models/customer';
import {select, Store} from '@ngrx/store';
import {selectCustomers} from '../store/selector/customer.selectors';
import {CustomerState} from '../store/reducer/customer.reducer';
@Component({
selector: 'app-customer-view',
templateUrl: './customer-view.component.html',
styleUrls: ['./customer-view.component.scss']
})
export class CustomerViewComponent {
customers$: Observable<Customer[]>;
constructor(private store: Store<CustomerState>) {
this.customers$ = this.store.pipe(select(selectCustomers));
}
}
Add the following code to the customers-view.compoment.html file.
xxxxxxxxxx
<h4>List of Customers</h4>
<div *ngFor="let customer of customers$ | async; let i=index">
<span >{{i+1}}.</span> {{customer.name}}
</div>
12. Add UI Controls to Add New Customers
Generate UI control component to Add Customers
ng generate component customer/CustomerAdd
Add code to dispatch the add customer action
this.store.dispatch(addCustomer(customer));With all modification the customer-add.component.ts
xxxxxxxxxx
export class CustomerAddComponent {
constructor(private store: Store<CustomerState>) {
}
addCustomer(customerName: string): void {
const customer = new Customer();
customer.name = customerName;
this.store.dispatch(addCustomer(customer));
}
}
And the customer-add.component.html file.
xxxxxxxxxx
<h4>Add New Customer</h4>
<input #box >
<button (click)="addCustomer(box.value)">Add</button>
13. Add StoreModule for Feature in Customer Module
Add Store module in the CustomerModule
StoreModule.forFeature(customerFeatureKey, reducer),
Also, add the exports
exports: [CustomerViewComponent,CustomerAddComponent]
The customer.module.ts will look like this:
xxxxxxxxxx
import {NgModule} from '@angular/core';
import {CommonModule} from '@angular/common';
import {CustomerViewComponent} from './customer-view/customer-view.component';
import {CustomerAddComponent} from './customer-add/customer-add.component';
import {StoreModule} from '@ngrx/store';
import {customerFeatureKey, reducer} from './store/reducer/customer.reducer';
@NgModule({
declarations: [CustomerViewComponent, CustomerAddComponent],
imports: [
CommonModule,
StoreModule.forFeature(customerFeatureKey, reducer),
],
exports: [
CustomerViewComponent,
CustomerAddComponent
]
})
export class CustomerModule {
}
13. Import the CustomerModule in the AppModule
Import the CustomerModule into the AppModule
xxxxxxxxxx
import { BrowserModule } from '@angular/platform-browser';
import { NgModule } from '@angular/core';
import { AppComponent } from './app.component';
import { StoreModule } from '@ngrx/store';
import { reducers, metaReducers } from './reducers';
import { StoreDevtoolsModule } from '@ngrx/store-devtools';
import { environment } from '../environments/environment';
import {CustomerModule} from './customer/customer.module';
@NgModule({
declarations: [
AppComponent
],
imports: [
BrowserModule,
StoreModule.forRoot(reducers, { metaReducers }),
!environment.production ? StoreDevtoolsModule.instrument() : [],
CustomerModule
],
providers: [],
bootstrap: [AppComponent]
})
export class AppModule { }
11. Update the App Component With CustomerView and CustomerAdd Component
Now update the app.component.html file by removing the default content and embedding both the 'app-customers-view' and 'app-customer-add' components.
The app.component.html file should look like this:
xxxxxxxxxx
<div style="text-align:center">
<h1>
Welcome to {{ title }}!
</h1>
</div>
<app-customer-view></app-customer-view>
<app-customer-add></app-customer-add>
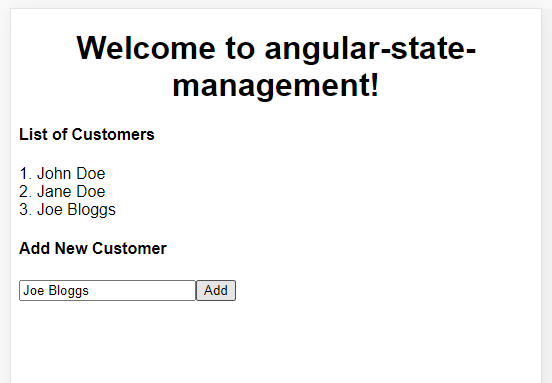
12. Run the App
Our coding is done! Let's run the app again (if it is not already running).
npm start
The app will look like this:
The code for this app is available here.
Thank you, your feedback on this article is highly appreciated.
Opinions expressed by DZone contributors are their own.
Comments