Arduino Data on MQTT
Using a combination of MQTT and API functionalities, we have created Digital Twins for our device automatically.
Join the DZone community and get the full member experience.
Join For FreeAs Hardware, we have chosen an Arduino Uno WiFi Rev2.

1. Configure the Arduino Device
1.1 Set up the WiFi Connection
1.1.1 Manage Username and Password
#define SECRET_SSID "<your username>"
#define SECRET_PASS "<your password>"
1.1.2 WiFi Connection Code
#include <WiFiNINA.h>
#include "arduino_secrets.h"

///////please enter your sensitive data in the Secret tab/arduino_secrets.h
char ssid[] = SECRET_SSID;     // your network SSID (name)
char pass[] = SECRET_PASS;    // your network password (use for WPA, or use as key for WEP)

WiFiClient wifiClient;

void setup() {
  //Initialize serial and wait for port to open:
  Serial.begin(9600);
  while (!Serial) {
    ; // wait for serial port to connect. Needed for native USB port only
  }

  // attempt to connect to Wifi network:
  Serial.print("Attempting to connect to WPA SSID: ");
  Serial.println(ssid);
  while (WiFi.begin(ssid, pass) != WL_CONNECTED) {
    // failed, retry
    Serial.print(".");
    delay(5000);
  }

  Serial.println("You're connected to the network");
  Serial.println();
}

void loop()
{}
1.2 Set up the MQTT Connection to akenza
#include <PubSubClient.h>

//MQTTClient mqttClient(WiFiClient);

char host[] = "mqtt.akenza.io";
char clientid[] = "Arduino";
char username[] = "<copy from Akenza Device Api configuration>";
char password[] = "<copy from Akenza Device Api configuration>";
char outTopic[] = "<copy from Akenza Device Api configuration>";

PubSubClient client(host, 1883, callback, wifiClient);

void setup() {
  if (client.connect(host, username, password)) {
    Serial.print("Connected to ");
    Serial.println(host);
    Serial.println();

    boolean r = client.subscribe(outTopic);
    Serial.print("Subscribed to ");
    Serial.println(outTopic);
    Serial.println();
    }
    else {
      // connection failed
      // mqttClient.state() will provide more information
      // on why it failed.
      Serial.print("Connection failed: ");
      Serial.println(client.state());
      Serial.println();
  }
}
Akenza accepts messages in JSON format for MQTT connections. To build up a well-formed JSON object, we make use of the ArduinoJson library.
#include <ArduinoJson.h>

void loop()
{
  StaticJsonDocument<256> doc;
  doc["Temperature"] = 22;
  doc["Humidity"] = 68;
  doc["Light"] = 96;

  // Add an array
  JsonArray data = doc.createNestedArray("data");
  data.add(48);
  data.add(2.3);

  char out[128];
  int b =serializeJson(doc, out);
  Serial.print("publishing bytes = ");
  Serial.println(b,DEC);

  boolean rc = client.publish(outTopic, out);

  // The above line prints:
  // {"sensor":"gps","time":1351824120,"data":[48.756080,2.302038]}
  delay(5000);
  client.loop();
}
Please note that these are just examples of data; if you would like to send to the cloud data coming from a sensor, the code has to be adapted accordingly.
2. Connect the Arduino device via MQTT on akenza
2.1 Creating a Secret
2.1.1 Setting up an MQTT Device Connector on akenza

2.2 Create an MQTT Device

2.3 Set up the Arduino Device

3. Final Result
#include <SPI.h>
#include <PubSubClient.h>
#include <WiFiNINA.h>
#include <ArduinoJson.h>
#include "arduino_secrets.h"
///////please enter your sensitive data in the Secret tab/arduino_secrets.h
char ssid[] = SECRET_SSID; // your network SSID (name)
char pass[] = SECRET_PASS; // your network password (use for WPA, or use as key for WEP)
char host[] = "mqtt.akenza.io";
char clientid[] = "Arduino";
char username[] = "0783ddd64683f579";
char password[] = "bd604gmgit0x7kilc8puok3g2rxsldl2";
char outTopic[] = "/up/bd604gmgit0x7kilc8puok3g2rxsldl2/id/99E77F4ECC728656";
//set interval for sending messages (milliseconds)
const long interval = 8000;
unsigned long previousMillis = 0;
int count = 0;
//receive data
void callback(char* topic, byte* payload, unsigned int length) {
char str[length+1];
Serial.print("Message arrived [");
Serial.print(topic);
Serial.print("] ");
int i=0;
for (i=0;i<length;i++) {
Serial.print((char)payload[i]);
str[i]=(char)payload[i];
}
str[i] = 0; // Null termination
Serial.println();
StaticJsonDocument <256> doc;
deserializeJson(doc,payload);
// deserializeJson(doc,str); can use string instead of payload
const char* sensor = doc["sensor"];
long time = doc["time"];
float latitude = doc["data"][0];
float longitude = doc["data"][1];
Serial.println("latitude =");
Serial.println(latitude,2);
Serial.println(sensor);
}
WiFiClient wifiClient;
PubSubClient client(host, 1883, callback, wifiClient);
void setup() {
//Initialize serial and wait for port to open:
Serial.begin(9600);
while (!Serial) {
; // wait for serial port to connect. Needed for native USB port only
}
// attempt to connect to Wifi network:
Serial.print("Attempting to connect to WPA SSID: ");
Serial.println(ssid);
while (WiFi.begin(ssid, pass) != WL_CONNECTED) {
// failed, retry
Serial.print(".");
delay(5000);
}
Serial.println("You're connected to the network");
Serial.println();
if (client.connect(host, username, password)) {
Serial.print("Connected to ");
Serial.println(host);
Serial.println();
boolean r = client.subscribe(outTopic);
Serial.print("Subscribed to ");
Serial.println(outTopic);
Serial.println();
}
else {
// connection failed
Serial.println("Connection failed ");
Serial.println(client.state());
Serial.println();
}
}
void loop()
{
StaticJsonDocument<256> doc;
doc["Temperature"] = 22;
doc["Humidity"] = 68;
doc["Light"] = 96;
// Add an array
JsonArray data = doc.createNestedArray("data");
data.add(48);
data.add(2.3);
char out[128];
int b =serializeJson(doc, out);
Serial.print("publishing bytes = ");
Serial.println(b,DEC);
boolean rc = client.publish(outTopic, out);
// The above line prints:
// {"sensor":"gps","time":1351824120,"data":[48.756080,2.302038]}
delay(5000);
client.loop();
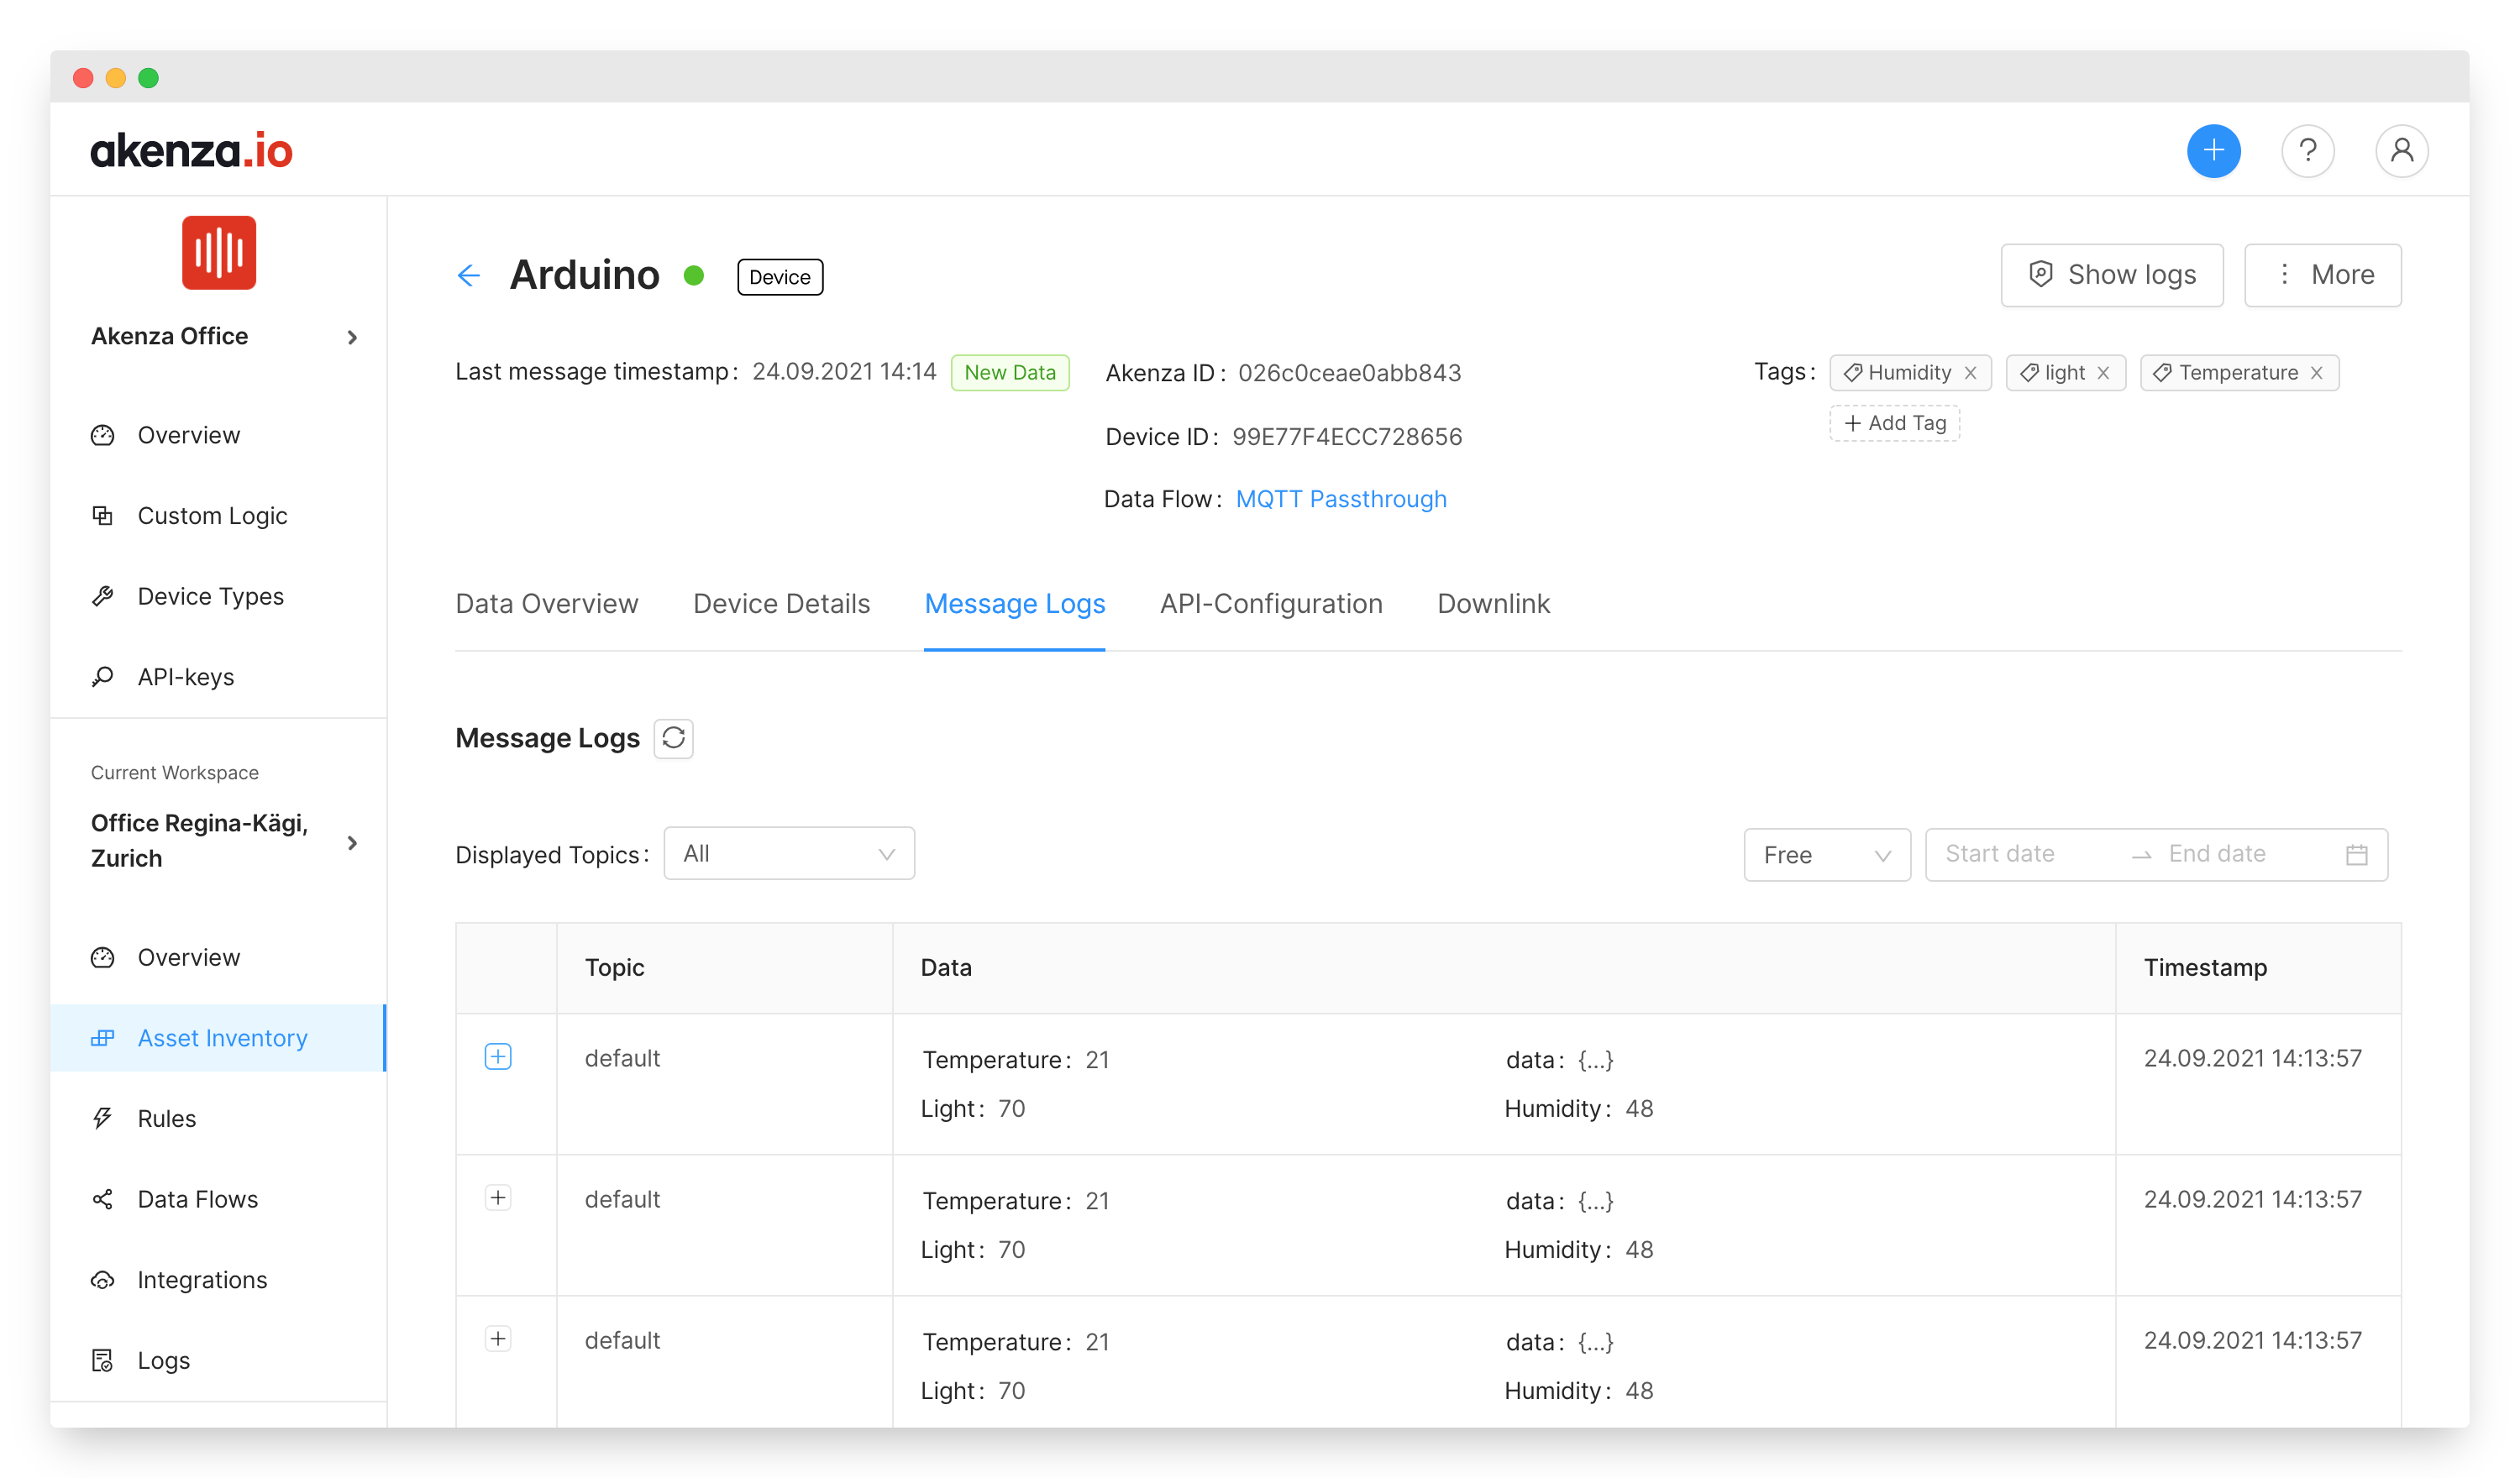
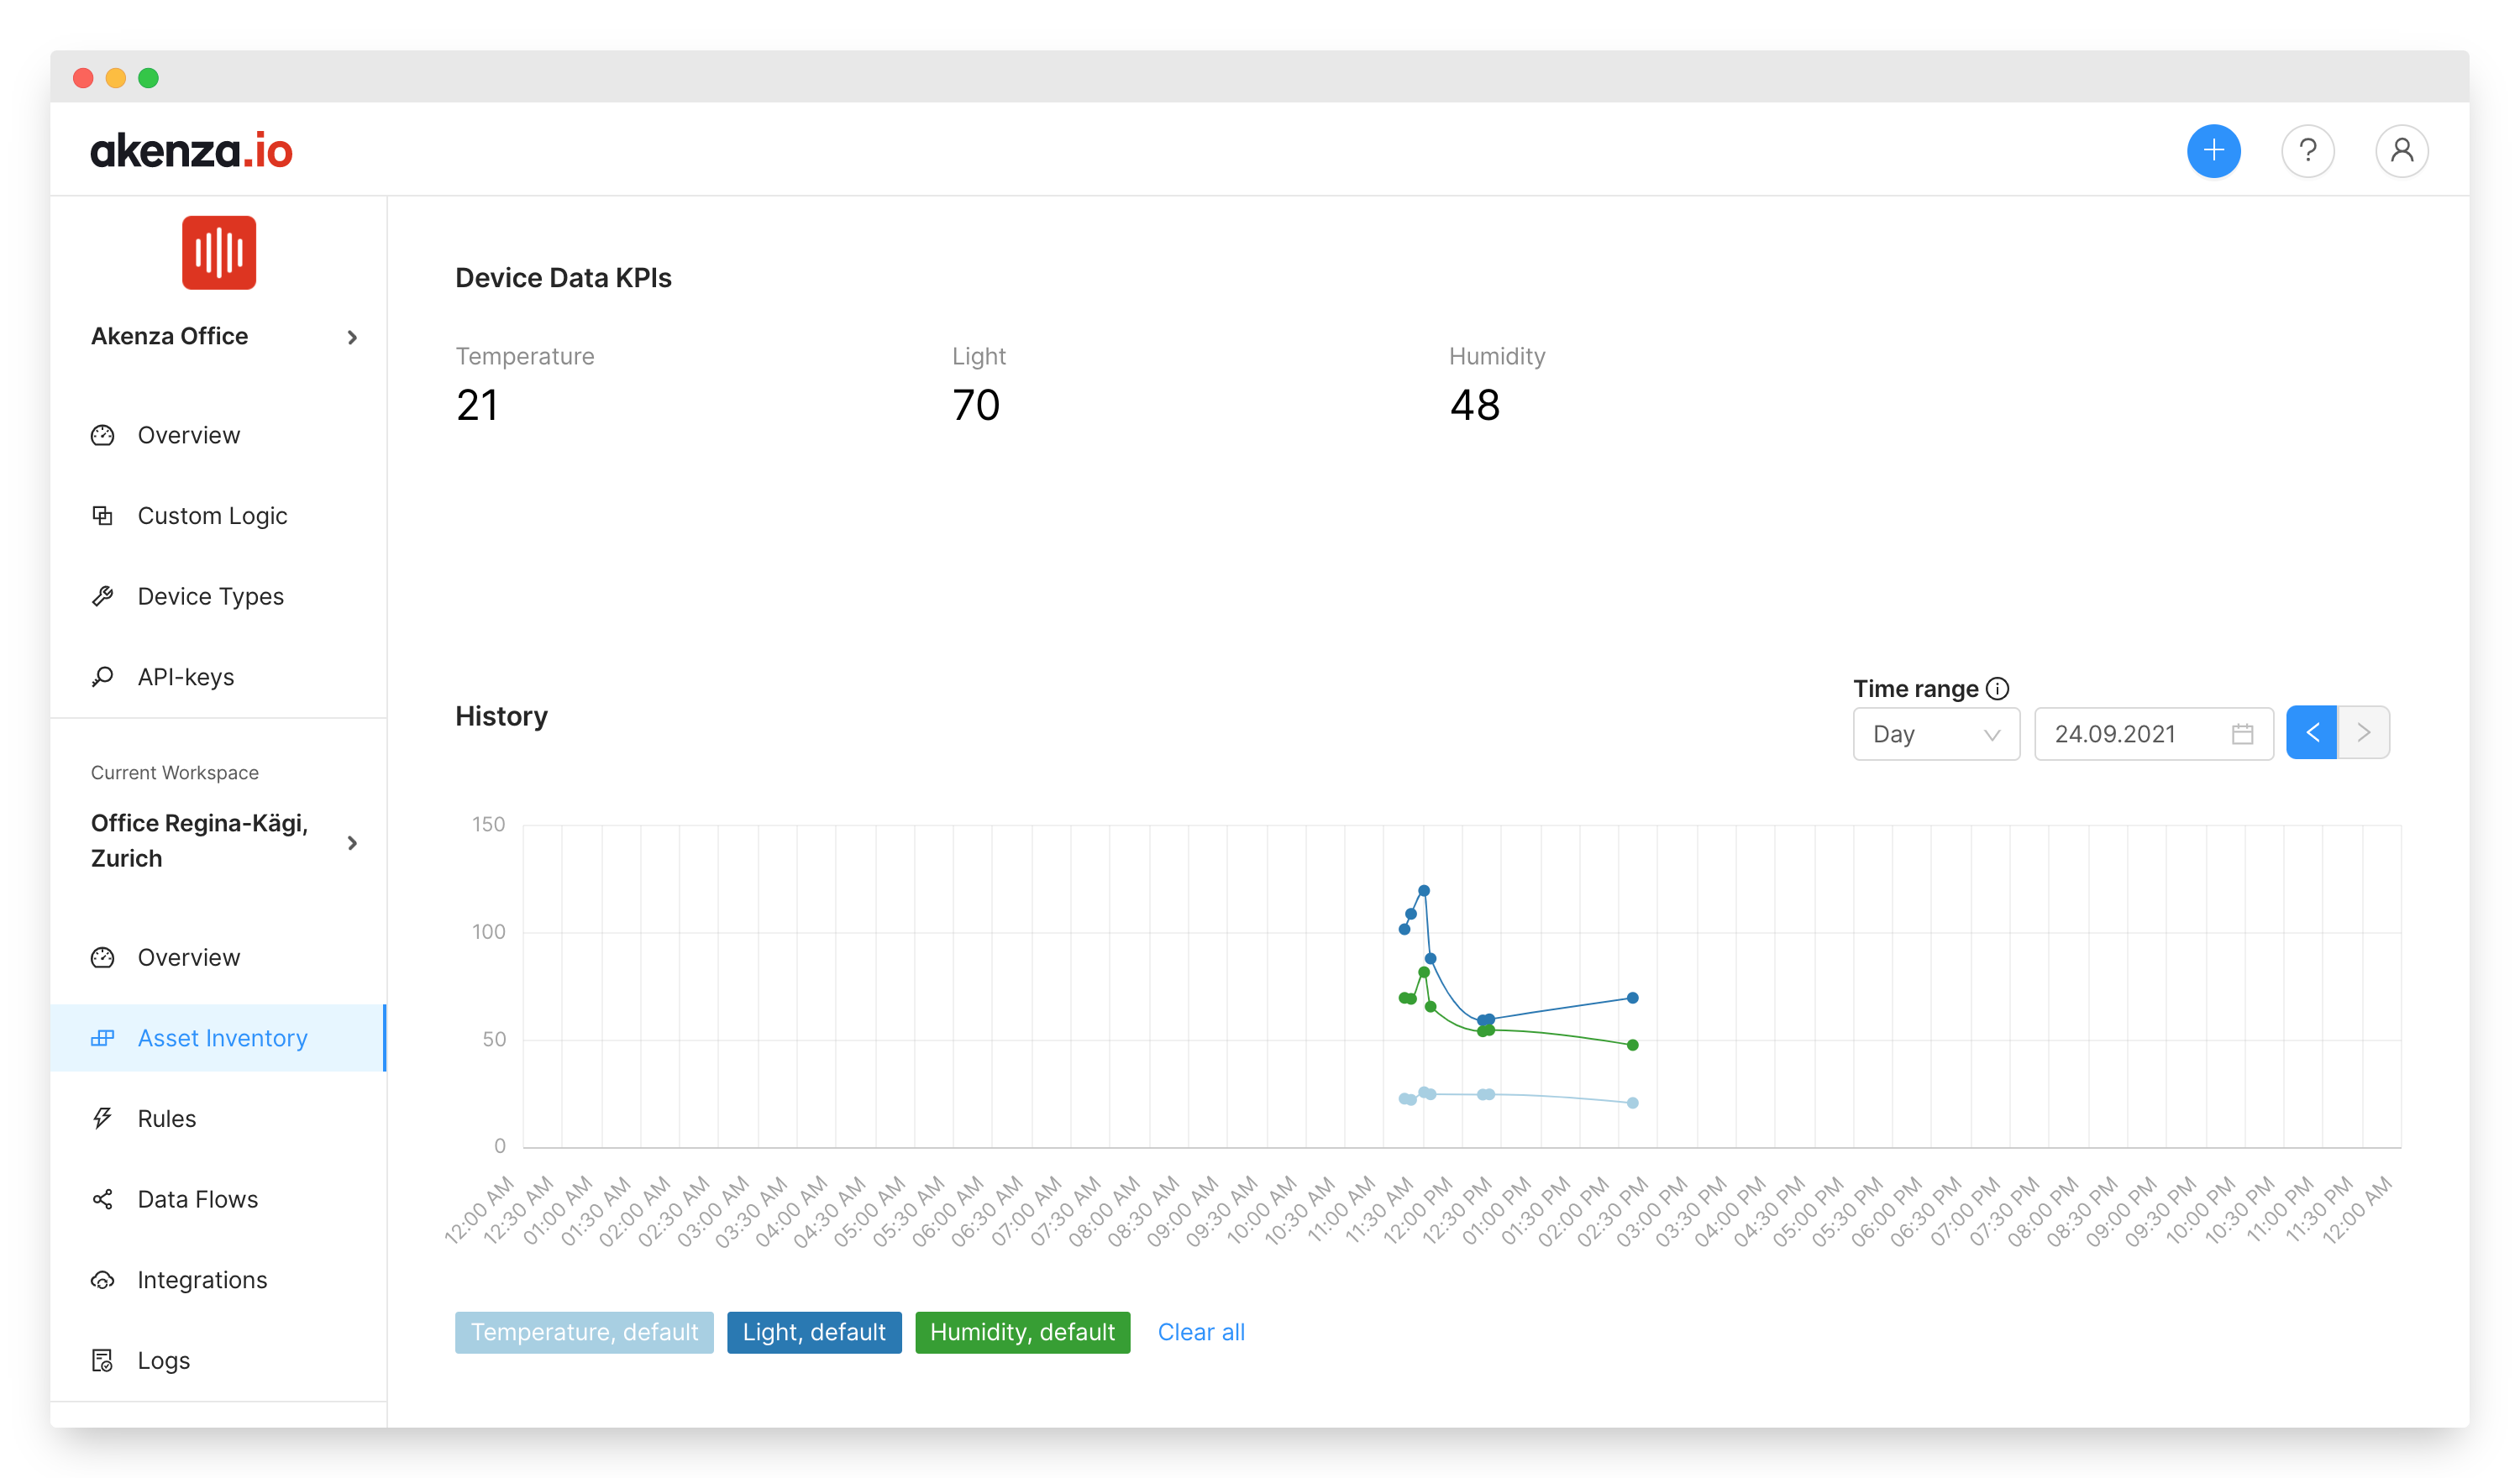
}It automatically decodes the received JSON and visualizes data received from the Arduino device. Incoming data can be viewed on the Device Detail Page within Message Logs.
Published at DZone with permission of Marco Mantoan. See the original article here.
Opinions expressed by DZone contributors are their own.
Comments