Upgrade Your Hobbyist Arduino Firmware To Work With STM32 For Wider Applications
Running out of processing power or memory? Want better timing control of your functions? Here, get started with making the switch to 32-bit ARM-based MCUs.
Join the DZone community and get the full member experience.
Join For FreeIf you're new to the DIY IoT community or even if you're a seasoned maker but need to spin up a quick prototype for something that collects some sensor data and takes some actions based on it automatically, you probably have an Arduino running some code somewhere in your workshop. Now, if you have been adding more sensors and more controls and more peripherals to your little system for a while till it's not so little anymore, or if you find yourself looking for real-time capabilities or just more power, it might be time to upgrade to a 32-bit ARM Cortex-M based chip such as one from the STM32 family.
For the purposes of this tutorial, we will focus on the main advantages of making the switch and the high-level firmware changes needed for the same, along with code examples. I would suggest using the STM32 Discovery Board to play with and test the code before moving on to designing a custom PCB with an STM32 chip.
IDE and Setup
If you're used to using Arduino IDE for development, suddenly switching over to something more widely used in the industry like Keil Studio will probably be too much of a jump. A good middle ground would be the STM32CubeIDE.
As a summary, let's outline the basic tools you will need to have to get started:
- STM32CubeIDE: Download links
- STM32CubeMX: This is an add-on to the STM32 IDE that provides an easy GUI for configuring the microcontroller. Download link
- STM32 development board with programming cable
Here is a good quick-start guide from Digikey for installing and setting up the IDE and connecting to the development board.
Next, we will get to the heart of it all, porting over the code.
Porting the Firmware
Peripheral Code
Some of the main protocols we will cover in this tutorial based on how widespread they are include Digital Read/Write, I2C, ADC (for leading analog sensors for example), and PWMs.
1. Digital I/O
This is relatively easy; you just have to replace the digitalWrite() and digitalRead() with the respective STM32 HAL functions.
Here is a code example.
// Arduino code for Digital I/O
pinMode(LED_PIN, OUTPUT);
digitalWrite(LED_PIN, HIGH);
int state = digitalRead(LED_PIN);// STM32 HAL Code
HAL_GPIO_WritePin(GPIOA, GPIO_PIN_5, GPIO_PIN_SET);
GPIO_PinState state = HAL_GPIO_ReadPin(GPIOA, GPIO_PIN_5);2. PWM
Controlling PWM-based outputs is relatively complicated unless you're using Arduino libraries that are built for specific modules. For example, if you want to know how to control an LED strip or servos, it's beneficial to know how to work with PWM signals.
Here is an example of setting up a PWM output.
- In the graphical interface of your STM32CubeIDE, configure Timer2 to operate in PWM Mode and set CH1 as output.
![Configure Timer2 to operate in PWM Mode]()
- Set the RCC mode and configuration as shown in the image in the System Core settings.
![Set the RCC mode and configuration]()
- Hit "Generate Code" from the "Project" menu on the menu bar to auto-generate the code to configure the PWM signal. Here is a screenshot of what it looked like for me.
![Auto-generated code to configure the PWM signal]()
- Add some code in your main function to test the PWM output.


int main(void)
{
    int32_t dutyCycle = 0;

    HAL_Init();
    SystemClock_Config();
    MX_GPIO_Init();
    MX_TIM2_Init();
    HAL_TIM_PWM_Start(&htim2, TIM_CHANNEL_1);

    while (1)
    {
        for(dutyCycle = 0; dutyCycle < 65535; dutyCycle += 70)
        {
            TIM2->CCR1 = dutyCycle;
            HAL_Delay(1);
        }

        for(dutyCycle = 65535; dutyCycle > 0; dutyCycle -= 70)
        {
            TIM2->CCR1 = dutyCycle;
            HAL_Delay(1);
        }
    }
}
Now, if you connect the GPIO pin attached to TIM2 to an oscilloscope, you'll see the PWM signal with the duty cycle you set! You can check which GPIO pin is attached to that timer using the configuration view for that timer; TIM 2 if you follow the example, as shown in the image below.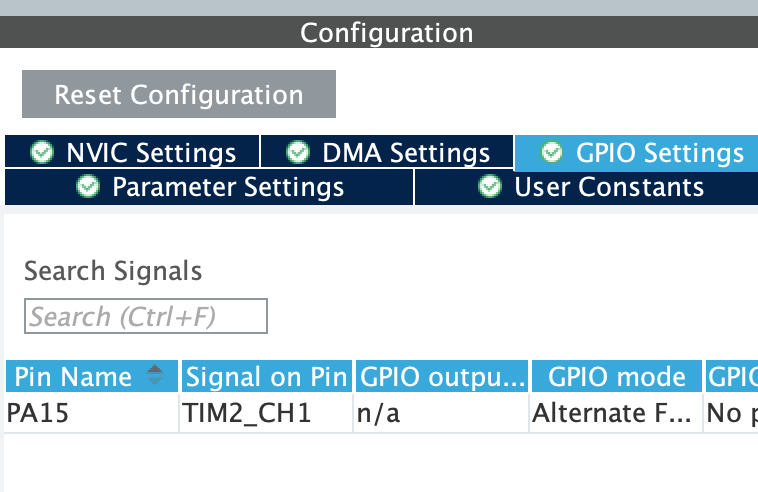
3. Analog Read
Another commonly used function you've probably used your Arduino for is reading analog sensors. With an Arduino, it was as simple as using the AnalogRead(pin_number) function.
On an STM32 though, it's not that much harder. You can follow the steps below.
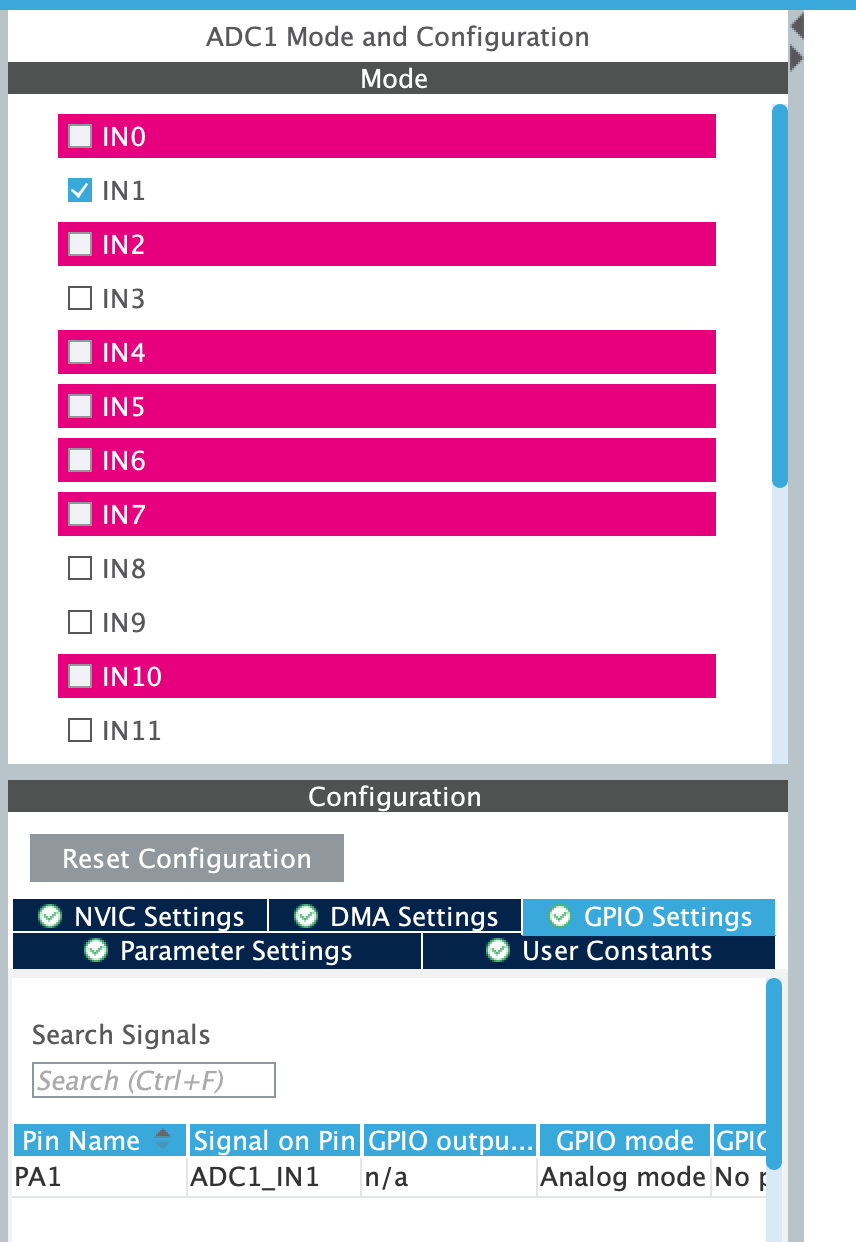
- Go to the "Pinout & Configuration" tab. Enable ADC1 and select the channel connected to your analog sensor (e.g., ADC1_IN0 for PA0).
- Configure the ADC parameters as needed. From the Analog tab, select the ADC you want to use, and select one of the interrupts that don't show any conflicts; that is, they're not highlighted in red. If you go to the GPIO section, it will show which pin on the MCU it's connected to.
![Connected pin]()
- "Generate Code" as before for the configuration code.
- Here is some sample code for your main function to read the analog value:
int main(void)
{
    HAL_Init();
    SystemClock_Config();
    MX_GPIO_Init();
    MX_ADC1_Init();

    HAL_ADC_Start(&hadc1);

    while (1)
    {
        if (HAL_ADC_PollForConversion(&hadc1, HAL_MAX_DELAY) == HAL_OK)
        {
            uint32_t adcValue = HAL_ADC_GetValue(&hadc1);
            printf("ADC Value: %lu\n", adcValue);
        }
        HAL_Delay(1000);
    }
}
4. I2C
A lot of industrial quality sensors, I/O expansion devices, multiplexers, displays, and other useful peripherals commonly communicate over I2C. On an Arduino, you probably used the Wire library to communicate with I2C peripherals. Let's dive into how to communicate with an I2C peripheral on an STM32.
- Go to the graphical interface, enable I2C1 (or another I2C instance), and configure the pins (e.g., PB6 for I2C1_SCL and PB7 for I2C1_SDA).
![Configure the pins]()
- Configure the I2C parameters as needed (e.g., speed, addressing mode). I kept the default settings for this example.
- Generate the code.
- Here is some sample code for sending and receiving data over I2C.

int main(void)
{
    HAL_Init();
    SystemClock_Config();
    MX_GPIO_Init();
    MX_I2C1_Init();

    uint8_t data = 0x00;
    HAL_I2C_Master_Transmit(&hi2c1, (uint16_t)0x50 << 1, &data, 1, HAL_MAX_DELAY);
    HAL_I2C_Master_Receive(&hi2c1, (uint16_t)0x50 << 1, &data, 1, HAL_MAX_DELAY);

    while (1)
    {
    }
}

static void MX_I2C1_Init(void)
{
    hi2c1.Instance = I2C1;
    hi2c1.Init.ClockSpeed = 100000;
    hi2c1.Init.DutyCycle = I2C_DUTYCYCLE_2;
    hi2c1.Init.OwnAddress1 = 0;
    hi2c1.Init.AddressingMode = I2C_ADDRESSINGMODE_7BIT;
    hi2c1.Init.DualAddressMode = I2C_DUALADDRESS_DISABLE;
    hi2c1.Init.OwnAddress2 = 0;
    hi2c1.Init.GeneralCallMode = I2C_GENERALCALL_DISABLE;
    hi2c1.Init.NoStretchMode = I2C_NOSTRETCH_DISABLE;

    if (HAL_I2C_Init(&hi2c1) != HAL_OK)
    {
        Error_Handler();
    }
}
Conclusion
In this article, we covered interacting with peripherals using some of the most common communication protocols with an STM32. If you would like a tutorial on other communication protocols, or have questions about configuring your first STM32 controller, please leave a comment below.
Opinions expressed by DZone contributors are their own.
Comments