Introduction to IoT Sensors
This great introduction to prototyping boards and sensors will get you collecting data from Arduinos and Raspberry Pis in no time at all.
Join the DZone community and get the full member experience.
Join For FreeThe Internet of Things is one of the most important and promising technological topics today. Some market researchers estimate that there are more than 20 billion connected devices and counting. Around us, there are smartphones, wearables, and other devices, all of which use sensors. Nowadays, sensors play an important role in our everyday life and in IoT. Sensors monitor our health status (e.g. a heartbeat), air quality, home security, and are widely used in the Industrial Internet of Things (IIoT) to monitor production processes. For these reasons, it is important to know how they work and how we can use them to acquire information.
What Is a Sensor?
Generally speaking, a sensor is a device that is able to detect changes in an environment. By itself, a sensor is useless, but when we use it in an electronic system, it plays a key role. A sensor is able to measure a physical phenomenon (like temperature, pressure, and so on) and transform it into an electric signal. These three features should be at the base of a good sensor:
It should be sensitive to the phenomenon that it measures
It should not be sensitive to other physical phenomena
It should not modify the measured phenomenon during the measurement process
There is a wide range of sensors we can exploit to measure almost all the physical properties around us. A few common sensors that are widely adopted in everyday life include thermometers, pressure sensors, light sensors, accelerometers, gyroscopes, motion sensors, gas sensors and many more. A sensor can be described using several properties, the most important being:
Range: The maximum and minimum values of the phenomenon that the sensor can measure.
Sensitivity: The minimum change of the measured parameter that causes a detectable change in output signal.
Resolution: The minimum change in the phenomenon that the sensor can detect.
Sensor Classification
Sensors can be grouped using several criteria:
Passive or Active. Passive sensors do not require an external power source to monitor an environment, while Active sensors require such a source in order to work.
Another classification is based on the method used to detect and measure the property (mechanical, chemical, etc.).
Analog and Digital. Analog sensors produce an analog, or continuous, signal while digital sensors produce a discrete signal.
There are other ways and methods to group sensors but the classifications shown above are the easiest.
How to Use Sensors in IoT
The development of prototyping boards and the low price of sensors allow us easily use them in IoT projects. There are several prototyping boards on the market, suited for different projects depending on features and specifications. In this context, we will consider the two most popular boards: the Arduino Uno and Raspberry Pi 2.
This article will explore how to connect different sensors to these boards and how to interact with them.
Before diving into the details on how to use sensors with these boards, it is important to note that every sensor has its own operating voltage range. This parameter is very important because the voltage supplied by the board must not be higher than the maximum voltage allowed by the sensor. Therefore, it is important to read the sensor data sheet carefully before connecting it to the board to avoid damage. The same principle is valid for the output signal, which must be lower than the maximum voltage that the board can tolerate.
How to Use Arduino With Sensors
The first and the most popular board is the Arduino Uno. It is a microcontroller board based on an ATmega328P. It is very easy to use, and a good starting point. This board provides 6 analog and 14 digital pins. It is perfect to use with analog and digital sensors.
How to Measure the Temperature Using Arduino
The easiest way to start is to connect an analog sensor to the Arduino. An analog sensor, as stated before, is a sensor that provides a continuous signal. For our first basic example, we will connect a simple temperature sensor, a TMP36. For more information, you can refer to the sensor data sheet. Generally speaking, the output voltage of this sensor is directly proportional to the environmental temperature. Arduino provides several analog input pins, labeled with an "A," that are suitable for accepting analog signals coming from a sensor. The schema below describes how to connect the sensor:

The code to read the temperature is very simple:
const int tempSensorPin = A1;
void setup() {
    Serial.begin(9600);
}
void loop() {
    int pinValue = analogRead(tempSensorPin);
    Serial.println("Pin value: " + String(pinValue));
    float voltage = (pinValue / 1024.0) * 5.0;
    Serial.println("Voltage: " + String(voltage));
    float temperature = (voltage - 0.5) * 100; // °C
    Serial.println("Temperature: " + String(temperature)
    );
    delay(5000);
}
How to Measure the Temperature and Humidity Using Arduino
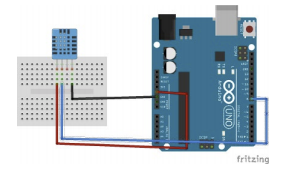
Now it is time to connect a digital sensor to an Arduino. There are several digital sensors available, but for the sake of simplicity, we will consider a common digital sensor called the DHT11. This sensor measures the temperature and humidity. It is a very cheap sensor that provides a digital output. In this scenario, the sensor data pin has to be connected to the digital Arduino pin, as shown below:
The code is very simple. Even though we can parse the digital signal and read the temperature and the humidity, we will use a library to simplify development. The library is available in the Arduino IDE in the Sketch->Include library menu item.
#include "DHT.h"
#define PIN 8
#define DHTTYPE DHT11 // sensor type
DHT dht(PIN, DHTTYPE);
void setup() {
    Serial.begin(9600);
}
void loop() {
    int temp = dht.readTemperature();
    int hum = dht.readHumidity();
    Serial.println("Temperature: " + String(temp));
    Serial.println("Humidity: " + String(hum));
    delay(5000);
}
Running the code above, Arduino will log the temperature and the humidity every 5 seconds.
How to Connect an I2C Sensor
An I2C sensor is a serial bus used to connect peripherals to microprocessors. It is widely used and it requires four different pins:
Vin
GND
CLK (Clock)
SDA (Data)
To experiment with the I2C sensor with Arduino, we'll analyze the BMP280/BME280 sensor. This sensor measures, among other properties, the barometric pressure. The diagram below shows how to connect a BMP280 to Arduino:
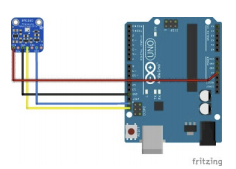
As you can see, there are four different connections. The same connection can be used with a BME280. Do not forget to connect the sensor's CLK pin to the Arduino CLK and the SDA pin (the data) to the Arduino SDA. In addition, the SDO pin cannot be left floating, so you should connect it to the ground or to Vcc. The source code to read the pressure is shown below:
#include <Wire.h>
#include <Adafruit_Sensor.h>
#include <Adafruit_BMP280.h>
//BMP280
Adafruit_BMP280 bmp;
void setup() {
    Serial.begin(9600);
    if (!bmp.begin()) {
        Serial.println("Could not find a valid BMP280
        sensor, check wiring!");
        while (1);
    }
}
void loop() {
    float pressure = bmp.readPressure();
    Serial.println("Pressure: " + String(pressure));
    delay(5000);
}
Before running the code above, you have to import a library to handle the sensor, as described in the previous example.
How to Use Sensors With a Raspberry Pi
Raspberry Pi is a single-board computer developed by the Raspberry Pi Foundation. There are several versions of Raspberry Pi with different specifications, but they all have their own operating system based on Linux. It is similar to a PC because it supports video output, USB ports, and keyboards. It is a very powerful board, and the examples below show only a little bit of its power.
How to Use Movement Sensors
To monitor movements, we will use a PIR sensor, which stands for Passive Infrared. It uses an infrared sensor to detect low-level radiation emitted by a warm body. Put simply, when the radiation level changes, it means a warm body is moving into its detection area. This sensor uses a digital pin that gets low (or high) when motion is detected. The schema below shows how to connect the sensor to Raspberry Pi. The connection may change if you use a different PIR version or a different Raspberry Pi board:

The Python code is shown below:
import RPi.GPIO as GPIO
import time
GPIO.setmode(GPIO.BCM)
sensorPin = 7
GPIO.setup(sensorPin, GPIO.IN)
while True:
if GPIO.input(sensorPIN) == GPIO.LOW:
print "Motion detected"
else:
print "No motion"
time.sleep(0.5)
When the PIR detects a movement, this simple app will log "Motion detected."
How to Detect Gas
Another interesting sensor is the MQ-4 sensor. The MQ-4 has a high sensitivity to natural gas. It can respond quickly, and is very easy to use. The connections between the sensor and Raspberry Pi are the same as in the PIR example. Be sure to use the sensor's digital pin, and be sure of the output voltage, which must be lower than 3V. If the sensor has an output greater than 3V, you have to use a logic-level converter. The code to use the MQ-4 is the same as the previous example.
Summary
At the end of this tutorial, we have learned how to use different types of sensors and how to connect them to the two most popular prototyping boards. It is possible to reuse the same sensors with different boards. Once you know how to read data from sensors, you have endless possibilities, and you're ready to explore IoT. You can use data from sensors by storing it in the cloud and using it later to create dashboards.
Opinions expressed by DZone contributors are their own.
Comments