Automate Spring Boot App Deployment With GitLab CI and Docker
Take a look at how you can use Spring Boot and Gitlab CI with Docker to build and automate the deployment of an application.
Join the DZone community and get the full member experience.
Join For FreeIn this guide, we will walk through the process of the automated deployment of a Spring Boot application using GitLab CI.
Docker and Spring Boot is a very popular combination, and we will take advantage of GitLab CI and automatically build, push and run a Docker image on application server.
GitLab CI
The Gitlab CI/CD service is the part of GitLab that builds, tests, and places the latest changes in the desired environment whenever the developer pushes code to the GitLab repository.
Some of the main reasons why GitLab CI is a good choice:
- It is easy to learn, use and scalable
- Maintenance is easy
- Integration of new jobs is easy
- The CI is fully part of the repository
- Good Docker integration
- Container registry - basically your own private Docker hub
- It's economically a good solution. Each month you have 2000 minutes of build time for free, which is more than enough for certain projects
Why GitLab CI Over Jenkins
This is for sure a wide and debatable topic, but in this article, we won't dive deeply into that. Both GitLab CI and Jenkins have pros and cons and they are for sure very powerful tools.
Let's try to point out use cases where GitLab might be wiser choice.
As it is previously mentioned, CI is fully part of GitLab repository, which means it's not needed to install it and maintenance is minimum. Once the .yml script is finished, you are more or less done with everything.
Jenkins can be overhead for small projects as you have to set up and configure everything by yourself. You also usually need a dedicated Jenkins server, and that is also extra maintenance, cost, and another thing to worry about.
What You’ll Need
In order to successfully follow this guide, there are few prerequisites. If any help is needed related to these prerequisites I've included a link to the appropriate guide, so feel free to visit it if necessary.
- You have Spring Boot project pushed on GitLab
- You have Docker installed on application servers (guide)
- You have container registry for Docker images (in this guide Docker hub will be used)
- You have generated SSH RSA key on your servers (guide)
What You’ll Build
You will basically create a Dockerfile and .gitlab-ci.yml, which will be used to automatically:
- Build application Jar file for each successful deployment, which will be easily downloadable from GitLib
- Build the Docker image
- Push the image to the Docker repository
- Run image on an application server
Basic Project Info
Spring Boot application for this guide is generated via Spring Initializr. Basically it is a Maven project built on Java 8 or 11. We will cover later how Java 8 and 11 affects the Docker image.
Dockerfile
Let's start with the Dockerfile.
xxxxxxxxxx
FROM maven:3.6.3-jdk-11-slim AS MAVEN_BUILD
#FROM maven:3.5.2-jdk-8-alpine AS MAVEN_BUILD FOR JAVA 8
ARG SPRING_ACTIVE_PROFILE
MAINTAINER Jasmin
COPY pom.xml /build/
COPY src /build/src/
WORKDIR /build/
RUN mvn clean install -Dspring.profiles.active=$SPRING_ACTIVE_PROFILE && mvn package -B -e -Dspring.profiles.active=$SPRING_ACTIVE_PROFILE
FROM openjdk:11-slim
#FROM openjdk:8-alpine FOR JAVA 8
WORKDIR /app
COPY --from=MAVEN_BUILD /build/target/appdemo-*.jar /app/appdemo.jar
ENTRYPOINT ["java", "-jar", "appdemo.jar"]
There are few things nice to know related to this Dockerfile.
Java Version
Let's see what from Docker's point of view is different between Java 8 and 11. Long story short: it's the Docker image size and deployment time.
Docker images built on Java 8 will be noticeably smaller than ones on Java 11. That also means build and deploy times will be faster for Java 8 projects.
- Java 8 - Build time: ~ 4 min with image size of ~180 MB
- Java 11 - Build time: ~ 14 min with image size of ~480 MB
Note: These stats are related to plain Spring Boot projects that are used for the purpose of this guide; on a real application these numbers will be probably a bit different.
Docker Images
As it is already seen in previous example, we have huge difference for app image size and build time just because of the Java version. The actual reason behind that is Docker images used in Dockerfile.
If we take another look at the Dockerfile, the real reason behind the large Java 11 image size is because there is no verified/tested Alpine version of open-jdk:11 image. Instead, we had to use a open-jdk:11-slim image which produces larger images.
If you are not familiar with the OpenJDK image versions, I suggest taking look at the official OpenJDK Docker documentation. There you can find an explanation for each OpenJDK version of image.
Additional Notes
ARG SPRING_ACTIVE_PROFILE is used so it's possible to build and package an application with correct environment-related properties.
Unfortunately, at the time when this guide is written, there is no clean way to use that variable in ENTRYPOINT , and in order to run an application on different environments, it's mandatory. Basically the ENTRYPOINT would look like this:
xxxxxxxxxx
ENTRYPOINT ["java", "-Dspring.profiles.active=development", "-jar", "appdemo.jar"]
And to make it dynamic, what you naturally would expect is to simply convert it to:
xxxxxxxxxx
ENTRYPOINT ["java", "-Dspring.profiles.active=$SPRINT_ACTIVE_PROFILE", "-jar", "appdemo.jar"]
As already-mentioned, unfortunately, this is not possible, but fortunately this problem can be easily solved when running an image with the Docker. This will covered in .gitlab-ci.yml.
gitlab-ci.yml
Before writing this file there are few things to prepare first. Basically what we want to achieve is that whenever code is pushed, an automatic deployment is started on the corresponding environment.
Create .env Files and Branches
We need first to create branches and .env files that contain environment-related variables. Each branch will actually represent the environment where our application is running.
We will deploy our application on three different environments: development, QA, and production. That means we need to create three "main" branches. We already have the master branch which represents the production environment, so simply create 2 more branches: development and QA.
Our dev, QA, and prod applications will run on different servers and they will have different Docker container tags, ports and SSH Keys. That means our gitlab-ci.yml file will need to be dynamic, lets solve that problem by creating .env file for each environment that we have.
.develop.env
.qa.env
.master.env
IMPORTANT: There is one simple rule when naming these files: they need to be named by the branch on GitLab, so a file name should be like this: .$BRANCH_NAME.env
For example this is .develop.env file.
xxxxxxxxxx
export SPRING_ACTIVE_PROFILE='development'
export DOCKER_REPO='username/demo_app:dev'
export APP_NAME='demo_app_dev'
export PORT='8080'
export SERVER_IP='000.11.222.33'
export SERVER_SSH_KEY="$DEV_SSH_PRIVATE_KEY"
Important notes related to .env file:
SPRING_ACTIVE_PROFILE: self-explanatory, which Spring application properties we want to use.
DOCKER_REPO: This is a repository for the Docker image. Since we are using one repository we will use tags to distinguish between images used on different environments, so that means we will have 3 different tags: dev, qa and production.
And our Docker hub looks like this.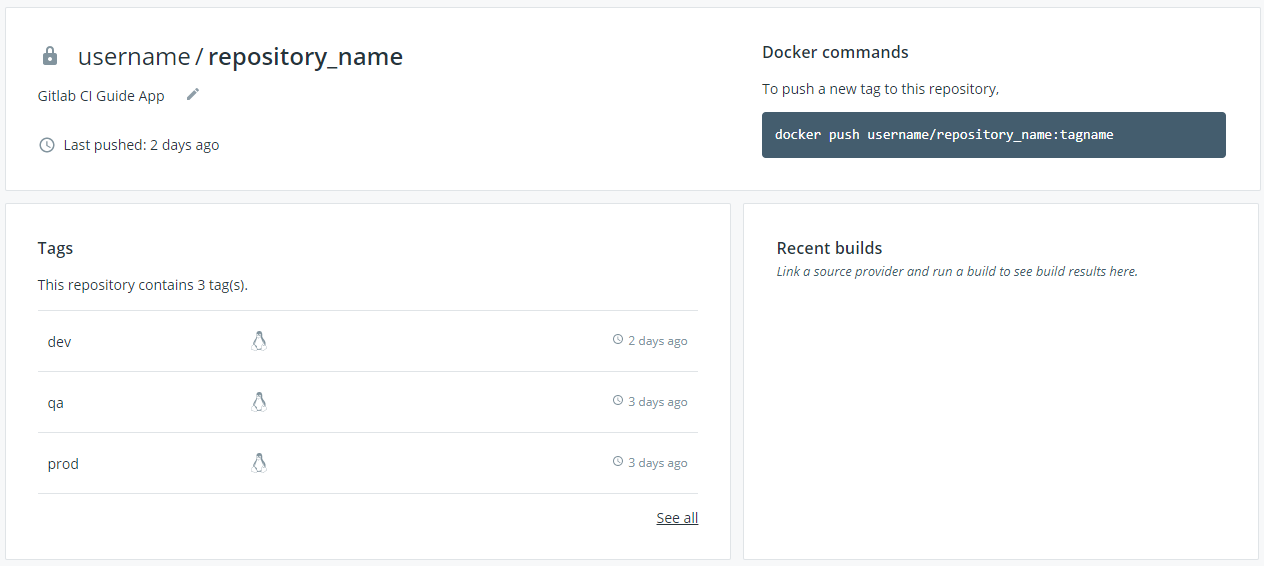
As you can see there is a repository with three different tags, and each tag (application version) is being updated whenever the code is pushed on a GitLab branch.
- APP_NAME: This property is very important because it allows us to name our running container. Based on it we will be able to stop and re-run latest Docker image on application server.
If you do not set this property, Docker will randomly give name to your container. That can be an issue because you wont be able to automatically stop running container on a clean way. - PORT: This is the port where we want our Docker container to be run at.
- SERVER_IP: IP of the server where application is going to live. Usually each environment will be on different server.
- SERVER_SSH_KEY: This is SSH key that we already generated on each of our servers. It is a bit different than previous keys, because it does not contain hard-coded value,
$DEV_SSH_PRIVATE_KEYis actually a variable that comes from GitLab repository. Below there will be more details about that.
Create GitLab Variables
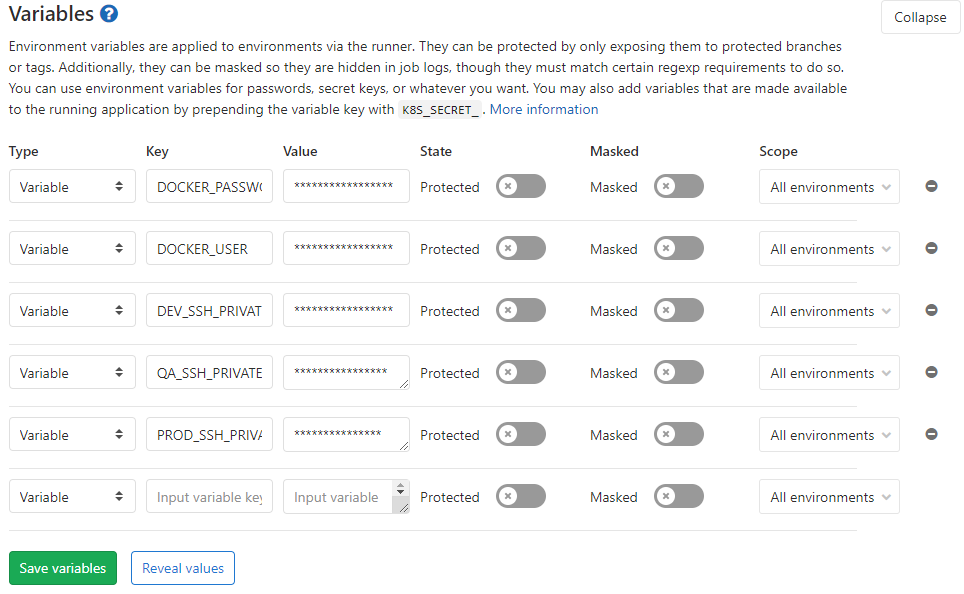
The last step that needs to be done is creating GitLab variables. Here it's recommended to keep variables that you do not want everyone to see. We will keep here some credentials and ssh keys.
Open your GitLab repository and go to: Settings -> CI/CD. In the Variables section add new variables:
- DOCKER_USER: username for accessing Docker hub or any other container registry
- DOCKER_PASSWORD: password for accessing same container registry
- $ENV_SSH_PRIVATE_KEY: SSH private key that you previously generated on your servers. Your key should look like this.
Important notes for SSH KEY:
- You need to copy full key value including:
-----BEGIN RSA PRIVATE KEY----- and -----END RSA PRIVATE KEY-----
At the end, your GitLab variables should look like this.
Create the gitlab-ci.yml File
And finally, let's create the file that will put together all this.
xxxxxxxxxx
services
docker:19.03.7-dind
stages
build jar
build and push docker image
deploy
build
imagemaven3.6.3-jdk-11-slim
stagebuild jar
before_script
source .$CI_COMMIT_REF_NAME.env
script
mvn clean install -Dspring.profiles.active=$SPRING_ACTIVE_PROFILE && mvn package -B -e -Dspring.profiles.active=$SPRING_ACTIVE_PROFILE
artifacts
paths
target/*.jar
docker build
imagedockerstable
stagebuild and push docker image
before_script
source .$CI_COMMIT_REF_NAME.env
script
docker build --build-arg SPRING_ACTIVE_PROFILE=$SPRING_ACTIVE_PROFILE -t $DOCKER_REPO .
docker login -u $DOCKER_USER -p $DOCKER_PASSWORD docker.io
docker push $DOCKER_REPO
deploy
imageubuntulatest
stagedeploy
before_script
'which ssh-agent || ( apt-get update -y && apt-get install openssh-client -y )'
eval $(ssh-agent -s)
echo "$SSH_PRIVATE_KEY" | tr -d '\r' | ssh-add -
mkdir -p ~/.ssh
chmod 700 ~/.ssh
echo -e "Host *\n\tStrictHostKeyChecking no\n\n" > ~/.ssh/config
source .$CI_COMMIT_REF_NAME.env
script
ssh root@$SERVER "docker login -u $DOCKER_USER -p $DOCKER_PASSWORD docker.io; docker stop $APP_NAME; docker system prune -a -f; docker pull $DOCKER_REPO; docker container run -d --name $APP_NAME -p $PORT:8080 -e SPRING_PROFILES_ACTIVE=$SPRING_ACTIVE_PROFILE $DOCKER_REPO; docker logout"
Let's explain what is happening here:
services:
- docker:19.03.7-dind
This is actually a service that allows us to use Docker in Docker. Running Docker in Docker is generally not a good idea, but for this use case it's totally fine, since we will just build the image and push it to the repository. You can get more information about Docker in Docker here.
stages:
- build jar
- build and push Docker image
- deploy
For each gitlab-ci.yml file, it's mandatory first to define stages. Stages will be executed in the order defined under stages part of the script.
In every stage we will have to add this part:
before_script:
- source .${CI_COMMIT_REF_NAME}.env
This simply loads previously created env. files, and it will enable the usage of variables that are defined inside. Depending on which branch build is running variables are automatically injected. (That is the reason why we had to name .env files by exact branch name)
These are the actual stages in our deployment process.

As you can see under the stages, there are three circles with a green check marks, which means all the stages are executed successfully.
xxxxxxxxxx
build:
image: maven:3.6.3-jdk-11-slim
stage: build jar
before_script:
- source .${CI_COMMIT_REF_NAME}.env
script:
- mvn clean install -Dspring.profiles.active=$SPRING_ACTIVE_PROFILE && mvn package -B -e -Dspring.profiles.active=$SPRING_ACTIVE_PROFILE
artifacts:
paths:
- target/*.jar
This is part of the code that executes the first stage, building a jar file that can be downloaded and used later for whatever you need it. This is actually an optional stage, and it's used just to demonstrate how easy it is to build jar and download it from GitLab.
The second stage is building and pushing the Docker image on the Docker repository.
xxxxxxxxxx
docker build:
image: docker:stable
stage: build and push docker image
before_script:
- source .${CI_COMMIT_REF_NAME}.env
script:
- docker build --build-arg SPRING_ACTIVE_PROFILE=$SPRING_ACTIVE_PROFILE -t $DOCKER_REPO .
- docker login -u $DOCKER_USER -p $DOCKER_PASSWORD docker.io
- docker push $DOCKER_REPO
Because of this step, we had to use docker:19.03.7-dind service. As you can see we are using the latest stable version of Docker, and we are simply building our image for an adequate environment, then we are authenticated to our Dockerhub and pushing image.
The final part of our script is:
xxxxxxxxxx
deploy:
image: ubuntu:latest
stage: deploy
before_script:
- 'which ssh-agent || ( apt-get update -y && apt-get install openssh-client -y )'
- eval $(ssh-agent -s)
- echo "$SSH_PRIVATE_KEY" | tr -d '\r' | ssh-add -
- mkdir -p ~/.ssh
- chmod 700 ~/.ssh
- echo -e "Host *\n\tStrictHostKeyChecking no\n\n" > ~/.ssh/config
- source .${CI_COMMIT_REF_NAME}.env
script:
- ssh root@$SERVER "docker stop $APP_NAME; docker system prune -a -f; docker pull $DOCKER_REPO; docker container run -d --name $APP_NAME -p $PORT:8080 -e SPRING_PROFILES_ACTIVE=$SPRING_ACTIVE_PROFILE $DOCKER_REPO"
In this step, we are using the Ubuntu Docker image so we can ssh to our application server and run a few (Docker) commands. Part of the code in before_script is mostly taken from the official documentation, but, of course, we had to adjust to it a bit for our needs. In order to avoid making private key verified, this line of the code is added:
xxxxxxxxxx
- echo -e "Host *\n\tStrictHostKeyChecking no\n\n" > ~/.ssh/config
But if you do not like it, you can follow this guide and verify your private key.
As you can see in the last stage of the script, we are executing a few Docker commands.
- Stop the running Docker container by executing command:
docker stop $APP_NAME. (This is the reason why we definedAPP_NAMEin our .env file) - Delete all the Docker images that are not running by executing
docker system prune -a -f. This is actually not mandatory, but I wanted to remove all unused images on my server. - Pull the latest version of the Docker image (that was built and pushed in the previous stage).
- Finally, run the Docker image with the following command:
docker container run -d --name $APP_NAME -p $PORT:8080 -e SPRING_PROFILES_ACTIVE=$SPRING_ACTIVE_PROFILE $DOCKER_REPO
I hope this guide will help you to better understand and implement GitLab CI in your projects. If you have any questions or suggestions feel free to contact me or leave a comment.
Opinions expressed by DZone contributors are their own.
Comments