Spring Config Integration With a PCF Application: A Step-by-Step Guide
A developer takes us through the process of integrating a Spring config file with a PCF application, including all the code you need to get started.
Join the DZone community and get the full member experience.
Join For FreeWhy Spring Configuration?
Spring Cloud Config provides support for externalized configuration in a distributed system. It allows you to dynamically push updates to configuration properties to the application without needing to restart or redeploy.
Step-by-Step Guide to Integrate With a PCF Application
Step 1: Add a Maven Dependency
xxxxxxxxxx
<dependency>
<groupId>io.pivotal.spring.cloud</groupId>
<artifactId>spring-cloud-services-starter-config-client</artifactId>
</dependency>
<dependency>
<groupId>org.springframework.cloud</groupId>
<artifactId>spring-cloud-starter-config</artifactId>
</dependency>
<dependency>
<groupId>org.springframework.boot</groupId>
<artifactId>spring-boot-starter-actuator</artifactId>
</dependency>
pom.xml
xxxxxxxxxx
<project xmlns="http://maven.apache.org/POM/4.0.0"
xmlns:xsi="http://www.w3.org/2001/XMLSchema-instance"
xsi:schemaLocation="http://maven.apache.org/POM/4.0.0 http://maven.apache.org/xsd/maven-4.0.0.xsd">
<modelVersion>4.0.0</modelVersion>
<groupId>gsahoo.demo</groupId>
<artifactId>aSpringConfigDemo</artifactId>
<version>1.0.0</version>
<packaging>jar</packaging>
<name>aspringconfig-demo</name>
<description>Spring Boot with spring config</description>
<parent>
<groupId>org.springframework.boot</groupId>
<artifactId>spring-boot-starter-parent</artifactId>
<version>2.3.0.RELEASE</version>
<relativePath ></relativePath> <!-- lookup parent from repository -->
</parent>
<properties>
<project.build.sourceEncoding>UTF-8</project.build.sourceEncoding>
<project.reporting.outputEncoding>UTF-8</project.reporting.outputEncoding>
<java.version>1.8</java.version>
<spring-cloud.version>Hoxton.SR6</spring-cloud.version>
</properties>
<dependencies>
<dependency>
<groupId>junit</groupId>
<artifactId>junit</artifactId>
<version>3.8.1</version>
<scope>test</scope>
</dependency>
<dependency>
<groupId>org.springframework.boot</groupId>
<artifactId>spring-boot-starter</artifactId>
</dependency>
<dependency>
<groupId>com.fasterxml.jackson.core</groupId>
<artifactId>jackson-databind</artifactId>
</dependency>
<dependency>
<groupId>org.projectlombok</groupId>
<artifactId>lombok</artifactId>
</dependency>
<dependency>
<groupId>io.springfox</groupId>
<artifactId>springfox-swagger2</artifactId>
<version>2.6.1</version>
</dependency>
<dependency>
<groupId>io.springfox</groupId>
<artifactId>springfox-swagger-ui</artifactId>
<version>2.6.1</version>
</dependency>
<dependency>
<groupId>org.springframework.boot</groupId>
<artifactId>spring-boot-starter-web</artifactId>
</dependency>
<dependency>
<groupId>io.pivotal.spring.cloud</groupId>
<artifactId>spring-cloud-services-starter-config-client</artifactId>
</dependency>
<dependency>
<groupId>org.springframework.cloud</groupId>
<artifactId>spring-cloud-starter-config</artifactId>
</dependency>
<dependency>
<groupId>org.springframework.boot</groupId>
<artifactId>spring-boot-starter-actuator</artifactId>
</dependency>
</dependencies>
<dependencyManagement>
<dependencies>
<dependency>
<groupId>org.springframework.cloud</groupId>
<artifactId>spring-cloud-dependencies</artifactId>
<version>${spring-cloud.version}</version>
<type>pom</type>
<scope>import</scope>
</dependency>
<dependency>
<groupId>io.pivotal.spring.cloud</groupId>
<artifactId>spring-cloud-services-dependencies</artifactId>
<version>2.2.1.RELEASE</version>
<type>pom</type>
<scope>import</scope>
</dependency>
</dependencies>
</dependencyManagement>
<build>
<plugins>
<plugin>
<groupId>org.springframework.boot</groupId>
<artifactId>spring-boot-maven-plugin</artifactId>
</plugin>
</plugins>
</build>
</project>
Step 2: Add refreshscope and EnableAutoConfiguration to the Model Class
x
package gsahoo.demo.model;
import org.springframework.beans.factory.annotation.Value;
import org.springframework.boot.autoconfigure.EnableAutoConfiguration;
import org.springframework.cloud.context.config.annotation.RefreshScope;
import org.springframework.context.annotation.Configuration;
import org.springframework.stereotype.Component;
public class Person {
("${person.company}")
String company = null;
public void setCompany(String company) {
this.company = company;
}
public String getCompany() {
return company;
}
}
If you are autowiring this model object in any other class then make sure to add refreshscope to that class as well.
Step 3: Enable Actuator Endpoints
By default only the /health and /info endpoints are enabled. Enable other endpoints one-by-one by declaring explicitly or enabling them all by using a wildcard character.
Add the below line to your application.properties file to enable the /refresh endpoint:
management.endpoints.web.exposure.include=refresh
You may additionally disable default security for this tutorial by adding the below code to application.properties file:
management.security.enabled=false
or by adding the below lines of code to your Spring Boot application:
xxxxxxxxxx
package gsahoo.demo;
import org.springframework.boot.SpringApplication;
import org.springframework.boot.autoconfigure.SpringBootApplication;
import org.springframework.boot.autoconfigure.security.servlet.SecurityAutoConfiguration;
import org.springframework.cloud.context.config.annotation.RefreshScope;
import org.springframework.context.annotation.Bean;
import org.springframework.context.annotation.Configuration;
import org.springframework.boot.actuate.autoconfigure.security.servlet.ManagementWebSecurityAutoConfiguration;
(exclude = {SecurityAutoConfiguration.class , ManagementWebSecurityAutoConfiguration.class})
public class aSpringConfigDemoApplication {
public static void main(String[] args) {
SpringApplication.run(aSpringConfigDemoApplication.class, args);
}
Note: For this tutorial, security is disabled in order to access actuator endpoints. In a prod environment you must consider security.
Step 4: Add a Property to the application.properties File
person.company=ABC
Step 5: Build and Deploy the App to Cloud Foundry
cf push
Run the above command from the root folder of the application. Use the manifest.yml file to declare your app name:
xxxxxxxxxx
---
applications
nameaspringconfig-demo
memory1G
instances1
pathtarget/aSpringConfigDemo-1.0.0.jar
buildpack<provide-your-buildpack-version>
disk_quota2G
Step 6: Create an Instance of Spring Server in CF
Select Spring Config from PCF Marketplace to create an instance.
Use JSON to enter GitLab information:
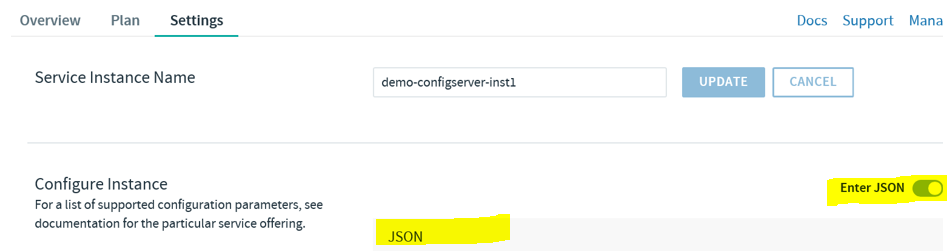
Use the below format to enter your JSON data:
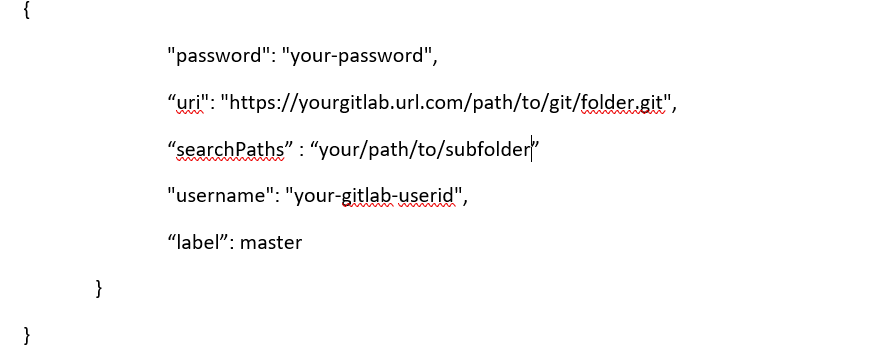
uri- the HTTP URL to the GitLab URL.searchPaths- the GitLab URL subfolder that the application should search through for the config file. If this is not specified then the app will search in the current folder specified by the "uri" attributes.username- user account to login to the above GitLab URL. It must have read access to the GitLab URL from where it will read the config file.password- password attached to the GitLab user name.label- specify which GitLab branch to use to read the config file. If not specified then it defaults to the "master branch."
Step 7: Bind Your App to the Above Service Instance
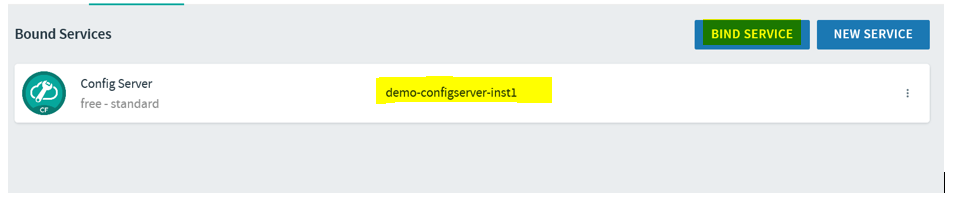
If the service instance is created successfully then it can be viewed from the Service Instance manager:
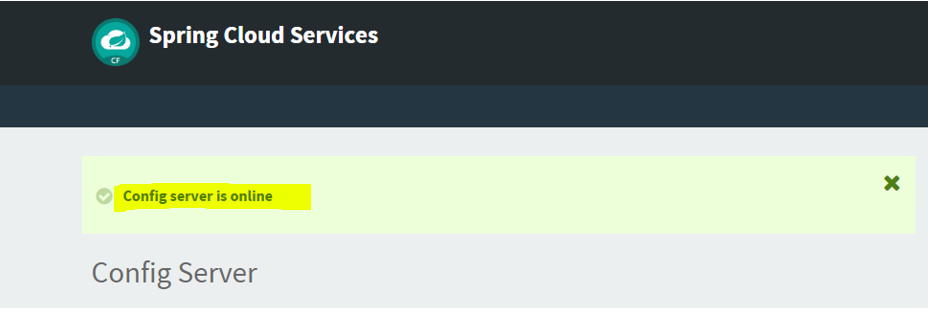
If it is successfully bound to the app then you should see a log entry as below:
xxxxxxxxxx
--- [ main] b.c.PropertySourceBootstrapConfiguration : Located property source: [BootstrapPropertySource {name='bootstrapProperties-configClient'}, BootstrapPropertySource {name='bootstrapProperties-https:............................
Testing
Step 1: Add/Update the Property Value in a Config File in GitLab
- Create a file named
aspringconfig-demo-cloud.properties(filename follows the naming convention<application_name>-<active-profile-name>.properties) under the folder that was provided in theserachPathsproperty above. Be sure to put this file under the GitLab URL provided in theuriproperty above. - Add a new value for
person.companye.g.person.company=XYZ. - Commit the file to GitLab.
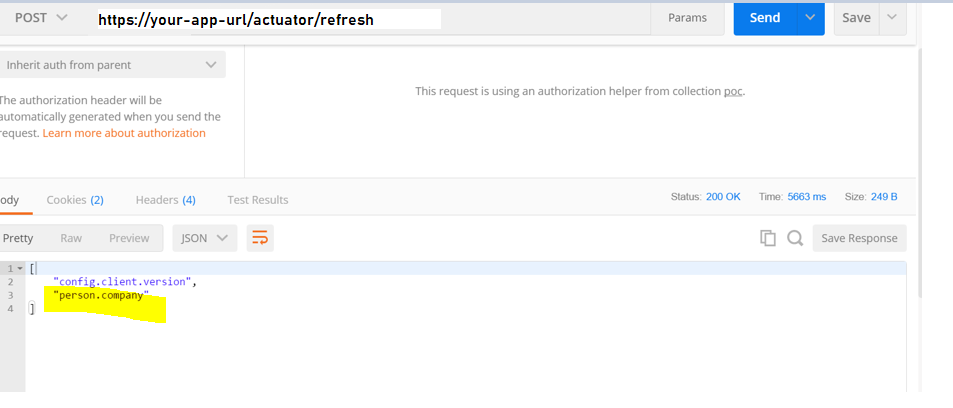
Step 2: Call the Actuator/Refresh Endpoint to Refresh/Reload the Property
The property that was changed in Step 1 will be returned by this call. Your application now has a reference to the updated value:
How Does it Work Internally?
When a Spring bean is declared with @refreshscope, a proxy wrapper gets created for that bean. This proxy class interacts with underlying an bean class to return the value.
When a refresh event occurs in Spring:
- invalidate the proxy class.
- reload the config file.
- recreate the underlying bean class.
- return the new value.
Though this feature has the benefit of updating to a new value at runtime, care should be taken considering that on a refresh event Spring beans become invalid until re-creation. If a user is using the bean at that time they may experience a 500 error or similar error.
File Precedence
- Precedence rules for GitLab config files are also the same as in a regular Spring Boot application:
- Active profiles take precedence over defaults.
- Profile-specific property files override the application-named property file which overrides non-specific property files such as the
application.propertiesfile orapplication.ymlfile.
If the app name is "foo" and profile name is "dev" then foo-dev.properties overrides the foo.properties file. The foo.properties file overrides the application.properties file.
When multiple files are specified, the latter ones can override the values of earlier ones.
References
http://cloud.spring.io/spring-cloud-config/single/spring-cloud-config.html
https://cloud.spring.io/spring-cloud-config/multi/multi__spring_cloud_config_server.html
Opinions expressed by DZone contributors are their own.
Comments