Automated Testing With Jasmine Framework and Selenium
With the help of this Selenium Jasmine framework tutorial, readers will learn how to set up the Jasmine framework with Selenium and how to run your test cases.
Join the DZone community and get the full member experience.
Join For FreeIn today’s fast-paced world of software development, we have new technologies and languages for development coming on very frequently. With this, comes several testing and automation tools and frameworks in the related market. Choosing the right set of tools and frameworks becomes an absolute necessity because it impacts the accuracy and TTM (Time to Market).
JavaScript is one of the widely used programming languages for web automation testing. It also supports a number of Selenium test automation frameworks for web UI testing. Of all the available ones, the Jasmine framework turns out to be the best-suited, as it provides a stable and functional architecture. It is easy to get started with the Jasmine framework and implement test scenarios with the same.
In this tutorial of Selenium automation testing with Jasmine, we look into the nitty-gritty of Jasmine from an automation testing standpoint. We will also learn how to set it up, followed by a sample code writing, and execution.
Let’s get started!
Introduction to Jasmine Framework
Jasmine Framework is an open-source JavaScript testing framework. It is a behavior-driven (BDD), development-inspired framework that is independent of any other frameworks. It is used for unit testing of synchronous and asynchronous JavaScript test scenarios. In addition to its outstanding support for JS, it provides extensive support for Python, Ruby, and other JavaScript-based languages. Furthermore, it is available for different versions like Standalone, Node.js, etc. An additional benefit of using Jasmine is that it is an independent framework with minimal (to no) dependency on language, browser, and platform.
The Jasmine framework does not require a DOM and is very easy to set up. Also, it provides an immaculate and easy to read syntax like the example below:
describe("A suite is just a function", function() {
  var a;

  it("and so is a spec", function() {
	a = true;

	expect(a).toBe(true);
  });
});
Why Use Jasmine Framework as a Testing Framework for JavaScript Tests?
Having understood what Jasmine Framework is, let us look at the key advantages of using JavaScript Selenium automation testing for Web UI testing:
- Easy to set up and easy to write tests.
- Very fast as it has almost zero overhead and no external dependencies for Jasmine core.
- It comes with out-of-the-box support to fulfill all the test needs.
- Can run the browser and Node.js tests with the same framework.
- An extensive and active community and regularly updated documentation for support and development.
- Support for usage of spies for test doubles implementation in the framework.
- It even supports testing of frontend code using the Jasmine-jQuery extension.
- It also supports test-driven development in addition to behavior-driven development.
- Unlike other JavaScript testing frameworks, the Jasmine framework has built-in assertions.
- It comes with an inbuilt test runner, which can be used to run browser tests.
- Provides a rich number of built-in matchers that can be used to match expectations and add asserts to the test cases. Some examples are:
toEqualtoBetoBeTruthy
Advantages of Using Jasmine Framework With Selenium
Jasmine and Selenium are popularly used for JavaScript automation testing and web UI automation testing respectively. When working on a JavaScript-based web UI project, it is better to combine the forces to take the advantage of them:
- Jasmine framework and Selenium automation testing complement each other in being open-source, easy to implement, and scale.
- Their capacity to work with almost all browsers and platforms is another added advantage.
- By using a Selenium Grid, Jasmine framework tests can be executed more quickly through parallel execution. You can refer to our earlier article on the “Importance of Parallel Testing in Selenium” to get a detailed understanding about the advantages offered by parallel test execution.
Getting Started With the Jasmine Framework
Having gathered some knowledge around the what and why of the Jasmine framework in JavaScript, let us now dig deeper and get our hands dirty with the implementation. In this section of the Selenium Jasmine
framework tutorial, we will learn about the workflow of Jasmine and understand the basics of writing test scenarios.
Let us assume we need to test a file Test.js using the Jasmine framework. SpecRunner.html would be the output file that will run all test cases from spec.js taking Lib as an input and then show the results in the browser.
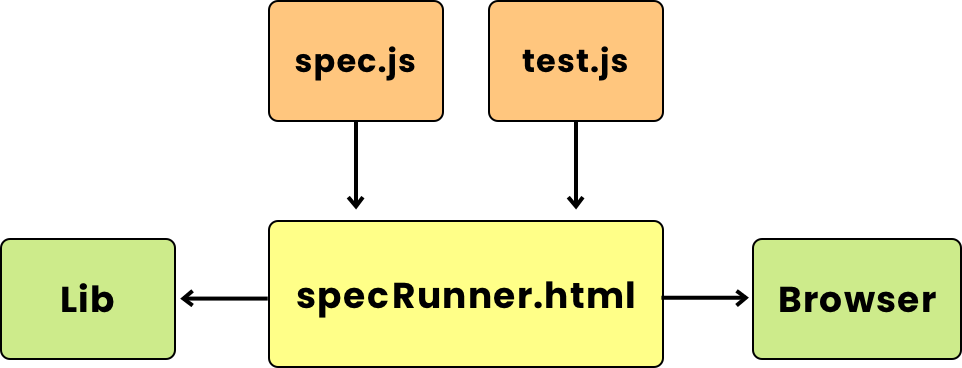
Lib: Consists of built-in JavaScript files that help test varied functions and other JS files within the project.SpecRunner.html: A usual HTML file that will render the output of the test run in the browser.test.js: This file comprises the actual functionalities/code under test, which is to be tested with the help of thespec.jsandlibfiles.spec.js: Also referenced as the test case file, this contains all the testcases in a prescribed format for the file to be tested.
Here are the basic building blocks of the Jasmine framework tests:
- Suite block: Suite forms the basic building block of the Jasmine framework. One suite is composed of test cases or specs written to test a particular file and is made up of two blocks: the
describe()block andit()block. describe(): This is used to group related test cases written underit(). There is only onedescribe()at the top level, unless the test suite is a nested one. In which case, it takes a string parameter to name the collection of test cases in that particulardescribe()block.it()—contains specs/test cases: This is used to define the specs or test cases inside thedescribe()block. Like adescribe(), it takes similar parameters—one string for name and one function that is the test case we want to execute. A spec without any assertions is of no use.
Each spec in the Jasmine framework consists of at least one assertion, which is referred to as expectation here. If all expectations pass in a spec, it is called a passing spec. On the other hand, if one or more expectations fails in a spec, it is called a failing spec.
Note: Since it() and describe() blocks are JavaScript functions, all the basic variable and scope rules apply to them as per JS code. Also, they can contain any valid executable code. This means variables at the describing() level are accessible to all and it() level within the test suite.
Expectations or Matchers
Expectations or matchers are a way to implement assertions in the Jasmine framework. This is done with the help of the expect function, which takes the actual value produced by the test case as output.
It is then chained with a matcher function that takes expected results for that test case and then evaluates them to give a boolean result. The returned value is true if the expectation matches, else it is false. The Jasmine framework also provides the utility to check for negative assertions by adding not before the matcher for a required expect function.
All the expect functions come under the it() block, and each it() block can have one or more expect() blocks. The Jasmine framework provides a wide range of in-built matchers and lets you extend matchers via custom matchers:
describe("This is a describe block for expectations", function() {

it("this is a positive matcher", function() {
    expect(true).toBe(true);
  });

it("this is a negative matcher", function() {
    expect(false).not.toBe(true);
  });

});
Here is a small example to understand the usage and implementation of the describe(), it(), and expect() blocks. We will be testing a file named Addition.js having a corresponding spec file with test cases as AdditionSpec.js:
function Addition() = {

   initialValue:0,

   add:function (num) {
      this.initialValue += num;
      return this.initialValue;
   },

   addAny:function () {
      var sum = this.initialValue;

      for(var i = 0; i < arguments.length; i++) {
         sum += arguments[i];
      }

      this.initialValue = sum;
      Return  this.initialValue;
   },
};
describe("to verify Addition.js file",function() {
//test case: 1
it("Should have initial value", function () {
expect(Addition.initialValue).toEqual(0);
});
//test case: 2
it("should add numbers",function() {
expect(Addition.add(5)).toEqual(5);
expect(Addition.add(5)).toEqual(10);
});
//test case :3
it("Should add any number of numbers",function () {
expect(Addition.addAny(1,2,3)).toEqual(6);
});
});The Jasmine framework also provides support for nested suites utilizing the nested describe() blocks. Here is an example of a spec file with nesting for the same Addition.js:
describe("to verify Addition.js file using nested suites",function() {

   // Starting of first suite block
   describe("Retaining values ",function () {

      //test case:1
      it ("Should have initial value", function () {
         expect(Addition.currentVal).toEqual(0);
      });
   }); //end of first suite block

   //second suite block
   describe("Adding single number ",function () {

      //test case:2
      it("should add numbers",function() {
         expect(Addition.add(5)).toEqual(5);
         expect(Addition.add(5)).toEqual(10);
      });
   }); //end of second suite block

   //third suite block
   describe("Adding Different Numbers",function () {

      //test case:3
      it("Should add any number of numbers",function() {
         expect(Addition.addAny(1,2,3)).toEqual(6);
      });
   }); //end of third suite block
});
Using Standalone Jasmine Framework Distribution for Selenium Automation Testing
To get started with the Jasmine framework, follow the below mentioned steps to complete the system setup.
Step 1
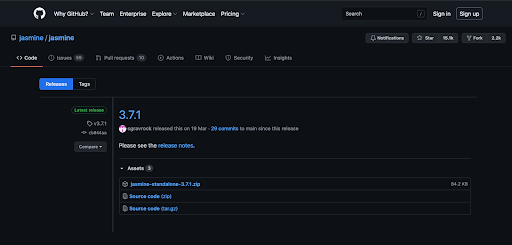
Download the latest version of Jasmine from the official website.
Step 2
Download the standalone zip for the selected version from this page.
Step 3
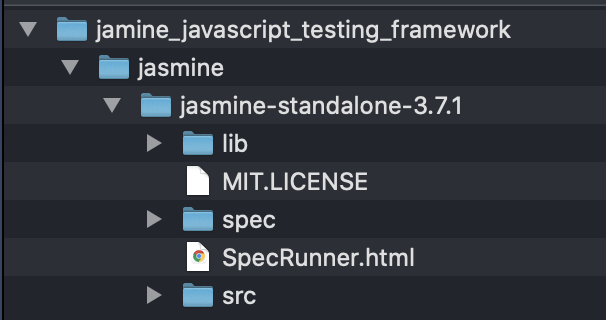
Create a new directory in your system and then add a sub directory to it.

Step 4
Move the downloaded standalone zip inside this sub directory and unzip it here. Once unzipped, your directory structure should look something like this.
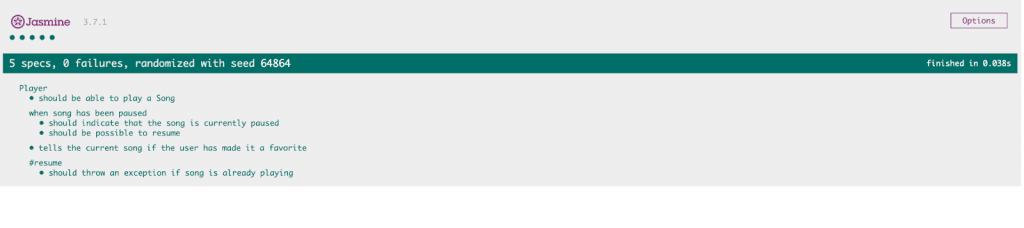
Step 5
To verify the setup, load the SpecRunner.html in your web browser. If you see an output like below, it means you have completed the setup for the Jasmine framework on your system.
Let’s see how to modify this to run our test case for the Addition.js using AdditionSpec.js and Nested_AdditionSpec.js.
Firstly, we will remove all the existing files from the src and spec folder and add the files for our example, which we have understood already. After doing this, the folder structure would look something like this.
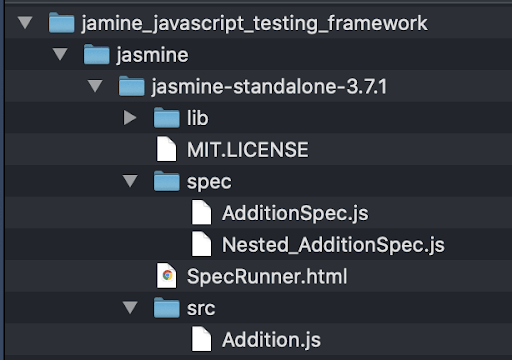
Having updated the files, we need one more step to execute our specs, which is to update references to files under the spec and src folder as per our changes in SpecRunner.html.
For this, open the SpecRunner.html and it will look like this:
<!DOCTYPE html>
<html>
<head>
  <meta charset="utf-8">
  <title>Jasmine Spec Runner v3.7.1</title>

  <link rel="shortcut icon" type="image/png" href="lib/jasmine-3.7.1/jasmine_favicon.png">
  <link rel="stylesheet" href="lib/jasmine-3.7.1/jasmine.css">

  <script src="lib/jasmine-3.7.1/jasmine.js"></script>
  <script data-fr-src="lib/jasmine-3.7.1/jasmine-html.js"></script>
  <script data-fr-src="lib/jasmine-3.7.1/boot.js"></script>

  <!-- include source files here... -->
  <script data-fr-src="src/Player.js"></script>
  <script data-fr-src="src/Song.js"></script>

  <!-- include spec files here... -->
  <script data-fr-src="spec/SpecHelper.js"></script>
  <script data-fr-src="spec/PlayerSpec.js"></script>

</head>

<body>
</body>
</html>
Update the file name in the src and spec sections and save it. Now, you are ready to load the SpecRunner.html again to see the results.
Setting Up the Jasmine Framework Environment Using npm
To get started with Selenium automation testing using the Jasmine framework in JavaScript, we need to have some prerequisite setup in our system:
Step 1
Make sure the latest JavaScript version is installed on the system. Also, check for Node.js and npm on your system and upgrade to the newest version if required:
brew install node
npm install npm@latest -g
Step 2
Navigate to the directory where you want to create your test case, execute it, and install the Jasmine framework by triggering the npm command:
npm install -g jasmineStep 3
Once this is done, we will install Chrome Driver and Selenium WebDriver in the same directory to execute the Jasmine framework Selenium test cases on the local Selenium Grid:
npm install --save chromedriver
npm install --save selenium-webdriver
Step 4
Once all this is done, we are good to initialize our Jasmine framework project using the init command:
jasmine init
You should be able to see a spec folder, which will be further used for adding test case files. For this Selenium Jasmine framework JavaScript tutorial, we will be using the following .js file:
// Require modules used in the logic below
const {Builder, By, Key, until} = require('selenium-webdriver');

// You can use a remote Selenium Hub, but we are not doing that here
require('chromedriver');
const driver = new Builder()
    .forBrowser('chrome')
    .build();

// Setting variables for our testcase
const baseUrl = 'https://accounts.lambdatest.com/login'

// function to check for login elements and do login
var loginToLamdbatest = async function() {

    let loginButton = By.xpath('//button');

    // navigate to the login page
    await driver.get(baseUrl);

    // wait for login page to be loaded
    await driver.wait(until.elementLocated(loginButton), 10 * 1000);
    console.log('Login screen loaded.')
}

//to set jasmine default timeout
jasmine.DEFAULT_TIMEOUT_INTERVAL = 20 * 1000;

// Start to write the first test case
describe("Selenium test case for login page", function() {
    it("verify page elements", async function() {
        console.log('<----- Starting to execute test case ----->');

	//to do login
	await loginToLamdbatest();

	var welcomeMessage = By.xpath('//*[@class="form_title"]');

	//verify welcome message on login page
	expect(await driver.findElement(welcomeMessage).getText()).toBe('Welcome Back !');

	//to quit the web driver at end of test case execution
	await driver.quit();

	console.log('<----- Test case execution completed ----->');
    });
});
In this example file, we have automated a scenario to navigate to the LambdaTest login page and then verify the welcome message on the page. We have used a local Selenium WebDriver and running the tests on the Chrome browser. To execute the test case, use the following command if you are at the same directory level as the file.:
jasmine exampleSeleniumSpec.jsOnce triggered, you will see a Chrome browser tab open up on your system and get redirected to a given page, and after successful verification, the browser is closed, and the terminal shows logs like below:
⇒  jasmine example-spec.js
Randomized with seed 07075
Started
<----- Starting to execute test case ----->
Login screen loaded.
<----- Test case execution completed ----->
.


1 spec, 0 failures
Finished in 7.882 seconds
Randomized with seed 07075 (jasmine --random=true --seed=07075)
Using Jasmine to Run Selenium Tests on Selenium Grid
Running tests on a local Selenium Grid is not a scalable and reliable approach. You would need to invest significantly in building the test infrastructure if the tests have to be run across a number of browsers, platforms, and device combinations. This is where cloud testing can be useful as it offers the much-needed benefits of scalability, reliability, and parallel test execution.
We will run the Jasmine framework tests on Selenium Grid Cloud on LambdaTest. You will need to have your LambdaTest username and access token handy to continue with the execution, details are available in the LambdaTest profile section. Set the following environment variables on your machine:
For Mac/Linux
export LT_USERNAME="YOUR_USERNAME"
export LT_ACCESS_KEY="YOUR ACCESS KEY"
For Windows
set LT_USERNAME="YOUR_USERNAME"
set LT_ACCESS_KEY="YOUR ACCESS KEY"
Once this is done, we modify the spec file to have a remote web driver configuration for the LambdaTest Hub to execute test cases on the grid.
For this, we will be adding the required browser capabilities for execution on the LambdaTest Grid and use a remote web driver on their grid. Modified exampleSeleniumSpec.js as per our requirements would look like this:
// Require modules used in the logic below
selenium = require('selenium-webdriver');
const {Builder, By, Key, until} = require('selenium-webdriver');

// Setting variables for our testcase
const baseUrl = 'https://accounts.lambdatest.com/login'
const username= process.env.LT_USERNAME || "<Your_lambdatest_username>"
const accessKey=  process.env.LT_ACCESS_KEY || "<Your_lambdatest_accessKey>"

var remoteHub = 'https://' + username + ':' + accessKey + '@hub.lambdatest.com/wd/hub';

const caps = {
         'build': 'Jasmine-selenium-javascript',
    'browserName': 'chrome',
    'version':'73.0',
    'platform': 'Windows 10',
    'video': true,
    'network': true,
    'console': true,
    'visual': true
        };

         const driver = new selenium.Builder().
            usingServer(remoteHub).
            withCapabilities(caps).
            build();

// function to check for login elements and do login
var loginToLamdbatest = async function() {

    let loginButton = By.xpath('//button');

    // navigate to the login page
    await driver.get(baseUrl);

    // wait for login page to be loaded
    await driver.wait(until.elementLocated(loginButton), 10 * 1000);
    console.log('Login screen loaded.')
}

//to set jasmine default timeout
jasmine.DEFAULT_TIMEOUT_INTERVAL = 20 * 1000;
jasmine.getEnv().defaultTimeoutInterval = 60000;

// Start to write the first test case
describe("Selenium test case for login page", function() {

it("verify page elements", async function() {
        console.log('<----- Starting to execute test case ----->');

	//to do login
	await loginToLamdbatest();

	var welcomeMessage = By.xpath('//*[@class="form_title"]');

	//verify welcome message on login page
	expect(await driver.findElement(welcomeMessage).getText()).toBe('Welcome Back !');

	//to quit the web driver at end of test cae execution
	await driver.quit();

	console.log('<----- Test case execution completed ----->');
    });
});
This would also have a similar command to execute and would give the same output as follows on the terminal:
⇒ jasmine lambdatest.js
Randomized with seed 11843
Started
<----- Starting to execute test case ----->
Login screen loaded.
<----- Test case execution completed ----->
.
1 spec, 0 failures
Finished in 15.777 seconds
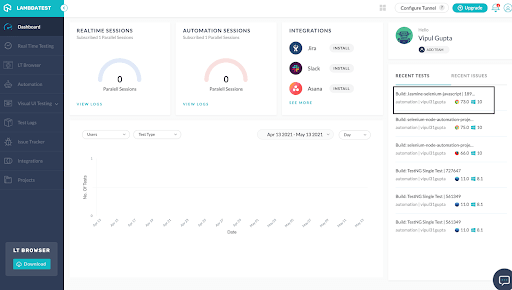
Randomized with seed 11843 (jasmine --random=true --seed=11843)You can now navigate the LambdaTest dashboard for the user account and view the execution results and logs on various tabs.
Under “Recent Tests” on the left side, you can see the latest execution on the Dashboard tab.
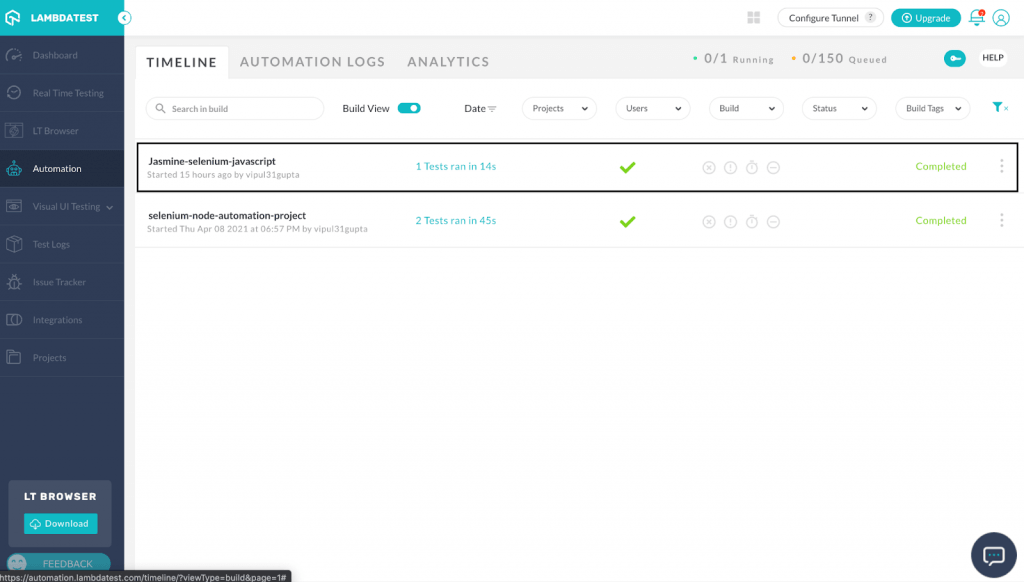
To analyze the complete timeline for your different test case runs, we can navigate to the “Automation” Tab.
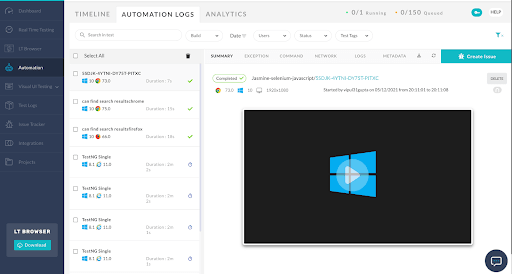
In the “Automation” tab, go to the “Automation Logs” section to view the entire execution logs and video of our test case. This helps in debugging the issues by analyzing the run.
You can also navigate to other tabs and per the requirement to add/view data for the execution.
With this, we have completed our Jasmine framework JavaScript Selenium tutorial to understand the setup and execution with Jasmine framework on the local and LambdaTest Grid cloud.
It’s a Wrap
So, in this Jasmine framework tutorial with Selenium, we learned about the whats and whys of Jasmine and Selenium, how they make a good combination for automation web UI-based code using JavaScript, and all advantages it provides. Having done the setup and understanding the test case basics, we have successfully executed our test case on local and Selenium Grid with the help of LambdaTest. So, get started and write your first Selenium automation testing code with Jasmine and JavaScript.
Happy Testing!
Published at DZone with permission of Kritika Murari. See the original article here.
Opinions expressed by DZone contributors are their own.
Comments