Back to Basics: Accessing Kubernetes Pods
Kubernetes is a colossal beast. You need to understand many concepts before it starts being useful. Here, learn several ways to access pods outside the cluster.
Join the DZone community and get the full member experience.
Join For FreeKubernetes is a colossal beast. You need to understand many different concepts before it starts being useful. When everything is set up, you'll probably want to expose some pods to the outside of the cluster. Kubernetes provides different ways to do it: I'll describe them in this post.
Setup
For the sake of the demo, I'll be using kind:
kind is a tool for running local Kubernetes clusters using Docker container "nodes." kind was primarily designed for testing Kubernetes itself, but may be used for local development or CI.
I'll use a two-nodes cluster:
kind: Cluster
apiVersion: kind.x-k8s.io/v1alpha4
nodes:
- role: control-plane
  extraPortMappings:
  - containerPort: 30800             # 1
    hostPort: 30800                  # 1
- role: worker                       # 2
- role: worker # 2- #1: Port forwarding to cope with the Docker VM layer on Mac (see below)
- #2: Two nodes
kind create cluster -- config kind.yml
Next, we need a container. It shouldn't just run and stop. Let's use the latest Nginx image available at the time of this writing.
With kind, we have to preload images so they are available.
docker pull nginx:1.23
kind load docker-image nginx:1.23
Finally, I alias kubetcl to k:
alias k=kubectlNo Outside Access by Default
The default situation is to provide no access to the outside of the cluster.
k create deployment nginx --image=nginx:1.23 # 1- #1: Create a deployment of a single pod.
Let's check if everything is fine:
k get podsNAME READY STATUS RESTARTS AGE
nginx-6c7985744b-c7cpl 1/1 Running 0 67sThe pod has an IP, but we cannot reach it outside the cluster.
k get pod nginx-6c7985744b-c7cpl --template '{{.status.podIP}}'10.244.1.2Let's confirm the IP by running a shell inside the pod itself:
k exec -it nginx-6c7985744b-c7cpl -- /bin/bash
hostname -I10.244.1.2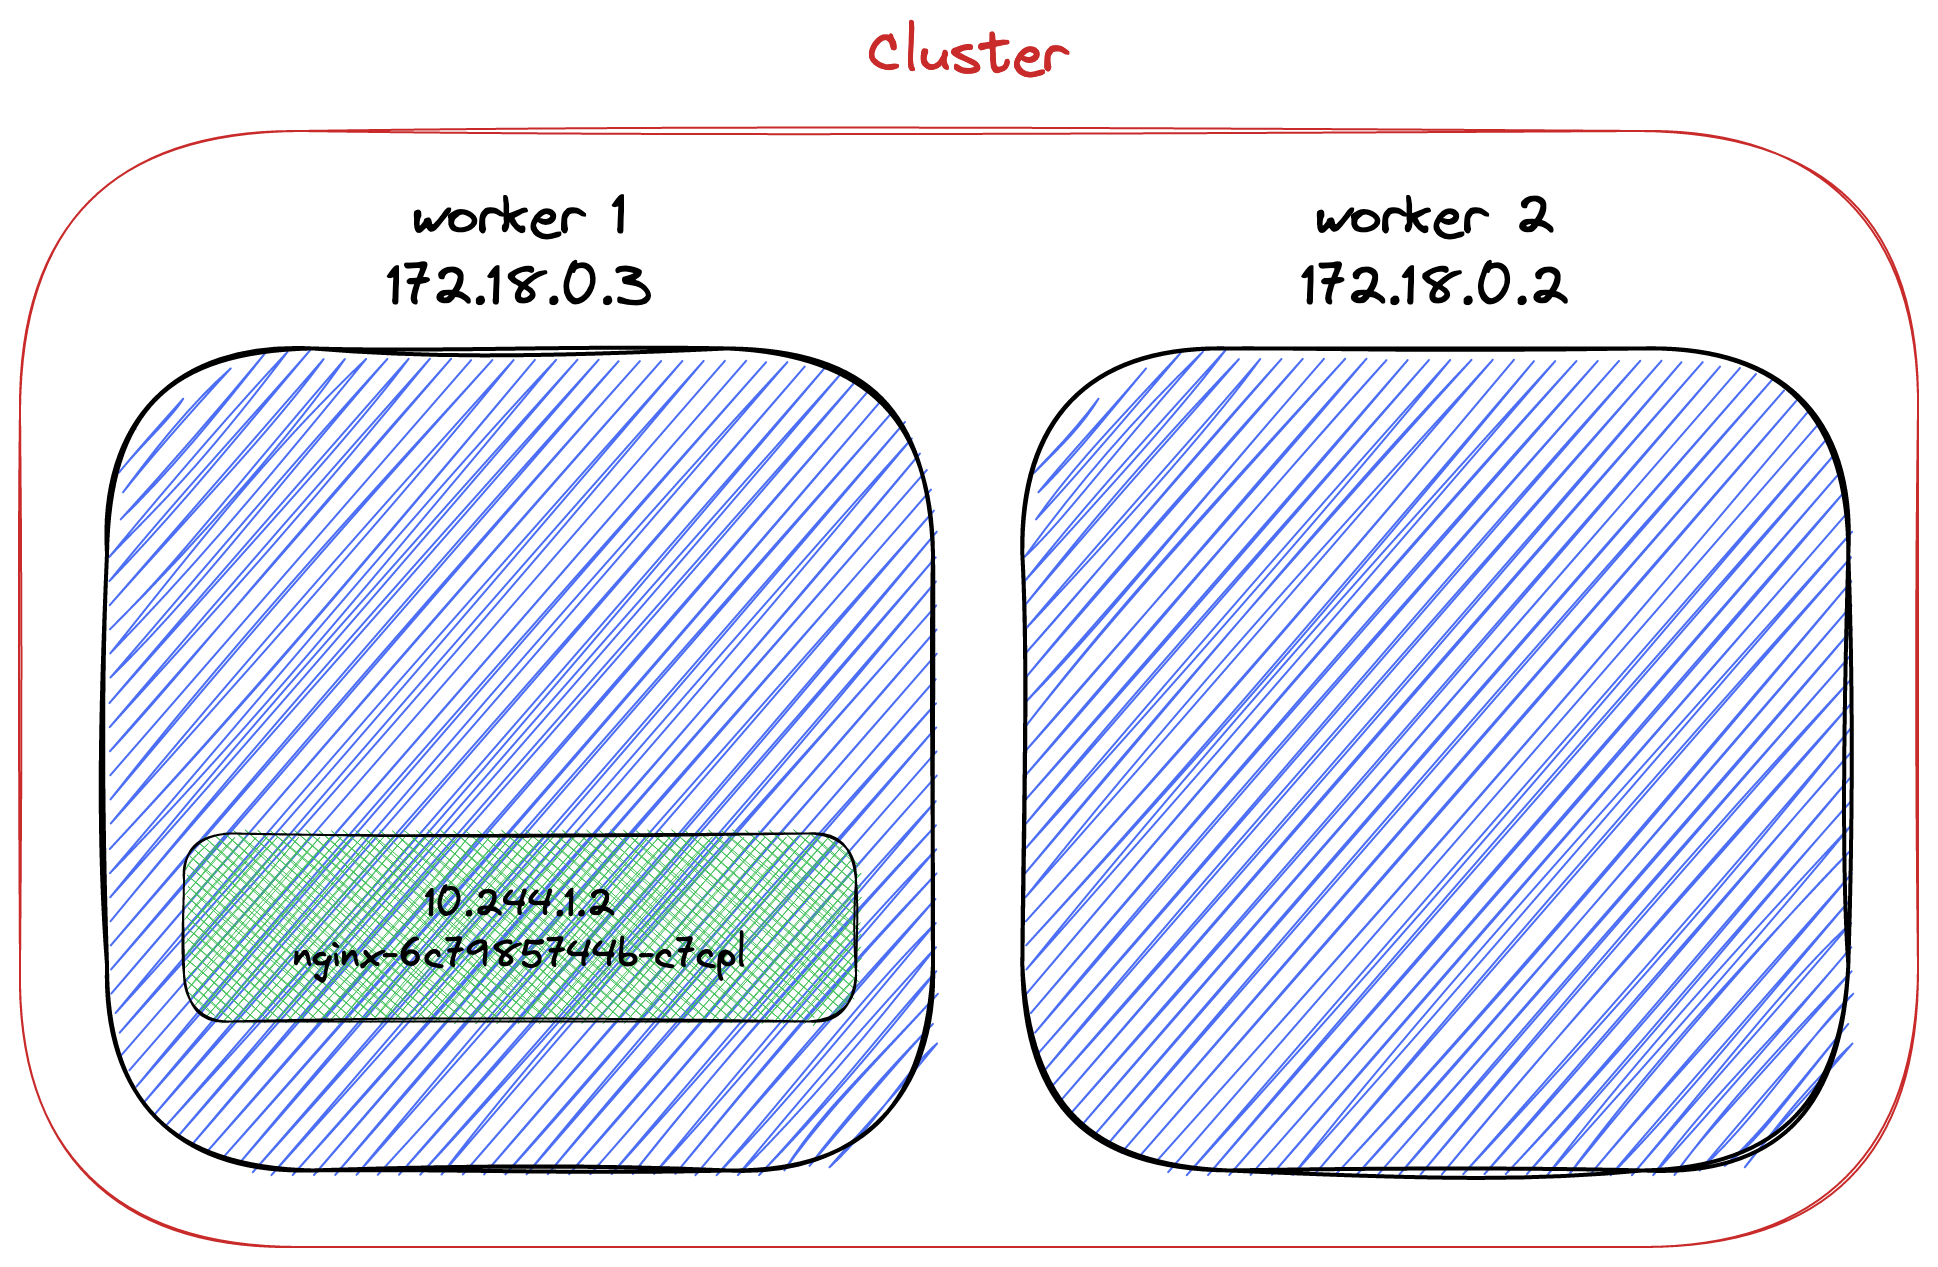
We cannot successfully ping this IP outside the cluster: it's an internal IP.
Internal IPs Are Not Stable
We created a deployment; hence, if we delete the single pod, Kubernetes will detect it and create a new one, thanks to its self-healing capabilities.
k delete pod nginx-6c7985744b-c7cpl
k get podsNAME READY STATUS RESTARTS AGE
nginx-6c7985744b-c6f92 1/1 Running 0 71sLet's check its new IP:
k exec -it nginx-6c7985744b-c6f92 -- /bin/bash
hostname -I10.244.2.2Kubernetes created a new pod, but its IP differs from the deleted pod's. We cannot rely on this IP for pod-to-pod communication. Indeed, we should never directly use a pod's IP.
To solve this issue, Kubernetes provides the Service object. Services represent a stable interface in front of pods. Kubernetes manages the mappings between a service and its pod(s). It binds new pods and unbinds removed ones.
ClusterIP: Exposes theServiceon a cluster-internal IP. Choosing this value makes theServiceonly reachable from within the cluster. This is the defaultServiceType.
Let's expose the existing deployment with a service:
k expose deployment nginx --type=ClusterIP --port=8080
k get svcNAME TYPE CLUSTER-IP EXTERNAL-IP PORT(S) AGE
kubernetes ClusterIP 10.96.0.1 <none> 443/TCP 9m47s
nginx ClusterIP 10.96.93.97 <none> 8080/TCP 4sFrom this point on, it's possible to access the pod via the service's ClusterIP.

All is set for access inside the cluster. From the outside, it's not possible yet. So why shall we use ClusteIP? It's pretty darn useful for services that you don't want to expose to the outside world: databases, ElasticSearch nodes, Redis nodes, etc.
Accessing a Pod
Accessing a pod from outside the cluster is when things become interesting.
We first need to remove the existing deployment and service.
k delete deployment nginx
k delete svc nginx
The simplest way to allow external access is to change the service's type to NodePort.NodePort adds an access port to a ClusterIP.
NodePort: Exposes the Service on each Node's IP at a static port (theNodePort). AClusterIPService, to which theNodePortService routes, is automatically created. You'll be able to contact theNodePortService, from outside the cluster, by requesting:.- Publishing Services (NodePort)
I want the pod to return its IP and hostname to demo it. We must move away from the command line to a dedicated Kubernetes manifest file because we have to configure Nginx. It results in the same state as with the command line, with the added Nginx configuration:
apiVersion: apps/v1
kind: Deployment
metadata:
  name: nginx
  labels:
    app: nginx
spec:
  replicas: 1
  selector:
    matchLabels:
      app: nginx
  template:
    metadata:
      labels:
        app: nginx
    spec:
      containers:
      - name: nginx
        image: nginx:1.23
        volumeMounts:                                                     # 1
          - name: conf
            mountPath: /etc/nginx/nginx.conf
            subPath: nginx.conf
            readOnly: true
      volumes:                                                            # 1
        - name: conf
          configMap:
            name: nginx-conf
            items:
              - key: nginx.conf
                path: nginx.conf
---
apiVersion: v1                                                            # 1
kind: ConfigMap
metadata:
  name: nginx-conf
data:
  nginx.conf: |
    events {
        worker_connections  1024;
    }
    http {
        server {
            location / {
                default_type text/plain;
                return 200 "host: $hostname\nIP:   $server_addr\n";
            }
        }
    }
---
apiVersion: v1
kind: Service
metadata:
  name: nginx
spec:
  selector:
    app: nginx
  type: NodePort                                                          # 2
  ports:
    - port: 80
nodePort: 30800- #1: Override the default configuration to return hostname and IP address.
- #2:
NodePortmaps the pod's port to an externally accessible port.
Let's apply the configuration:
k apply -f deployment.ymlNote that I'm running on Mac; hence, there's a VM container around Docker, like in Windows. For this reason, kind needs to port forward the VM to the host. Please check the kind documentation on how to achieve it.
Once Kubernetes has scheduled the pod, we can access it on the configured port:
curl localhost:30800host: nginx-b69d8877c-p2s79
IP: 10.244.2.2
The pathway of the request is as follows (notwithstanding the VM layer on Mac/Windows):
The
curlrequest goes to any node.Note that on a cloud-provider setup, you could target any Kubernetes node that hosts a pod part of the deployment. With the local setup, we target
localhostand let the VM layer targets a node.The node sees the port
30800and forwards the request to theNodePortservice with the relevant port.The service forwards the request to the pod, translating the port from
30800to80.
Now, let's increase the number of pods in our deployment to two:
k scale deployment nginx --replicas=2
k get pods -o wide
Kubernetes balances the cluster so that each pod resides on a different node:
NAME                    READY   STATUS    RESTARTS   AGE    IP           NODE           NOMINATED NODE   READINESS GATES
nginx-b69d8877c-w7db4   1/1     Running   0          129m   10.244.2.2   kind-worker    <none>           <none>
nginx-b69d8877c-z5kqs   1/1     Running   0          38m    10.244.1.2   kind-worker2   <none>           <none>
To which node/pod will requests be sent?
while true; do curl localhost:30800; donehost: nginx-b69d8877c-w7db4
IP: 10.244.2.2
host: nginx-b69d8877c-w7db4
IP: 10.244.2.2
host: nginx-b69d8877c-z5kqs
IP: 10.244.1.2
host: nginx-b69d8877c-z5kqs
IP: 10.244.1.2
host: nginx-b69d8877c-w7db4
IP: 10.244.2.2
host: nginx-b69d8877c-w7db4
IP: 10.244.2.2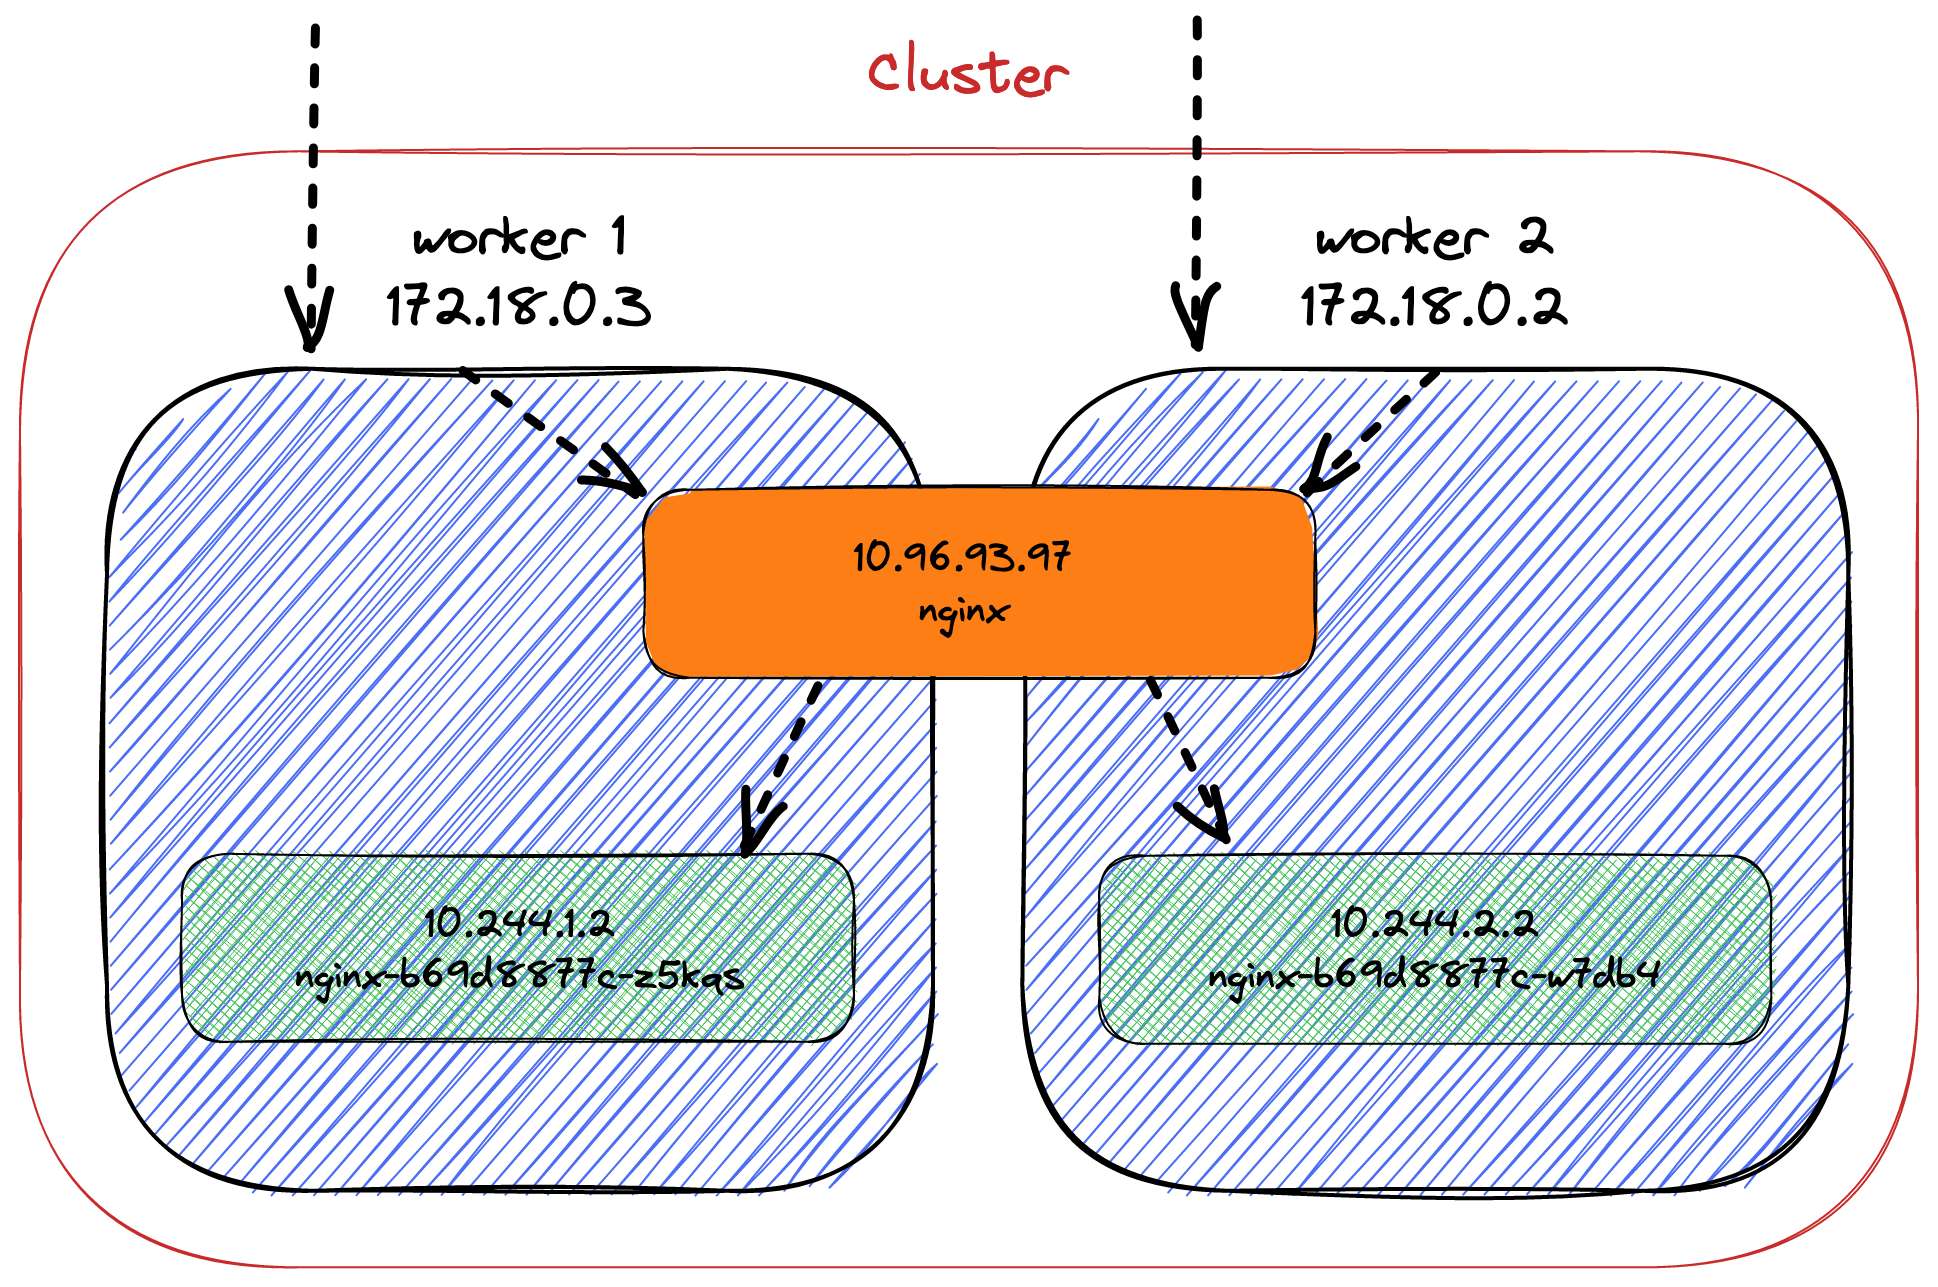
The service balances the requests between all available pods.
The Load Balancing Abstraction
NodePort allows querying any cluster node. LoadBalancer is a facade over the cluster that does... load balancing. It's an abstract object provided by Kubernetes: each cloud provider implements it differently depending on its peculiarities though the behavior is the same.
LoadBalancer: Exposes the Service externally using a cloud provider's load balancer. NodePort and ClusterIP Services, to which the external load balancer routes, are automatically created.
- Publishing Services (LoadBalander)
First, we need a LoadBalancer implementation. kind has out-of-the-box integration with MetalLB:
MetalLB is a load-balancer implementation for bare metal Kubernetes clusters, using standard routing protocols.
- MetalLB
It's no use paraphrasing kind's excellent documentation on how to install MetalLB. We can update the manifest accordingly:
apiVersion: v1
kind: Service
metadata:
  name: nginx
spec:
  selector:
    app: nginx
  type: LoadBalancer
  ports:
    - port: 80
      targetPort: 30800
Let's look at the services:
k get svcNAME TYPE CLUSTER-IP EXTERNAL-IP PORT(S) AGE
kubernetes ClusterIP 10.96.0.1 <none> 443/TCP 4h37m
nginx LoadBalancer 10.96.216.126 127.0.0.240 8080:31513/TCP 82m # 1- #1: It has an external IP!
Unfortunately, as I mentioned above, on Mac (and Windows), Docker runs in a VM. Hence, we cannot access the "external" IP from the host. Readers with proper Linux systems should access it.
Depending on the cloud provider, LoadBalancer may provide additional proprietary capabilities.
Ingress, When You Need Routing
Ingress focuses on routing requests to services in the cluster.
It shares some aspects with LoadBalancer:
- It intercepts inbound traffic.
- It's implementation-dependent and implementations offer different features: e.g., Nginx, Traefik, HAProxy, etc.
However, it's not a Service.
Ingress exposes HTTP and HTTPS routes from outside the cluster to services within the cluster. Traffic routing is controlled by rules defined on the Ingress resource.
Installing an Ingress depends a lot on the implementation. The only common factor is that it involves CRDs.
To demo, I'll use the Apache APISIX Ingress controller. I won't paraphrase the installation instructions of Ingress APISIX on Minikube. The only difference is to set the NodePort to a set value:
helm install apisix apisix/apisix \
  --set gateway.type=NodePort \
  --set gateway.http.nodePort=30800 \
  --set ingress-controller.enabled=true \
  --namespace ingress-apisix \
  --set ingress-controller.config.apisix.serviceNamespace=ingress-apisix
Note that though the documentation mentions Minikube, it's applicable to any local cluster, including kind.
The following services should be available in the ingress-apisix namespace:
NAME TYPE CLUSTER-IP EXTERNAL-IP PORT(S) AGE
apisix-admin ClusterIP 10.96.98.159 <none> 9180/TCP 22h
apisix-etcd ClusterIP 10.96.80.154 <none> 2379/TCP,2380/TCP 22h
apisix-etcd-headless ClusterIP None <none> 2379/TCP,2380/TCP 22h
apisix-gateway NodePort 10.96.233.74 <none> 80:30800/TCP 22h
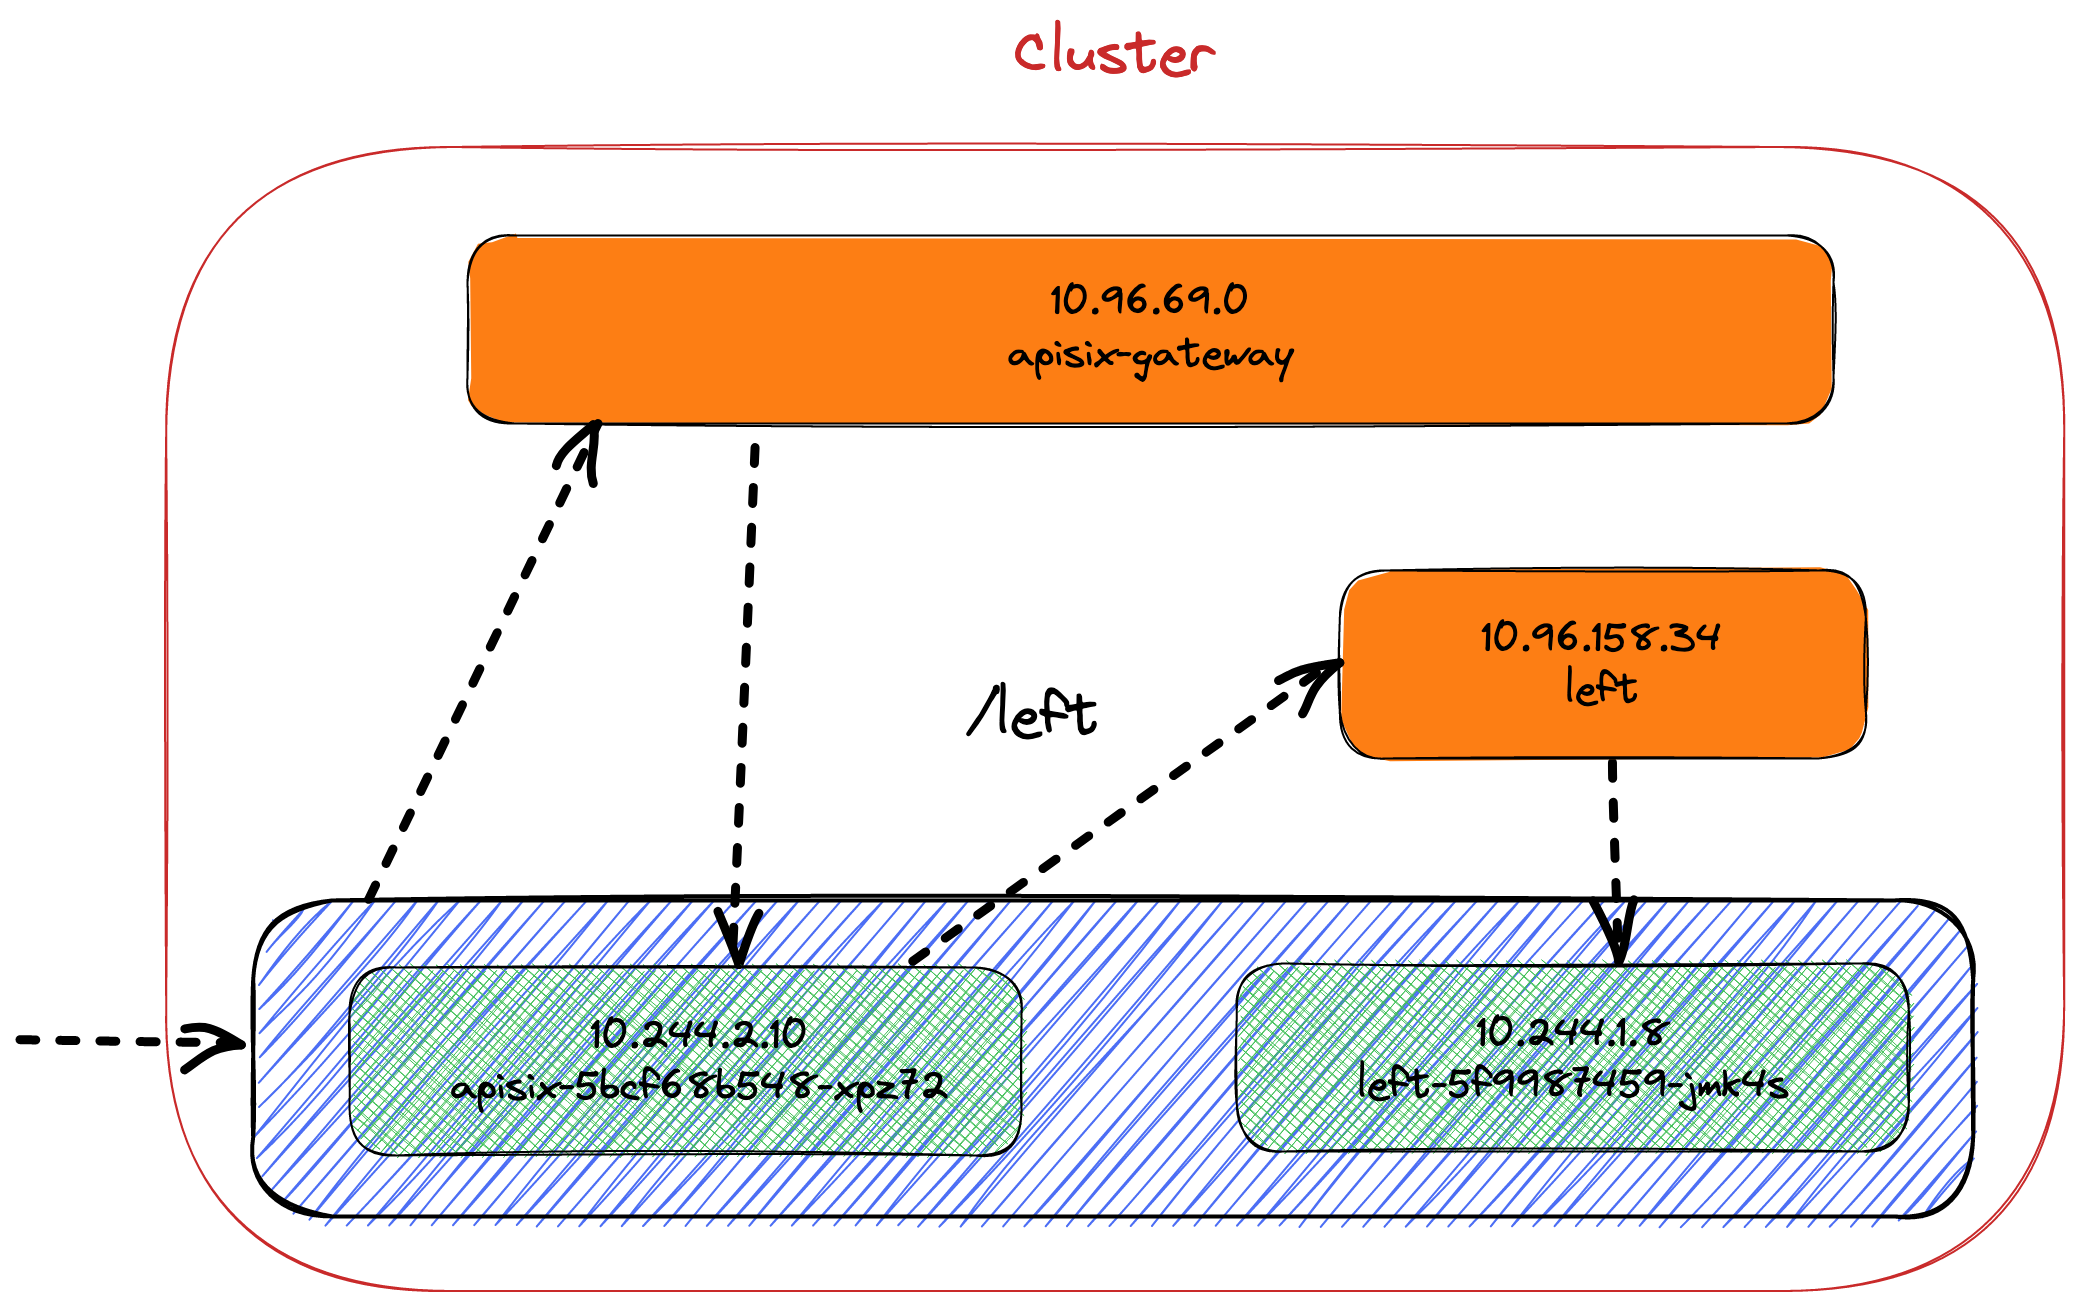
apisix-ingress-controller ClusterIP 10.96.125.41 <none> 80/TCP 22hTo demo, we will have two services: each one will have an underlying deployment of one pod. Requesting /left will hit one service and return left; /right, right.
Let's update the topology accordingly:
apiVersin: apps/v1
kind: Deployment
metadata:
  name: left
  labels:
    app: left
spec:
  replicas: 1
  selector:
    matchLabels:
      app: left
  template:
    metadata:
      labels:
        app: left
    spec:
      containers:
      - name: nginx
        image: nginx:1.23
        volumeMounts:
          - name: conf
            mountPath: /etc/nginx/nginx.conf
            subPath: nginx.conf
            readOnly: true
      volumes:
        - name: conf
          configMap:
            name: left-conf
            items:
              - key: nginx.conf
                path: nginx.conf
---
apiVersion: v1
kind: Service
metadata:
  name: left
spec:
  selector:
    app: left
  ports:
    - port: 80
---
apiVersion: v1
kind: ConfigMap
metadata:
  name: left-conf
data:
  nginx.conf: |
    events {
        worker_connections  1024;
    }
    http {
        server {
            location / {
                default_type text/plain;
                return 200 "left\n";
            }
        }
    }
The above snippet only describes the left path. It should contain a similar configuration for the right path.
At this point, we can create the configuration to route paths to services:
apiVersion: apisix.apache.org/v2beta3            # 1
kind: ApisixRoute                                # 1
metadata:
  name: apisix-route
spec:
  http:
  - name: left
    match:
      paths:
      - "/left"
    backends:
    - serviceName: left                          # 2
      servicePort: 80                            # 2
  - name: right
    match:
      paths:
        - "/right"
    backends:
    - serviceName: right                         # 3
servicePort: 80 # 3- Use the
ApisixRouteCRD created by the installation. - Forward request to the
leftservice. - Forward request to the
rightservice.
Here's what it should look like. Note that I've chosen to represent only the left path and one node not to overload the diagram.
To check that it works, let's curl again.
curl localhost:30800
{"error_msg":"404 Route Not Found"}It's a good sign: APISIX is responding.
We can now try to curl the right path to ensure it will forward to the relevant pod.
curl localhost:30800/rightright/left, it works as well.
Conclusion
In this post, I've described several ways to access pods outside the cluster: NodePort and LoadBalancer services and Ingress. For Ingress, you may have noticed that the ApisixRoute object is a proprietary CRD. To avoid it, Kubernetes aims to provide an abstraction: the CNCF is working on a Gateway API project.
I'll describe it in a future post.
The complete source code for this post can be found on GitHub.
To Go Further:
- Services, Load Balancing, and Networking
- Kubernetes Services simply visually explained
- Kubernetes NodePort vs LoadBalancer vs Ingress? When should I use what?
- Understanding Kubernetes LoadBalancer vs NodePort vs Ingress
- What's the difference between ClusterIP, NodePort, and LoadBalancer service types in Kubernetes?
- Kubernetes Ingress Controller Overview
- Apache APISIX Ingress Controller FAQ
Published at DZone with permission of Nicolas Fränkel. See the original article here.
Opinions expressed by DZone contributors are their own.
Comments